
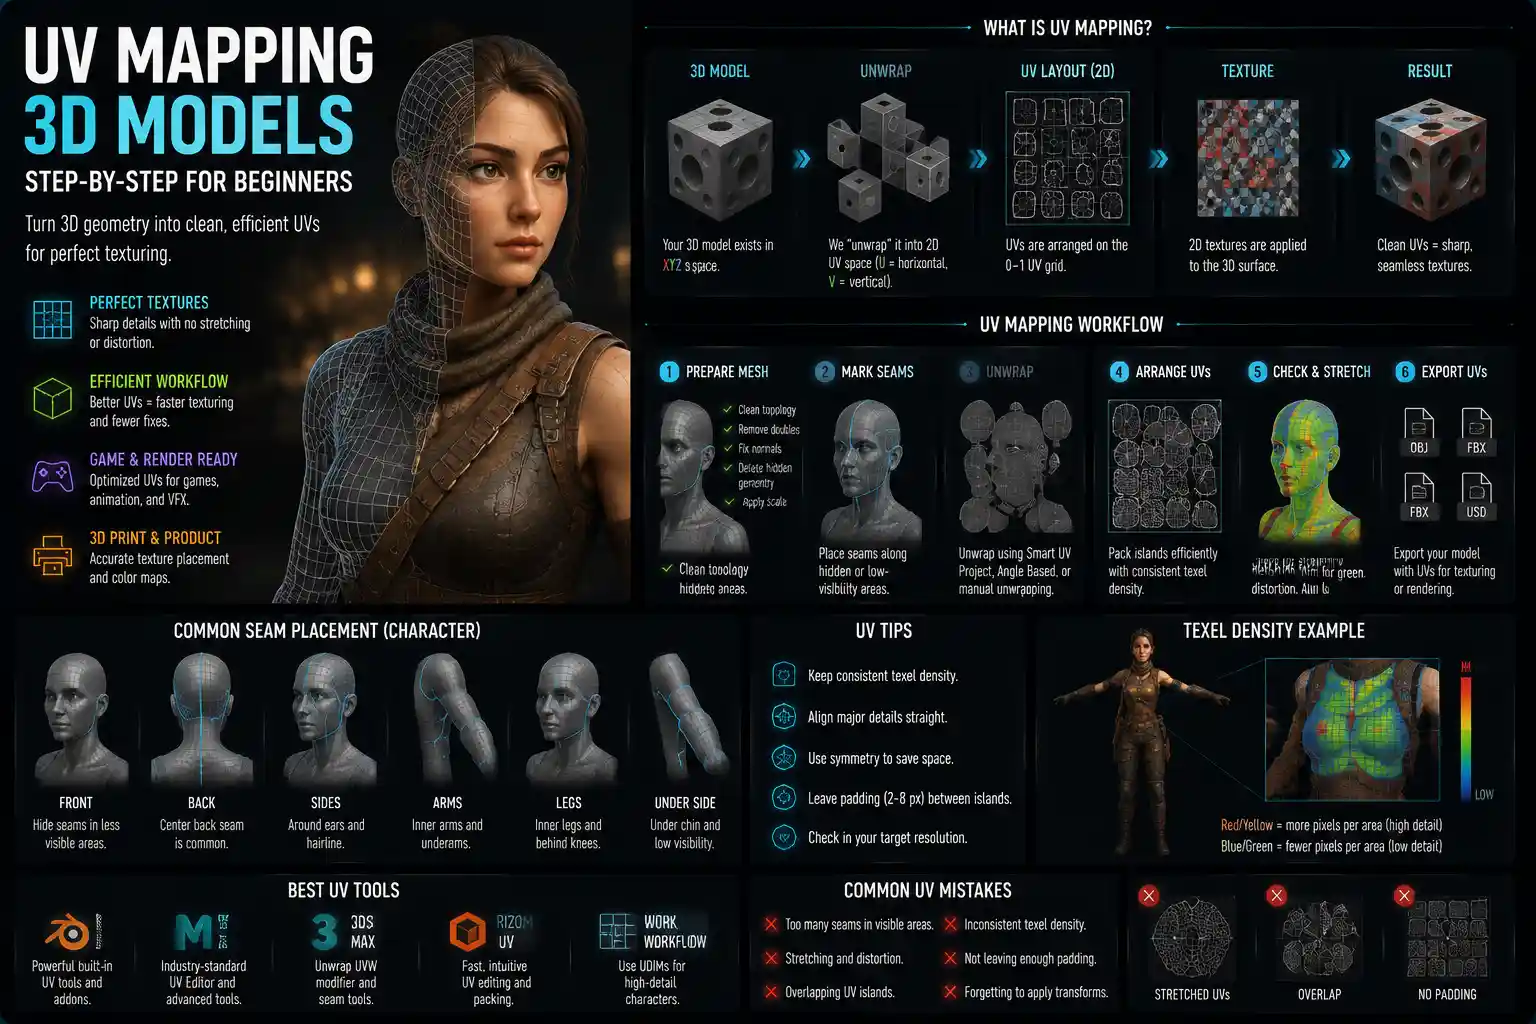
If you’ve ever opened a 3D modeling program and stared at a beautifully sculpted character, only to realize it looks like a plain gray blob when you try to add texture, you’ve encountered the problem UV mapping solves. For new 3D artists, UV mapping often feels like an arcane, frustrating step between modeling and texturing—a confusing mix of stretching, seams, and weird coordinate systems that gets in the way of creative work. But understanding how to UV map 3D models correctly is what turns a generic shape into a realistic character, a detailed game asset, or a product-ready 3D print. At its core, UV mapping is just the process of unfolding a 3D mesh into a 2D plane, like flattening a cardboard box to lay a printed design on it. This guide will break down every step of the process, from core concepts to pro tips that save time and improve your final results.
What Is UV Mapping, and Why Does It Matter?
Before diving into the step-by-step process, it’s important to clarify what UV mapping actually is, and why it’s a non-negotiable step for almost every 3D project. 3D models exist in XYZ coordinate space: X is width, Y is height, Z is depth, which defines the shape of the mesh in 3D space. To add 2D textures (color, roughness, normal maps, etc.) to that 3D shape, you need a second set of 2D coordinates: U for horizontal and V for vertical, shortened to UV. UV mapping assigns each vertex of your 3D mesh to a position on this 2D UV grid, letting your software know exactly how to stretch a 2D texture over the 3D surface.
Think of it like wrapping a birthday present. The 3D present is your mesh, and the wrapping paper is your 2D texture. If you just drape the paper over the box haphazardly, you’ll get wrinkles, bunching, and misaligned patterns. UV mapping is the process of cutting the wrapping paper to lay it flat, so every part of the box gets the right amount of paper with no stretching. For 3D work, that means no blurry textures on key details, no stretched text on a 3D logo, and consistent detail across your entire model.
UV mapping matters for every type of 3D work:
- Game development: Clean UVs ensure textures look sharp on character models and environment assets, even at a distance. Poor UVs can cause texture bleeding, blurring, and increased file sizes that hurt game performance.
- Product visualization: Accurate UV mapping lets you match real-world textures and branding perfectly, so clients see exactly what the finished product will look like.
- 3D animation and VFX: Consistent UVs make it easier to paint textures, adjust details, and ensure your model looks correct when rendered for film or television.
- 3D printing: Even for full-color 3D printing, UV mapping controls how color textures are applied to the surface, so the final printed part matches your digital design.
While automatic UV tools have improved dramatically in recent years, manual adjustments are still required for professional results. Even the best auto-generator can leave hidden stretching or suboptimal seam placement that will ruin your final texture work.
Preparing Your Mesh for UV Mapping
Before you even open the UV editing tools in your software, you need to make sure your 3D mesh is ready for UV mapping. Skipping this step leads to extra work later, as you’ll have to re-do your UVs if you change your mesh after the fact. There are a few key preparation steps that save hours of frustration down the line.
Clean Up Your Mesh
UV mapping is based on the vertices and faces of your mesh, so any errors in your base geometry will translate to errors in your UVs. Before starting, check for common mesh issues: non-manifold geometry (edges connected to more or fewer than two faces), overlapping faces, flipped normals, and unmerged vertices. Most 3D software (Blender, Maya, 3ds Max, ZBrush) has built-in tools to find and fix these issues automatically. For example, Blender’s "Merge By Distance" tool will weld together vertices that are sitting on top of each other, eliminating accidental overlaps in your UVs.
Finalize Your Model
It’s a bad habit to start UV mapping before you’ve finished sculpting or modeling your base shape. If you add more details, move edges, or adjust the overall shape after UV mapping, you’ll have to adjust or completely re-do your UVs to match. Of course, you can always tweak small details later, but major shape changes should be done before you start unwrapping. If you’re working with a subdivision surface or a dynamic subdivision model, make sure you apply any level of detail you need before unwrapping, or check that your software can generate UVs that adapt to subdivision correctly.
Plan Your UV Layout
Before cutting seams, think about how your model will be used and where you can hide seams. This is one of the most overlooked steps, but it makes a huge difference in the final result. Ask yourself a few questions:
- What parts of the model will be visible to the viewer? Seams can be hidden on areas that are never seen, like the underside of a table or the inner armpit of a character.
- Do any textures need to stay straight? For example, the grain on a wooden table should run consistently across the surface, so you’ll want to avoid cutting seams across the tabletop if possible.
- Do you have symmetry? Most characters and many hard-surface models are symmetrical. You can save texture space by UV mapping one half and mirroring the UVs for the other half, cutting your required texture size in half.
"A good UV is one where you can’t see the seams. The whole point is to do such a good job that the viewer only notices the texture, not the work you put into unwrapping."
For example, if you’re UV mapping a human character, common seam placement is along the center back of the head, inside the groin, and along the inner edge of the arms and legs. These areas are almost never visible in typical poses, so even a slightly noticeable seam will never be caught by the viewer. For a hard-surface model like a coffee mug, you can place a seam along the bottom edge that sits against the table, so the entire outer surface is one clean, unbroken piece of UV.
Step-by-Step Process to UV Map a 3D Model
Now that your mesh is ready and you’ve planned your seam placement, let’s walk through the core step-by-step process that works for almost any 3D model, regardless of whether you’re using Blender, Maya, Substance Painter, or another tool. The specific buttons may vary, but the core workflow is universal.
- Mark Seams
Start by marking your seams on the 3D mesh. Seams are the edges where you’ll "cut" your mesh to unfold it flat into the 2D UV grid. Using your pre-planned seam placement, select the edges you want to cut and mark them as seams. For organic models like characters, you’ll cut around limbs and the head to separate them into distinct pieces that can unfold easily without stretching. For hard-surface models, you can often keep entire flat faces connected, cutting seams only around corners or along hidden edges.
If you’re new to seam marking, err on the side of more seams rather than fewer. Too many small UV islands are easier to work with than one large island that has massive stretching across curved surfaces. You can always stitch small islands together later if you need to.
- Unfold the UVs
Once your seams are marked, it’s time to unfold your mesh into the 2D UV grid. Most modern software has an automatic unwrap feature that will take your marked seams and generate a flat UV layout automatically. In Blender, this is the "Unwrap" tool; in Maya, it’s the "Automatic Unfold" feature; in ZBrush, it’s "UV Master".
After unwrapping, you’ll see your mesh split into multiple UV islands—separate groups of connected faces, all laid out flat in the 0-to-1 UV grid (the standard UV space that all textures use). The goal of unwrapping is to get each island as flat as possible with minimal stretching. If you see large areas of distortion or stretching after automatic unwrap, you can adjust your seams and re-unwrap to fix it. A good rule of thumb: if stretching is visible on the 3D model when you apply a checkered texture, it needs to be fixed before moving on.
- Check for Stretching and Distortion
The best way to check for stretching is to enable a checker texture (sometimes called a grid texture) on your 3D model. This is a simple texture with evenly sized black and white squares. If the squares stay the same size and perfectly square across your entire 3D model, your UVs have no stretching. If the squares are stretched out or squashed in some areas, that’s exactly how your texture will look when you apply it—blurry, distorted, and uneven.
To fix stretching, you can: move individual UV points to adjust the shape of the island, use your software’s "relax UV" tool to spread points more evenly, or add a new seam to split a large distorted island into two smaller, flatter islands. For curved surfaces, like a character’s shoulder, some minor stretching is unavoidable, but you should always prioritize keeping stretching low on areas that are front and center, like a character’s face.
- Scale and Arrange UV Islands
Once all your islands are distortion-free, you need to arrange them within the 0-to-1 UV grid to maximize texture resolution and ensure that important details get more texture space. The key rule here is: the larger a UV island is in the 0-to-1 grid, the higher resolution its texture will be. That means you want to give more space to parts of the model that are visible and need high detail, and less space to parts that are hidden or low-detail.
For example, on a character model, the face should get a much larger section of the UV grid than the sole of the shoe, which is almost never visible. On a table model, the top surface that everyone sees should get more space than the legs. If all your islands are the same relative scale, important details will be unnecessarily blurry, and you’ll waste texture space on unimportant areas.
When arranging islands, leave a small gap (usually 2-4 pixels, depending on your texture size) between each island to prevent texture bleeding, where pixels from one island bleed onto another when the texture is mipmapped or filtered. Most software has an automatic packing tool that will arrange your islands efficiently while leaving the correct gap between them. You usually just need to adjust the scale of individual islands before packing, and the tool will handle the rest.
- Export and Test Your UVs
Once your layout is done, export your UV map or your model with embedded UVs, then test it in your texturing software. Import the model, apply a test texture or checkered grid, and double-check for stretching, seams, and distortion. It’s much easier to fix issues at this stage than after you’ve spent hours painting a detailed texture.
Pro Tips for Better UV Mapping
Even if you follow the basic workflow, small habits can make a big difference in the quality of your final UVs. These pro tips come from years of professional 3D work, and they help you avoid common mistakes that new artists make.
Use UV Mirroring for Symmetrical Models
As we mentioned earlier, most characters and many hard-surface models are symmetrical. Instead of unwrapping both sides, you can delete the UVs for one half, mirror the UVs from the other half, and stack them on top of each other in the UV grid. This cuts the number of islands you need to arrange in half, and frees up more texture space for high-detail areas. For example, a character’s face can take up twice as much space when you mirror the left and right sides, which means much sharper detail in the final texture. Just make sure you don’t mirror UVs if you plan to add asymmetric details like a scar on one side of the face—you’ll need separate UV space for that.
Avoid Rotating UV Islands at Odd Angles
When packing UV islands, it’s tempting to rotate small islands at odd angles to fit more into the available space. But this can cause blurring when the texture is rendered, because the texture sampling has to interpolate pixels across the rotated edge. Whenever possible, keep edges of UV islands aligned to the horizontal and vertical axes of the UV grid. This ensures maximum sharpness, especially for hard-surface models with straight edges and fine details. The tiny amount of extra space you save by rotating at 45 degrees isn’t worth the blurry texture you get in return.
Use Consistent Texel Density
Texel density is the number of texture pixels (texels) per 3D unit of distance. Consistent texel density means that a 1cm section of your 3D model will have the same number of texture pixels, regardless of which part of the model it’s on. This ensures that all parts of your model have the same level of detail and sharpness. If you don’t pay attention to texel density, you might end up with a hand that has 4 times the detail of an arm, because the UV island for the hand is scaled larger relative to its 3D size.
Most modern 3D software has tools to calculate and set consistent texel density across all your UV islands automatically. For game assets, a common standard is 1024 pixels per meter for background assets, and 2048-4096 pixels per meter for visible foreground assets. If you’re working on a project with multiple assets, keeping texel density consistent across all of them ensures that all assets look equally sharp when rendered together.
Hide Seams in High-Curvature Areas
If you have to place a seam in a visible area, hide it in a crease or area of high curvature. Seams are much less noticeable when they fall along a natural crease, like between the nose and the cheek, or along the edge of a box corner. Because the curvature of the mesh breaks up the surface, the eye won’t notice the small shift in texture that a seam can cause. This is a common trick character artists use to avoid obvious seams on visible parts of the body.
Use Automatic Unwrapping for Simple Shapes, Manual for Complex Areas
Automatic unwrapping tools are incredibly good now, but they’re not perfect. For simple hard-surface shapes like cubes, cylinders, and flat boards, automatic unwrapping will give you perfect results in seconds. For complex organic shapes like faces or hands, you’ll get better results if you do minor manual adjustments after auto-unwrapping to fix stretching around curved areas. Don’t be afraid to tweak individual UV points to get the distortion low—this small investment of time pays off in a much sharper final texture.
Common UV Mapping Mistakes to Avoid
Even experienced artists make these common mistakes, which cause problems later in texturing and rendering. Being aware of them helps you avoid hours of rework.
One of the most common mistakes is wasting texture space. New artists often leave large empty gaps between UV islands, or give too much space to low-detail areas. This means you’re not using the full resolution of your texture, so important details end up blurry even if you’re using a 4K texture file. Using automatic packing tools and adjusting the scale of islands based on visibility solves this problem.
Another common mistake is not leaving enough gap between UV islands, leading to texture bleeding. When your GPU renders a mipmap (a lower-resolution version of your texture for distance rendering), it blends pixels between adjacent islands if there’s no gap. This causes a faint halo of the wrong color around edges of your model. Leaving a 2-4 pixel gap between islands (which most automatic packing tools do by default if you set the correct margin) eliminates this issue.
Many new artists also ignore stretching on hidden areas, assuming that no one will see it. While you don’t need to give hidden areas much texture space, leaving massive stretching can cause weird visual artifacts if the model is ever posed differently than you expected. For example, a character’s underarm might be visible if the character raises their arm in an animation. It’s worth taking five minutes to fix major stretching even on hidden areas to avoid surprises later.
Finally, one of the most frustrating mistakes is UV mapping before finalizing your model. If you add a detail like a pocket to a shirt after you finish UV mapping, you’ll have to unwrap that new part and fit it into your existing UV layout, which can be a hassle. Always get your model as close to final as possible before you start UV mapping—it will save you time in the long run.
Conclusion
UV mapping doesn’t have to be the frustrating, confusing step that stops new 3D artists from finishing their projects. Once you understand the core idea—unfolding a 3D mesh into 2D space so textures can be applied correctly—it’s just a matter of following a consistent workflow, planning ahead, and checking for common issues like stretching and texture bleeding. The basic process we’ve covered here works for every type of 3D model, from simple hard-surface assets to complex organic characters. As you practice, you’ll develop your own habits for seam placement and layout that work for your workflow, and you’ll start to see how good UVs make texturing faster and the final result much more professional. The next time you finish a 3D model and get ready to texture it, take the time to do your UVs right—your finished work will be better for it.