
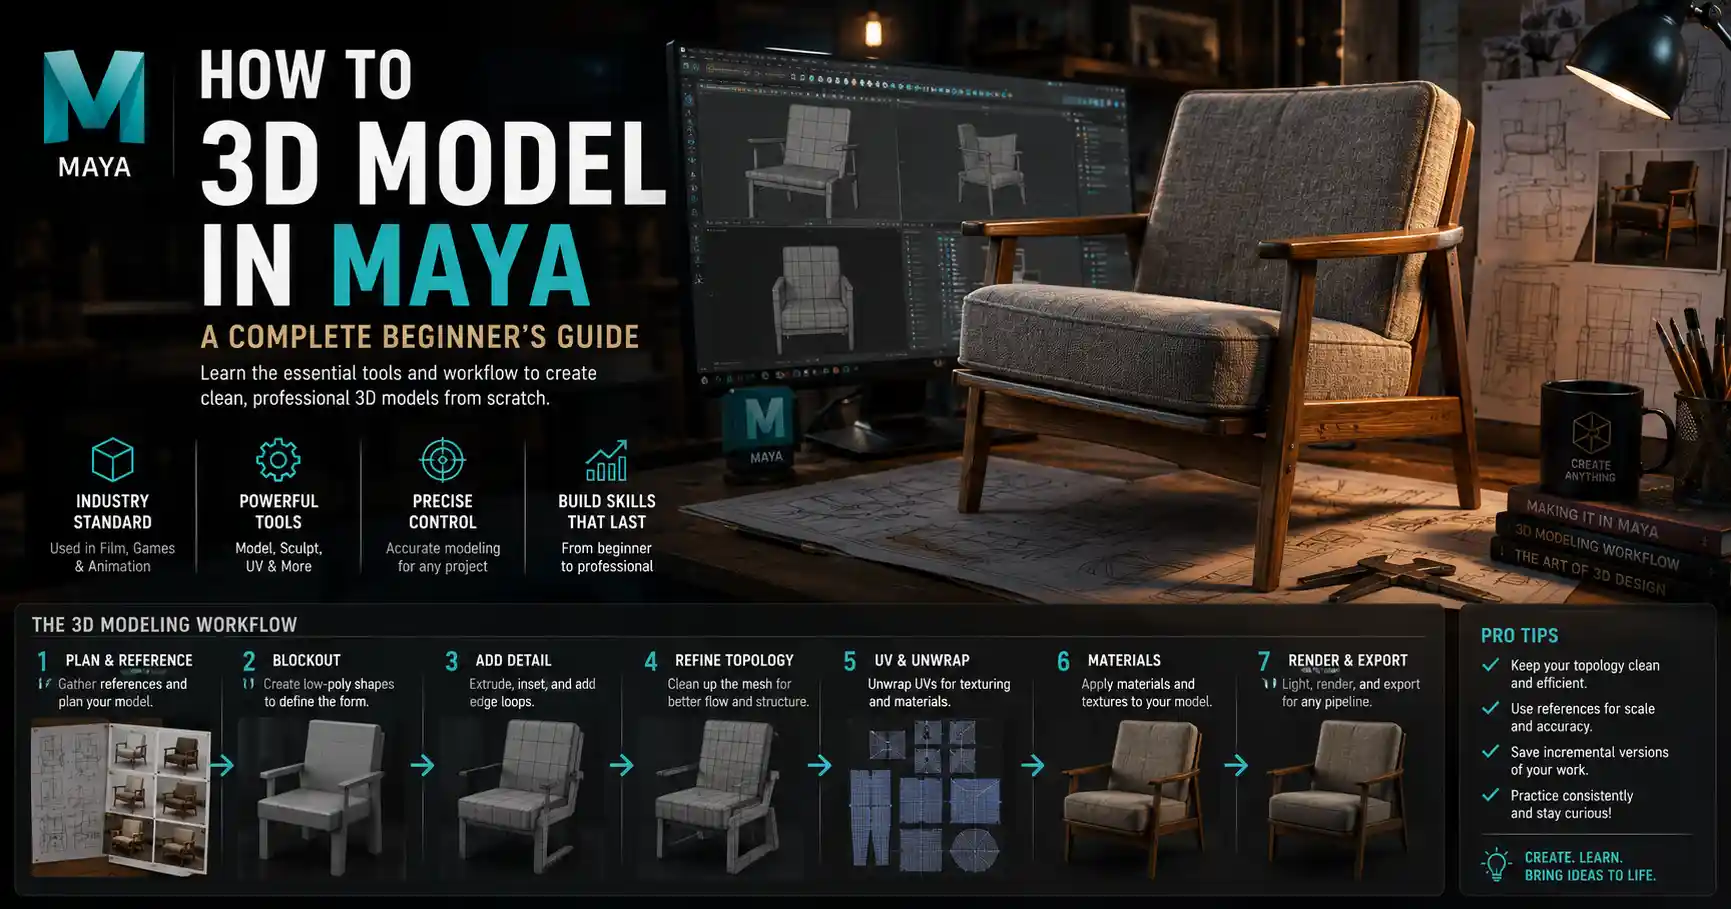
If you’ve ever wanted to create 3D assets for games, film, animation, or product design, Autodesk Maya is one of the most powerful and industry-standard tools to learn. Used by major studios from Pixar to Ubisoft, Maya offers a flexible, robust set of tools for modeling everything from simple props to complex character designs. While its wide range of features can feel intimidating for new users, breaking the process down into manageable steps makes learning to 3D model in Maya approachable for anyone with basic computer skills and a bit of patience. This guide will walk you through the core process, from setting up your project to refining your final model for use.
Preparing Your Workspace and Project
Before you start pulling points and extruding faces, you need to set up your Maya project correctly. A properly organized project prevents lost files, broken references, and headaches later when you’re ready to export or render your work. Maya’s project system automatically sorts your models, textures, renders, and other assets into dedicated folders, so it’s worth taking five minutes to set this up correctly from the start.
Creating a New Project
To create a new project, open Maya and go to File > Project Window > New. Name your project something descriptive (like "casual_chair_prop" instead of "project1") and choose a save location on your computer that’s easy to find. Maya will automatically generate default folders for scenes, sourceimages, textures, and exports. Unless you have a specific reason to change the folder structure, stick with the defaults — it’s what Maya expects, and it keeps your assets organized. Once you’ve set your location, click "Accept" to save the project settings.
Customizing Your Modeling Workspace
Maya comes with pre-built workspaces optimized for different tasks, and the Modeling workspace is the best starting point for new modelers. You can switch to it by clicking the "Modeling" option in the workspace dropdown menu at the top right of the screen. Even the default Modeling workspace can be adjusted to fit your workflow, though. Many new users find that hiding unused panels (like the render or animation toolbars) reduces clutter and makes it easier to find the tools you need.
A few quick customizations that will make your modeling process smoother:
- Turn on X-Ray Shade in the viewport menu to see and select edges through opaque geometry, which is invaluable when working on complex enclosed shapes
- Enable grid snapping and point snapping by default, so you can easily align vertices and edges when building base shapes
- Undock the Modeling Toolkit panel and pin it to the side of your screen for one-click access to the most common modeling tools
Finally, set your viewport to use multiple views (top, front, side, and perspective) instead of a single perspective view. Working in multiple views helps you keep your shape accurate in all three dimensions — it’s very common to make a model that looks great in the perspective view but is lopsided or stretched when viewed from the side. Checking multiple views as you go saves hours of correction later.
Starting with Polygonal Base Meshes
The vast majority of 3D modeling in Maya uses polygonal modeling, the most accessible and flexible technique for beginners. Polygonal modeling builds shapes from connected vertices, edges, and faces, starting with a simple base mesh that you gradually refine into your final shape. Starting simple is key — resist the urge to jump into high-detail work before your base shape is correct.
Choosing the Right Base Mesh
Maya includes several default primitive shapes that work perfectly as starting points for most models. Cubes are the most common starting shape, because their evenly spaced edges make it easy to pull out new forms. Spheres work well for organic, round shapes like heads or boulders, while cylinders are ideal for anything with a long rounded shape like legs, chair legs, or bottles.
For example, if you’re modeling a simple mug, you would start with a cylinder, not a cube. If you’re modeling a table, a cube is the perfect starting point for the table top, and another three or four scaled cubes work for the legs. The goal of the base mesh is to match the general volume and proportions of your object as closely as possible with as few polygons as possible. This low-poly base will act as your guide as you add detail later.
Blockout Your Proportions First
Once you have your starting primitive, the next step is to create a blockout: a rough, low-poly version of your model that establishes the correct overall proportions and major forms. Blocking out is one of the most important steps in modeling, because it’s much easier to adjust proportions when you have a low-poly shape than it is to fix them after you’ve added hundreds of extra edges and details.
"Proportions are 90% of good modeling. If your base blockout is wrong, no amount of clever edge work or fine detail will make the model look right."
To create your blockout, use Maya’s core transformation tools: move, rotate, and scale. Use the multi-view layout to adjust your shape from every angle. For example, if you’re blocking out a character’s head, you might start with a sphere, then scale it vertically to make it slightly taller than it is wide, then pull out vertices to create the basic shape of the jaw and brow. If you’re modeling a backpack, start with a scaled cube, then pull out the front face to create the front pocket, and extrude edges to create the shoulder straps.
A few core tools you’ll use constantly during the blocking out phase:
- Extrude: Pulls a new face or edge out from your existing mesh to create a new form, the most used tool for adding volume to a base shape
- Insert Edge Loop: Adds a continuous row of edges across your mesh to create more geometry where you need it
- Bevel: Softens hard edges by splitting them into multiple small faces, which makes models look more realistic and renders better
When you’re finished blocking out, step back and compare your model to your reference. Check the proportions: is the handle of your mug the right size relative to the body? Is the seat of your chair wider than the legs? Don’t move on to adding detail until your blockout matches the proportions of your reference image perfectly.
Refining Geometry and Adding Detail
Once your base blockout is proportionally correct, it’s time to refine your geometry and add small and medium details to your model. This stage is where your rough shape starts to look like a finished object, and it’s where understanding Maya’s modeling tools really pays off.
Working with Topology
Topology refers to the way edges and faces are arranged on your polygonal mesh. Good topology makes your model easier to edit later, looks smoother when subdivided, and works better if you plan to animate the model later. For beginners, the most important rule of good topology is to keep your polygon faces as quadrilaterals (quads) as possible. Quads are four-sided polygons that subdivide cleanly, while triangles and n-gons (polygons with more than four sides) can cause pinching and weird artifacts when you smooth your model.
That said, don’t stress too much about perfect topology when you’re starting out. A few triangles in non-critical areas (like the inside of a mug that will never be seen) won’t break your model. Focus on keeping edges flowing along the shape of your object. For organic models like characters, edges should follow the muscle structure — for example, edges around the eyes should follow the curve of the eyelid, to make the model deform correctly when the character blinks. For hard-surface models like furniture or cars, edges should follow the hard lines and curves of the object.
Adding Hard-Surface Details
If you’re modeling a hard-surface object (anything man-made, like a tool, furniture, or a car), there are a few common techniques you’ll use to add detail in Maya. One of the most common is boolean operations, which let you cut one shape out of another or combine two shapes into one. For example, if you want to cut a circular hole in a cube for a doorknob, you can create a smaller cylinder that passes through the cube, then use the Boolean Difference tool to cut the hole out automatically.
Booleans are fast and convenient, but they can sometimes create messy topology with n-gons and uneven edges. After using a boolean, it’s good practice to clean up the resulting mesh by merging vertices, reconnecting edges, and turning any n-gons into quads. Another method for adding hard-surface details is extruding inward: for example, to create a hole in a mug, you can select the top and bottom faces of the cylinder, delete them, then select the inner edge and extrude it inward to create the thickness of the mug wall. This method gives you more control over your topology, but it’s slightly slower than using booleans.
Adding Organic Details
For organic models like characters, plants, or rocks, you’ll use different techniques to add natural-looking detail. One of the most useful tools in Maya for organic modeling is Sculpt Geometry, which lets you push and pull the surface of your mesh like you would sculpt clay digitally. You can adjust the size and strength of your brush to pull out small details like knuckles on a hand or wrinkles on a face, or to smooth out uneven areas of your mesh.
Another common method for adding organic detail is to use subdivision modeling. Subdivision splits your low-poly mesh into smaller faces and smooths the overall surface, so you can get a smooth, high-resolution shape from your clean low-poly base. In Maya, you can add a subdivision surface modifier to your mesh by going to Modify > Convert > Polygon to Subdiv, or you can use the Smooth tool to permanently subdivide your mesh. Most modelers keep their low-poly base intact and work with a subdivided preview, so they can go back and adjust the base shape quickly if they need to.
Cleaning Up and Preparing for Export
When you’re happy with the shape and detail of your model, the next step is to clean up your mesh and prepare it for its final use, whether that’s importing into a game engine, rendering for a portfolio, or 3D printing. Skipping this step can lead to errors when you try to use your model later, so it’s an important part of the process that many beginners overlook.
Check for Common Modeling Errors
There are a few common errors that almost every new modeler makes, and checking for them will save you a lot of frustration down the line. Use this quick checklist to clean up your model:
- Check for duplicated vertices: When you merge edges or extrude faces, it’s common to get overlapping vertices that don’t merge properly. To fix this, select all vertices on your mesh, go to Mesh > Combine, then Merge Vertices and adjust the tolerance to merge any overlapping points. Duplicated vertices cause shading errors and make your model heavier than it needs to be.
- Check for non-manifold geometry: Non-manifold geometry is geometry that doesn’t have a clear inside and outside, usually caused by edges that are connected to three or more faces, or faces that overlap. Non-manifold geometry causes issues with 3D printing, rendering, and exporting. You can find non-manifold geometry in Maya by going to Mesh > Clean Up and checking the option to select non-manifold geometry.
- Delete unused and hidden geometry: If you have extra faces inside your model that will never be seen (like the inside bottom of a mug), delete them to reduce your polygon count. You should also delete any construction history on your model when you’re done editing — construction history keeps track of every tool you used to create the model, which makes your file size larger and can slow Maya down. To delete construction history, select your model and go to Edit > Delete by Type > History.
- Check your polygon count: If you’re modeling for a game, you need to keep your polygon count within the limits of your target platform. If you’re modeling for 3D printing or rendering, you can afford a higher polygon count, but you still don’t want more geometry than you need.
UV Unwrapping
If you plan to add textures to your model (which almost all finished models need), you’ll need to do UV unwrapping before you export. UV unwrapping is the process of flattening your 3D mesh into a 2D map, so you can apply 2D textures to it correctly. Think of it like unwrapping a globe into a flat map of the world — every point on your 3D mesh corresponds to a point on the 2D UV map.
Maya has a built-in UV Editor that makes unwrapping straightforward. For simple models, you can use the Automatic Unwrap tool to get a basic UV layout, then adjust the UV shells to minimize stretching. For more complex models, you’ll manually cut seams along natural edges of the model (like the seam between the lid and the body of a jar) to split the mesh into manageable UV shells, then unfold them to get a clean, low-stretch layout. Good UVs ensure that your textures look consistent across your model, with no weird stretching or blurring in visible areas.
Exporting Your Model
Once your model is clean and your UVs are done, you’re ready to export. The correct export format depends on what you’re going to use the model for: OBJ is a universal format that works for most 3D printing and rendering workflows, FBX is the standard format for game engines like Unity and Unreal, and STL is specifically for 3D printing. When exporting, make sure to check the options to export UVs and normals, so any textures you add later will work correctly. Always save a copy of your original Maya scene file before exporting, so you can go back and edit it later if you need to.
Tips for Improving Your Maya Modeling Skills
Learning to model well in Maya takes practice, but there are a few habits you can build that will help you improve faster than just trial and error. First, always work from reference images. Even the most experienced modelers don’t model from memory — you’ll get much better results if you have front, side, and perspective reference images of the object you’re modeling loaded into your Maya viewport. You can import reference images as image planes in Maya, so they stay aligned with your viewports as you work.
Second, start small before you tackle complex projects. It’s tempting to jump straight into modeling a full character when you’re just starting out, but that will likely lead to frustration when you run into problems you don’t know how to solve. Start with simple hard-surface objects like mugs, chairs, or tools to get comfortable with the tools and workflow. Once you’re comfortable with those, move on to more complex hard-surface objects like cars, then try organic shapes like heads and full characters. Building your skills incrementally gives you a strong foundation for more complex work later.
Third, learn keyboard shortcuts for the tools you use most. Maya has customizable hotkeys, and memorizing hotkeys for common tools like move, rotate, scale, extrude, and insert edge loop will cut your modeling time in half. You don’t need to memorize all the hotkeys at once — just start with the three transformation tools, then add new hotkeys as you go. Even saving a few seconds per operation adds up to hours over the course of a project.
Finally, study other artists’ work. Many 3D artists share their wireframe renders on sites like ArtStation and Behance, so you can see how experienced modelers arrange their topology and organize their meshes. Pay attention to how they edge flow for organic models, and how they place edges around hard corners for hard-surface models. Over time, you’ll start to recognize patterns that you can apply to your own work.
Conclusion
Learning to 3D model in Maya is a rewarding skill that opens up opportunities in game development, film, animation, product design, and 3D printing. While the software has a steep learning curve for beginners, breaking the process down into clear steps — starting with setting up your project, blocking out your base shape, refining your geometry, and cleaning up your final model — makes the process manageable. Remember that good modeling is about more than just mastering tools: it’s about getting your proportions right first, keeping your topology clean, and practicing consistently. Start with small projects, build your skills gradually, and don’t be afraid to make mistakes — every mistake you fix teaches you something that makes your next model better. With time and practice, you’ll be able to create clean, professional 3D models in Maya for any use.