
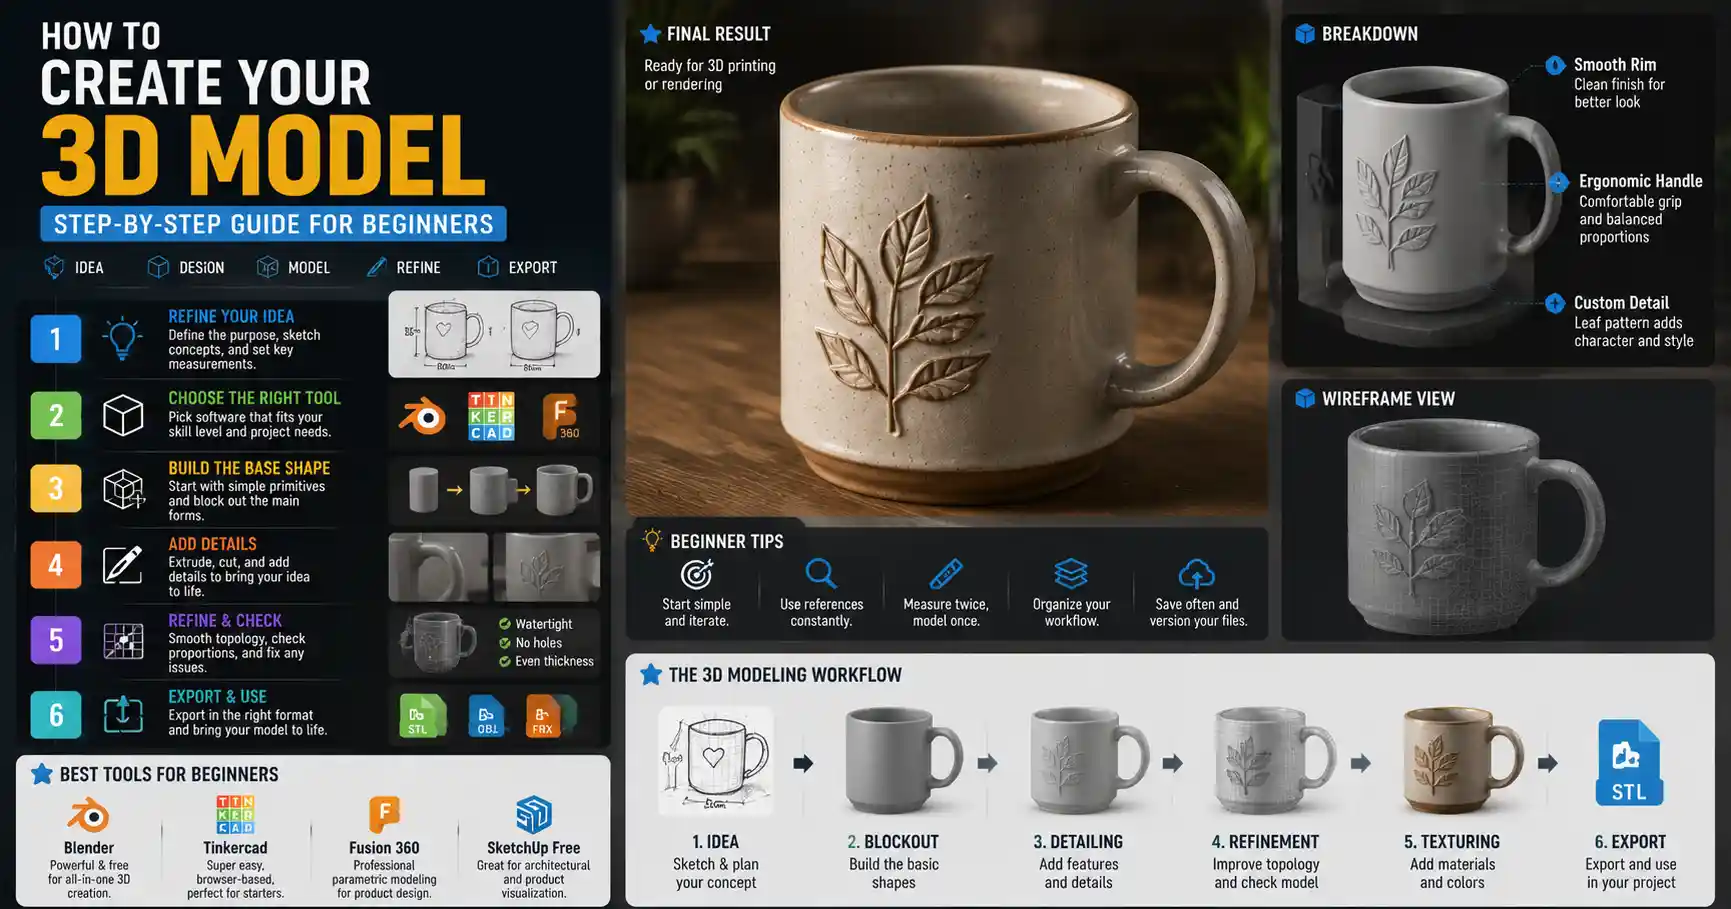
Every week, millions of creative person has a sketch scribbled on a napkin, a mental image of a product that could fix a daily frustration, or a character concept that won’t leave their head. But for most people, that idea stays locked in their imagination or hidden in a sketchbook—mostly because they assume turning that concept into a tangible 3D model requires a fancy engineering degree, thousands of dollars in equipment, or years of training. The truth today is that anyone with a laptop and a little curiosity can turn even the most abstract idea into a polished 3D model ready for 3D printing, animation, or product development. All it takes is breaking the process down into manageable steps, choosing the right tools for your skill level, and learning a few core principles that work for every project, from custom jewelry to a prototype for a new startup.
Step 1: Refine Your Idea Before You Open Any Software
The biggest mistake new 3D creators make is jumping straight into 3D modeling software before they’ve worked out exactly what they want to build. While it might feel exciting to start clicking and dragging, you’ll save hours of frustrating rework if you take time to refine your idea on paper first. 3D modeling is a problem-solving process, and you need a clear problem to solve before you start pulling points and edges.
Start with a core purpose
Every good 3D model serves a purpose. Are you building a 3D printable phone stand for your car? A character model for an independent video game? A prototype of a new kitchen gadget you want to sell? Your purpose will shape every decision you make about your model, from what dimensions you use to what level of detail you need to add. A 3D printable functional part requires exact measurements and watertight geometry, while a concept model for an art exhibit can prioritize aesthetics over precision.
For example, if your idea is a custom wall hook to hold your heavy winter coat, your core purpose is “hold 10kg of weight without breaking, fit on a standard drywall anchor, match the mid-century modern decor of my hallway.” That clear purpose immediately narrows down your design choices: you know you need a thick base, a curved hook that sits far enough out from the wall to fit coat hangers, and a minimalist shape that matches your existing furniture.
Sketch and document your requirements
Once you know your core purpose, get your idea down on paper (or a 2D drawing app like Procreate or Photoshop) with all the critical details. You don’t need to be a professional artist—simple orthographic sketches (front, top, and side views) are more useful than a fancy perspective drawing for 3D modeling. Jot down every requirement you can think of: dimensions, weight capacity, color, level of detail, what materials it will be made from (if it’s going to be 3D printed or manufactured), and any constraints (like how much time you have to build it, or what software you already know how to use).
- Add key measurements to your sketch: even approximate numbers will help you get the proportions right when you start modeling
- Cut out any features that don’t serve your core purpose: if you don’t need a decorative carved border on your wall hook, leave it out for now
- Collect reference images: if you’re designing a character inspired by 1980s anime, pull a few examples of the art style to reference as you model
- Note if your model needs to be 3D printable, which means it needs to be watertight and not have overhangs steeper than 45 degrees (for most FDM printers)
By the end of this step, you should have a clear blueprint you can follow when you open your 3D modeling software. This preparation will cut your modeling time by at least half, and help you avoid the common problem of abandoning a project halfway through because you don’t know what to do next.
Step 2: Choose the Right 3D Modeling Tool for Your Skill Level and Project
There are hundreds of 3D modeling tools on the market today, ranging from free browser-based apps for beginners to professional-grade software used by Pixar and Boeing. The tool you choose should match your experience level, your project type, and your budget. Picking the wrong tool can turn a fun weekend project into a frustrating experience that makes you want to give up entirely.
Free beginner-friendly tools for new creators
If you’ve never modeled anything before, you don’t need to drop $50 a month on a professional subscription. There are several excellent free tools that are designed to be easy to learn for beginners:
- Tinkercad: This browser-based tool from Autodesk is perfect for absolute beginners and simple functional models. It uses a basic block-building approach that’s almost impossible to mess up, and it exports models that are ready for 3D printing right out of the box. If you want to build a simple container, a wall hook, or a custom keychain, Tinkercad is the perfect place to start.
- Blender: Blender is a free, open-source tool that’s powerful enough for professional character modeling, animation, and 3D art. It has a steeper learning curve than Tinkercad, but there are thousands of free tutorials online, and it can do everything from 3D printing to game development.
- SketchUp Free: SketchUp is a popular tool for architectural and product design. The free web version is great for beginners building larger models like furniture or room layouts, and it’s known for its intuitive push-pull interface that makes shaping 3D objects feel natural.
Professional tools for more advanced projects
If you already have some 3D modeling experience, or you’re working on a professional project like a product prototype, these tools are industry standards:
- Fusion 360: Fusion 360 from Autodesk is a parametric modeling tool that’s perfect for product design and mechanical parts. It’s free for hobbyists and small businesses, and it includes tools for simulation, CAM, and 3D printing preparation. Most product designers and makers start with Fusion 360 once they outgrow Tinkercad.
- ZBrush: ZBrush is the industry standard for high-resolution character sculpting and organic 3D models. It’s used for everything from movie character designs to detailed figurine models for 3D printing. It has a unique workflow that takes some getting used to, but it can create levels of detail that are impossible with other tools.
- SolidWorks: SolidWorks is a professional parametric modeling tool used by mechanical engineers and industrial designers for precision parts. It’s more expensive than Fusion 360, but it’s the standard for industrial manufacturing.
Scan physical objects to skip the drawing board
What if your idea exists in the physical world already, but you need a digital 3D model of it? For example, you might have a hand-sculpted clay prototype, and you want to turn it into a digital model you can edit and 3D print multiple copies of. In that case, 3D scanning is a great option that can turn a physical object into a 3D model in a matter of minutes.
Entry-level 3D scanners like the EinScan-SE cost a few hundred dollars, and even your smartphone can be used with apps like Qlone or Polycam to create a basic 3D scan of small objects. The resulting scan will usually need some cleanup to fix holes or odd geometry, but it’s a huge time saver if you’re starting with a physical prototype.
“The best 3D modeling tool is the one you already know how to use. Don’t waste six months learning a professional tool just to build a simple keychain. Start simple, iterate, and upgrade your tools as your skills grow.”
Step 3: Build Your 3D Model Core and Add Detail
Once you have your refined idea and your tool of choice, it’s time to start building your model. The exact workflow will vary depending on whether you’re working with parametric modeling (used for functional parts, where you can edit dimensions at any time) or sculpting (used for organic models like characters or sculptures), but the core process is the same: start big, add small details last.
Block out the basic shape first
Just like you refined your idea on paper before you started modeling, you should start by blocking out the basic large shapes of your model before you add any small details. For a wall hook, that means creating a rectangle for the base and a curved prism for the hook, and positioning them roughly where they need to go. For a character head, that means creating a single sphere or ellipsoid to represent the overall shape of the head.
This step is all about getting the proportions right. It’s much easier to adjust the size of a basic block than it is to fix the proportions of a fully detailed model. If you’re working from measurements, this is where you set your core dimensions to match what you wrote down in your planning step. For example, if your base needs to be 10cm wide, 4cm tall, and 3cm deep, you set those dimensions now, before you add any holes for mounting or any decorative edges.
Combine and refine basic shapes
Once you have your basic blocks, you can start combining them, cutting away material, and refining the overall shape. Most 3D modeling tools work with two basic operations: adding material (joining two shapes together) and subtracting material (cutting a hole or a shape out of a larger object). For your wall hook, that might mean cutting a countersunk hole into the base for a screw head to sit flush, and rounding the edges of the hook so it doesn’t scratch your coat.
For organic sculpting work, this is where you start pushing and pulling the basic shape to get the overall form right. For a character head, you’d widen the jaw, push the brow forward, and add the basic shape of the nose and lips before you start adding details like pores or wrinkles. This is the stage where you step back from your model often, check it against your reference sketches, and adjust the overall shape until it matches what you imagined.
Add fine details last
Only when you’re happy with the overall shape and proportions should you start adding fine details. That means adding things like texture, engravings, button holes, facial wrinkles, or decorative features. There are a few good reasons to wait to add details: if you change your mind about the overall shape later, you don’t have to redo all your detailed work, and adding details last keeps your model simple and easy to work with while you’re still working out the big shapes.
One important thing to remember here: don’t add more detail than you actually need. If your wall hook is going to be painted matte black and hung on a wall behind your front door, you don’t need to add a 0.1mm detailed wood grain texture to the model. Extra detail just increases the file size of your model, makes it slower to slice for 3D printing, and can cause errors if you don’t clean up the geometry properly. Only add details that actually add value to your final product.
Step 4: Validate and Prepare Your Model for Its End Use
Once you’ve finished building your 3D model, your work isn’t done yet. Every 3D model needs to be checked and prepared for its final use, whether that’s 3D printing, animation, or manufacturing. A beautiful 3D model that has bad geometry will fail when you try to print it or manufacture it, so this step is critical.
Check for common geometry errors
All 3D models are made of polygons connected together to form a surface. If that surface has holes, non-manifold edges, or overlapping polygons, that can cause big problems when you try to use the model. Common errors to check for include:
- Holes in the surface: most 3D printing slicers require a fully enclosed, watertight model. Even a small hole can cause the print to fail.
- Non-manifold geometry: this is an edge that is connected to more than two faces, which confuses slicer software. It’s a common error when you merge two shapes together.
- Overlapping faces: two faces that occupy the same space can cause rendering errors or 3D printing errors.
- Dimensions that don’t match your requirements: double-check all your key measurements to make sure they’re correct. A 1cm error in the size of a 3D printable phone stand will render it useless.
Most modern 3D modeling tools include built-in inspection tools that will automatically find common errors for you. For 3D printable models, free tools like Meshlab or Netfabb Basic will automatically check your model and fix most common errors with a single click.
Adjust for your end use
After you’ve fixed any geometry errors, you need to adjust your model to match its end use. Let’s look at the most common use cases:
3D printing: If your model is going to be 3D printed on a standard FDM printer, you’ll need to add a small amount of tolerance to any moving parts (usually 0.2mm to 0.5mm, depending on your printer’s precision), and check for any overhangs that are steeper than 45 degrees (overhangs steeper than that will require support material, which leaves a rough surface on your print). If you don’t want support material, you can slightly adjust the angle of the overhang to bring it under 45 degrees.
Animation or game development: If your model is going to be used in a video game or animation, you’ll need to reduce the polygon count (a process called retopology) to make sure it runs smoothly in a game engine. You’ll also need to unwrap UVs and add texture maps to add color and surface detail to the model.
Industrial manufacturing: If your model is going to be injection molded or CNC machined, you’ll need to add draft angles to the walls of the model, and make sure all internal corners have the right radius to match the tooling that will be used to make the part.
For example, if you’re 3D printing the wall hook we’ve been using as an example, you’d check that the screw hole is the right size for the screw you’re using, make sure the hook angle is under 45 degrees so you don’t need support material, and run a check to make sure the model is watertight before you export it as an STL file (the standard file format for 3D printing).
Test with a low-stakes prototype
If this is your first 3D model of this type, it’s always a good idea to test it before you invest time or money into a final high-quality print or manufacturing run. For 3D printed models, that means printing a quick low-resolution draft to check that the dimensions are right and the shape works as intended. If you designed that wall hook to fit a 10mm thick coat hanger, you can test the prototype to make sure it actually fits, and adjust the model if it’s too small or too big.
Step 5: Iterate and Improve Your Model
Very few people get a 3D model perfect on the first try. Even professional 3D modelers go through multiple iterations of a design before they get it right. Iteration is the process of testing your model, identifying what doesn’t work, and adjusting it to fix the problem. This is the step that separates good 3D models from great ones.
For example, let’s say you printed your first iteration of the wall hook, and when you hang your coat on it, it pulls right off the wall. You check the design, and realize you made the base too thin, so the screw doesn’t have enough material to grip into. You go back to your 3D model, increase the thickness of the base from 3mm to 6mm, export a new STL, and print it again. Now it holds your coat perfectly.
The good news is that digital 3D modeling makes iteration almost free. You don’t have to start over from scratch like you would if you were carving a physical prototype out of wood. You just open your model, adjust the dimension you need to change, and export a new file. If you keep good modeling habits (like naming your parts and keeping your model organized), changing one part of the model won’t break the rest of it.
One good habit to get into is to save a new version of your model every time you make a major change. That way, if you make a change you don’t like, you can always go back to an older version and start over from there. Most 3D modeling tools have built-in version control, but even if yours doesn’t, you can just save files with names like wall_hook_v1.stl, wall_hook_v2.stl, and so on.
As you iterate, don’t be afraid to get feedback from other people. If you’re designing a product to sell, show a prototype to potential customers and ask them what they think. If you’re designing a character for a game, show it to other artists and ask for constructive criticism. Fresh eyes will often spot problems you’ve become blind to after staring at your model for hours.
Conclusion
Turning an idea into a 3D model isn’t some magical skill that only professional engineers and artists can master. It’s a step-by-step process that anyone can learn with a little patience and practice. Start by refining your idea and getting clear on your purpose, choose the right tool for your skill level and project, build your model from big shapes to small details, check and prepare your model for its end use, and iterate until it works exactly the way you want it to.
The best way to get good at 3D modeling is to start small. Pick a simple project that solves a small problem in your life—like that wall hook we talked about, or a custom stand for your headphones, or a small figurine of your favorite character. Work through the process step by step, and don’t get discouraged if your first model isn’t perfect. Every 3D model you build will teach you something new that will make your next model better. Before you know it, you’ll be turning every idea you have into tangible 3D models you can hold, use, and share.