
If you’ve ever sent a 3D model to a 3D printing service or tried to print a design at home, you’ve likely encountered a file that didn’t slice correctly, had gaps in the walls, or turned out nothing like your original concept. More often than not, the problem isn’t your printer or your slicer software—it’s the STL file, the universal standard for 3D printable models. First developed in the late 1980s for stereolithography 3D printing, STL (short for Standard Tessellation Language) remains the most widely used file format for additive manufacturing, even decades later. Unlike native CAD files that store complex parametric data, STLs simplify 3D models into a mesh of triangular faces, making them compatible with almost every 3D printer and slicing tool. But that simplicity comes with a catch: a poorly prepared STL can derail even the most carefully planned print. Whether you’re a hobbyist designing your first cosplay prop, an engineer prototyping a product, or an artist preparing a sculpture for 3D printing, learning how to prepare STL files correctly saves time, material, and frustration. This guide walks you through every step of the process, from exporting your original design to fixing common errors and sharing your final file.
Understanding STL Basics Before You Start
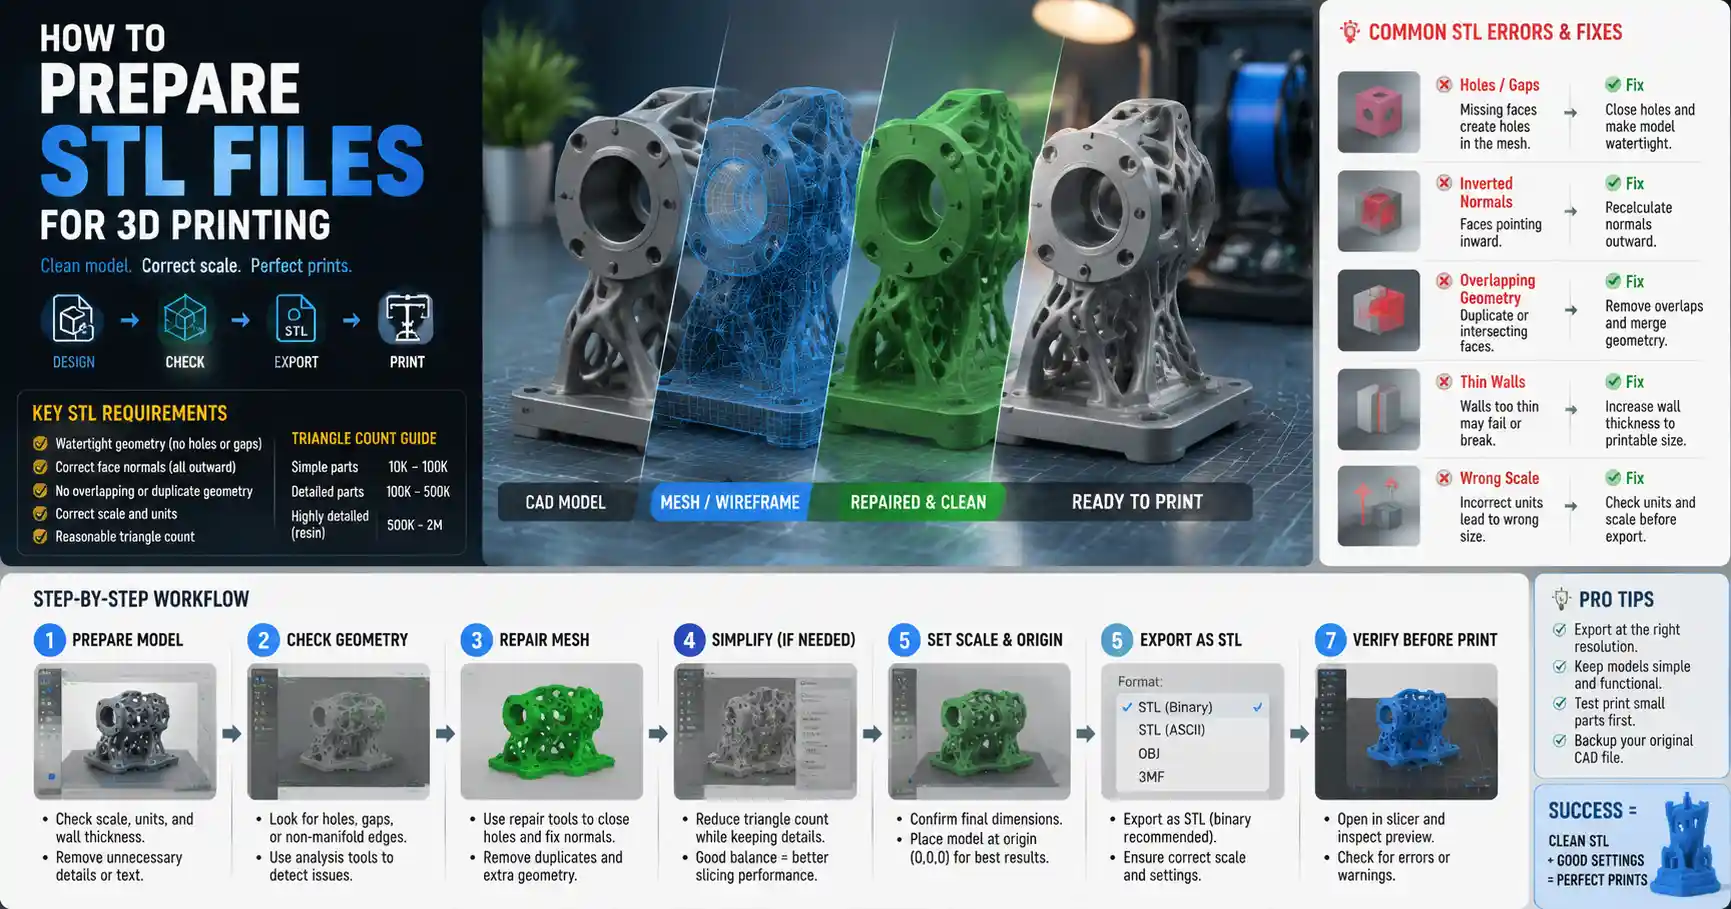
Before you dive into editing and exporting, it helps to understand what an STL file actually does, and what common requirements 3D printers have for this format. As mentioned, STLs represent 3D objects using a surface mesh made entirely of triangles. Each triangle is defined by the coordinates of its three vertices, and the mesh together creates the outer shape of your object. Unlike CAD files that keep track of features like holes, fillets, and parametric dimensions, STLs only store the surface geometry—so any error in how those triangles are assembled will translate to errors in your print.
One of the most common misconceptions about STL files is that higher triangle count always equals better quality. It’s true that more triangles can create smoother curved surfaces, but an excessively high triangle count will bloat your file size, slow down slicing software, and offer no tangible improvement in print quality. For most FDM 3D printers, which have a minimum layer resolution between 0.1mm and 0.3mm, a triangle count between 100,000 and 500,000 is more than enough for even detailed models. Resin printers, which offer higher detail, can handle up to 2 million triangles, but anything beyond that is usually unnecessary.
Key STL Requirements for 3D Printing
Before you export your STL, keep these core requirements in mind to avoid common errors:
- Watertight geometry: Every edge of every triangle must connect to exactly one other triangle edge. Any gap, overlapping face, or disconnected edge creates a "hole" in the mesh, which slicers can’t interpret to generate print toolpaths.
- Correct face normals: Each triangle has a front (outer) face and a back (inner) face. Slicers rely on correct normals (all pointing outward) to identify which side is inside vs. outside the object. Inverted normals can lead to missing walls or empty objects.
- No overlapping or duplicate geometry: Two overlapping shapes or duplicate faces in the same area confuse slicers, often leading to inconsistent wall thickness or failed slices.
- Correct units and scale: STL files don’t store unit information by default, so it’s up to you to export your model at the correct size and scale it properly before export.
Most modern CAD and 3D modeling software automatically addresses some of these issues during export, but it’s not uncommon for errors to slip through, especially for complex organic models created in sculpting software like ZBrush or Blender.
Step 1: Preparing Your Original 3D Model for Export
The STL preparation process starts long before you export the file. Your original 3D model—whether created in parametric CAD like SolidWorks or Fusion 360, or sculpted in a polygonal modeling program like Blender or ZBrush—needs to be print-ready before you convert it to STL. Fixing issues at the source is almost always easier than repairing the mesh after export.
Check and Adjust Wall Thickness
The most common design flaw that leads to failed prints is insufficient wall thickness. 3D printers can only produce features as thin as their nozzle or resin tolerance allows, and walls that are too thin will be fragile, curl during printing, or fail to print at all. For FDM printing with a standard 0.4mm nozzle, a minimum wall thickness of 1.2mm (three nozzle diameters) is recommended for functional parts, while 1.5mm is ideal for structural integrity. For resin printing, you can go as thin as 0.5mm for decorative parts, but 0.8mm is safer for anything that needs to hold shape.
To check wall thickness in most CAD programs, use the built-in measurement tool to confirm the distance between opposite inner and outer walls. In sculpting programs, you can use offset or solidify tools to add uniform thickness to a hollow sculpt. If you’re designing a large part, consider hollowing it out to reduce material use and print time—just make sure to add drainage holes if you’re using resin printing, to let excess resin escape during the print process.
Adjust Scale and Units
Since STL files don’t store unit data, your modeling software will interpret your model’s dimensions as whatever unit you have set in your preferences. If you design a 10cm mug in millimeters (resulting in a 100mm dimension) but your software is set to inches when you export, your 10cm mug will become 10 inches, which is far too large. Before exporting, double-check your model’s dimensions against your intended final size. If you need to resize it, do it in your original modeling software rather than after exporting to STL, to avoid accidental distortion.
Fix Common Source Geometry Errors
Before export, run your software’s built-in check geometry tool to catch common issues like:
- Small disconnected mesh fragments (often called "floaters" or "noise") left over from modeling or sculpting
- Internal overlapping geometry from joined or boolean operations
- Holes left by deleted faces or misaligned edges
For example, when you use a boolean union to combine two objects in Fusion 360, the software sometimes leaves behind tiny leftover edges or overlapping faces that don’t affect the CAD file but will create errors in the exported STL. Most CAD programs have a "heal geometry" tool that can automatically fix most of these issues before export.
Export Settings for Optimal STL Quality
When you’re ready to export, you’ll need to set the deviation or tolerance parameters that control how many triangles are used to approximate your original model. These settings go by different names depending on your software: Fusion 360 calls it "deviation tolerance" and "angle tolerance," SolidWorks uses "resolution" and "deviation," Blender uses "source export scale." The goal is to find a balance between smooth surfaces and manageable file size.
As a general rule of thumb, set your deviation tolerance to half of your 3D printer’s layer height. If you print at 0.2mm layer height, a 0.1mm deviation tolerance means the triangles will never deviate more than 0.1mm from your original model’s surface—far smaller than the printer can resolve, so you won’t see any stairstepping on curved surfaces. For angle tolerance, a setting of 15-30 degrees works for most models, which adds more triangles to sharp curves to keep them smooth without adding unnecessary triangles to flat surfaces.
Step 2: Repairing Common STL Errors
Even if you carefully prepare your model before export, it’s common for STLs to have small errors that need fixing before printing. This step is especially critical for complex organic models, which are more likely to have non-watertight meshes. Fortunately, there are many free and paid tools available to repair STLs, including Meshmixer, Blender 3D Print Toolbox, MeshLab, and online tools like 3D Slash or Materialise MiniMagics.
“90% of 3D printing failures I see as a service bureau aren’t from printer issues—they’re from bad STL files. A 2-minute repair check can save you 10 hours of failed printing and wasted material.”
That quote from a 3D printing service manager with 10 years of experience highlights just how important this step is. Even if your model looks fine to the naked eye, small errors can cause big problems. Let’s walk through the most common errors and how to fix them.
Non-Watertight Meshes and Holes
Holes in the mesh are the most common STL error, usually caused by boolean operations, mismatched edges when joining separate objects, or exported models that were never turned into a solid. Slicers rely on knowing where the inside and outside of your model are, so a hole means the slicer can’t correctly generate infill and walls. Most repair tools have an automatic "fill holes" function that will close small holes automatically. For larger holes, you can usually use a live preview to select individual holes and fill them manually, or retopologize the area to fix the mesh.
Inverted or Incorrect Face Normals
If normals are flipped (pointing inward instead of outward), the slicer will think the inside of your model is the outside, and vice versa. This can result in the slicer generating an empty shell with no walls, or an object that’s solid where it should be hollow. In most mesh editing tools, flipping normals is a one-click operation: just select all faces and click "recalculate normals outside." Some automatic repair tools will fix inverted normals without any input from you.
Overlapping Faces and Duplicate Geometry
Duplicate faces or overlapping mesh areas confuse slicers, leading to irregular wall thickness, extra material being added, or sliced files that crash mid-print. Automatic repair tools will usually remove duplicate faces automatically, but for large overlapping areas, you may need to delete the overlapping section manually and then fill any resulting hole. If you joined multiple separate objects to create your STL, always check for overlapping geometry after export.
Reducing Excessive Triangle Count
If you export a high-poly sculpt from ZBrush, you can end up with an STL that has 10 million or more triangles, which will crash most slicing software and serve no practical purpose. If your file is larger than 50MB and you’re printing on a standard consumer 3D printer, you can reduce the triangle count (called "decimation" in mesh editing) without losing any visible detail. Meshmixer and Blender both have automatic decimation tools that let you set a target triangle count or percentage reduction, and preserve the original shape of your model.
Step 3: Validating and Testing Your STL File
Once you’ve repaired your STL, you need to validate it to confirm it’s ready for slicing and printing. Skipping this step can lead to wasted time when your slicer fails to load the file or generates a g-code that won’t print. Validation doesn’t take long, and it catches any errors that the automatic repair process missed.
Use Mesh Validation Tools
Most STL editing tools have built-in validation checks that will scan your mesh and highlight any remaining errors. For example, Blender’s 3D Print Toolbox add-on will scan your model and report the number of non-manifold edges, intersecting faces, and holes, and even give you one-click options to fix most issues. For a quick online check, you can upload your STL to the 3D Hubs STL Check tool, which will automatically scan for common errors and let you download a repaired version for free.
When you run validation, pay special attention to non-manifold geometry, which is any mesh topology that doesn’t follow the rules for 3D printing. Non-manifold edges are edges that are shared by more than two faces, or edges that only have one face connected to them. This creates an ambiguous situation where the slicer can’t tell what’s inside or outside, and it’s one of the most common causes of failed slicing. Most validation tools will highlight non-manifold edges, and many will fix them automatically.
Check Scale and Orientation
After validation, double-check that your STL is the correct size. Even if you set the scale correctly before export, it’s easy to accidentally export at the wrong units, so open your STL in your slicer or mesh editor and measure a key dimension to confirm it matches your intended size. For example, if you designed a phone case for an iPhone 14 that’s 71.5mm wide, measure the STL to confirm it’s still 71.5mm wide.
You can also orient your model in the mesh editor before importing it to your slicer, if you know the best orientation for printing. Orienting the model to minimize overhangs reduces the need for support material, which improves surface finish and saves material. For example, if you’re printing a 3D character, orient it so that the flat base is on the build plate, and angle large flat surfaces to avoid creating large overhangs that need extensive support.
Test Slice Your STL
The best way to confirm your STL is good is to load it into your slicer and run a full slice. Most modern slicers like Cura, PrusaSlicer, or Bambu Studio will warn you if the STL has errors before it starts slicing. If the slicer loads the model without warnings, generates a valid g-code, and the preview shows solid walls, correct infill, and no missing sections, your STL is ready to go. If the slicer highlights errors, go back to your mesh editor to fix them, then test slice again.
For parts that require tight tolerances, like interlocking 3D printed parts or parts that have to fit around an existing object, it’s a good idea to print a small test section first to confirm your STL is sized correctly. For example, if you’re designing a custom gear that has to mesh with an existing off-the-shelf gear, print a test version of the gear at 100% scale to confirm the fit before printing the full assembly.
Step 4: Sharing or Archiving Your Final STL
Once your STL is ready to print or share, there are a few best practices to follow to make sure other people (or your future self) can use it without issues. Whether you’re uploading it to a 3D model sharing site like Thingiverse or Printables, sending it to a 3D printing service, or archiving it for future prints, following these steps avoids common confusion.
- Export with a clear file name: Avoid generic names like "model.stl" or "final design.stl." Use a descriptive name that includes the part name, version, and size, like "iphone_14_pro_matte_case_v2_black.stl" or "cosplay_vader_chest_armor_left.stl." This makes it easy to find the right file later, especially if you have multiple versions.
- Include unit and scale information in your documentation: Since STLs don’t store units, always include the intended dimensions and units in any readme or description when sharing. For example, note "Finished chest armor is 30cm tall x 25cm wide, exported in millimeters" so other users can confirm they’re scaling it correctly.
- Compress large STLs for sharing: If you have a high-poly STL that’s larger than 10MB, compress it into a ZIP or RAR file before sharing or uploading. Most 3D model sites accept compressed files, and it reduces upload and download time for everyone. Avoid using obscure compression formats that require special software to open—stick to standard ZIP that can be opened on any operating system.
- Keep a copy of your original CAD file: STLs are great for 3D printing, but they’re not editable the way native CAD files are. If you need to adjust the size or modify a feature later, you’ll be glad you saved the original source file. Always archive the original model along with the STL, whether you’re storing it locally or in the cloud.
- Check any service-specific requirements: If you’re sending your STL to a professional 3D printing service, double-check their requirements before sending. Some services prefer multiple STLs for separate parts instead of a single assembled STL, some have maximum file size limits, and some require you to export with specific tolerance settings. Most services will check your STL for errors, but fixing it yourself before sending speeds up the process and avoids extra fees for error correction.
If you’re sharing your STL publicly on a model sharing site, it’s also helpful to include photos of the finished print, along with recommended print settings like infill percentage, wall thickness, and support requirements. This helps other users get a good result the first time, and reduces the number of questions you’ll get about why the model won’t print.
Conclusion
Preparing STL files doesn’t have to be complicated, but it does require attention to a few key details that make the difference between a successful print and a failed one. The process starts with good design habits: checking wall thickness, fixing errors in your original CAD or sculpt before export, and setting the right export tolerance to balance quality and file size. After export, a quick repair and validation step catches the common errors that slip through, from non-watertight holes to inverted normals, and test slicing confirms your file works with your printer’s software. Finally, clear naming and documentation make it easy to share or archive your file for future use.
While it might feel like a chore to check and repair your STL before printing, the small amount of time you spend preparing the file pays off in fewer failed prints, less wasted material, and consistent results. As 3D printing becomes more accessible for hobbyists and professionals alike, mastering STL preparation is a core skill that will help you get the most out of your 3D printer, whether you’re printing a small toy at home or prototyping a new product for market. With the tools and steps outlined in this guide, you’ll be able to prepare error-free STL files every time.