
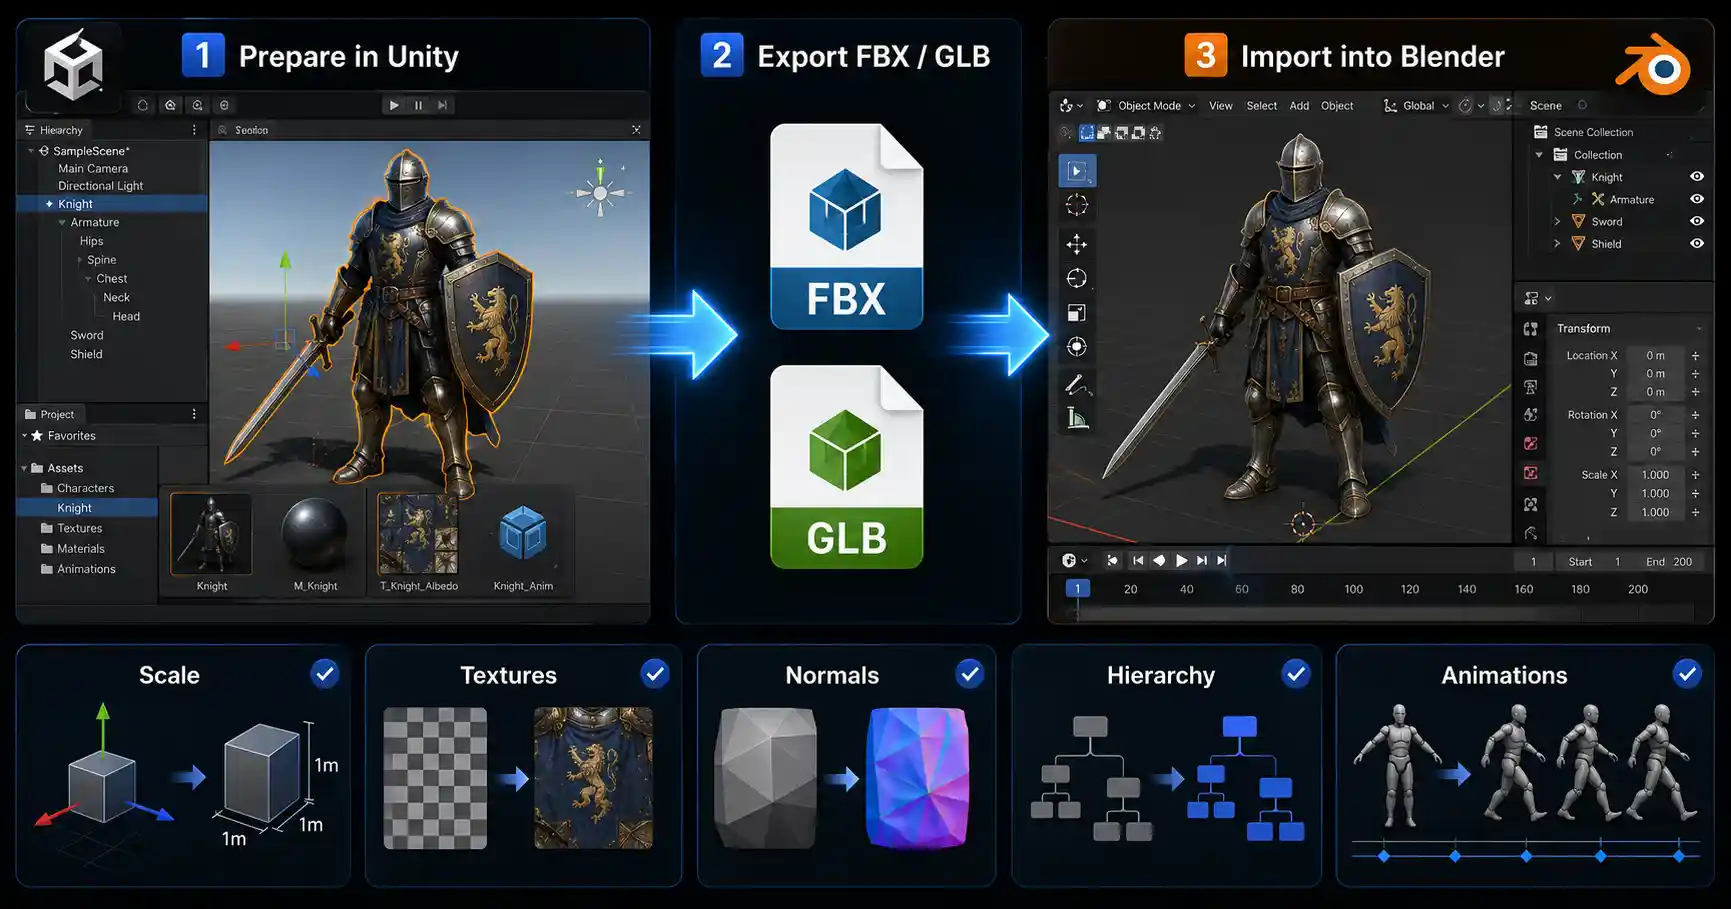
If you’ve ever built a 3D scene, character, or asset in Unity and wanted to tweak its geometry, retouch textures, or create cinematic renders in Blender, you’re not alone. Many game developers, indie creators, and 3D artists move assets between these two industry-standard tools to leverage each one’s strengths: Unity excels at real-time development and interactive experiences, while Blender offers unrivaled free, open-source tools for high-fidelity modeling, sculpting, and rendering. Importing a 3D model from Unity to Blender sounds complicated at first, especially if you’re new to either program, but the process is straightforward once you understand the export settings, file formats, and troubleshooting steps. This step-by-step guide walks you through every stage, from preparing your model in Unity to fixing common issues in Blender after import.
Preparing Your 3D Model in Unity Before Export
Before you export any asset from Unity, taking a few minutes to prepare your model will save you hours of fixing errors later in Blender. Unity stores 3D assets in a specific project structure, and not all models in your scene are ready to export directly. Skipping preparation often leads to missing textures, broken hierarchies, or scaled geometry that requires extra work to fix.
Identify and Organize Your Target Model
First, you need to confirm which model you want to export. If you’re exporting a model you imported into Unity from another source, you already have the original source file, but many creators build custom models directly in Unity by combining multiple meshes, adjusting transforms, or baking textures for real-time use. In other cases, you may want to export a modified version of an existing asset that you’ve adjusted in your Unity scene.
Start by locating the model in either your Project window or the Hierarchy window. If it’s a static object in an open scene, drag the model from the Hierarchy into your Project window to create a prefab. This saves all your current transform adjustments, component changes, and material assignments so you don’t lose them during export. For models made of multiple meshes (for example, a character with separate arms, torso, and head meshes), group them under a single parent empty GameObject to keep the hierarchy organized when you import into Blender.
Clean Up Unnecessary Data
Unity adds a lot of extra data to models that isn’t needed for 3D work in Blender, so cleaning up this data keeps your file size small and avoids import errors. Some key clean-up steps include:
- Remove any non-model components: Unity adds colliders, rigidbodies, scripts, and audio sources to GameObjects, and these won’t transfer to Blender. Delete these components from your target model before export to reduce file bloat.
- Reset or apply transforms: If you’ve scaled, rotated, or moved your model in the Unity scene, make sure the transforms are applied. Right-click the GameObject in the Hierarchy, select Apply Transform to bake your adjustments into the model data. This avoids importing a model that’s the wrong size or rotated incorrectly in Blender.
- Unpack any embedded textures: If your model uses custom textures that are compressed for Unity, make sure they are unpacked in your project. Go to the texture import settings in the Inspector, click Extract to save the texture as a separate PNG or JPEG file you can easily access when importing into Blender.
- Remove hidden or unused meshes: If your parent GameObject has hidden child meshes that you don’t need in Blender, delete or unparent them before export to avoid cluttering your Blender scene.
Verify Materials and Texture Assignments
One of the most common issues when moving models from Unity to Blender is missing or incorrectly assigned textures. Before you export, double-check that every mesh on your model has the correct material assigned in the Unity Inspector. Note the file path of your textures in the Project window—you’ll need this path later when you reassign textures in Blender, so writing it down or keeping the folder open on your desktop saves time.
Choosing the Right Export File Format
The file format you choose for export from Unity will make a huge difference in how your model looks and works in Blender. Not all formats support all features, so the best choice depends on what you plan to do with the model after import. Unity supports several common 3D export formats, and each has its own advantages and drawbacks.
FBX: The Most Versatile Option
FBX (Filmbox) is the industry standard for transferring 3D assets between different programs, and it’s the most recommended format for moving models from Unity to Blender. Both Unity and Blender have native support for FBX, and it supports meshes, UV mapping, bone rigs, animations, basic material data, and texture paths. This makes it ideal for almost every use case, from static environment assets to rigged animated characters.
One of the biggest benefits of FBX is that it preserves your model’s hierarchy, so grouped meshes and parent-child relationships that you set up in Unity will transfer directly to Blender’s Outliner window. It also supports arbitrary scale and can handle large, complex models without corruption. The only major downside of FBX is that it doesn’t preserve Blender-specific data, but since you’re moving from Unity to Blender, this isn’t an issue for this workflow.
glTF/GLB: Modern Web-Friendly Alternative
glTF (GL Transmission Format) and its single-file variant GLB are a relatively new open standard for 3D assets, designed for efficient transmission and loading of 3D content online. Both Unity and Blender support glTF/GLB natively in recent versions, and they have some advantages over FBX for certain use cases. GLB packages all your model data, textures, and materials into a single file, which makes it easier to transfer between programs without losing texture references.
glTF also preserves more accurate PBR (physically based rendering) material data than FBX, which means your materials will look closer to how they did in Unity when you import them into Blender. This is a huge benefit if you’re working on PBR assets for games or ArchViz. The main downside of glTF/GLB is that some older versions of Unity or Blender have buggy support for rigged models or complex animations, so if you’re working with an animated character, FBX is usually a safer choice.
Other Formats: OBJ and USDZ
OBJ is an older, very simple 3D format that supports static meshes and UV mapping, but it doesn’t support rigs, animations, or advanced material data. It’s only a good choice if you’re exporting a single static mesh with no extra features, and you want a very small file size. USDZ is Apple’s augmented reality format, and it’s only useful if you’re planning to use the model for AR content after editing in Blender. For most general use cases, FBX or GLB are the best choices.
When moving assets between different 3D tools, the best file format is almost always the one that both programs support natively. Avoid obscure or proprietary formats that require third-party plugins to open—they almost always introduce more problems than they solve.
Step-by-Step Export from Unity
Once your model is prepared and you’ve chosen the right file format, you’re ready to export from Unity. The exact steps vary slightly depending on whether you’re exporting a prefab from the Project window or an object from an open scene, but the core export settings are the same for both. This step-by-step guide uses FBX as the export format, since it’s the most widely compatible, but we’ll note differences for GLB export where relevant.
Exporting a Prefab or Scene GameObject
First, select your model in either the Project window (if it’s a prefab) or the Hierarchy window (if it’s in an open scene). To export, you can use one of two methods: the native Unity export tool or the Asset Bundle export. For most users, the native export tool is all you need:
- With your model selected, go to the top menu bar and select Assets > Export Package if you’re exporting the entire asset with all dependencies. If you just want to export the model geometry and materials, use GameObject > Export as FBX (this option is available in Unity 2019.1 and all newer versions). If you don’t see this option, you can also export via the Asset menu: select Assets > Export FBX.
- Choose a save location on your computer that’s easy to find, like your desktop or a dedicated project folder. Name your file with a descriptive name, like
player_character_v2, to avoid confusion later. - Adjust the export settings in the FBX export window to match your needs. The most important settings are covered in the next section.
- Click Export and wait for Unity to generate the FBX file. For complex models with multiple meshes, this can take a minute or two.
If you’re exporting as GLB, the process is very similar. In newer versions of Unity, you can select your model, go to GameObject > Export as GLB, and follow the same steps. If you have an older version of Unity, you’ll need to install the official glTF package from the Unity Package Manager before you can export.
Optimal FBX Export Settings for Blender
The default FBX export settings in Unity aren’t always optimized for import into Blender, so adjusting a few key settings will avoid common issues. The most important settings to change are:
- Transform Units: Set this to Centimeters to match Blender’s default unit system. If you leave this set to Unity’s default of Meters, your model will import 100 times larger than it should be in Blender, which requires extra scaling work to fix.
- Export Normals: Check this box to export the model’s normals with the file. This preserves the smoothing you set in Unity, so your model won’t have weird shading issues in Blender.
- Export Tangents: Check this box if your model uses normal maps for PBR texturing. Tangents are required for normal maps to display correctly.
- Export Blend Shapes (Morph Targets): Check this if your model has blend shapes for facial animations or other morphs. Blender supports blend shapes, so exporting them preserves this data.
- Export Animations: Check this only if you want to import the model’s animations into Blender. If you only need the static model, leave this box unchecked to reduce file size.
- Include Materials: Check this box to export material and texture path data. This makes it easier to automatically assign materials when you import into Blender.
For most models, leaving all other settings at their default values will work fine. If you’re exporting a rigged character with a skinning weights, make sure Export Bones and Export Skin Weights are checked to preserve the rig.
Importing Your Model into Blender
Now that you have your exported FBX or GLB file, it’s time to import it into Blender. Like with the Unity export step, adjusting the import settings correctly will avoid most common issues. Blender has improved its import tools a lot in recent versions, so as long as you’re using Blender 2.8 or newer (which includes all 3.x versions), the process is very smooth.
Preparing Your Blender Scene
Before you import, open Blender and clear the default scene to avoid clutter. Blender starts with a default cube, light, and camera, so press A to select all objects, then press Delete to remove them. If you’re importing the model into an existing Blender scene, you don’t need to clear everything, but make sure you have an empty area to place the new model so it doesn’t overlap with existing geometry.
It’s also a good idea to set your Blender project units to match the export settings you used in Unity. Go to the top menu, select Scene Properties > Units, and set the length unit to Centimeters. This matches the FBX export setting we recommended earlier, so your model will import at the correct scale automatically.
Step-by-Step Import Process
Once your Blender scene is prepared, follow these steps to import your model:
- Go to the top menu bar and select File > Import. You’ll see a list of supported file formats; select FBX (.fbx) if you exported as FBX, or glTF (.gltf/.glb) if you exported as GLB.
- Navigate to the location where you saved your exported file from Unity, select the file, and check the import settings in the panel on the right side of the import window.
- Adjust the import settings to match your model. For FBX, the most important settings are: Scale set to 1.0 (if you set the export units to Centimeters correctly), Import Materials checked, Import Bones checked (if you’re importing a rigged character), and Import Animations checked (if you need animations).
- Click the Import FBX (or Import glTF) button in the top right corner of the window. Blender will import the model, and for complex models, this can take 30 seconds to a few minutes.
After the import finishes, your model should appear in the Blender viewport. If you don’t see it immediately, press Numpad . (period) to frame the selected model in the viewport—sometimes Blender imports the model outside the default camera view, so this shortcut will jump you straight to it.
Fixing Materials and Textures
Even if you checked the export materials box in Unity, you may find that some or all of your textures are missing after import into Blender. This is normal, because Unity stores textures in a different file path on your computer than Blender expects, so it can’t find the texture files automatically. Fixing this is a straightforward process:
First, open the Shader Editor in Blender, and select the mesh with the missing texture. Look for the texture node in the shader tree—it will show a pink color or an error message because the file path is broken. Click the file path box on the texture node, navigate to the folder where your textures are stored (the one you noted earlier in Unity), and select the correct texture image. Repeat this for every material on your model until all textures are loaded correctly.
If you’re using Blender 3.0 or newer, you can use the Find Missing Files tool to automatically fix all broken texture paths at once. Go to File > External Data > Find Missing Files, then select the folder where your textures are stored. Blender will automatically search the folder and reconnect all missing textures, which saves a lot of time if you have a model with many different materials.
For PBR materials, you may need to adjust the shader connections to match Blender’s PBR workflow. Unity uses a different default PBR shader than Blender, so the metallic and roughness maps may be connected to the wrong inputs. Just drag the connection from the metallic map to the Metallic input on the Principled BSDF shader, and the roughness map to the Roughness input, and your material will look correct.
Troubleshooting Common Issues
Even if you follow all the steps correctly, you may run into common issues when importing your Unity model into Blender. Most of these are easy to fix once you know what’s causing them. Here are the most frequent problems and how to solve them:
Model Imports at the Wrong Scale
This is the most common issue, and it’s almost always caused by mismatched unit settings between Unity and Blender. If your model imports 100 times too big or too small, don’t manually scale it—you can fix it easily by re-importing with the correct settings. If you exported from Unity with Meters as the unit, you can fix it in Blender by changing the import scale to 0.01 when you import the FBX, which converts meters to centimeters to match Blender’s unit system.
If you’ve already imported the model and don’t want to re-import, you can fix the scale by selecting the model, going to Object > Apply > Scale after you manually adjust the size. This bakes the new scale into the model data so you don’t have incorrect scale values causing issues later.
Missing Meshes or Broken Hierarchy
If some of your meshes are missing after import, or the parent-child hierarchy is broken, the most common cause is not grouping your meshes under a single parent GameObject in Unity before export. Go back to Unity, re-group all your meshes under a single parent, re-export the FBX, and import again. If you still have missing meshes, check that the meshes are not set to Static in Unity—this sometimes causes export issues, so toggling static off before export fixes the problem.
Weird Shading or Incorrect Normals
If your model has weird faceted shading or dark spots that weren’t there in Unity, you probably forgot to export normals from Unity. Re-export the model with Export Normals checked, and re-import into Blender. If that doesn’t fix it, you can recalculate normals in Blender by selecting the model, going to Mesh > Normals > Recalculate Outside to fix any flipped or incorrect normals.
Animation or Rig Issues
If you’re importing a rigged animated character and the bones don’t work correctly, check that you checked Export Bones and Export Skin Weights in the Unity export settings. If the animations are the wrong speed, you can adjust the animation speed in Blender’s Dope Sheet by scaling the keyframes. Most issues are caused by Unity exporting animations at 60 frames per second, while Blender defaults to 24 fps—just scale the keyframes by 0.4 to match, and your animation will play at the correct speed.
Conclusion
Moving a 3D model from Unity to Blender doesn’t have to be a complicated process that leaves you with broken models and missing textures. By taking the time to prepare your model in Unity, choosing the right file format (FBX for most use cases, GLB for PBR assets), and matching your export and import settings, you can transfer your model with all its features intact. The most important steps are preparing your model before export, matching unit settings between the two programs, and knowing how to quickly fix common issues like missing textures or incorrect scale.
Whether you’re creating promotional renders of your Unity game assets, tweaking geometry you built in Unity, or combining assets from a Unity project with other 3D work in Blender, this workflow gives you a reliable way to move assets between the two tools. Both programs are industry staples, and knowing how to move content between them opens up a lot of creative possibilities: you can use Blender’s powerful sculpting and rendering tools to polish assets you built for Unity, or create custom cinematics from your Unity game scenes. With the steps outlined in this guide, you’ll be able to import your Unity models into Blender quickly and avoid the most common pitfalls.