
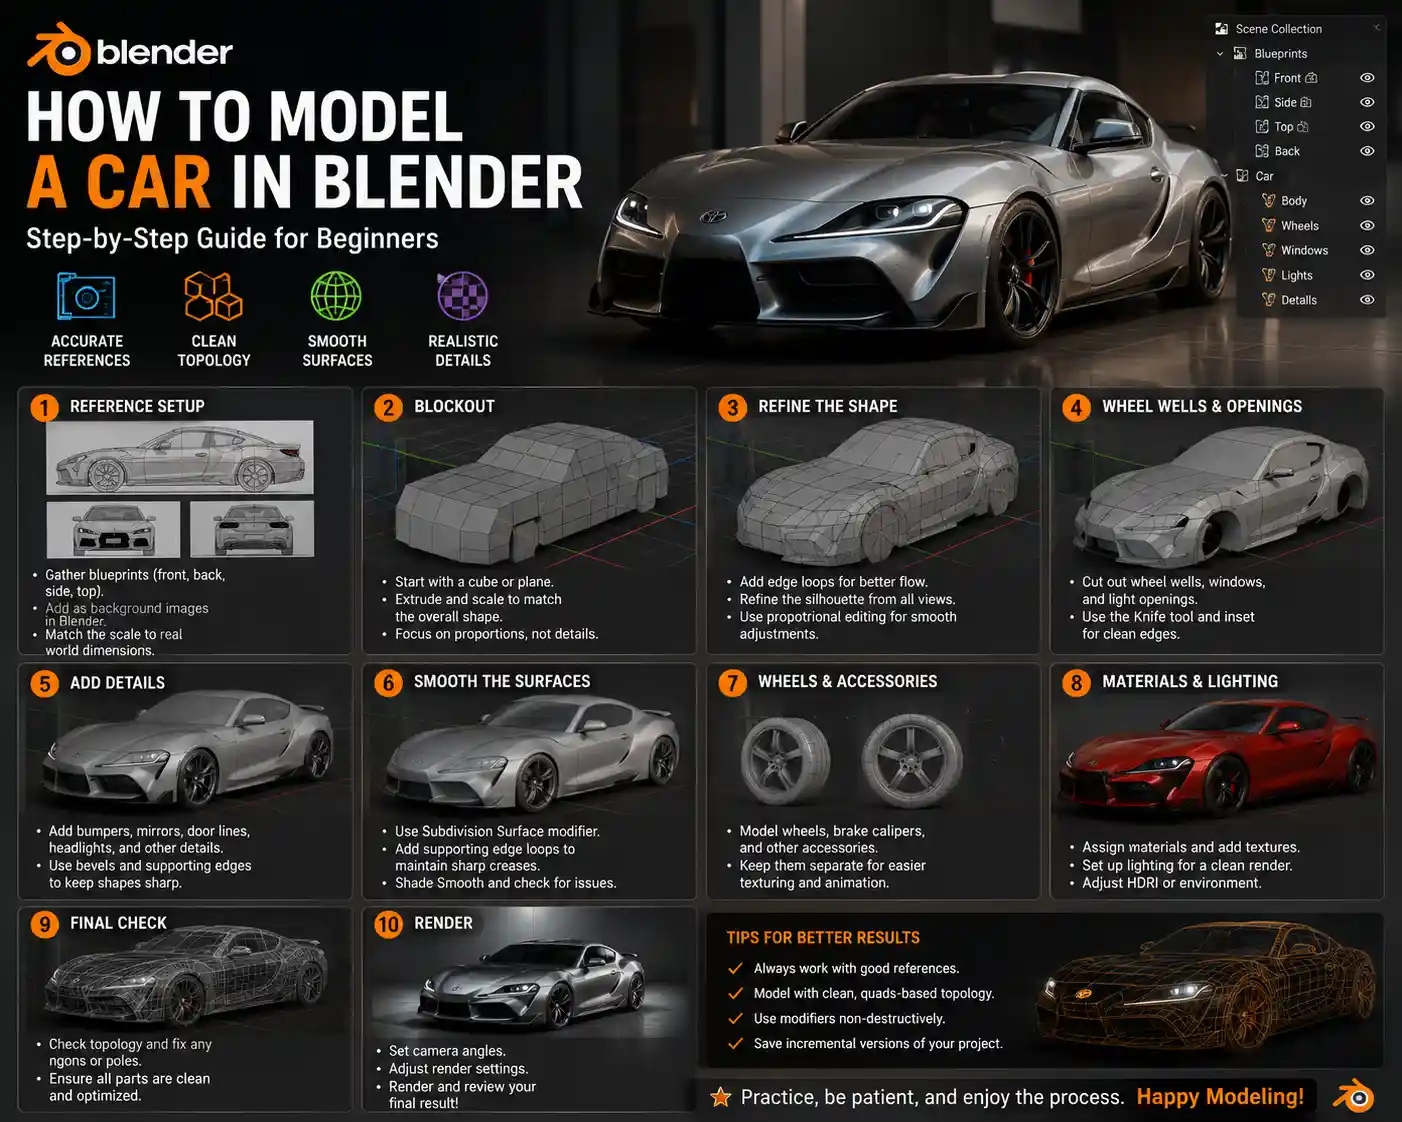
3D modeling a car is one of the most popular projects for new and intermediate Blender users alike. Cars combine clean, flowing curves, sharp geometric details, and recognizable proportions that make them both a satisfying challenge and a great test of core 3D modeling skills. Whether you want to create a asset for a video game, a render for a design portfolio, or just a fun hobby project, Blender’s free, open-source toolset has everything you need to build a detailed, production-ready car model from scratch. This step-by-step guide breaks the process down into manageable, actionable stages, even if you’re still relatively new to Blender.
Pre-Production: Reference Gathering and Blender Setup
Before you click “New File” in Blender, the most important work for a realistic car model happens off the 3D viewport. A great 3D car model lives or dies by its proportions, and you can’t get accurate proportions without high-quality reference images. Skipping this step almost always leads to a lopsided, unrealistic model that looks more like a toy than a real vehicle, no matter how much detail you add later.
Finding the right reference images
Not all references are created equal. You need orthographic (straight-on) views of the car from the front, back, side, and top to use as a background template in Blender. If you’re modeling a specific production car, start with these sources:
- Official manufacturer press pages: Many automakers release high-resolution, straight-on images of new models that work perfectly as references.
- Online car catalogs: Sites like Car and Driver or Edmunds often publish clear studio shots from multiple angles.
- The Blueprints: This community-run site has free orthographic blueprints for thousands of classic and modern car models, pre-sized to match each other for easy use in Blender.
- 3D model marketplaces: If you can’t find a free blueprint, you can often purchase a low-resolution reference pack for a few dollars that includes all four required views.
Aim for images that don’t have perspective distortion – that means the camera is pointed directly at the center of the car, not from above or below, and the sides of the car are parallel to the edge of the frame. If you only have photos shot from an angle, collect at least 10-15 photos from different angles to cross-check proportions as you model.
Setting up your reference background in Blender
Once you have your references, importing them into Blender as background images takes just a few minutes. Start with the default Blender scene, delete the default cube, then add four background images one for each orthographic view:
- Go to the Sidebar > View tab > Background Images and toggle the option on.
- Click “Add Image” and select your side view reference. Set the view to “Right” so the reference only appears when you’re in the right orthographic view.
- Repeat this process for the front, top, and back views, assigning each image to its corresponding view.
- Adjust the opacity of the images to around 70% so you can see your model over the reference, and scale the background to match the default Blender grid. A standard car is around 4.5 meters long, so adjust your reference size to match that real-world scale.
Adding reference images this way lets you check your work against the blueprint at every step, without having to switch between windows or apps. It’s a simple habit that eliminates 90% of the proportion errors new modelers make.
Blocking Out the Base Shape
Blocking is the process of creating a low-resolution rough version of your car that gets the overall proportions right before you add any fine details. There are two common approaches to blocking a car in Blender: box modeling (starting from a simple cube and sculpting the shape) and poly modeling (building the shape edge by edge). For beginners, box modeling is more intuitive, so we’ll focus on that method here.
Starting with the core volume
Add a plane to your scene, scale it to match the overall length and width of the car in your top reference, then subdivide it 3-4 times. This gives you enough geometry to start pulling the shape into the general car silhouette. Switch to edit mode, and start moving vertices to match the outline of the car from the top view: narrow the front end, widen the fenders, and taper the rear end to match your reference. Don’t worry about perfection here – you just need the basic silhouette.
Next, switch to the side view and pull the vertices up to match the height of the roof, the hood, and the trunk. The most common mistake new modelers make at this stage is making the roof too tall or the hood too short. Double-check against your reference: most modern passenger cars are between 1.4 and 1.6 meters tall, with the wheelbase (distance between the center of the front and rear wheels) taking up roughly 70-75% of the total car length. Keep adjusting until the overall volume matches the reference from every angle.
“Proportions are 90% of what makes a 3D car look realistic. You can add every door handle and stitch in the world, but if the wheelbase is wrong, everyone will notice it looks off.”
— Ian McGlasham, veteran Blender vehicle artist and creator of the popular Car Modeling Masterclass course
Cutting out the basic openings
Once you’re happy with the core volume, it’s time to cut out the wheel wells, window openings, and door gaps. Use Blender’s Knife Tool to trace the outline of the wheel wells on the front and rear fenders, then delete the faces inside the outline to leave an opening. Do the same for the windshield, side windows, and rear window. Leave the roof and pillars connecting the body to the frame – you can refine those edges later.
At this stage, you should have a rough, hollow block that clearly reads as a car from any angle. Before you move on, take a minute to check for symmetry. Almost all cars are perfectly symmetrical along their center line, so you can delete half the model, add a Mirror Modifier to the remaining half, and any changes you make to one side will automatically apply to the other. This cuts your work in half and guarantees perfect symmetry from the start.
Refining Curves and Adding Major Details
With your block done, it’s time to refine the shape and add the major features that make a car recognizable: fender flares, character lines, the hood scoop, door panels, and bumper edges. This is where you move from a rough block to a smooth, cohesive shape that matches your reference.
Smoothing and adding geometry
Before you start refining, add a Subdivision Surface Modifier to your base model. This modifier automatically smooths your geometry by adding extra polygons, turning your rough block into a curved shape. Start with 2 levels of subdivision – that’s enough smoothness for most projects without slowing down your viewport. Leave the mirror modifier on below the subdivision modifier so symmetry still works as you edit.
Now you can start working on the car’s signature lines. Most modern cars have one or two “character lines” running along the side of the body, from the front fender to the rear taillight. To add these lines, use Blender’s Loop Cut Tool to add two parallel edge loops along the path of the character line. The distance between the two loops determines how wide the crease will be. Then, pull the vertices between the loops in or out to match the depth of the line in your reference. Add extra edge loops around tight curves like wheel arches and the roof line to keep those edges sharp after subdivision.
Working on the key body features
Break down the car into sections and refine them one at a time to avoid feeling overwhelmed. Some of the most important sections to focus on include:
- Wheel arches: Most production cars have slightly flared wheel arches that curve out from the main body. Add extra edge loops around the opening, then pull the vertices out slightly to create the flare. Be sure to match the curve to your reference – some arches are more rounded, while others are almost square on performance models.
- Hood and trunk: The hood isn’t a flat surface – it usually has a slight crown in the center that slopes down toward the fenders. Use proportional editing to gently pull the center of the hood up to create this curve. The trunk usually has a small lip at the rear edge that helps with aerodynamics; add a loop cut near the edge and pull it up slightly to create that shape.
- Windshield and pillars: The A-pillars (the pillars on either side of the windshield) are a common source of proportion errors. They should slope backward with the windshield, and be thick enough to look structural but not so thick that they block the windows. Match the angle to your side reference, then smooth the intersection where the pillar meets the roof and the body.
- Bumpers: Modern bumpers are integrated into the body shape, with smooth transitions between the bumper and the fenders. Add edge loops along the bumper line, then shape the curve to match the front and rear references.
As you work, stop every 10-15 minutes and orbit the camera around your model to check the shape from all angles. It’s easy to get the side view perfect and realize the front view is totally wrong when you turn it around. The mirror modifier makes it easy to adjust one side and see the change across the whole car, so don’t be afraid to tweak proportions even at this stage.
Adding Fine Details and Components
Once the main body shape is perfect, it’s time to add the smaller details and separate components that bring the car to life. The level of detail you add depends on what you’re using the model for: a video game asset will need less detail than a portfolio render, but even for games, the right small details make the model feel realistic.
Body details
Start with the small details on the main body. Door handles are a good place to start: you can model a simple door handle by extruding a small rectangle from the door panel, then beveling the edges and adding a small indent for the handle recess. For side mirrors, add a separate object, block out the base that attaches to the door, then shape the mirror housing to match your reference. Door gaps and panel gaps are another small detail that makes a huge difference: add a 1-2mm indent along the edge of every panel (doors, hood, trunk, fenders) to separate them. Even if the gap is very small, it reads as a separate panel to the viewer, making the model feel more realistic.
Next, add the windows. Create a separate object for the windshield, side windows, and rear window, then shape each piece to fit the opening in the body. Slightly shrink the window so there’s a small gap between the window and the body, which matches how real cars are built. Add a slight curvature to the windshield – almost all windshields curve slightly side-to-side and top-to-bottom, so a flat plane will look fake.
Wheels and suspension
Wheels are one of the most important parts of a car model, and they’re surprisingly easy to get right. Start with a circle for the rim, extrude it to the right thickness, then add the spokes. For a basic alloy wheel, you can create one spoke, duplicate it around the center of the wheel, and use a Boolean Modifier to cut the spokes out of the rim. The tire is even simpler: add a torus shape, scale it to match the wheel size, and adjust the radius of the torus to get the right tire thickness. Be sure to add a slight bulge to the sidewall of the tire – real tires aren’t perfectly flat, they curve out slightly from the rim.
When placing the wheels, double-check the ride height: the gap between the top of the tire and the wheel arch should be between 5 and 10 centimeters for a standard production car. Performance cars often sit lower, with a smaller gap, while trucks and SUVs sit higher. If you’re going for extra realism, you can add small details like brake rotors, brake calipers, and suspension components inside the wheel well – these details will show through the spokes of the rim in renders, adding extra depth to your model.
Additional components
Depending on your project, you can add more details like headlights, taillights, grilles, and emblems. For headlights, block out the outer housing, add a separate transparent lens for the front, and add internal reflectors and bulbs inside. For grilles, you can use a plane with a procedural grid texture to create the holes, or model each slat individually for a higher-detail model. If you’re modeling the interior, you can add seats, a dashboard, a steering wheel, and gauge clusters – but that’s a whole separate project, so most modelers leave the interior solid for a simple exterior model.
Preparing the Model for Rendering or Export
Once you’re done modeling, there are a few final steps to prepare your car for rendering, 3D printing, or export to a game engine. These steps clean up your model and fix common issues that can cause problems later.
Checking for mesh errors
First, apply your modifiers to the model if you’re done editing. Apply the mirror modifier and the subdivision modifier first, then check for non-manifold geometry – this is geometry that has edges connected to more than two faces, or faces with no area, which can cause issues when smoothing or 3D printing. In Blender, you can check for non-manifold geometry by going to edit mode, clicking Select > Select All by Trait > Non Manifold. Blender will automatically select any problematic edges, so you can fix them by merging overlapping vertices or rearranging edges.
Next, check your polygon count. If you’re exporting the model for a video game, you’ll want to keep the total polygon count under 100,000 triangles for a moving car asset. If you’re creating a high-poly model for rendering or 3D printing, you can have up to several million polygons, but keep an eye on your file size – more polygons don’t always mean a better result, so remove any extra geometry that doesn’t contribute to the final shape.
Adding materials and UVs
If you’re planning to render your car in Blender’s Eevee or Cycles renderer, you’ll need to assign materials to different parts of the model. A basic car material setup includes:
- A glossy, slightly metallic car paint material for the body, with a small amount of roughness to match real clear coat.
- Glass material with low roughness and high transmission for windows.
- Rubber material with high roughness for tires and door seals.
- Metallic material for rims, trim, and exhaust tips.
- Plastic material for bumpers, mirror housings, and interior trim.
If you want to add custom textures like decals, racing stripes, or a custom paint job, you’ll need to UV unwrap your model first. UV unwrapping maps 2D texture coordinates to your 3D model, so textures display correctly. For a car, it’s best to UV unwrap each separate component (body, wheels, windows, bumpers) separately to get a clean, non-stretched UV layout.
Conclusion
Modeling a car in Blender is a challenging but incredibly rewarding project that teaches you core 3D modeling skills you can apply to almost any other project. The key to success is taking it step by step: start with accurate references, get your proportions right in the blocking stage, refine the main shape before you add fine details, and clean up your model before you render or export. It’s normal for your first few attempts to have small errors – even experienced modelers spend hours tweaking proportions and refining curves to get a perfect result. With practice, you’ll be able to model any car you want, from a classic Mustang to a modern hypercar, and end up with a model you can be proud to add to your portfolio or use in your next project.