
If you’ve just downloaded Blender and spent your first weekend experimenting with 3D modeling, you’ve probably hit a familiar wall: your clean mesh looks great, but it feels lifeless without the right texture. A wooden table should feel worn, a brick wall should show weathering, and a fabric sofa should have that subtle weave that makes it look real. The good news is you don’t need to pay for expensive texture packs or learn advanced photo editing to get professional-looking results. Thousands of high-quality free textures are available online for Blender beginners, and using them is simpler than you might think. This guide will walk you through everything you need to know to find, download, import, and use free textures to level up your 3D projects, no budget required.
What Are Textures, and Why Do They Matter in Blender?
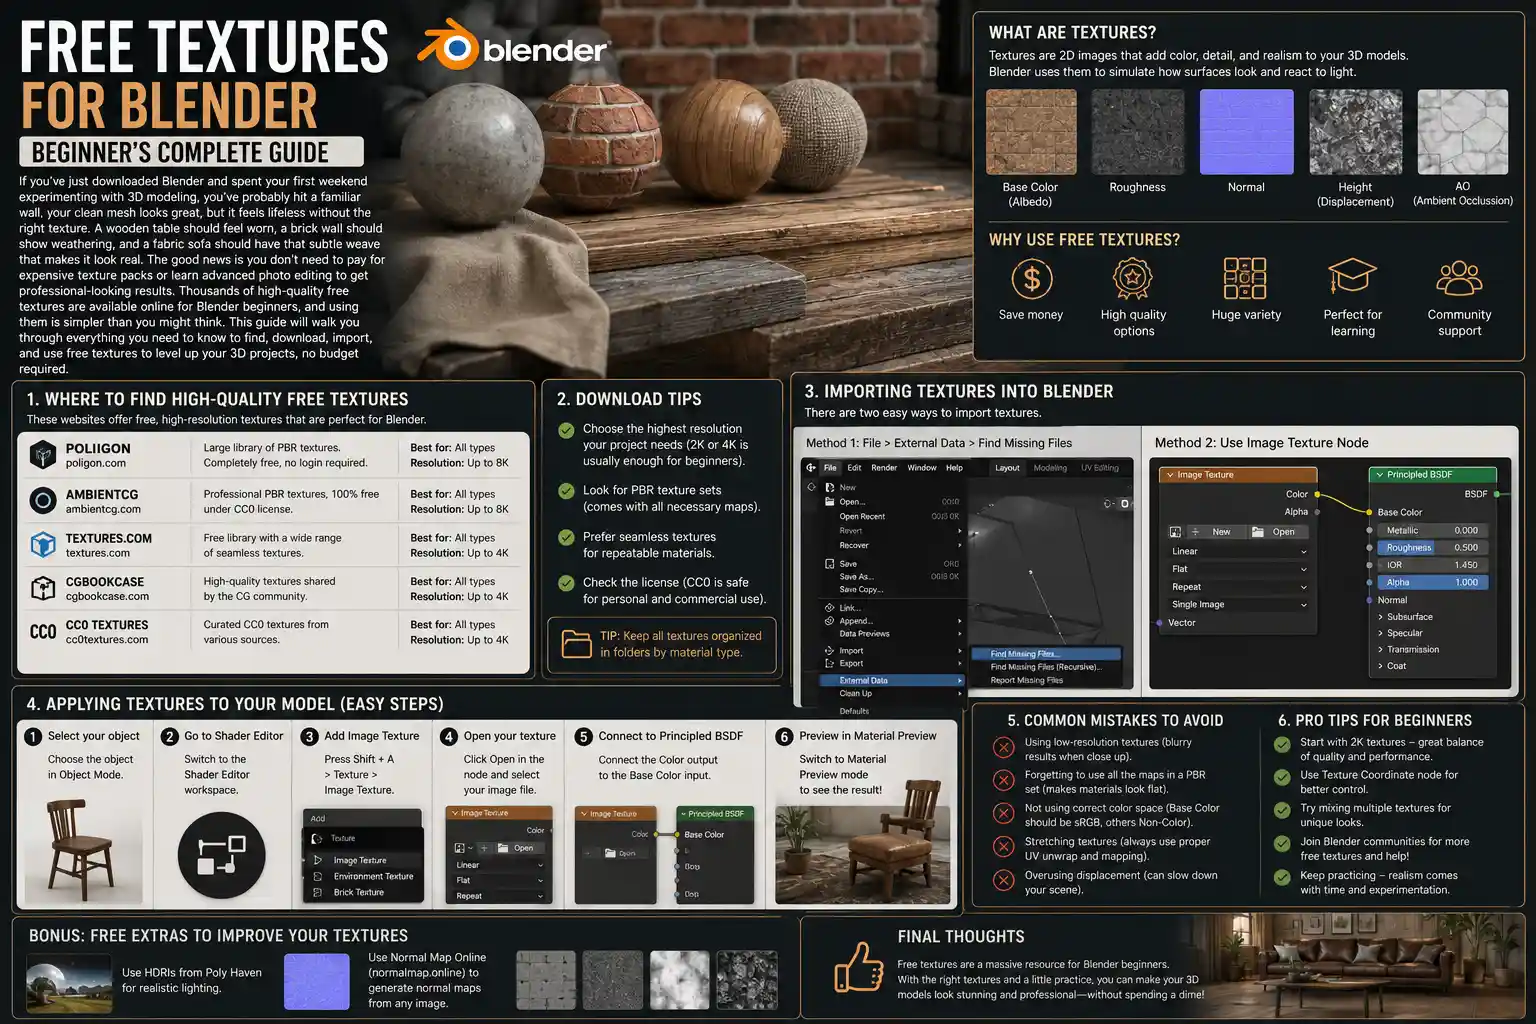
If you’re new to 3D design, you might be wondering what exactly a texture does, and how it differs from other Blender settings like materials. Put simply, a texture is a 2D image that you wrap around a 3D mesh to add surface detail, color, roughness, and other physical properties. A basic material might give your mesh a flat brown color, but a wood texture adds grain, knots, and subtle color variations that make it look like real wood. Textures don’t just change how an object looks, either: they can change how it reacts to light, how rough or smooth it feels, and even how transparent or bumpy it is.
For beginners, textures are the fastest way to go from a basic, beginner-looking model to a render that looks polished and professional. A $2000 3D artist’s portfolio relies on good textures just as much as a beginner’s first hobby project, and the difference between a bad texture and a good texture can be the difference between a render that looks fake and one that looks like a photo. The rise of PBR (physically based rendering) workflows has made textures even more accessible: modern PBR texture packs come with all the separate maps you need to get realistic lighting and surface detail, pre-organized and ready to drop into Blender.
Common Texture Map Types You’ll Use in Blender
As you start downloading free textures, you’ll notice most packs come with multiple image files, each with a different suffix. These are called maps, and each one controls a different property of your material. For beginners, you don’t need to memorize all of them right away, but these are the most common you’ll encounter:
- Albedo (or Base Color) Map: This is the base color of your texture, without any shading or lighting. It’s the starting point for almost every material.
- Normal Map: Adds small-scale bump and detail to your surface without requiring you to add extra geometry to your mesh. This is how you get subtle details like brick mortar or fabric weave without slowing down your project.
- Roughness Map: Controls how rough or smooth a surface is. Rough surfaces scatter light (like unpolished wood), while smooth surfaces reflect light clearly (like glass or polished metal).
- Metallic Map: Defines which parts of the surface are metal and which are non-metal, which helps Blender calculate accurate reflections.
- Ambient Occlusion Map: Adds subtle shadowing to cracks and crevices, which makes your texture look more detailed and grounded.
Most free PBR texture packs will include all of these maps, ready to use. That’s one of the biggest advantages of using pre-made free textures over creating your own as a beginner: all the work of organizing and processing the maps is already done for you.
Where to Find High-Quality Free Textures for Blender
Not all free textures are created equal. A quick Google search for “free textures” will turn up lots of low-resolution, watermarked, or incorrectly formatted files that will leave you frustrated. The good news is there are dozens of trusted websites that offer 100% free, high-resolution PBR textures that are legal to use for both personal and commercial projects. We’ve rounded up the best options for beginners, sorted by use case.
Top Free Texture Sites for Beginners
These sites are all beginner-friendly, with easy search, clear licensing, and no hidden paywalls for basic downloads:
- Poly Haven: Formerly known as HDRI Haven, Poly Haven is one of the most beloved resources for Blender users. All textures are 100% free, CC0 licensed (meaning you can do anything you want with them, no attribution required), and come in 1K, 2K, 4K, and even 8K resolutions. The library is curated, so you won’t find low-quality junk here, and the search function makes it easy to find exactly what you need, from grass to concrete to leather.
- TexturingXYZ: TexturingXYZ offers a huge library of free PBR textures, with new additions every month. Their free library has hundreds of options for everything from food to building materials, and all free textures are licensed for commercial use with attribution (which is easy to add if you need it). They also offer 8K resolution for most free textures, which is great for close-up renders.
- CCTextures: If you’re looking for a massive library with thousands of options, CCTextures is it. All textures are CC0, free for any use, and sorted by category for easy browsing. They have everything from animal fur to wall graffiti, and the site is totally ad-free for basic users.
- AmbientCG: AmbientCG has one of the largest collections of CC0 PBR textures online, with over 10,000 free options available. The site lets you customize the resolution before you download, so you don’t have to download a huge 8K file if you only need 1K for a background object. They also have a Blender add-on that lets you import textures directly into your project without leaving Blender, which is perfect for beginners.
- BlenderKit: BlenderKit is a popular add-on for Blender that has a huge library of free textures, materials, and even models. The free plan gives you access to thousands of free CC0 textures, and the add-on integrates directly into Blender so you can drag and drop textures onto your mesh with one click. The only catch is some of the premium content is behind a paywall, but the free library is more than enough for most beginner projects.
Understanding Licensing for Free Textures
One thing many beginners forget to check is the license of a texture before they use it in a project, especially if they plan to share or sell their work. Most of the sites listed above use CC0 licensing, which means the texture is released into the public domain, and you can use it for any purpose, personal or commercial, without asking permission or crediting the creator. Some sites use CC BY licensing, which requires you to credit the original creator when you use the texture. This is usually as simple as adding a line to your project credits like “Wood texture from Poly Haven”, so it’s not a big burden.
Always avoid textures that say “for personal use only” if you plan to use your project for anything commercial, including social media posts, commissions, or selling 3D models. Sticking to the trusted sites listed above will almost always keep you on the right side of licensing rules.
“The best texture for your project isn’t the most expensive one. It’s the one that fits your scene and doesn’t distract from the story you’re trying to tell. Free resources from trusted sites give beginners the same tools professionals use, without the barrier of cost.”
How to Import and Apply Free Textures to Your Model in Blender
Once you’ve downloaded your free texture pack, the next step is to get it into Blender and apply it to your model. If you’re using Blender 3.0 or later (which almost all beginners are now), the process is straightforward, even if you’ve never done it before. We’ll walk through the step-by-step process for the default Blender PBR workflow, which works for almost all free PBR textures you’ll download.
Step 1: Unpack Your Downloaded Texture Files
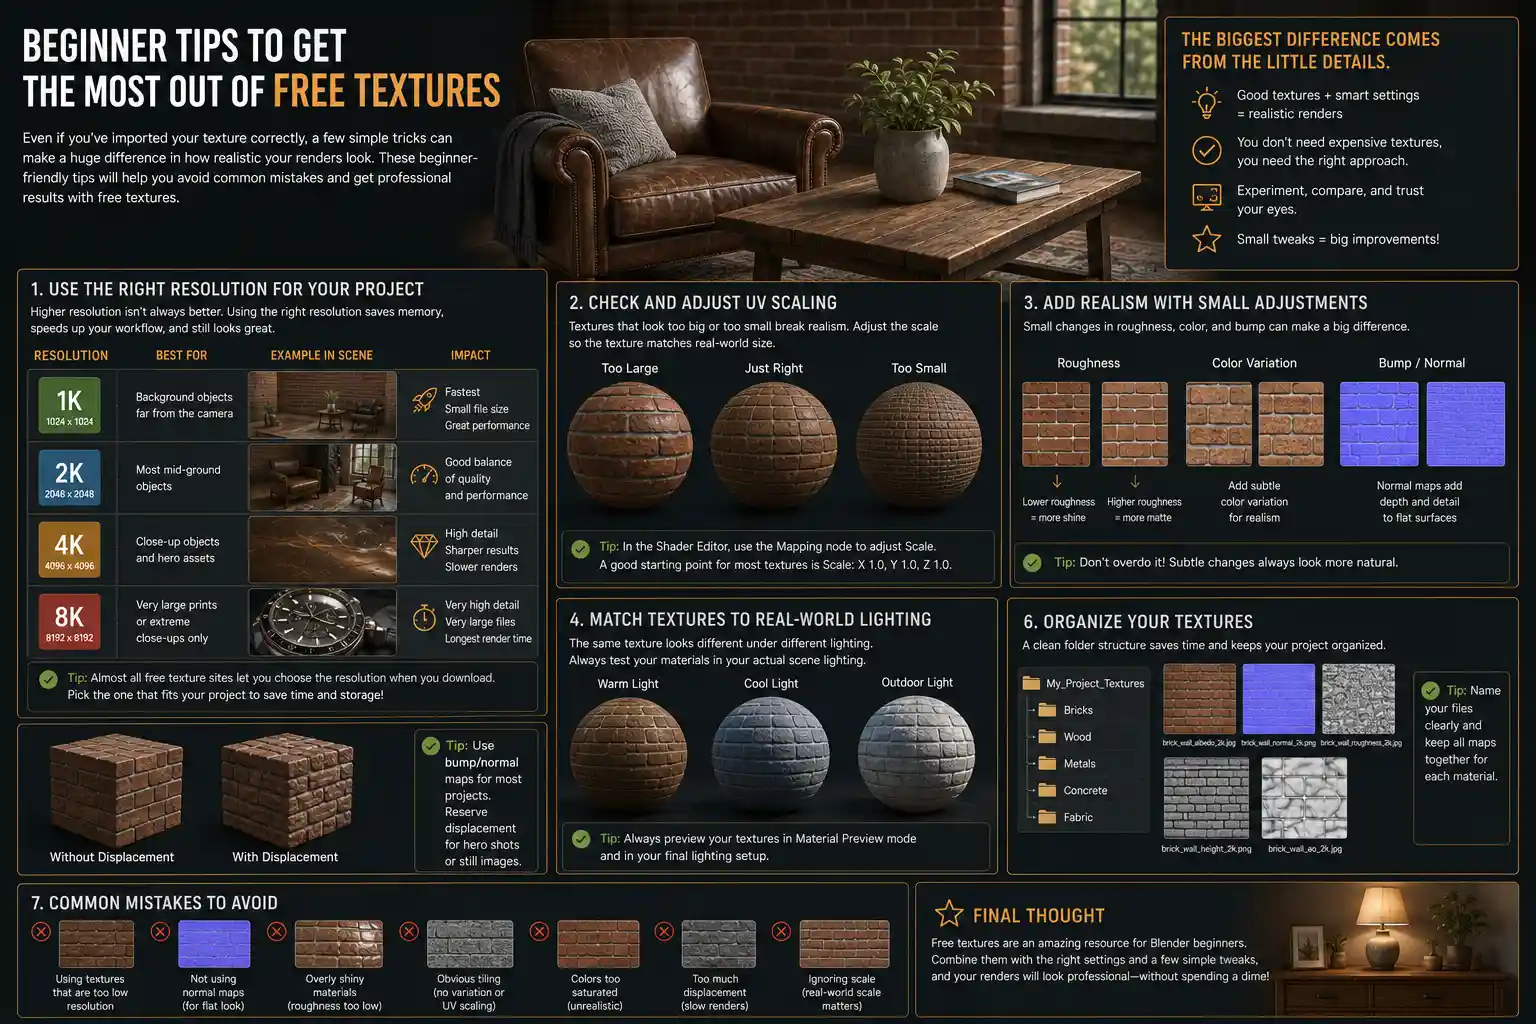
Most free texture packs download as a ZIP file. The first thing you need to do is unzip it to get to the individual image files. Create a dedicated folder on your computer for all your Blender textures, so you can always find them later. Organizing your textures by category (wood, stone, fabric, etc.) will save you time down the line when you’re working on multiple projects.
Step 2: Set Up Your Material in the Shader Editor
To add a texture, you’ll need to use Blender’s Shader Editor. Here’s how to get started:
- Select your 3D object in the viewport.
- Switch to the Shading workspace from the top menu bar. This will open the Shader Editor on the bottom half of your screen.
- Click “New” to create a new material. Blender will automatically add a default Principled BSDF shader node, which is the standard shader for PBR workflows. You don’t need to change this – it’s exactly what you need for most textures.
The Principled BSDF shader has input slots for every common texture map, which is why it’s so easy to connect your downloaded maps. All you need to do is add an Image Texture node for each map, and connect it to the corresponding input on the Principled BSDF node.
Step 3: Import Each Texture Map
Start with the base color (albedo) map first:
- Click Add > Texture > Image Texture from the Shader Editor menu to create a new Image Texture node.
- Click “Open” in the Image Texture node, then navigate to your unzipped texture folder and select the albedo/base color file.
- Drag the output dot from the Image Texture node to the input dot labeled “Base Color” on the Principled BSDF node. You’ll immediately see the color of your object update in the viewport.
Repeat this process for each additional map you want to add:
- For a normal map: Add a new Image Texture node, load the normal map file, then add a Normal Map node (Add > Vector > Normal Map) between the Image Texture node and the Normal input on the Principled BSDF. Connect the Image Texture output to the Color input of the Normal Map node, then connect the Normal output of the Normal Map node to the Normal input of the Principled BSDF.
- For a roughness map: Add a new Image Texture node, load the roughness file, then connect the output to the Roughness input on the Principled BSDF. Most roughness maps are grayscale: white is fully rough, black is fully smooth.
- For a metallic map: Add a new Image Texture node, load the metallic file, then connect the output to the Metallic input on the Principled BSDF. Again, this is usually grayscale: white is fully metallic, black is non-metallic.
- For an ambient occlusion map: You can multiply this with your base color to add subtle shadowing, or connect it to the Strength input of a Bump node for extra depth.
Step 4: Fix UV Unwrapping (The Most Common Beginner Mistake)
If you’ve applied your texture and it looks stretched, blurry, or warped, the problem isn’t your texture – it’s your UV unwrapping. UV unwrapping is the process Blender uses to wrap the 2D texture image around your 3D mesh. If your UVs are wrong, your texture will look wrong no matter how good the image is.
Fortunately, Blender has a quick automatic unwrap option that works great for most beginner models. To fix stretched textures:
- Go into Edit Mode on your mesh, select all faces by pressing A.
- Open the UV Editing workspace from the top menu bar.
- Click UV > Smart UV Project from the menu bar. Leave the default settings as they are, and click OK. Blender will automatically unwrap your mesh to fit the texture.
- Go back to the Shading workspace, and your texture should now look correctly proportioned.
For simple objects like a cube, sphere, or plane, Smart UV Project will almost always give you good results. As you get more advanced, you can learn to manually unwrap for better results, but automatic unwrapping is perfect for beginners just getting started with free textures.
Beginner Tips to Get the Most Out of Free Textures
Even if you’ve imported your texture correctly, there are a few simple tricks you can use to make your textures look even better, without any extra work. These tips are designed for beginners, and they’ll help you avoid the most common mistakes that make 3D renders look amateur.
Use the Right Resolution for Your Project
Many beginners think they need to use 8K resolution for every texture, but that’s just not true. 8K textures look great, but they’ll slow down your Blender project, make your file sizes huge, and increase your render time for no reason. A good rule of thumb is:
- 1K resolution: For background objects that are far from the camera
- 2K resolution: For most mid-ground objects in a scene
- 4K resolution: For close-up objects that are the focus of your render
- 8K resolution: Only for very large prints or extreme close-up shots
Almost all free texture sites let you choose your resolution when you download, so you can just pick the one that fits your project and save yourself the hassle of dealing with huge files.
Combine Textures for More Unique Results
One of the biggest advantages of using pre-made free textures is that you can mix and match them to create entirely new materials. If you find a leather albedo map you love but don’t like the roughness map, you can use the roughness map from a different leather texture to get exactly the look you want. You can even add a subtle grunge texture over a concrete wall to make it look more worn, or mix a wood grain texture with a painted color map to get painted wood.
Mixing textures is a great way to make your project feel unique, instead of using the same default free texture that hundreds of other beginners have used. It takes 30 extra seconds, and it can make a huge difference in how professional your render looks.
Adjust Values to Match Your Scene
Just because you connected the texture map doesn’t mean you can’t change the default values. If your roughness map makes your wood too rough, you can lower the overall roughness value in the Principled BSDF node to make it a little shinier. If your base color is too dark, you can add a Bright/Contrast node between your Image Texture and the Base Color input to lighten it up. Don’t be afraid to tweak the values to match the lighting and mood of your specific scene – free textures are just a starting point, not a finished product.
Use a Seamless Texture for Large Surfaces
When you’re texturing a large surface like a floor or a wall, you need a seamless (tileable) texture. Seamless textures are designed to repeat over and over without showing a visible seam between each copy. All the free texture sites listed above offer seamless textures by default, but it’s always good to check the description before you download. If you use a non-seamless texture for a large floor, you’ll see a visible line where the texture repeats, which will ruin the realism of your render.
Take Advantage of Blender Add-Ons to Speed Up Workflow
As we mentioned earlier, there are several great Blender add-ons that let you browse and import free textures without leaving Blender. Two of the best for beginners are:
- AmbientCG Add-On: Lets you browse the entire AmbientCG CC0 library and import textures with one click, automatically setting up all the shader nodes for you. This cuts out the entire process of adding nodes manually, which is perfect for beginners who are still learning the Shader Editor.
- BlenderKit Add-On: Comes pre-installed with Blender now, and the free plan gives you access to thousands of ready-to-use textures that you can drag and drop directly onto your mesh. All the nodes are already set up, so you don’t have to do any work to get started.
These add-ons are totally free, and they can save you a lot of time as a beginner. If you’re still struggling with the Shader Editor, using an add-on to set up your textures automatically is a great way to get good results while you learn how the process works.
Common Beginner Problems and How to Fix Them
Even if you follow all the steps correctly, you might run into a few common issues when you first start using free textures in Blender. Here are the most frequent problems beginners face, and how to fix them in two minutes or less:
My texture looks black in the viewport
This is one of the most common issues, and it’s almost always caused by one of two things. First, check that you’re in Texture Shaded mode in the viewport: click the dropdown menu in the top right corner of the viewport and select “Texture Preview” or “Rendered” to see your texture. If it’s still black, check the color space of your image texture. For everything except base color and albedo maps, Blender automatically sets the color space to “Non-Color” – that’s correct. For base color maps, you need to set the color space to “sRGB” (or “Filmic sRGB” in newer Blender versions). If your base color is set to Non-Color, it will look black or washed out. Just click the color space dropdown in the Image Texture node and change it to sRGB, and it will fix the problem.
My texture is blurry
Blurry textures are usually caused by one of three issues: you downloaded a low-resolution texture for a close-up object, your UVs are too stretched, or your texture filtering is set to too much blur. To fix this, first check the resolution: if you used a 1K texture for a close-up, download a 2K or 4K version. If the resolution is fine, re-unwrap your UVs with Smart UV Project to fix stretching. If that still doesn’t work, go to the texture properties panel, find the “Filtering” option, and switch from “Linear” to “Closest” for sharp pixels, or leave it on Linear but turn up the texture resolution in the render settings.
My texture doesn’t look realistic, even after I imported all the maps
If your texture looks flat or fake, the problem is usually not your texture – it’s your lighting. Textures rely on good lighting to look realistic. A PBR texture will only look right if you have correct lighting in your scene. Try adding an HDRI environment map (you can get free HDRIs from Poly Haven too) to get realistic ambient lighting, and adjust the strength of your lights to match the mood you want. Most beginners start with a single point light that creates harsh shadows, which makes even the best texture look flat. Adding a soft HDRI background will make your textures look dramatically better in almost every case.
Conclusion
Free textures are one of the best resources for Blender beginners, giving you access to professional-quality surface detail without the cost of premium texture packs. Whether you’re working on a hobby animation, a 3D print, a student project, or your first freelance commission, there are thousands of high-quality legal free textures available that will fit your needs. By sticking to trusted sites, learning the basic PBR workflow in the Shader Editor, and following a few simple best practices, you can get professional-looking results even as a new user.
The best way to get comfortable using textures is to practice: download a few different packs, experiment with mixing them, and tweak the settings to see what works for your scene. Over time, you’ll build up your own library of go-to free textures, and you’ll develop an eye for what looks good in different types of projects. You don’t need to spend hundreds of dollars on texture packs to make great 3D art – all the tools you need are already out there, waiting for you to download them.