
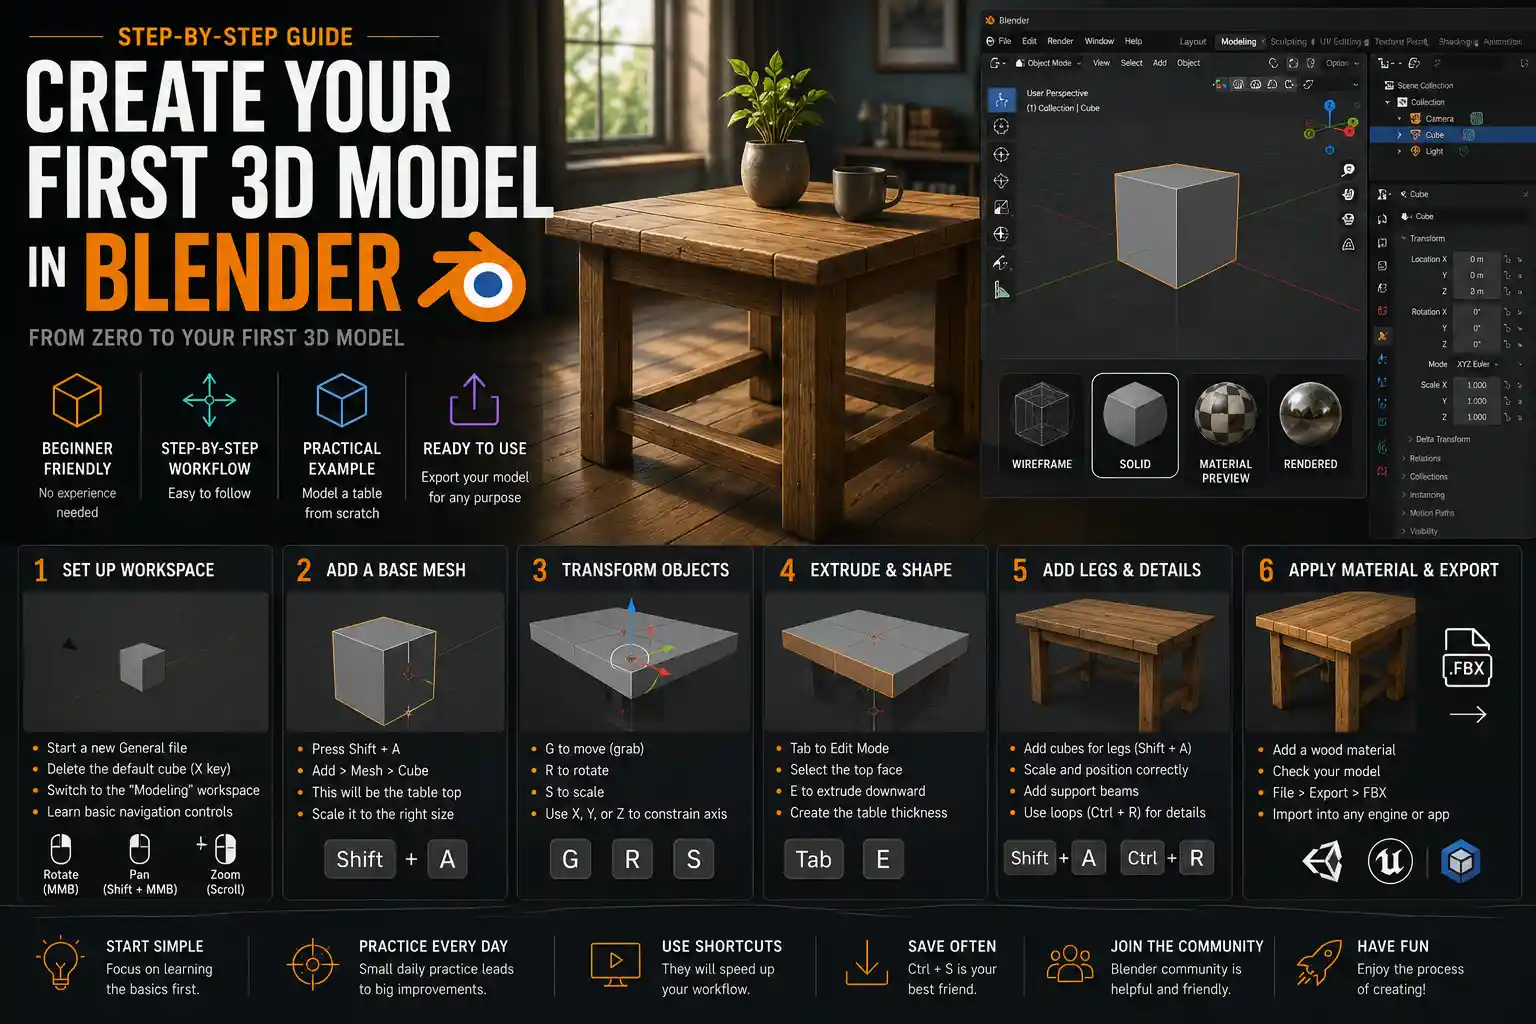
Whether you’re designing a 3D asset for a video game, building a prototype for 3D printing, or just experimenting with digital art, Blender is the ideal starting point. This free, open-source 3D creation suite has exploded in popularity over the last decade, boasting professional-grade tools that rival expensive paid software like Maya or 3ds Max. Best of all, it works on Windows, Mac, and Linux, so anyone with a computer can start creating. If you’ve never opened Blender before, the interface can feel overwhelming at first—with dozens of menus, viewport navigation tricks, and terminology that sounds like a foreign language. But breaking the process down into simple, manageable steps makes creating your first 3D model far less intimidating. This guide will walk you through every stage, from setting up your workspace to exporting your finished model, with practical tips to avoid common beginner mistakes.
Setting Up Your Blender Workspace for 3D Modeling
Before you start creating anything, it’s important to get your Blender workspace set up for efficient modeling. When you first open Blender, it loads a default scene with a cube, a light source, and a camera. While this is a good starting point, taking two minutes to adjust your layout will save you time and frustration later.
Resetting the Default Scene
First, let’s clear the default setup if you want to start completely fresh. Many new beginners keep the default cube and try to model over it, which can lead to messy file organization. To start clean: go to the File menu, hover over New, and select General. This will load a new default scene. If you want to delete the default cube to start from scratch, just right-click the cube object in the 3D viewport and select Delete, or press the X key on your keyboard and confirm deletion.
Choosing the Right Workspace
Blender comes with pre-configured workspaces designed for different tasks, like sculpting, animation, rendering, and modeling. At the top of the screen, you’ll see a row of tabs labeled with each workspace. Click the tab that says Modeling to switch to the modeling-focused layout. This layout splits your screen into two main areas: a large 3D viewport on the top for editing your model, and a properties panel on the right for adjusting object settings. The left sidebar includes a tool shelf where you can access common modeling tools like add, move, scale, and rotate.
Customizing Viewport Shading
Viewport shading controls how your model is displayed in the 3D viewport, and switching between modes can help you check your work as you model. There are four main shading modes you’ll use regularly, accessible via a small dropdown menu in the top right corner of the viewport:
- Wireframe: Displays only the edges of your model, so you can see through to the back and check your geometry easily. This is great for checking for overlapping faces or messy topology.
- Solid: Displays solid objects with basic lighting. This is the default shading mode, and it’s fast enough for everyday modeling even on slower computers.
- Material Preview: Shows any materials or textures you’ve added to your model, so you can get a rough idea of how it will look when rendered.
- Rendered: Uses Blender’s real-time Eevee or Cycles render engine to display a final-quality preview. Use this sparingly while modeling, as it can slow down your workflow.
Most beginners stick to Solid mode for most of their modeling process, switching to Wireframe occasionally to check their work. For most simple models, this balance of speed and visibility works perfectly.
Mastering Basic Blender Controls and Object Creation
Before you dive into editing shapes, you need to get comfortable with Blender’s core navigation and object controls. Unlike 2D drawing software, Blender operates in three-dimensional space, so you’ll need to learn how to pan, zoom, and rotate your view to work on any part of your model.
Core Viewport Navigation
If you’re using a mouse with a scroll wheel, Blender’s navigation is intuitive once you memorize these three core controls:
- Rotate the view: Hold down the middle mouse button (scroll wheel) and drag your mouse to rotate the view around your model. This is the most used navigation control, so practice it until it feels natural.
- Zoom in and out: Scroll the mouse wheel up to zoom in, and down to zoom out. If you don’t have a middle mouse button, you can hold
Ctrland the right mouse button to zoom instead. - Pan the view: Hold
Shiftand the middle mouse button, then drag to pan the view without rotating. This is useful for moving your view to a different part of the scene without changing your angle.
To focus your view on a specific object, just select the object by clicking it, then press the Period key on your numpad. This will zoom the viewport right to your selected object, which is a huge time saver when working on large scenes.
Adding Basic Meshes
All 3D models in Blender start with a base mesh—a simple primitive shape that you’ll edit to create your final model. Blender comes with a library of basic meshes you can add to your scene with just a few clicks. To add a base mesh, press Shift + A on your keyboard to open the Add menu, then hover over Mesh to see the list of available primitives. Common starting primitives include:
- Cube: Great for blocky objects like buildings, furniture, or character basemesh blocking
- Sphere: Perfect for round objects like balls, planets, or heads
- Cylinder: Used for pipes, candles, tree trunks, and cylindrical objects
- Plane: A flat square often used as a base for landscape modeling or as a background
For this guide, let’s create a simple wooden table as our example model. Add a cube as your base mesh for the table top—this will give you a solid block to work from.
Transform Objects: Move, Scale, Rotate
The three core transformation tools are the foundation of any modeling work in Blender. You can access all three from the left toolbar, but using keyboard shortcuts will speed up your workflow dramatically:
- Move: Press
G(short for "grab") to activate the move tool. Click once to confirm the move, or pressEscto cancel. You can constrain movement to a single axis by pressingX,Y, orZafter activating the tool. For example, if you pressGthenZ, you can only move the object up and down, which prevents accidental movement in other directions. - Scale: Press
Sto activate the scale tool. Drag your mouse to make the object bigger or smaller, then click to confirm. To scale only on one axis, pressX,Y, orZafter pressingS. For our table example: after adding a cube for the table top, pressSthenZto scale it down on the Z axis, turning the thick cube into a thin, flat table top. Then pressSagain to scale the whole thing up to a more realistic table size. - Rotate: Press
Rto activate the rotate tool. Like the other tools, you can constrain rotation to a single axis by pressingX,Y, orZafter activating.
After you’ve sized your table top, add four more cubes for the table legs. Move and scale each leg to fit at the four corners of the table top. Once you’re done, you’ll have a simple block-out of your table. This stage of modeling is called blocking, and it’s how you establish the overall size and shape of your model before you add fine details.
Editing Meshes with Blender’s Edit Mode
Blender has two main interaction modes for objects: Object Mode, where you can move, scale, and rotate entire objects, and Edit Mode, where you can edit the individual vertices, edges, and faces that make up your mesh. This is where you’ll refine your base mesh into a detailed final model. To switch between modes, use the dropdown menu in the top left corner of the 3D viewport, or just press Tab on your keyboard to toggle back and forth quickly.
Understanding Vertices, Edges, and Faces
All polygonal 3D meshes are made of three core components, and you can select each of them in Edit Mode using the selection buttons in the top left of the viewport:
- Vertices: The individual points that define your mesh. A vertex is just a point in 3D space, and when you connect multiple vertices, you get edges.
- Edges: The straight lines between two vertices.
- Faces: The flat polygons formed when three or more edges connect together. Most models use four-sided faces (quads) for clean topology, which makes smoothing and editing easier later on.
To select a component, just click it. Hold Shift to select multiple components at once. For example, if you want to move the top edge of your table leg to make it shorter, just switch to Edit Mode, select edge selection, click the top edge of the leg, press G, and drag it down.
"The biggest mistake new 3D modelers make is adding too much detail too early. Focus on getting the big shapes right first, then add small details once the overall form is perfect. A great model with bad proportions is still a bad model, no matter how many fine details you add."
Essential Edit Mode Tools for Beginners
You don’t need to master every Blender tool to create great models. These five core tools will cover 90% of what you need for most beginner projects:
- Extrude: Extrusion lets you pull a new face out of an existing face to add length or volume. For example, if you want to add a drawer to your table, just select the front face of the table top, press
Eto extrude, and drag it forward to create the drawer shape. This is one of the most used tools in all of modeling, so it’s worth practicing. - Inset: Inset creates a smaller, inset face inside an existing face, which is perfect for things like drawer fronts, picture frames, or window openings. To use it, select a face, press
I, then drag your mouse to adjust the size of the inset. - Loop Cut: A loop cut adds a new edge loop (a continuous line of edges) all the way around your mesh. This is useful for adding extra geometry where you need it, like for adding a bend to a straight leg or creating a rounded corner. To add a loop cut, press
Ctrl + R, hover your mouse over the edge where you want to add the cut, scroll your mouse wheel to adjust the number of cuts, then click to confirm. - Bevel: Bevel softens sharp edges by cutting off the corner and adding a new sloped edge. Almost all real-world objects have slightly rounded edges, so adding bevels makes your model look much more realistic. To use it, select the edges you want to bevel, press
Ctrl + B, then drag your mouse to adjust the size of the bevel. Scroll your mouse wheel to add more segments to the bevel for a smoother curve. - Knife Tool: The knife tool lets you cut new edges anywhere on your mesh, which is useful for adding custom shapes or cutting openings. Press
Kto activate it, then click and drag to draw your cut line, and pressEnterto confirm.
Back to our table example: let’s add a bevel to the top edge of the table to make it look more realistic. Select the entire table top object, press Tab to enter Edit Mode, switch to edge selection, and select the four outer edges of the table top. Press Ctrl + B, drag your mouse to make a small bevel, scroll up once to add one extra segment, then click to confirm. Suddenly your sharp, blocky table top looks like a real piece of wood.
Checking for Common Modeling Errors
As you edit your mesh, it’s easy to accidentally create errors that will cause problems later when you smooth, 3D print, or render your model. Get in the habit of checking for these common issues as you work:
- Non-manifold geometry: This is geometry that doesn’t have a clear inside and outside, like three faces sharing a single edge or an open edge where a face should be. Non-manifold geometry will break smoothing and 3D printing exports. To check for it, go to Select > Select Non-Manifold in Edit Mode, and Blender will automatically select all problematic geometry for you to fix.
- Overlapping faces: Two faces occupying the same space can cause rendering glitches. Switch to Wireframe shading mode and orbit around your model to check for overlapping edges or faces.
- Extra vertices: Unneeded vertices that don’t contribute to the shape of your model just increase file size and make editing harder. Delete any extra vertices you don’t need by selecting them and pressing
X> Delete Vertices.
Adding Details, Materials, and Adjustments
Once you’re happy with the overall shape of your model, it’s time to add fine details and make it look finished. For many projects, this step is what turns a basic block model into something that looks realistic and professional.
Adding Fine Details
For simple models like a table, you don’t need a lot of fine details, but small touches make a big difference. For example, you can add a small chamfer to the bottom of the table legs, add cutouts for handles on the drawers, or add a subtle curve to the table top. If you want to add more organic details like wood grain or carved patterns, you can use either subdivision surface modeling for high-poly details, or texture mapping to add details to a low-poly model without increasing polygon count.
If you’re new to modeling, stick to adding only details that are necessary for your use case. If you’re 3D printing the table, you’ll need to model all the details physically. If you’re just creating a render for a digital art piece, you can add most fine details via textures, which is much faster.
How to Add and Assign Materials
Materials control how your model looks when rendered—they define the color, roughness, reflectivity, and other surface properties. Adding a material to your model in Blender is straightforward:
- Select your object in Object Mode, then go to the Properties panel on the right side of the screen and click the red sphere icon to open the Material Properties tab.
- Click the New button to create a new material. Blender will give it a default name, but you can rename it to something descriptive like "Wood_Table_Top" to keep your file organized.
- Adjust the material settings: for our wooden table, set the Base Color to a warm brown, and adjust the Roughness to around 0.7–0.8, which gives it a matte, natural wood look. If you wanted a glossy table, you’d lower the roughness value to make it more reflective.
- If you have multiple objects with different materials (like a metal table leg and a wood table top), repeat this process for each object, or assign different materials to different faces of the same object in Edit Mode.
Blender also lets you import image textures to add more realism. For example, you can download a free wood texture image online, then add it as a Base Color texture to your material to get realistic wood grain. For beginners, though, starting with a simple solid color material is a good way to get comfortable with the process before adding textures.
Smoothing Your Model
Most 3D models look blocky by default, because Blender displays mesh faces as flat. To make your model look smooth, you can use Blender’s automatic smoothing. Select your object, go to the Object Data Properties tab (the green triangle icon) in the Properties panel, and check the box that says Auto Smooth. This will smooth out the edges while keeping sharp edges where you want them, which is perfect for models like our table. For more dramatic smoothing, you can add a Subdivision Surface modifier: go to the Modifier Properties tab (the wrench icon), click Add Modifier, and select Subdivision Surface. Increase the Levels of Subdivision to 2 or 3, and Blender will automatically divide your mesh into smaller faces to create a perfectly smooth shape.
Exporting Your Finished 3D Model
Once your model is complete, you need to export it in the right file format for whatever you plan to use it for. Blender supports dozens of export formats, so choosing the right one depends on your end goal:
Common Export Formats and Their Uses
These are the most common export formats you’ll use as a beginner:
- GLB/GLTF: This is the standard format for web-based 3D, AR, and VR projects. It keeps all your model’s geometry and materials in a single file, which makes it easy to share and use online.
- OBJ: A universal format that works with almost every 3D software, including 3D printing slicers, game engines, and other modeling programs. It’s a good choice if you need to share your model with someone who uses a different 3D tool.
- STL: The standard format for 3D printing. If you plan to print your model, you’ll almost always export it as an STL file. Note that STL only stores geometry, not materials, so don’t use this if you need to keep your color or texture information.
- FBX: The most common format for game development and animated models. If you’re importing your model into Unity or Unreal Engine, FBX is usually the best choice.
- PNG/EXR (for images): If you just need a rendered image of your model to share, you’ll render it out and export it as a PNG or JPEG image file.
Steps to Export Your Model
Exporting your model from Blender only takes a few steps:
- In Object Mode, select all the objects you want to export. If you’re exporting the entire scene, you can just press
Ato select everything. - Go to the File menu, then hover over Export to see the list of available export formats.
- Select the format you need from the list. A panel will open on the left side of the screen with export options. For most cases, the default options work fine, but double-check that you’ve checked the box for Selection Only if you only want to export your selected objects, not the entire scene.
- Choose where you want to save the file on your computer, name your file, and click the Export button in the top right corner.
One common beginner mistake here is forgetting to pack external textures when exporting a file that includes materials. If you’re exporting a GLB or FBX file with custom textures, go to File > External Data > Pack Resources before exporting. This will embed all your texture images into the export file, so the materials will show up correctly when you open the file in another program.
Conclusion
Creating your first 3D model in Blender can feel like a steep learning curve at first, but breaking the process down into small, manageable steps makes it accessible to anyone. Start by setting up your workspace and getting comfortable with navigation, block out your basic shapes using primitive meshes and transformation tools, refine your model in Edit Mode with core tools like extrude and bevel, add materials and details to finish it off, then export it in the right format for your project. The most important thing for new beginners is to start small: don’t try to create a hyper-realistic character or a complex architectural model as your first project. Start with something simple like our table example, practice the core tools, and gradually work your way up to more complex projects. Blender’s community is one of the largest and most helpful in the world, with thousands of free tutorials and resources available if you get stuck. With a little practice, you’ll be creating professional-quality 3D models in no time.