
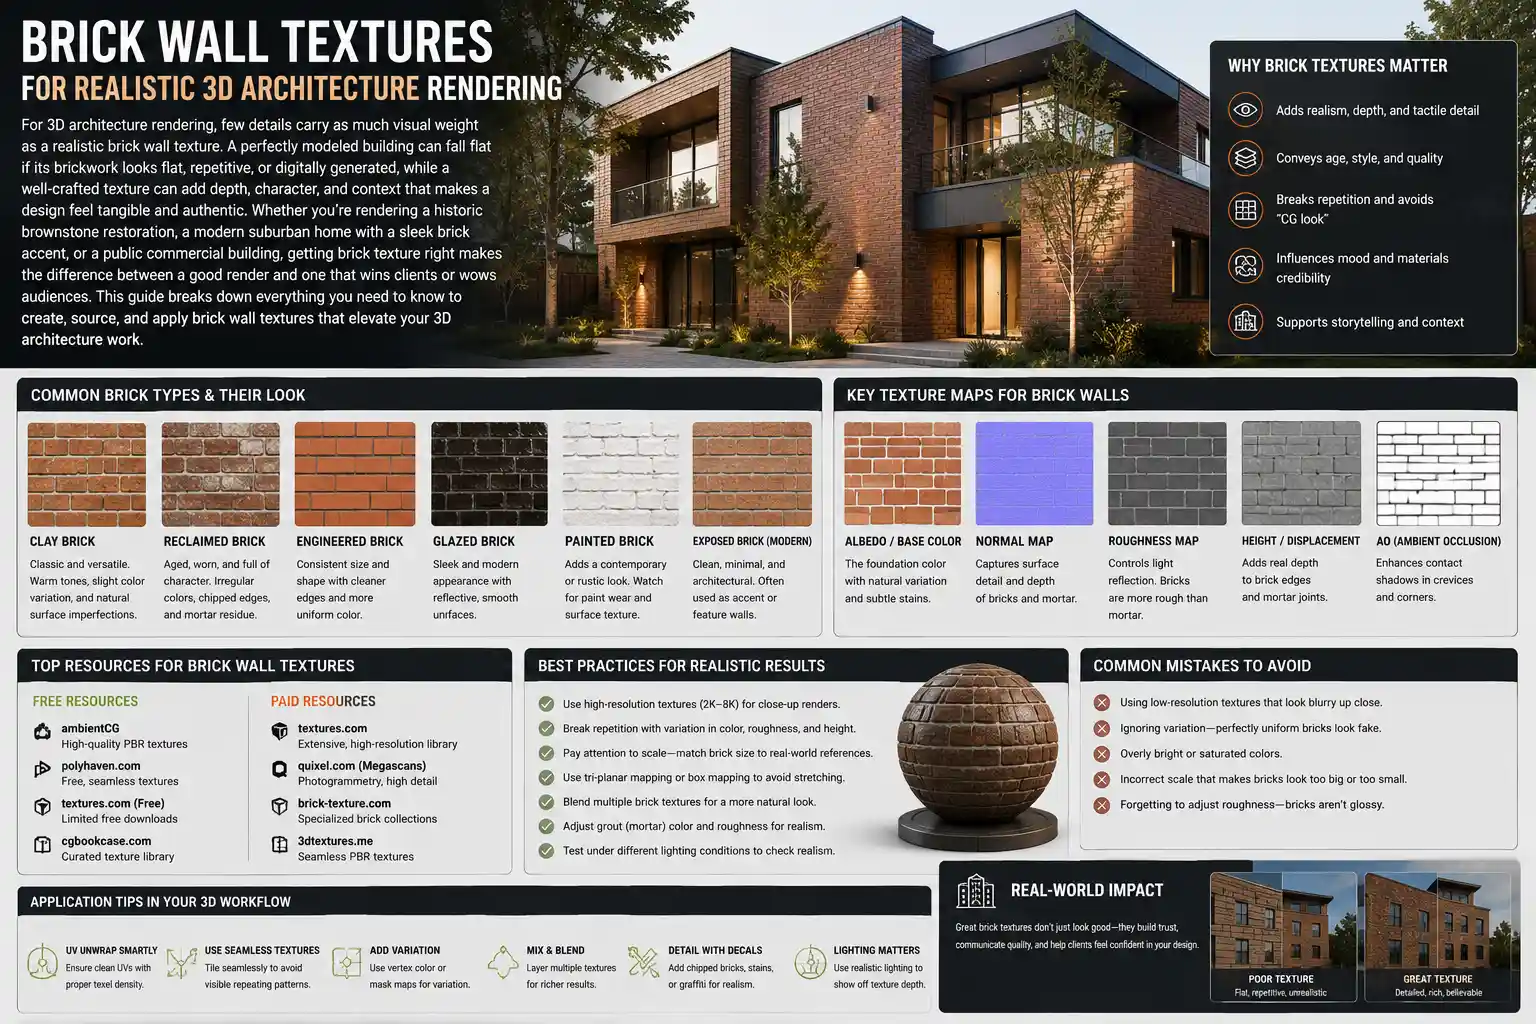
For 3D architecture rendering, few details carry as much visual weight as a realistic brick wall texture. A perfectly modeled building can fall flat if its brickwork looks flat, repetitive, or digitally generated, while a well-crafted texture can add depth, character, and context that makes a design feel tangible and authentic. Whether you’re rendering a historic brownstone restoration, a modern suburban home with a sleek brick accent, or a public commercial building, getting brick texture right makes the difference between a good render and one that wins clients or wows audiences. This guide breaks down everything you need to know to create, source, and apply brick wall textures that elevate your 3D architecture work.
Understanding the Role of Brick Texture in Architectural Visualization
Brick is one of the oldest and most widely used building materials in the world, with a history spanning thousands of years and regional variations that reflect local construction traditions. For architects and 3D artists, this diversity means brick texture does more than just fill a polygon surface—it communicates style, age, location, and budget. A rough, weathered red clay brick tells a story of a century-old urban building, while a uniform, matte white brick signals a contemporary minimalist design. Understanding this contextual role is the first step to choosing the right texture for your project.
Beyond storytelling, texture directly impacts the realism of a render. Unlike smooth materials such as glass or polished concrete, brick has inherent micro-variations that the human eye is trained to recognize. Every brick has slight differences in size, color, surface roughness, and chipping, and the mortar joints between bricks add their own depth and texture. When these details are missing or repeated unnaturally, viewers subconsciously register the render as fake, even if they can’t pinpoint why. A good brick texture accounts for these natural variations and interacts realistically with light, casting subtle shadows in mortar joints and catching highlights on raised brick edges.
Key functions of brick texture in rendering
- Contextual communication: Signals the building’s age, architectural style, and geographic location (e.g., yellow London stock brick vs. red Australian clay brick)
- Realism and immersion: Adds micro-detail that makes surfaces feel tangible rather than digitally generated
- Light interaction: Creates subtle shadow and highlight patterns that add depth to flat geometry
- Design emphasis: Can be used to highlight entryways, accent walls, or specific architectural features
It’s also important to distinguish between texture types for different use cases. In real-time architecture visualizations (such as interactive VR walkthroughs), you need optimized textures that balance quality with performance, while high-resolution still renders for print or marketing require 4K or 8K textures to hold up at large print sizes. Understanding your final output before you select or create a texture will save you hours of rework later.
Sourcing vs. Creating Custom Brick Wall Textures
When you need a brick texture for your project, you have two main options: sourcing a pre-made texture from a stock library or creating a custom one from scratch. Both approaches have advantages and drawbacks, and the best choice depends on your project timeline, budget, and specific requirements.
Pre-made Stock Textures: Pros and Cons
Pre-made textures are the most popular choice for most 3D artists, and for good reason. They’re fast to download, often low-cost or even free, and come in a huge range of brick types to suit most projects. High-quality stock sites like Poly Haven, TexturingXYZ, and Quixel Megascans offer physically scanned brick textures that already include all the required maps—albedo, roughness, normal, displacement, and ambient occlusion—so you can drop them straight into your scene with minimal adjustment.
That said, stock textures have limitations. The biggest issue is repetition. If you’re texturing a large facade, a single seamless stock texture will repeat across the surface, creating an obvious pattern that breaks realism. Even large seamless textures can show repetition on very big walls, and many cheaper stock textures are low-resolution or lack accurate micro-detail. They also can’t match custom brick patterns or specific regional brick types that your project calls for. For example, if your design uses a locally produced brick from a specific supplier in Perth, Australia, you’re unlikely to find an exact match in a generic stock library.
Creating Custom Photoscanned Textures
For projects that require absolute accuracy, creating your own custom texture via photogrammetry or photo-based texturing is the gold standard. This involves taking multiple high-resolution photos of a real brick wall (or individual bricks) and processing them into a usable texture set with all the required maps. Many large architecture firms do this when working on restoration projects, where matching the existing brickwork exactly is critical for planning approval.
Creating a custom texture doesn’t require a fancy studio setup. All you need is a digital camera or a high-resolution smartphone, a tripod, and free or low-cost processing software such as Agisoft Metashape, Blender, or Adobe Substance Designer. To get the best results, shoot the brick wall on an overcast day to avoid harsh shadows that can distort color data, and take multiple shots from different angles to capture depth information. For large walls, you can shoot multiple overlapping tiles and stitch them together to create a non-repeating texture that covers the entire facade without visible patterns.
Procedural Textures: A Flexible Middle Ground
Procedural textures, generated algorithmically in software such as Substance Designer or Blender’s Shader Editor, offer a flexible middle ground between pre-made stock and custom photoscanned textures. Instead of using a fixed image, procedural textures generate brick patterns, colors, and variations based on parameters you adjust. You can tweak brick size, color variation, mortar depth, weathering, and chipping to get exactly the look you need, and the result is inherently non-repeating, so you can cover any size surface without visible pattern repetition.
“Procedural brick textures are like having an unlimited brick yard at your fingertips. You don’t have to compromise on what’s available in stock libraries—you can dial in exactly the color variation, mortar joint width, and weathering your project needs.”
The learning curve for procedural texturing is steeper than downloading a stock texture, but the flexibility is worth it for many artists. Once you create a base procedural brick shader, you can reuse it for multiple projects, adjusting parameters to get a different look in minutes instead of starting from scratch. Procedural textures also are resolution-independent, so you can render at any size without pixelation, which makes them ideal for large-scale architectural prints.
Essential Texture Maps for Realistic Brick Rendering
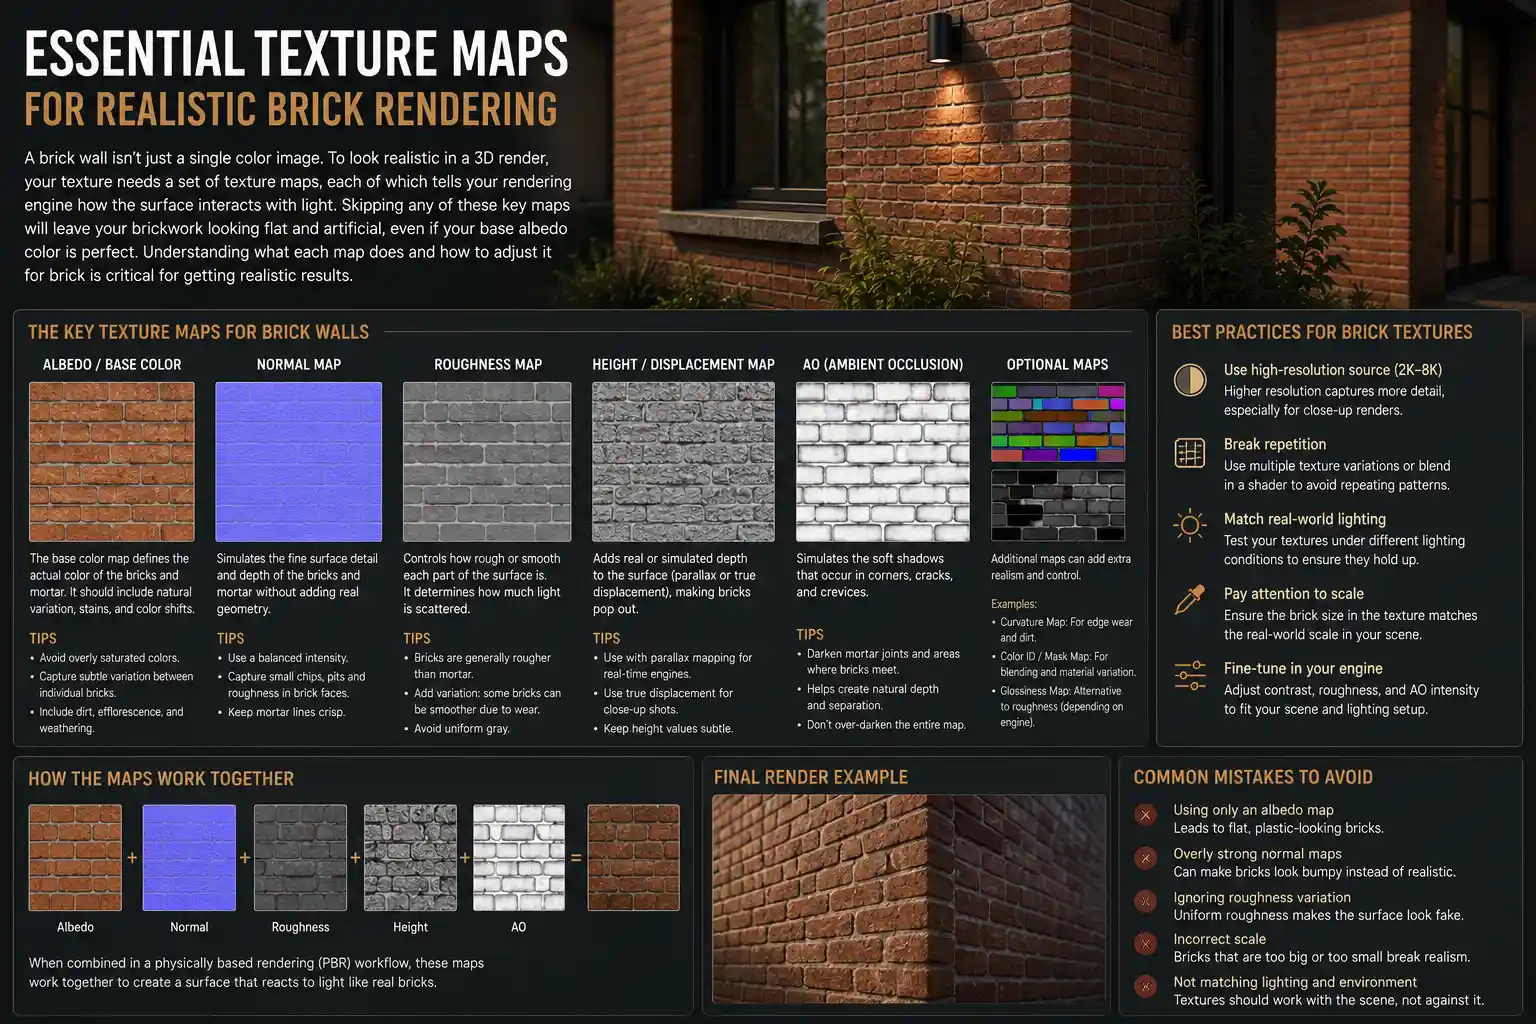
A brick wall isn’t just a single color image. To look realistic in a 3D render, your texture needs a set of texture maps, each of which tells your rendering engine how the surface interacts with light. Skipping any of these key maps will leave your brickwork looking flat and artificial, even if your base albedo color is perfect. Understanding what each map does and how to adjust it for brick is critical for getting realistic results.
Albedo (Diffuse) Map
The albedo map is the base color texture that most people think of when they hear “brick texture.” It defines the base color of each brick and the mortar between them. For realistic brick, the albedo map needs natural color variation between individual bricks—no two bricks are exactly the same color, even if they come from the same production batch. Cheap stock textures often have uniform brick color, which looks unnatural. Good albedo maps will have subtle shifts in hue and saturation from brick to brick, with minor stains or discoloration that you see on real brickwork.
Normal Map
A normal map adds micro-surface detail to your brick wall without requiring extra geometry. It simulates the bumps and indentations of brick by altering how light interacts with the surface, creating the illusion of depth in mortar joints and on rough brick faces. For brick, a good normal map is especially important because it creates the subtle shadowing inside mortar joints that makes the pattern pop. Without a normal map, even a perfect albedo map will look flat, because the rendering engine doesn’t know that the mortar is recessed below the brick face.
Displacement/Height Map
While a normal map simulates depth for small details, a displacement map actually modifies the geometry of your wall to create real depth. This is especially useful for close-up shots or high-resolution renders, where the difference between simulated depth (from a normal map) and actual depth (from displacement) is visible. For brick, displacement will create real indentations for mortar joints and real bumps on uneven brick faces, which cast real shadows that move correctly as your light source changes. For distant shots of large facades, a normal map is usually sufficient, but for hero shots or close-ups of entryways, displacement makes a dramatic difference in realism.
Roughness/Glossiness Map
The roughness map defines how shiny or matte the brick surface is. Most brick is relatively matte, but there’s natural variation: the face of a brick might be slightly rougher than the edges, and mortar is often more porous (and therefore rougher) than brick. Some modern brick finishes have a slight sheen, especially when wet, so the roughness map lets you adjust this. A common mistake new artists make is using a uniform roughness across the entire brick wall, but natural variation in roughness adds subtle detail that makes the surface feel real. For example, weathered brick might have areas that are smoother from decades of rain and exposure, while new brick has a uniform rough surface.
Ambient Occlusion Map
An ambient occlusion (AO) map adds darkening to crevices and cracks where light doesn’t reach easily. For brick, this means darkening the inside of mortar joints and any gaps between bricks, which adds depth and definition to the brick pattern. While most modern rendering engines can calculate baked ambient occlusion for your scene, having an AO map built into your texture adds an extra layer of depth that improves the final result, especially for real-time renders where dynamic AO can be performance-heavy.
If you’re sourcing scanned textures from a reputable library, all of these maps will be included and ready to use. If you’re creating your own, you’ll need to generate or export each map correctly for your rendering engine (Arnold, V-Ray, Blender Cycles, Unreal Engine, etc. all use slightly different map naming conventions, so check your software documentation to avoid mapping errors).
Best Practices for Applying Brick Textures to 3D Architecture Models
Even the highest-quality brick texture will look bad if it’s applied incorrectly to your 3D model. There are several common mistakes that artists make when texturing brick walls that break realism, but they’re easy to avoid with a few simple best practices.
Avoiding Visible Texture Repetition
Visible texture repetition is the most common mistake in brick rendering, and it’s one of the fastest ways to make a render look fake. When you tile a single seamless brick texture across a 20-meter-long facade, the repeating pattern becomes obvious to the human eye. There are several easy solutions to this problem:
- Use large non-repeating textures: For large facades, create or source a texture that’s at least twice the size of your wall, so you don’t have to tile it at all. For photoscanned walls, this means scanning a large enough area to cover the entire facade.
- Blend multiple textures: Use two or three different seamless brick textures with slightly different variations, and blend them together using a mask to break up the repeating pattern. This adds randomness that hides repetition.
- Add random variation with shaders: In most modern render engines, you can use a shader to randomize the rotation, scale, and color of individual bricks. This breaks up repetition without requiring multiple texture maps.
- Use trim sheets for modular buildings: For modular architecture projects, create a trim sheet with multiple unique brick sections that you can swap out for different modules to avoid repetition.
Matching Brick Pattern to Architectural Style
Not all brick walls are laid in the same pattern, and using the wrong pattern for your architectural style is a common mistake that will stand out to anyone familiar with architecture. Common brick patterns include:
- Stretcher bond: All bricks are laid lengthwise, with each brick centered over the joint below it. This is the most common pattern for modern residential and commercial buildings.
- Running bond: Similar to stretcher bond, but often used for thicker walls with varying brick orientations.
- Flemish bond: Alternates stretchers (lengthwise) and headers (endwise) in each course, creating a decorative pattern common in historic British and colonial architecture.
- English bond: Alternates complete courses of stretchers and courses of headers, another common historic pattern.
- Basket weave: Two bricks are laid side by side, alternating direction each course, creating a woven pattern often used for garden walls and paths.
Before you apply your texture, confirm that the pattern matches the architectural style of your building. A 19th-century townhouse designed with Flemish bond will look wrong if you use a standard stretcher bond texture, and it will undermine the credibility of your render. If you’re using a procedural texture, it’s easy to adjust the pattern to match; if you’re using a stock texture, make sure to check the product description to confirm the pattern before you download.
Adding Real-World Imperfections and Weathering
Real brick walls are never perfect. Even new brick walls have minor chips, mortar smudges, and slight color variations, and older brick walls have stains, efflorescence (the white powdery deposit that leaches out of brick over time), cracked bricks, and areas of discoloration from moisture or pollution. Adding these subtle imperfections makes your render feel far more realistic than a perfectly uniform brick wall.
You don’t need to overdo it—subtlety is key. For a new building, you only need minor variations in brick color and a few small mortar smudges to break up perfection. For a historic restoration project, you can add more pronounced weathering, dark stains around downspouts where water runs down the wall, and a few cracked or missing bricks to match the existing structure. Even for modern new builds, adding a small amount of imperfection avoids the “plastic” look that plagues many beginner renders.
Adjusting Scale for Realism
Another common mistake is using the wrong scale for your bricks. Standard modular brick size varies by region: in the US, a standard brick is 203 x 92 x 57 mm (8 x 3 5/8 x 2 1/4 inches), while in the UK, a standard metric brick is 215 x 102.5 x 65 mm. If your brick texture is sized incorrectly, viewers will subconsciously feel that something is wrong with the render, even if they can’t name the issue. Always match the brick size to the regional standard and the specific brick type your project uses, and scale your texture accordingly to match the real-world dimensions of your 3D model.
Optimizing Brick Textures for Different Render Workflows
Different render workflows require different texture optimization, and what works for a high-resolution still render won’t work for a real-time interactive walkthrough. Tailoring your texture to your final output will ensure you get the best quality without sacrificing performance.
High-Resolution Still Renders and Large-Format Prints
For still renders that will be used for marketing, client presentations, or large-format prints, you need maximum resolution and detail. Use 4K or 8K textures, enable displacement mapping for close-up shots, and don’t worry too much about file size—you only need to render one frame, so even large textures won’t slow down your workflow too much. For very large facades, consider using a tiered approach: use a high-resolution texture for the foreground section of the wall that’s closest to the camera, and a lower-resolution tiled texture for the distant background to reduce render time without losing quality.
Real-Time Renders, VR, and Interactive Walkthroughs
For real-time workflows in Unreal Engine, Unity, or Enscape, performance is just as important as quality. Large 8K textures will slow down frame rates and cause lag in interactive walkthroughs, so you need to optimize. Use 1K or 2K textures for most walls, and compress texture files to reduce file size. Use normal maps instead of displacement mapping to add detail without adding extra geometry, and bake ambient occlusion into your lightmap to reduce the number of dynamic calculations the engine has to do per frame. For larger walls, use a texture atlasing to combine multiple small textures into one larger texture, which reduces draw calls and improves performance.
Outdoor vs. Indoor Brick Textures
You should also adjust your texture based on whether the brick wall is indoor or outdoor. Outdoor brick is exposed to the elements, so it has more weathering, color variation, and roughness than indoor brick. Indoor brick accent walls are usually cleaner and more uniform, with less discoloration and chipping. For exterior walls in wet climates, you can add a subtle wetness map to simulate damp areas near the ground that stay wet longer after rain, which adds a lot of realism for exterior renders.
Conclusion
Brick wall textures are a small but critical detail in 3D architecture rendering, and getting them right elevates the entire quality of your work. By understanding the contextual role of brick, choosing the right approach (sourced, custom, or procedural) for your project, including all the essential texture maps, and applying your texture with attention to scale, pattern, and natural imperfections, you can create brickwork that feels tangible, authentic, and true to your architectural design. Whether you’re working on a historic restoration or a modern new build, the key is to embrace the natural variation that makes real brick feel alive—avoid perfect uniformity, match the pattern and scale to the project, and tailor your texture optimization to your final output. With these practices in place, your brick walls will add depth and character to your renders that clients and audiences will notice and appreciate.