
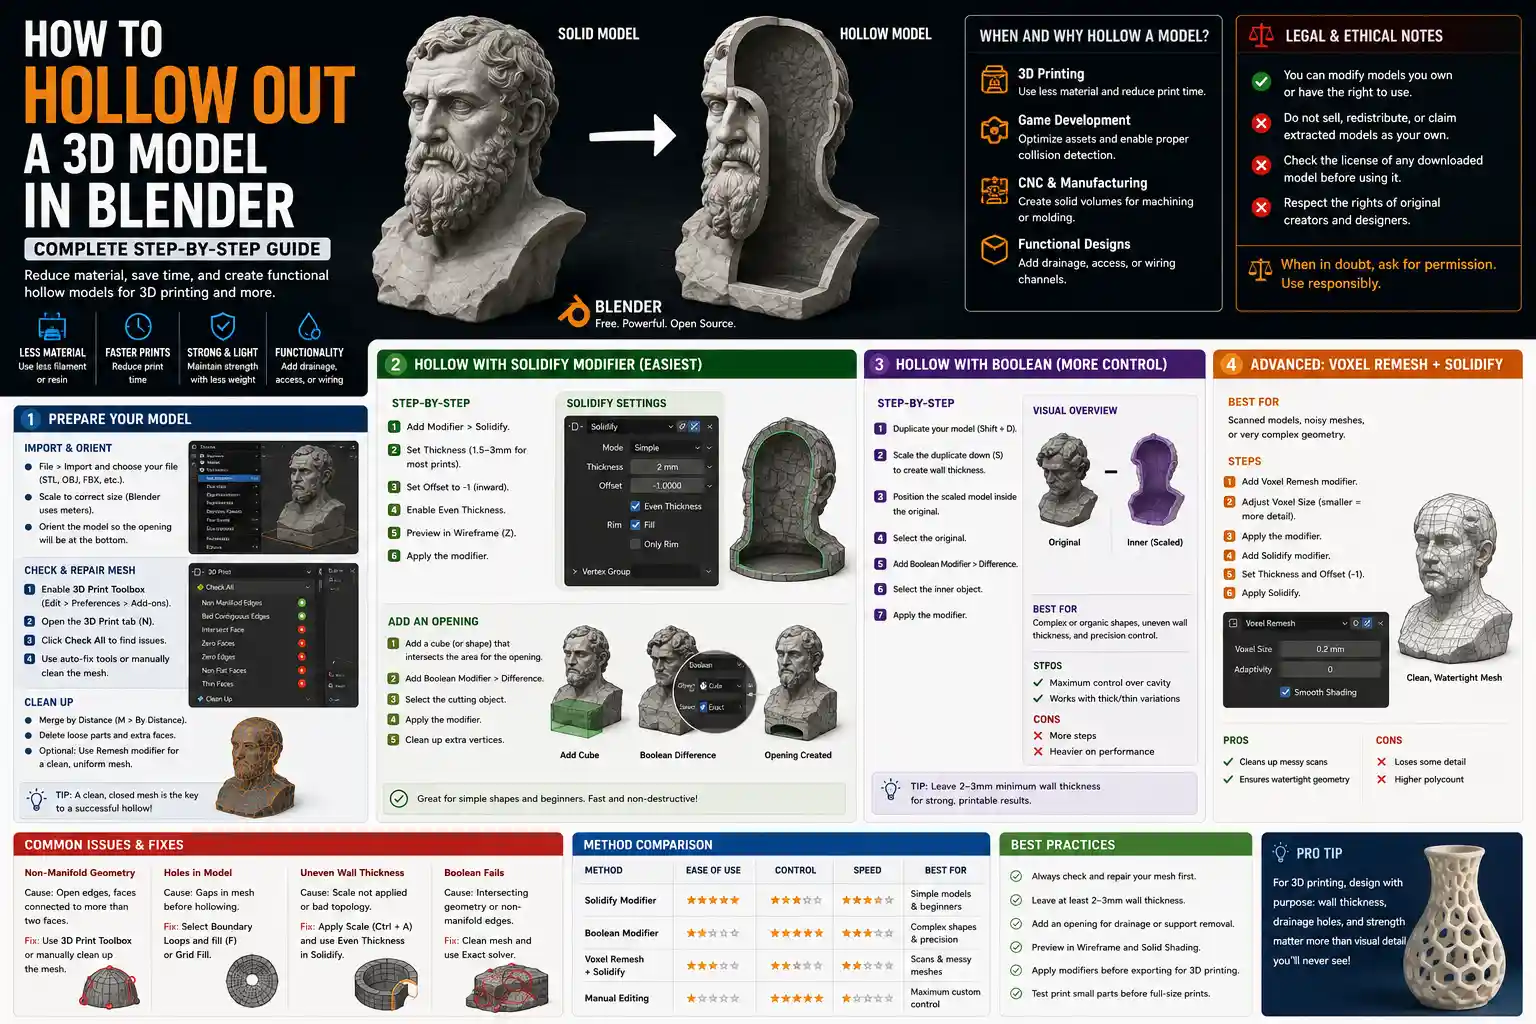
Whether you’re 3D printing a cosplay prop, designing a lightweight architectural scale model, or creating a hollow decorative vase that can hold water, hollowing out a solid 3D model is a critical step for reducing print time, cutting material costs, and meeting functional requirements. Blender, the free open-source 3D creation suite, offers multiple flexible methods to hollow out models, with tools that work for everything from simple geometric shapes to complex organic designs like character busts or custom figurines. Even if you’re new to Blender’s interface, this step-by-step guide will walk you through the most reliable techniques, help you avoid common pitfalls, and get your model ready for 3D printing or other applications.
Preparing Your Model for Hollowing
Before you start any hollowing operation in Blender, it’s important to set up your model correctly to avoid errors later. Rushing into hollowing without cleaning up your mesh can lead to non-manifold geometry, unexpected holes, or uneven wall thickness—all issues that can ruin a 3D print or final render. Taking 10 minutes to prep your mesh will save you hours of troubleshooting down the line.
Import and Orient Your Model
If you created your model in another program like ZBrush, Tinkercad, or Fusion 360, the first step is importing it into Blender. Blender supports most common 3D file formats, including STL, OBJ, and FBX, so you can work with nearly any external model. To import, go to File > Import and select your file type, then adjust the scale if needed: Blender defaults to meters as a unit, while many 3D printing models are designed in millimeters, so you may need to scale your model by 1000 to get the correct dimensions.
Once imported, orient your model so the opening you plan to add (for drainage or support removal in 3D printing) is facing downward or toward an inconspicuous area. Most users add a single opening on the bottom of the model, so positioning it early makes it easier to cut later.
Check for and Repair Mesh Errors
Hollowing operations rely on a clean, closed mesh to work correctly. Even tiny errors like overlapping faces, duplicate vertices, or non-manifold edges can cause tools like the Solidify modifier or boolean operations to fail. Before you start, run Blender’s built-in 3D Print Toolbox add-on to check for common issues:
- Enable the 3D Print Toolbox by going to Edit > Preferences > Add-ons, searching for "3D Print Toolbox," and checking the box next to it.
- Open the 3D Print Toolbox sidebar by pressing N to bring up the right-side menu, then selecting the 3D Print tab.
- Click Check All to scan your mesh for errors like non-manifold geometry, intersecting faces, and disconnected parts.
- Use the automatic repair buttons to fix most common issues, or manually edit problem areas by dissolving extra edges or merging duplicate vertices.
For complex organic models, you may also want to use the Remesh modifier to create a clean, uniform quad mesh before hollowing. This ensures your final wall thickness will be consistent across the entire model, rather than varying wildly in different areas.
Method 1: Hollowing With the Solidify Modifier (Best for Beginners)
The Solidify modifier is the simplest, most beginner-friendly way to hollow out a closed model in Blender. It works by adding an inner offset shell to your existing mesh, creating a hollow cavity inside with a consistent wall thickness you can adjust in real time. This method is ideal for simple closed models like vases, spheres, or figurines, and it requires minimal manual editing.
Step-by-Step Solidify Hollowing
Start with your cleaned, closed mesh selected, then follow these steps:
- Go to the Modifiers tab (the wrench icon) on the right sidebar, click Add Modifier, and select Solidify from the Generate menu.
- Adjust the Thickness value to set your desired wall width. For most 3D printing projects, 1.5mm to 3mm is standard—thicker walls are stronger for functional parts, while thinner walls save material and print time for decorative items.
- Make sure the Offset value is set to -1. This offsets the inner shell inward, keeping the outer shape of your model exactly the same while hollowing out the inside. If you leave Offset at 0, the thickness will be split evenly between the inside and outside, which will change the outer dimensions of your model—something you almost never want for 3D printing.
- Check the Even Thickness box to improve the consistency of your wall width, especially on curved or organic surfaces. This option helps prevent uneven thinning in tight corners or steep angles.
Once you’ve adjusted the settings to your liking, you can preview the hollow cavity by toggling wireframe view (press Z and select Wireframe) to see the inner shell. If everything looks good, apply the modifier by clicking the dropdown arrow next to the modifier name and selecting Apply to make the changes permanent.
Adding an Opening to Your Hollow Model
A Solidify modifier will give you a closed hollow model, but you’ll almost always need to add an opening. For 3D printing, this opening lets excess resin drain out in resin printing, or lets you remove support material from inside the cavity. For functional items like vases or planters, it provides drainage or access for planting. To add a clean opening:
- Add a cube or other primitive shape that’s larger than the opening you want, and position it so it intersects the area where you want your opening (usually the bottom of the model).
- Add a Boolean modifier to your hollow model, set the operation to Difference, and select your cutting primitive as the target.
- Apply the Boolean modifier to cut the opening, then use the Decimate or Remove Doubles tool to clean up any extra vertices left by the cut.
Method 2: Hollowing With the Boolean Modifier (Best for Complex Shapes)
For more control over the inner cavity, especially for large models or designs where you need to leave some internal structures intact, the Boolean difference method is more flexible than the Solidify modifier. This method works by creating an inner "cutter" mesh that’s smaller than your original model, then subtracting the inner cutter from the outer model to leave a hollow shell. It’s particularly useful for models with complicated internal geometry or when you need variable wall thickness in different areas.
The key difference between the Solidify and Boolean hollowing methods is that Boolean gives you full control to edit the inner cavity manually. If you need to add mounting points, leave internal supports, or adjust wall thickness in high-stress areas, Boolean is the way to go.
Step-by-Step Boolean Hollowing
Start with your cleaned, closed outer mesh, then follow this process:
- Duplicate your original outer mesh by pressing Shift+D, then press Enter to confirm the duplicate. Move the duplicate to a separate collection to keep your workspace organized.
- Scale the duplicated mesh inward uniformly to create your inner cutter. To do this, press S to enter scale mode, then type a small negative scale value like -0.95 (for 5% smaller overall size) and press Enter. Adjust this value based on your desired wall thickness: a 10cm model scaled in by 5% will have a 2.5mm wall thickness all around.
For non-uniform shapes, you can use the Shrinkwrap modifier instead of uniform scaling to get more consistent wall thickness. Add a Shrinkwrap modifier to your duplicated inner mesh, set the target as your original outer mesh, and adjust the Offset to your desired negative wall thickness. This pulls the inner mesh evenly toward the outer surface, resulting in more consistent thickness on irregular shapes than uniform scaling.
- Once your inner cutter is positioned correctly, go back to your original outer mesh, add a Boolean modifier, and set the operation to Difference. Select the inner cutter mesh as the target for the Boolean operation.
- Preview the result to check for any gaps or uneven walls. If the Boolean fails (a common issue with messy meshes), go back and check for overlapping faces or non-manifold geometry on either mesh, then try again.
- When you’re happy with the result, apply the Boolean modifier to finalize the hollow cavity.
One of the biggest advantages of this method is that you can edit the inner cutter before applying the Boolean. For example, if you’re making a custom lantern, you can cut openings in the inner cutter to add internal mounting points for a light socket, or add extra thickness to the base to make it more stable. This level of customization is impossible with the automatic Solidify modifier.
Method 3: Manual Hollowing for Irregular or Open Models
If you’re working with an open model (like a half-sphere or a character bust mounted to a base) or a highly detailed organic model with lots of crevices, neither the Solidify nor Boolean method may work well. In these cases, manual hollowing using the Sculpting or Edit Mode tools gives you full control to shape the inner cavity exactly how you need it. This method is more time-consuming, but it’s the most reliable option for non-standard models.
Sculpting-Based Manual Hollowing
For organic models like character busts or hand-sculpted figurines, sculpting the inner cavity is straightforward:
- Enter Edit Mode, select all the faces on the inside area of your open model, and extrude them inward to your desired wall thickness. Use the Offset Edge Slide tool to adjust the position of the extruded inner faces for even thickness.
- Switch to Sculpt Mode and use the Clay Strips or Smooth brush to adjust the inner cavity, removing any bulges or thin spots and evening out wall thickness.
- Use the Measure tool in Blender to check wall thickness in different areas as you work, to make sure you don’t accidentally make any section too thin.
If you have a closed model you want to hollow manually, you can first delete one side of the mesh to open it up, sculpt the inner cavity, then close the opening later or leave it open for your use case.
Checking Wall Thickness Consistency
No matter which hollowing method you use, it’s critical to verify that your wall thickness is consistent across the entire model. Thin spots can break during 3D printing or use, while unexpectedly thick spots waste material and increase print time. Blender has a built-in tool to visualize wall thickness called the Thickness analysis, accessible through the 3D Print Toolbox:
- Open the 3D Print Toolbox sidebar tab.
- Click the Thickness dropdown, set your minimum acceptable thickness (for example, 1.5mm), and click Check.
- Blender will highlight all areas that are thinner than your minimum value in red, making it easy to spot and fix problem spots by adding extra thickness to the inner cavity.
For even more detailed visualization, you can use the Vertex Color bake to display a heatmap of wall thickness across your entire model. This is especially helpful for large, complex models where you need to double-check high-stress areas like the neck of a bust or the handle of a mug.
Common Mistakes and How to Fix Them
Even with a clean starting mesh, hollowing in Blender can result in errors that break your model for 3D printing or other uses. Knowing the most common mistakes and how to fix them will save you a lot of time and frustration.
Non-Manifold Geometry After Hollowing
Non-manifold geometry is the most common issue after hollowing, and it’s almost always caused by overlapping edges or inner and outer faces that share vertices. 3D printers can’t process non-manifold meshes, so you’ll need to fix this before exporting your model. The easiest fix is to use Blender’s built-in Make Manifold tool in the 3D Print Toolbox, which automatically repairs most simple non-manifold issues. For more stubborn problems, enter Edit Mode, use the Select Non-Manifold tool (under Select > Select Non-Manifold) to find the problem area, then manually merge overlapping vertices or delete extra faces.
Uneven Wall Thickness
Uneven wall thickness is a common problem with the Boolean method when you use uniform scaling on an irregular model. A 2mm uniform scale inward on a long, thin handle will result in much thinner walls than the same scale on a wide, round body. To fix this, use the Shrinkwrap method for your inner cutter instead of uniform scaling, which pulls the inner mesh evenly toward the outer surface regardless of shape. If you already have uneven thickness, use the Thickness analysis tool to find thin spots, then go into Edit Mode and push the inner face inward to add more material.
Boolean Modifier Fails to Generate a Hollow Cavity
If your Boolean modifier gives you a weird result or no result at all, the most common cause is a mesh that isn’t completely closed. Both the outer and inner cutter meshes need to be completely closed (no holes) for Boolean difference to work correctly. Double-check both meshes for holes using the 3D Print Toolbox, and fill any holes before running the Boolean. Another common fix is to enable Boolean Solver > Fast Bmesh in the Boolean modifier settings, which is more reliable for complex meshes than the default solver.
Forgetting to Add a Drain Hole
This is one of the most common mistakes new 3D printing users make: after hollowing a model, they forget to add an opening for resin to drain out (for resin printers) or support material to be removed (for FDM printers). Even if you don’t need an opening for functional purposes, leaving a fully closed hollow model can cause pressure buildup during printing, which can crack the print or damage your printer. Always add at least one small drain hole on the lowest point of your model, even if it’s only 5mm wide.
Exporting Your Hollow Model for 3D Printing
Once your hollow model is complete and you’ve checked for errors, the final step is exporting it for 3D printing or other use. For most 3D printing workflows, you’ll export as an STL or OBJ file. To export correctly:
- Select only your hollow model, not any cutting primitives or inner cutter meshes you used during the hollowing process.
- Go to File > Export > STL (or OBJ, depending on your slicer’s requirements).
- Check the Selection Only box in the export settings to make sure you only export your selected model, not any other objects in your scene.
- Click Export STL to save your file.
Before slicing your model in your 3D printing software, it’s a good idea to run it through a third-party mesh repair tool like Meshmixer or Netfabb to catch any last-minute errors Blender might have missed. This extra step almost never hurts, and it can save you from wasting time and material on a failed print.
Conclusion
Hollowing out a 3D model in Blender doesn’t have to be complicated, even if you’re new to the software. The method you choose depends on your project: the Solidify modifier is perfect for beginners and simple closed models, the Boolean method gives you more control for complex designs, and manual hollowing works best for open or irregular shapes. By starting with a clean mesh, checking for errors early, and verifying your wall thickness before exporting, you can create a perfectly hollow model that’s ready for 3D printing or any other application. With a little practice, you’ll be able to hollow even complex models in less than 10 minutes, saving material, reducing print time, and getting the exact functional result you need.