
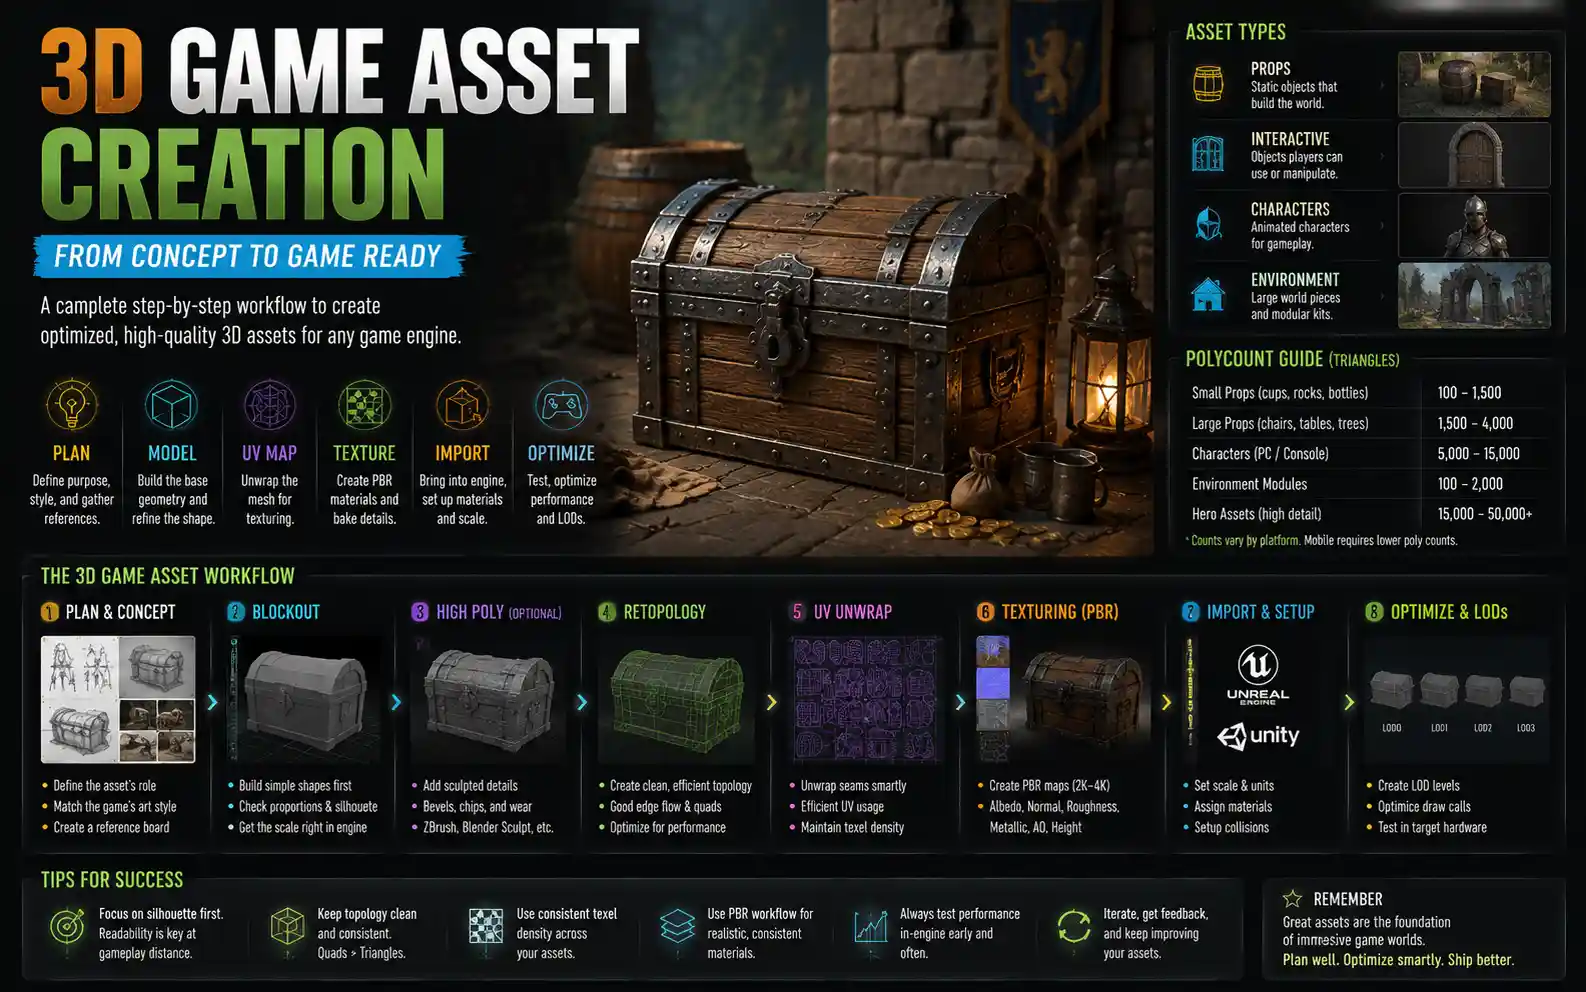
Whether you’re an indie game developer building your first passion project, a 3D artist looking to break into the games industry, or a hobbyist who wants to customize their favorite open-world game, learning how to create high-quality 3D game assets is one of the most valuable skills you can develop. Unlike static 3D models for film or architectural visualization, game assets need to strike a careful balance between visual appeal, performance, and flexibility. A stunning model that crashes the game engine or takes 10 minutes to load is useless for gameplay, so the process of creating 3D game assets follows unique rules and workflows. This guide will walk you through every step of the process, from planning your asset to exporting it ready for use in any game engine.
Planning Your 3D Game Asset
Before you open your 3D modeling software, the most important work of creating a good game asset happens in the planning phase. Skipping this step often leads to wasted time reworking models that don’t fit the game’s art style, performance requirements, or functional needs. The first question to answer is what role the asset will play in the game.
Define the asset type and purpose
3D game assets fall into a few broad categories, and each has different requirements. Prop assets are stationary objects like chairs, trees, or barrels that fill out game environments. They typically require lower polygon counts than interactive assets, since dozens or hundreds of them may be loaded at once. Interactive assets are objects that players can manipulate, open, pick up, or destroy, so they need to be modeled with separate moving parts in mind. Character assets are the most complex, requiring careful topology for animation, multiple texture maps for different skins, and rigging to work with in-game movement. Finally, environment assets include things like terrain, buildings, and roads, which often use modular design to let level designers piece together large worlds efficiently.
Match the game’s art style
Every game has an art style, and your asset needs to fit seamlessly into that aesthetic. A hyper-realistic zombie model will look out of place in a cartoonish platformer, just as a low-poly blocky tree will break immersion in a AAA open-world hiking simulator. Common styles include:
- Low-poly / stylized: Simple geometry, bold colors, minimal detail, common in indie games and mobile titles
- Hyper-realistic: High detail, realistic textures, accurate proportions, used in AAA first-person shooters and open-world games
- PBR (physically based rendering): A shading method that creates realistic, consistent lighting across different environments, used in most modern games regardless of detail level
- Hand-painted: Textures are painted directly onto the model to create a stylized, artistic look, common in adventure games and indie titles
Create a reference board
Even the most experienced artists don’t work from imagination alone. Collect reference images of your asset from multiple angles, noting details like texture, wear and tear, proportions, and color. If you’re creating a medieval wooden chest, for example, collect photos of real antique chests, reference art from other games with a similar style, and note how the wood grain runs, where the metal hinges attach, and what kind of wear appears on the corners from years of use. Tools like Pinterest, PureRef, or Google Images make it easy to organize all your references in one place that you can keep open while you work.
Modeling the Base Geometry
Once planning is complete, it’s time to create the base model of your asset in a 3D modeling program. Popular choices for game asset creation include Blender (free and open-source), Maya, 3ds Max, ZBrush, and Substance 3D Painter. For beginners, Blender is an excellent starting point, as it has all the tools you need for professional game asset creation at no cost.
Start with blockout
The first step of modeling is creating a blockout, a low-detail version of your asset that establishes basic proportions and silhouette. Don’t jump into adding small details right away. Blocking out lets you quickly test whether the shape of your asset reads correctly from the distances players will see it in-game. For example, a door prop that looks great up close but has a muddy silhouette from 50 meters away won’t work well in an open world.
When creating your blockout, focus on:
- Getting the core proportions right (a chair that’s twice as tall as a player character will look wrong even after you add details)
- Refining the silhouette to match your reference
- Making sure any modular pieces fit together correctly (for environment assets)
Retopologize for game performance
After you’re happy with the blockout and any high-detail sculpting (for assets that need fine surface detail like wrinkles or carvings), you’ll create a low-poly version of the model that’s optimized for game engines. This process is called retopology, and it’s one of the most important steps for game asset creation. Game engines render every polygon in your model, so an asset with 100,000 polygons will run much slower than one with 1,500 polygons that has the same visual shape, with detail added via textures.
“The goal of game asset modeling isn’t to make the highest poly model possible—it’s to get the most visual quality out of the least amount of geometry.”
The exact polygon count you should aim for depends on the asset type and the platform your game will run on. Mobile games require much lower polygon counts than PC or console games. As a general rule of thumb:
- Small props (cups, rocks, bottles): 100–1,500 triangles
- Large props (chairs, tables, trees): 1,500–4,000 triangles
- Player and non-player characters: 5,000–15,000 triangles (for mid-range PC/console; lower for mobile)
- Environment modules (wall sections, stairs): 100–2,000 triangles, depending on size
When doing retopology, focus on keeping edge loops clean and following the shape of the asset. This not only reduces the polygon count but also makes it easier to edit the asset later and, for characters, ensures smooth deformation when animated.
Check for common modeling mistakes
Before moving on to texturing, double-check your model for common issues that can cause problems in game engines. Make sure there are no non-manifold geometry (edges connected to more than two faces, or faces with no volume), reversed normals (which make surfaces appear invisible or inside-out), and overlapping faces. Most 3D modeling programs have automated tools to check for these issues, so run a check before you export. You should also delete any hidden faces that players will never see—for example, the back of a bookshelf that’s pressed against a wall. Removing these extra polygons saves performance for no loss of visual quality.
UV Unwrapping and Texturing
Once your model is optimized and error-free, it’s time to unwrap UVs and add textures. Textures bring your 3D model to life, adding color, detail, roughness, and other surface properties that make the asset look convincing in-game.
UV unwrapping 101
UV unwrapping is the process of flattening your 3D model onto a 2D plane so you can map 2D texture images onto its surface. Think of it like unwrapping a cardboard box so it lies flat, ready to be printed on. A good UV unwrap avoids stretching (which makes textures look blurry or distorted) and maximizes the use of the texture space, so you get the highest possible detail.
Key best practices for UV unwrapping for game assets:
- Pack UV islands (the separate flattened sections of your model) tightly to avoid wasting texture space. Leave a small gap between islands to prevent bleeding, where pixels from one section leak onto another in-game.
- Scale UV islands based on how much detail they need. A chest’s front face, which players will see clearly, should get more texture space than the bottom of the chest, which is hidden against the ground.
- Avoid stretching. Check your unwrap with a checkerboard texture—if the squares look distorted, adjust your UVs to fix the stretching.
For modular assets that use the same texture, you can unwrap multiple pieces onto the same UV sheet to save draw calls and improve performance.
Texturing workflows for modern game assets
Most modern games use physically based rendering (PBR) for texturing, which creates consistent, realistic-looking results across different lighting conditions. A PBR texture set includes multiple maps that define different properties of the surface:
- Albedo/base color: The base color of the surface, with no lighting information
- Normal map: Adds fine surface detail (like wood grain or scratches) without adding extra polygons
- Roughness/metallic: Defines how shiny or rough the surface is, and whether it’s a metal
- Ambient occlusion: Adds darkening to crevices and gaps, which makes the model look more detailed and realistic
Popular texturing tools for game assets include Substance 3D Painter, which has a huge library of smart materials that automatically add wear, tear, and detail to your assets, Blender’s built-in texture painting tools, and Adobe Photoshop for hand-painted textures. For beginner-friendly workflows, Substance Painter’s smart materials let you create professional-looking PBR textures in a fraction of the time it takes to paint every detail by hand.
Add realistic detail and variation
The difference between a beginner game asset and a professional one is often in the small details. Adding subtle wear and tear, like scratches on metal edges, scuff marks on the bottom of a chair, or dirt in crevices, makes the asset look lived-in and realistic. Avoid uniform textures—real wood has knots and grain variation, concrete has small cracks and stains, and fabric has wrinkles and fading. For games that use multiple copies of the same asset (like a forest full of trees), create a few different texture variations to avoid the forest looking repetitive.
When exporting your textures, match the resolution to the asset’s importance. A main character might use a 4K (4096x4096) texture, while a small prop that’s never seen up close can use a 1K (1024x1024) or even 512x512 texture. Using smaller texture sizes saves video memory and improves game performance, so don’t use a higher resolution than you need.
Optimization and Exporting for Game Engines
Even a beautifully modeled and textured asset isn’t ready for use until it’s optimized and exported correctly. Optimization is critical for game assets, as poor optimization can lead to low frame rates, long load times, and even game crashes, especially on lower-end PCs or mobile devices.
Key optimization techniques
There are several simple but effective optimization steps you can take to make your asset game-ready:
1. Combine meshes where possible: If you have a single prop made of multiple small objects (like a chest with a hinged lid that doesn’t move), combine them into a single mesh to reduce draw calls. Draw calls are the number of separate meshes the engine has to render each frame, so fewer draw calls mean better performance. Leave moving parts as separate meshes, of course.
2. Use level of detail (LOD) groups: Level of detail (LOD) is a technique where you create multiple versions of the same asset with decreasing polygon counts. When the asset is far away from the camera, the game engine automatically uses the low-poly version, which saves a huge amount of performance. Most major game engines (Unity, Unreal Engine) support LODs automatically, as long as you export the different LOD versions with your model. A standard LOD setup for a medium prop is four versions: LOD0 (full detail, close up), LOD1 (half the polygons, medium distance), LOD2 (quarter the polygons, far distance), LOD3 (billboard, very far distance).
3. Remove unnecessary detail: Double-check your model for any geometry that doesn’t contribute to the silhouette or visible detail. A common beginner mistake is modeling small details like screws or scratches when they can be added far more efficiently with a normal map. Removing these extra polygons cuts down the triangle count for no loss of visual quality.
4. Compress textures: Most game engines automatically compress textures, but you can reduce file size by exporting textures with the right compression settings for your target platform. Uncompressed 4K textures can be several megabytes each, and using dozens of these can quickly eat up video memory.
Exporting correctly for your game engine
Different game engines prefer different file formats, but the most common formats for game assets are FBX and GLB/GLTF. Both support exporting geometry, UVs, normals, and even rigging for characters. When exporting, make sure to:
- Apply scale, rotation, and location transformations to your model to avoid scaling issues in the game engine
- Export textures with the correct naming convention (most engines expect names like assetname_albedo.png, assetname_normal.png)
- Check the export settings for your target engine—for example, Unreal Engine expects normals to be exported with a specific direction, and adjusting this setting avoids lighting issues after import
After exporting, always import your asset into your game engine and test it before moving on to the next asset. Check how it looks in different lighting conditions, test its scale next to other assets and player characters, and check for any rendering issues like invisible faces or blurry textures. Catching small issues at this stage is much easier than fixing them after you’ve added dozens of assets to your level.
Best Practices for Consistent, Professional Results
Beyond the core workflow, following a few simple best practices will help you create game assets that are professional, easy to use, and consistent with your project’s overall art style.
Name and organize your files consistently: Nothing is more frustrating than searching through a folder of hundreds of assets to find “chest_final_final_new.blend” when you need to edit it. Use a clear naming convention for all your files, including the asset name, version number, and type. For example, prop_wooden_chest_v03.blend, prop_wooden_chest_albedo.png. Organize assets into folders by type (props, characters, environment) so you can find what you need quickly.
Start small before tackling complex assets: If you’re new to creating 3D game assets, don’t start by trying to model a full player character with 15,000 polygons and complex animation rigging. Start with small, simple props like a cup, a rock, or a chair. This lets you practice the full workflow (blockout, retopology, UVs, texturing, optimization) without getting overwhelmed, and you’ll have finished assets you can use in your project much faster.
Study professional game assets: One of the best ways to improve your work is to analyze assets from successful games. Sites like Sketchfab have thousands of free 3D game assets you can download and inspect, so you can see how professional artists topology their models, organize their UVs, and set up their textures. Pay attention to how they use polygon budget: where they add more geometry, and where they use textures to add detail instead.
Iterate based on feedback: Show your finished assets to other developers or artists and ask for feedback. It’s easy to get used to your own work and miss obvious issues like off proportions, stretched textures, or a silhouette that doesn’t read correctly. Even experienced artists rely on feedback to improve their assets, and getting outside perspective will help you grow much faster than working in isolation.
Conclusion
Creating high-quality 3D game assets is a skill that takes practice, but it follows a clear, repeatable workflow that anyone can learn with patience and consistent practice. Starting with careful planning to define your asset’s purpose and style, you move through blockout, retopology, UV unwrapping, texturing, optimization, and final testing. The key to success is remembering that game assets are not just static 3D models—they need to work within the constraints of a game engine, balancing visual quality with performance to create a smooth, immersive experience for players.
Whether you’re building a small indie game or building a portfolio to apply for a job in the games industry, focusing on optimization, clean topology, and consistent texturing will help you create assets that stand out. Start small, practice every step of the workflow, and don’t be afraid to iterate on your work—over time, you’ll develop the skills to create professional 3D game assets that fit perfectly into any project.