
When you step into a hyper-realistic virtual environment—whether it’s a sun-dappled redwood forest in a AAA game, a architectural visualization of a luxury mountain home, or a post-apocalyptic cityscape in a viral short film—what makes it feel tangible, not just digital? More than lighting, more than geometry, it’s the textures that sell the illusion. Textures are the skin of every 3D object, and in Unreal Engine, they do far more than just add color: they carry detail, react to light, and trigger emotional responses from viewers. Mastering unreal engine textures for realistic environments isn’t just about downloading high-resolution packs; it’s about understanding how Unreal Engine interprets texture data, how to optimize for performance without sacrificing detail, and how to layer and combine textures to mimic the random, imperfect beauty of the real world.
Understanding Texture Fundamentals for Unreal Engine Realism
Before diving into advanced workflows, it’s critical to build a foundation of how Unreal Engine uses textures to create realism. Unlike game engines of the past, modern Unreal Engine (versions 4.26 through 5.x) relies on physically based rendering (PBR), which ties texture values to how real materials interact with light. Every texture in a PBR workflow serves a specific purpose, and misunderstanding that role will break your realistic environment before you even start adding lighting.
Core PBR Texture Maps You Need for Realistic Environments
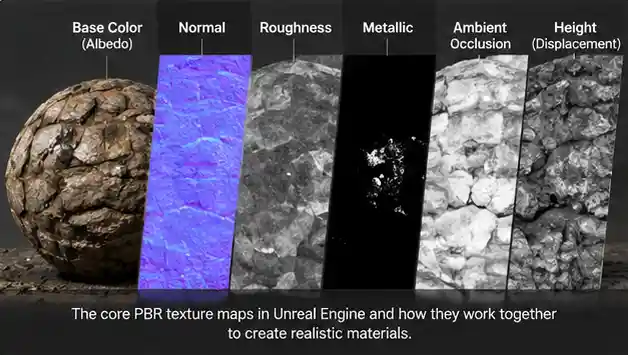
Most creators new to Unreal Engine mistakenly focus only on the base color (or albedo) map, but that’s just one piece of the puzzle. For realistic environments, you need a full set of PBR maps, each contributing to how the material looks and reacts:
- Base Color/Albedo: The base color of the material, without baked-in lighting or shadows. For realistic environments, this should be neutral in value—avoid overexposing highlights or underexposing shadows here, as Unreal’s lighting system will handle that dynamically.
- Normal Map: Adds fine surface detail without adding extra geometry. For environment assets like rock walls or tree bark, a high-quality 8K or 4K normal map can add micro-detail that catches dynamic light, making the surface feel rough instead of flat.
- Roughness/Glossiness: Defines how matte or shiny a surface is. This is one of the most impactful maps for realism: wet stone has low roughness, while loose sand has high roughness. A common mistake is making surfaces uniformly rough or uniformly smooth—real materials have variation here.
- Metallic: Specifies whether a material is metallic (1.0 value) or non-metallic (0.0 value). For natural environments, most surfaces are non-metallic, but small details like rusted metal on an old fence or wet leaves (which have a slight metallic sheen to mimic reflectivity) benefit from careful variation in this map.
- Ambient Occlusion (AO): Bakes in subtle shadowing in cracks and crevices, adding depth to your surfaces. When added to a material in Unreal, AO makes tiled textures feel more cohesive and detailed.
- Height/Displacement: Unreal Engine 5’s Nanite geometry enables true displacement mapping, which moves actual geometry to create large-scale height detail. This is a game-changer for environments, letting you create uneven terrain and detailed rock faces that hold up even at close range.
What makes Unreal different from other 3D tools in this area is its integration of PBR by default, and its ability to handle multiple texture channels at once without significant performance hits—when set up correctly. Even if you’re working with pre-made texture packs, understanding what each map does lets you tweak values to fit your specific environment, instead of relying on default settings that rarely look realistic out of the box.
Texture Resolution and Tiling Best Practices for Large Environments
Realistic environments are often large—think open worlds spanning kilometers, or entire building interiors that players can explore from any angle. That means tiling textures are unavoidable for large surfaces like ground, roads, or walls. The biggest pitfall with tiled textures is the obvious repeating pattern that breaks immersion instantly. To avoid this, Unreal Engine has built-in tools to randomize tiling, but the first step is starting with the right resolution. For large open environments, 2K or 4K textures are usually sufficient for most tiled surfaces, while hero assets (close-up objects players interact with) can use 8K textures to hold up to scrutiny.
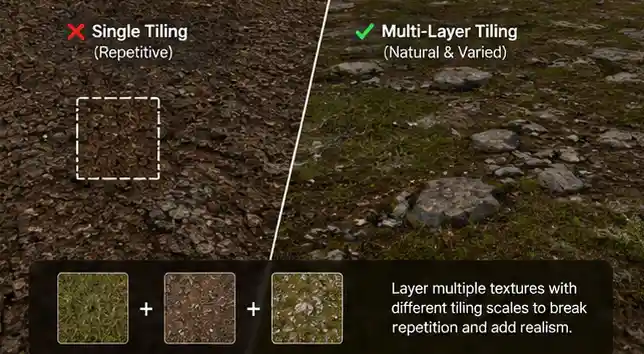
Another common best practice is to use 2–3 variations of the same base texture and layer them with different tiling rates. For example, a grass ground texture can have a 4K base grass texture tiling every 4 meters, a smaller 2K moss texture tiling every 1 meter, and a 2K dirt texture with a non-repeating alpha mask to break up the pattern. This approach eliminates obvious repetition while keeping performance manageable.
Sourcing and Preparing Textures for Unreal Engine Environments
Whether you’re creating your own textures from scratch or sourcing them from online libraries, pre-processing is where most realistic environments are won or lost. Even the highest-resolution texture will look flat and fake if it’s not prepared correctly for Unreal’s PBR workflow.
Where to Source High-Quality Textures
For independent creators and small studios, there’s no need to scan every texture yourself—there are dozens of reputable libraries that offer free and paid PBR texture packs optimized for Unreal Engine:
- Poly Haven: Free, CC0 licensed PBR textures up to 8K resolution, with a huge library of natural environment textures from rock to grass to wood.
- Quixel Megascans: Integrated directly into Unreal Engine via the Quixel Bridge, Megascans offers thousands of scanned PBR textures and 3D assets, with free access for all Unreal Engine users. All assets are pre-processed and ready to drop into your environment, making them ideal for fast prototyping and final builds.
- TexturingXYZ: Specializes in high-resolution scanned surface textures, perfect for hero assets and unique environment details that don’t look generic.
- AmbientCG: Another free CC0 library with PBR textures up to 8K, with a strong focus on architectural and natural environment textures.
If you want truly unique textures that don’t appear in every other Unreal project, creating your own via photogrammetry or photographing reference textures is the way to go. All you need is a DSLR or even a high-resolution smartphone camera, a tripod, and photo editing software to turn your photos into PBR maps. For example, photographing a cracked concrete wall in your neighborhood will give you a unique, non-repeating texture that feels far more authentic than a generic pack texture.
Pre-Processing Workflows to Avoid Common Issues
Before importing any texture into Unreal Engine, you need to adjust it to fit Unreal’s requirements. One of the most common issues is incorrect gamma correction: base color maps should be sRGB (gamma 2.2), while data maps like normal, roughness, metallic, and AO should be linear (gamma 1.0). Unreal usually sets this automatically based on how you name your texture files (for example, naming a texture Rock_BaseColor will tell Unreal it’s an sRGB map), but it’s always good to check the import settings to avoid washed-out colors or incorrect material behavior.
Another critical pre-processing step is removing unnecessary detail and fixing seam issues for tiled textures. Most photo-based textures have lighting gradients from when they were photographed, which will show up as weird bright or dark patches when tiled. Using a tool like Adobe Photoshop’s High Pass filter or Substance Designer to normalize the base color will remove these gradients. For tiled textures, also use the offset filter to check for seams, and use the clone stamp or healing brush to fix any visible lines between tiles.
For creators using Substance Painter or Substance Designer to create custom textures, you can export directly with Unreal Engine preset settings, which automatically names files correctly and sets up the right color spaces, saving you time on import.
Optimizing Texture Workflows in Unreal Engine 5
Unreal Engine 5 introduced two game-changing features for environment creation: Nanite virtualized geometry and Lumen global illumination. But these features don’t eliminate the need for texture optimization—if anything, they let you focus your texture budget where it matters most, making optimization more important than ever for realistic, high-performance environments.
The biggest mistake new Unreal creators make is using 8K textures for everything. Realism doesn’t come from throwing resolution at every surface—it comes from putting detail where the player will see it, and optimizing the rest to keep the experience smooth.
Using Virtual Textures for Large Open Worlds
For large, continuously streaming environments like open worlds, Unreal’s Virtual Textured Space (VTS) and Runtime Virtual Textures (RVT) are essential tools to balance quality and performance. RVTs let you paint texture layers directly on your terrain, blending multiple textures (grass, rock, dirt, snow) based on slope, height, or vertex painting, without having to store thousands of small texture tiles. This creates far more natural variation than tiled textures alone, because you can place small details exactly where they need to be, and the texture streams in only the resolution needed for the current camera position.
To set up RVT for terrain in Unreal Engine 5, you just add a Runtime Virtual Texture volume to your level that covers your terrain, assign your base material to use the RVT, and paint the different layers directly onto the terrain. This workflow eliminates the common “splat map” limitation of older terrain systems, where you were limited to a fixed number of layers and resolution was tied to the terrain size.
Texture Grouping and Compression Settings
Unreal Engine automatically compresses textures to reduce memory usage, but choosing the right compression settings for each texture type can have a huge impact on both quality and performance. For example:
- Use BC1 compression for opaque base color maps: this gives a good balance of quality and small file size, with almost no visible quality loss for most environment textures.
- Use BC3 compression for base color maps with alpha channels, or for combined roughness/metallic maps: BC3 preserves the alpha channel detail better than other compression formats.
- Use BC5 compression for normal maps: this preserves the two-channel normal map data with higher quality than generic compression, resulting in sharper surface detail.
- Use BC7 compression for high-resolution 8K base color textures or normal maps for hero assets: BC7 has higher quality than BC1/BC5, but a slightly larger file size, so it’s only worth using for close-up assets.
Texture grouping is another simple optimization that many creators miss. Assigning textures to the correct texture group (for example, putting environment textures in the “World” group, UI textures in the “UI” group) lets Unreal stream textures more efficiently, loading high-resolution textures only when the player is close to an object, and unloading textures from areas the player has left. For console and mobile builds, this is critical to avoid hitting memory limits that cause crashes or frame drops.
Leveraging Nanite and Displacement for Detailed Textured Assets
Before Unreal Engine 5, displacement mapping was too performance-heavy for use in large environments, so creators relied on normal maps to add detail. With Nanite, you can use true displacement mapping to turn height texture data into actual geometry, so the silhouette of your environment assets has detail that normal maps can’t match. For example, a rock wall with displacement will have actual uneven edges and crevices that cast real dynamic shadows, instead of just faking the detail on a flat surface.
When using displacement with Nanite, you don’t need to pre-tessellate your geometry—Unreal automatically handles the level of detail based on camera distance, so you only get the high-resolution geometry where the player can see it. This means you can use high-resolution height textures for every rock and tree in your environment without killing performance, resulting in far more realistic organic shapes.
Layering and Blending Textures for Natural Realism
Even if you have the highest-quality textures and perfect optimization, a realistic environment falls flat if textures look uniform and artificial. The real world is messy: tree trunks have patches of moss and peeling bark, concrete walls have cracks and stains, grassy ground has patches of mud and scattered rocks. Mastering texture layering and blending in Unreal Engine is the final step to creating environments that feel alive and authentic.
Vertex Painting for Custom Blending
Vertex painting is one of the most accessible ways to blend multiple textures on a single mesh or terrain in Unreal Engine. You simply paint weight values onto the mesh’s vertices, and each weight value controls how visible one texture layer is compared to another. For example, on a terrain, you can paint dirt into low-lying areas where water would collect, rock on steep slopes where grass can’t grow, and moss in shaded areas under trees. This gives you full control over the layout of your environment, so you don’t have to rely on automatic blending that can look generic.
To make vertex blending look more realistic, add a small amount of noise to the blend between layers, instead of a hard edge. Unreal’s material editor lets you add a noise texture to the blend mask, which creates a soft, uneven transition between grass and rock, for example, that looks far more natural than a straight line.
Using Smart Blending Rules to Mimic Real-World Patterns
For larger environments, automatic blending based on slope, height, and curvature saves hours of manual vertex painting. You can set up material graphs in Unreal that use these world parameters to blend textures automatically:
- Slope-based blending: Show rock on slopes steeper than 40 degrees, where grass can’t take root, and grass on shallow slopes.
- Height-based blending: Show snow on terrain above a certain height, and grass below it.
- Curvature-based blending: Show moss or dirt on the crevices of a rock wall, where water collects, and exposed rock on raised surfaces.
This approach mimics how natural environments actually form, so the resulting texture distribution looks natural instead of manually placed. For example, a slope-based blend will automatically place rock on steep cliff faces, which matches how real landscapes erode over time. You can still touch up areas with vertex painting if you want to add small details or fix odd blending results, but automatic blending handles 90% of the work for large open worlds.
Adding Micro-Detail with Detail Texturing
One trick that adds a huge amount of realism at almost no performance cost is adding a detail texture overlay to all your large tiled surfaces. A detail texture is a high-frequency, small-tiling texture (usually a subtle noise or fine surface texture) that you multiply over your base albedo and normal maps. This breaks up the blurriness of large-tiling base textures and adds fine micro-detail that catches light when the camera is close, making the surface feel much more detailed than it actually is.
For example, a 4K concrete wall texture tiling every 10 meters will look blurry up close, but adding a 1K fine concrete detail texture tiling every 1 meter adds fine grain and micro-roughness that makes it look sharp at close range. Unreal lets you adjust the intensity of the detail texture based on camera distance, so it fades out when the camera is far away and doesn’t add unnecessary detail when it’s not needed.
Common Mistakes to Avoid for Realistic Unreal Textures
Even experienced creators make simple texture mistakes that break the realism of their Unreal environments. Being aware of these common issues can save you hours of troubleshooting and help you get better results faster.
First, over-saturating base color maps is an extremely common mistake. Real world materials are almost never as saturated as creators make them in digital environments. Grass isn’t neon green, tree bark isn’t deep dark brown, and concrete isn’t pure gray. Pulling back the saturation of your base color maps by 5–15% almost always makes them look more realistic, because it matches how light interacts with natural materials. The only exception is man-made materials like painted signs or plastic, which can be more saturated, but even then, most real paints are less saturated than you’d expect.
Second, using uniform roughness values across an entire material. No real material has perfectly uniform roughness: even a new polished concrete floor has tiny scratches and dust that change the roughness across the surface. Adding subtle variation to your roughness map with a noise or detail texture will make the material feel more realistic, because it creates subtle variations in how light reflects off the surface. For example, a wet rock surface will have slightly lower roughness in areas where water sits, and slightly higher roughness in raised areas that are drier—this small variation makes the surface feel wet instead of just uniformly shiny.
Third, ignoring ambient occlusion. Many new creators skip adding AO maps to their materials, because it seems like a small detail, but AO adds subtle depth that makes textures feel grounded. Even a subtle AO map added to your material with a low intensity (10–20%) darkens crevices and adds depth that makes the texture feel three-dimensional instead of flat. For tiled textures, AO is especially important to break up the uniform look of repeating patterns.
Fourth, forgetting to adjust textures for your lighting setup. A texture that looks realistic under bright midday sun will look too dark and flat under overcast lighting, or indoor artificial light. Once you’ve set up your lighting in Unreal, go back and adjust your base color and roughness values to fit the lighting. For example, in a dark indoor environment, you can slightly increase the brightness of your base colors to compensate for the low light, without making them look blown out.
Conclusion
Creating realistic environments with Unreal Engine textures is a mix of technical understanding and artistic observation. It starts with mastering the fundamentals of PBR, sourcing or creating high-quality textures that fit your vision, and optimizing them to work with Unreal Engine’s unique features like Nanite, Lumen, and runtime virtual textures. The final step, layering and blending textures to mimic the messy, imperfect variation of the real world, is what turns a collection of generic textures into an immersive environment that feels believable. The biggest takeaway is that realism doesn’t come from the highest resolution textures or the most complex material graphs—it comes from attention to detail, understanding how real materials work, and putting your texture budget where it matters most to the player. With Unreal Engine’s powerful toolset and these best practices, you can create environments that are not only visually stunning, but perform well across every platform from PC to console to mobile.