
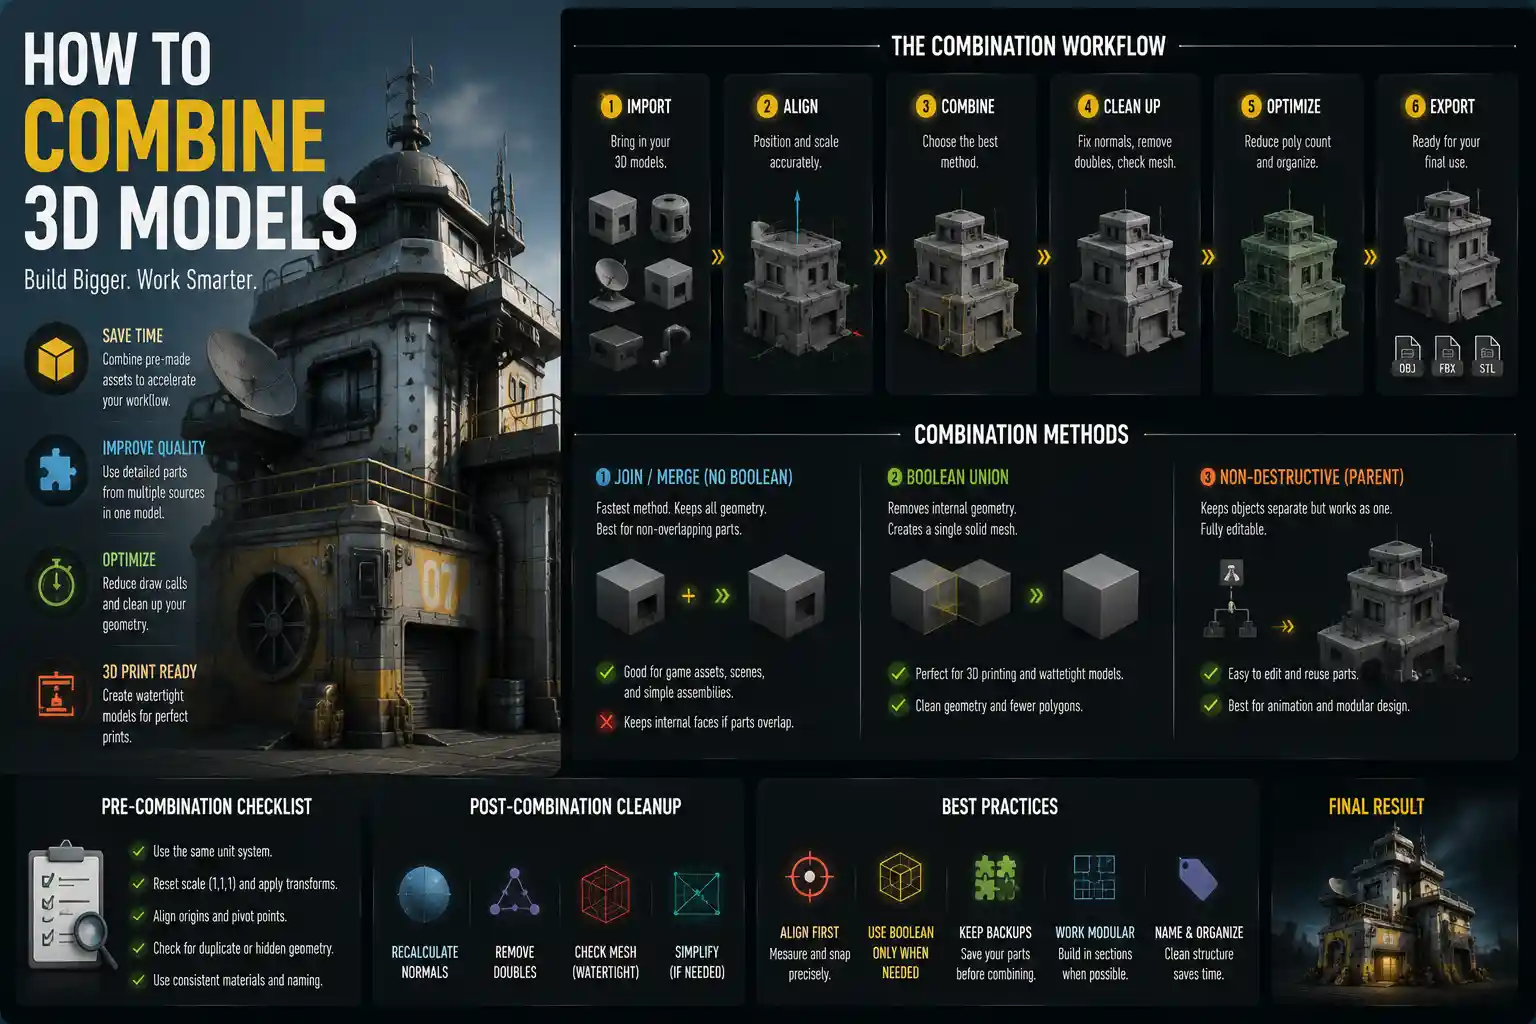
Whether you’re a game developer building a detailed open-world environment, a product designer prototyping a new consumer gadget, or a 3D artist creating a fantasy scene for a short film, you’ve likely faced a common challenge: combining multiple separate 3D models into a single, functional asset. Starting from scratch to recreate an entire object or scene is time-consuming, and most modern 3D projects rely on mixing pre-made assets, custom parts, and scanned elements to save time and boost quality. Learning how to combine 3D models correctly doesn’t just speed up your workflow—it ensures your final asset behaves correctly in rendering, 3D printing, or game engines, with no glitches, missing faces, or bloated file sizes. In this guide, we’ll walk through every step of the process, from pre-combination planning to final clean-up, for both beginner and intermediate 3D creators.
Pre-Combination Planning and Preparation
Before you click any “merge” buttons, taking 10 to 15 minutes to prepare your models will save you hours of troubleshooting later. Combining models that aren’t properly aligned or optimized will lead to messy geometry, broken normals, and errors down the line, regardless of what 3D software you use. The preparation step looks similar whether you’re working in Blender, Maya, 3ds Max, ZBrush, or even free browser-based tools like Tinkercad.
Check Model Compatibility and Unit Scaling
One of the most common mistakes new creators make is combining models built at different scale units. A character model built in centimeters and a weapon built in meters will end up with the weapon being 100 times too big (or too small) when merged, requiring frustrating re-scaling that can throw off proportions. Always check the unit settings of your source files first, and align all models to the same unit system before you start combining.
Compatibility also extends to model type: if you’re combining a high-poly sculpt for rendering with a low-poly game asset, you need to confirm that their polygon count and topology fit your final use case. For example, a 3D print requires a solid, watertight mesh, so combining multiple hollow models will cause print errors unless you adjust their geometry first. For game assets, you’ll want to keep total polygon count within the limits of your target engine, so merging 10 high-poly assets may require simplification before you start.
Organize Layers and Objects
Keeping your scene organized before merging makes it far easier to adjust mistakes later, even if you plan to end up with a single combined model. Most 3D software uses layers, collections, or outliner groups to separate objects, so name each model clearly and hide any unrelated assets from your view before you start. If you’re combining multiple parts of a single object—for example, a table with separate legs, a tabletop, and a drawer—group each part under a single parent collection to keep your outliner clean.
This step is especially important if you’re working on a project that requires non-destructive editing. Non-destructive workflow means you keep the original separate models editable even after combining, so you can go back and adjust the size of the table legs without redoing the entire merge. Organizing first makes this non-destructive approach seamless.
Gather Required Tools and Plugins
While most 3D software has built-in tools for combining models, some use cases require extra plugins to get clean results. For example, if you’re combining multiple overlapping models for 3D printing, a boolean union tool is usually required, and some open-source tools benefit from plugins that improve boolean reliability. If you’re working in Blender, popular plugins like BoolTool or 3D Print Toolbox include extra features for clean merging that the default tools don’t offer. For Autodesk Fusion 360, the Combine tool is built in, but you’ll want to confirm that your parametric history is enabled if you need to edit parts later.
Core Methods for Combining 3D Models
There’s no one “right” way to combine 3D models—the best method depends on your end goal: do you need a single editable asset for 3D printing, a merged static model for a game, or a non-destructive combination that lets you adjust parts later? Below, we break down the three most common methods, their use cases, and step-by-step best practices.
1. Simple Merge/Join (No Boolean Operation)
The simplest way to combine 3D models is to join multiple separate objects into a single object, without altering their geometry at all. This method is ideal when your models already fit together perfectly with no overlapping faces, and you just want to unify them for organizational purposes. Common use cases include merging multiple separate props in a game scene into a single batch to reduce draw calls, or combining non-overlapping parts of a model that share the same material.
In most software, this process is straightforward: select all the objects you want to combine, then click the “Join” (Blender) or “Merge” (Maya) button. The result is a single object that retains all the original geometry of each part, with no changes to overlapping areas (if any exist). If your models don’t overlap, this is the fastest method, and it produces the cleanest result with minimal clean-up required.
One key downside: if your models do overlap, simple joining leaves the overlapping faces inside the final model. This doesn’t cause issues for rendering or game assets that are viewed from the outside, but it will break 3D prints, because overlapping internal faces create non-watertight geometry that slicer software can’t read. It also increases your total polygon count unnecessarily, since you’re keeping faces that will never be seen.
2. Boolean Union
A boolean union is the go-to method when your models overlap, and you want to remove all internal overlapping geometry to create a single solid mesh. This is required for 3D printing, for creating solid product prototypes, and for any project where you need a single watertight mesh. Boolean operations work by comparing the geometry of two or more overlapping meshes and creating a new mesh that only includes the outer surface of the combined shape.
Booleans are one of the most powerful tools in 3D modeling, but they’re also one of the most prone to error. 90% of boolean failures come from bad source geometry, not bad tools. A clean, manifold mesh with no inverted normals or non-manifold edges will almost always give you a clean boolean result.
The basic process for a boolean union is:
- Select the base mesh you want to add other models to.
- Activate the boolean union tool and select all overlapping meshes to add to the base.
- Apply the operation to generate the new combined mesh.
While boolean unions are extremely useful, they can produce messy topology, especially on curved or complex surfaces. After the operation, you’ll often need to clean up extra triangles, non-manifold edges, and pinching where two meshes meet. For simple shapes like a mug with a handle, the result is usually clean enough to use directly, but for complex organic shapes like a character with attached accessories, you may need to retopologize the merged area to get smooth geometry.
3. Non-Destructive Combination with Parenting or Assemblies
Not all combinations require merging models into a single mesh. If you need to keep each part editable for future adjustments—for example, if you’re designing a chair where you might want to swap out the legs later, or an animated character with a changeable outfit—non-destructive combination is the best approach. This method doesn’t merge the geometry at all; it just groups the separate models together so they move and act as a single asset.
Common non-destructive approaches include:
- Parenting: One model is set as the parent object, and all other combined models are set as children. Moving the parent moves all children with it, but each child can still be selected and edited separately.
- Groups/Collections: All models are added to a single group or collection that can be moved, duplicated, or exported as a single unit, while retaining their status as separate objects.
- Assemblies: In CAD software like Fusion 360 or SolidWorks, assemblies let you combine multiple separate part files into a single functional design, with constraints that control how each part moves relative to others. This is ideal for mechanical designs where parts need to move independently.
The biggest benefit of non-destructive combination is flexibility. You can adjust the position, size, or shape of any individual part at any time without redoing the entire combination. The downside is that your final project will still have multiple separate objects, which can increase file size and draw calls if you’re exporting to a game engine. For most professional workflows, though, non-destructive combination is the preferred approach during the design process, with a final merge done only when you’re ready to export the finished asset.
Step-by-Step Combination for Common Use Cases
To put these methods into practice, let’s walk through step-by-step workflows for the three most common scenarios where you’d combine 3D models: 3D printing, game engine assets, and digital rendering.
Combining Models for 3D Printing
3D printing requires a single, solid, watertight mesh with no internal overlapping faces or holes, so a boolean union is almost always required. Follow these steps for a successful result:
- Import all your separate models into your 3D software and align them correctly, ensuring overlapping areas sit flush against each other. Any gaps between parts will create holes in the final mesh that will break the print.
- Check each model for non-manifold edges, inverted normals, and loose geometry. Use your software’s built-in repair tool (like Blender’s “Make Manifold” or Meshmixer’s “Inspector”) to fix any errors before running the boolean.
- Run a boolean union to combine all overlapping parts into a single solid mesh.
- Run the repair tool again on the merged mesh to fix any new non-manifold edges created by the boolean operation.
- Export the final mesh as an STL or OBJ file, and run it through your slicer’s preview tool to confirm it’s recognized as a solid printable object.
If you’re combining multiple small models that don’t overlap (for example, a batch of 10 different keychains printed on the same build plate), a simple join is all you need. Just align each model on the build plate, join them into a single object for export, and you’re done. No boolean required.
Combining Models for Game Development
For game development, the main goals of combining models are reducing draw calls (the number of separate objects the game engine has to render) and keeping polygon count low to maintain good performance. The right approach depends on whether the assets are static or moving:
- Static environment assets: If you’re combining multiple static props (like rocks, trees, and crates) in a level, you can merge them into a single mesh with a simple join, as long as they share the same material. This reduces draw calls significantly, and overlapping internal faces don’t affect performance or rendering, since they’re never seen by the player.
- Character and accessory assets: If you’re combining a character model with a hat, weapon, or other accessory that might be swapped out during gameplay, use non-destructive parenting instead of merging. This lets the game engine swap accessories without altering the base character mesh. If the accessory is permanent, merge it with a boolean union and clean up overlapping geometry to reduce polygon count.
Many modern game engines support static batching that automatically combines static meshes at load time, but pre-merging still improves performance for large levels, especially on mobile platforms.
Combining Models for Digital Art and Rendering
For digital art and VFX rendering, flexibility is usually more important than polygon count or watertight geometry. Most 3D artists start with non-destructive combination while they’re experimenting with composition, and only merge models when they’re sure of the final layout. If you’re combining multiple scanned assets or custom sculpted parts into a single sculpt, you can use ZBrush’s DynaMesh tool to merge them into a single organic mesh with clean topology. For static scenes with multiple props, grouping models into collections keeps your scene organized while letting you adjust individual props at any time.
Common Problems and How to Fix Them
Even with careful preparation, combining 3D models can lead to common errors that break your final asset. Below are the most frequent issues and practical fixes to resolve them quickly.
Non-Manifold Geometry
Non-manifold geometry is geometry that doesn’t have a clear inside or outside, usually caused by merged edges that share more than two faces, overlapping faces, or edges with no faces on one side. This is the most common cause of failed 3D prints and boolean operations, and it can also cause rendering errors.
Most modern 3D software has built-in tools to find and fix non-manifold geometry. In Blender, you can use the “Select Non-Manifold” tool to find problem areas, then use “Merge Edges by Distance” to weld close edges together and remove duplicate faces. For more complex issues, dedicated mesh repair tools like Meshlab or Meshmixer can automatically fix most non-manifold errors with a single click.
Messy Topology After Boolean Union
Boolean operations often leave messy, triangulated geometry with pinching or uneven surfaces at the intersection of two meshes. This is especially common with curved organic shapes. If you’re working on a high-poly render or 3D print, you can fix this by smoothing the intersection with a sculpting brush, then retopologizing the area to create clean topology. For game assets, you can use a decimation tool to reduce the number of extra polygons created by the boolean, then smooth the edges manually.
One simple trick to avoid messy topology is to add a small amount of extra geometry to both meshes before running the boolean. For example, if you’re adding a handle to a mug, subdivide both the mug and the handle at the intersection area before running the union. This gives the boolean tool more geometry to work with, resulting in a smoother intersection.
Double Faces and Overlapping Geometry
When you join two models that overlap without using a boolean, you’re left with double faces in the overlapping area. This doesn’t cause issues for rendering in most cases, but it increases your polygon count unnecessarily and can cause rendering glitches with transparency. To fix this, use your software’s “Remove Doubles” or “Delete Loose” tool to delete duplicate faces and internal hidden geometry. For more complex overlapping, you can use a boolean difference to cut out the overlapping area from one mesh before joining.
Scale and Position Misalignment
If you notice after merging that one model is the wrong size or in the wrong position, the fix depends on your workflow. If you used a non-destructive approach, you can just select the individual part and adjust it, no re-merging required. If you merged into a single mesh, you can separate the misaligned part by selecting its faces and using the “Separate” tool, adjust the scale and position, then re-merge. To avoid this problem entirely, always double-check your scale and position before applying the merge or boolean operation.
Best Practices for a Clean, Efficient Result
Following these simple best practices will ensure your combined models work as intended every time, regardless of your end use case:
- Keep a copy of your original separate models: Always save a version of your project with the original separate models before merging. This lets you go back and make adjustments if you make a mistake during merging, instead of starting over from scratch.
- Optimize before merging, not after: Simplify high-poly parts and remove hidden geometry before you combine models. This makes the merge operation faster and reduces the final file size of your combined asset.
- Match normals before combining: Inverted normals (faces that point inward instead of outward) cause rendering errors and broken booleans. Check that all faces on all source models have consistent normals before you start merging, and flip any inverted normals first.
- Use non-destructive workflow when possible: Avoid applying merge or boolean operations until you’re sure of your final design. Most 3D software lets you keep booleans as editable modifiers, so you can adjust the position of parts without undoing the entire operation.
- Test your final asset: After combining, test your asset in its target environment: slice it for 3D printing, import it into your game engine, or render a test frame to confirm there are no hidden errors. Catching errors early saves hours of work later.
For example, a professional product designer I worked with once told me he always keeps three versions of any combined design: the original separate parts, the non-destructive combined assembly, and the final merged export. This system has saved him countless hours when a client requests a last-minute change to one part of the design, instead of having to redo the entire combination from scratch.
Conclusion
Combining 3D models is a foundational skill for any 3D creator, but it’s far more than just clicking a “merge” button. The right approach depends on your end goal: a simple join works for non-overlapping game assets, a boolean union creates solid watertight meshes for 3D printing, and non-destructive parenting or grouping keeps your design flexible for future edits. By preparing your models properly, checking for errors before merging, and keeping backups of your original parts, you can avoid most common issues and create clean, functional combined assets every time.
Whether you’re just starting out with free 3D software like Blender or you’re a professional designer working on commercial projects, building good combination habits will speed up your workflow and give you more reliable results. Start with simple projects, practice fixing common errors, and you’ll soon be able to combine even complex sets of models quickly and cleanly.