
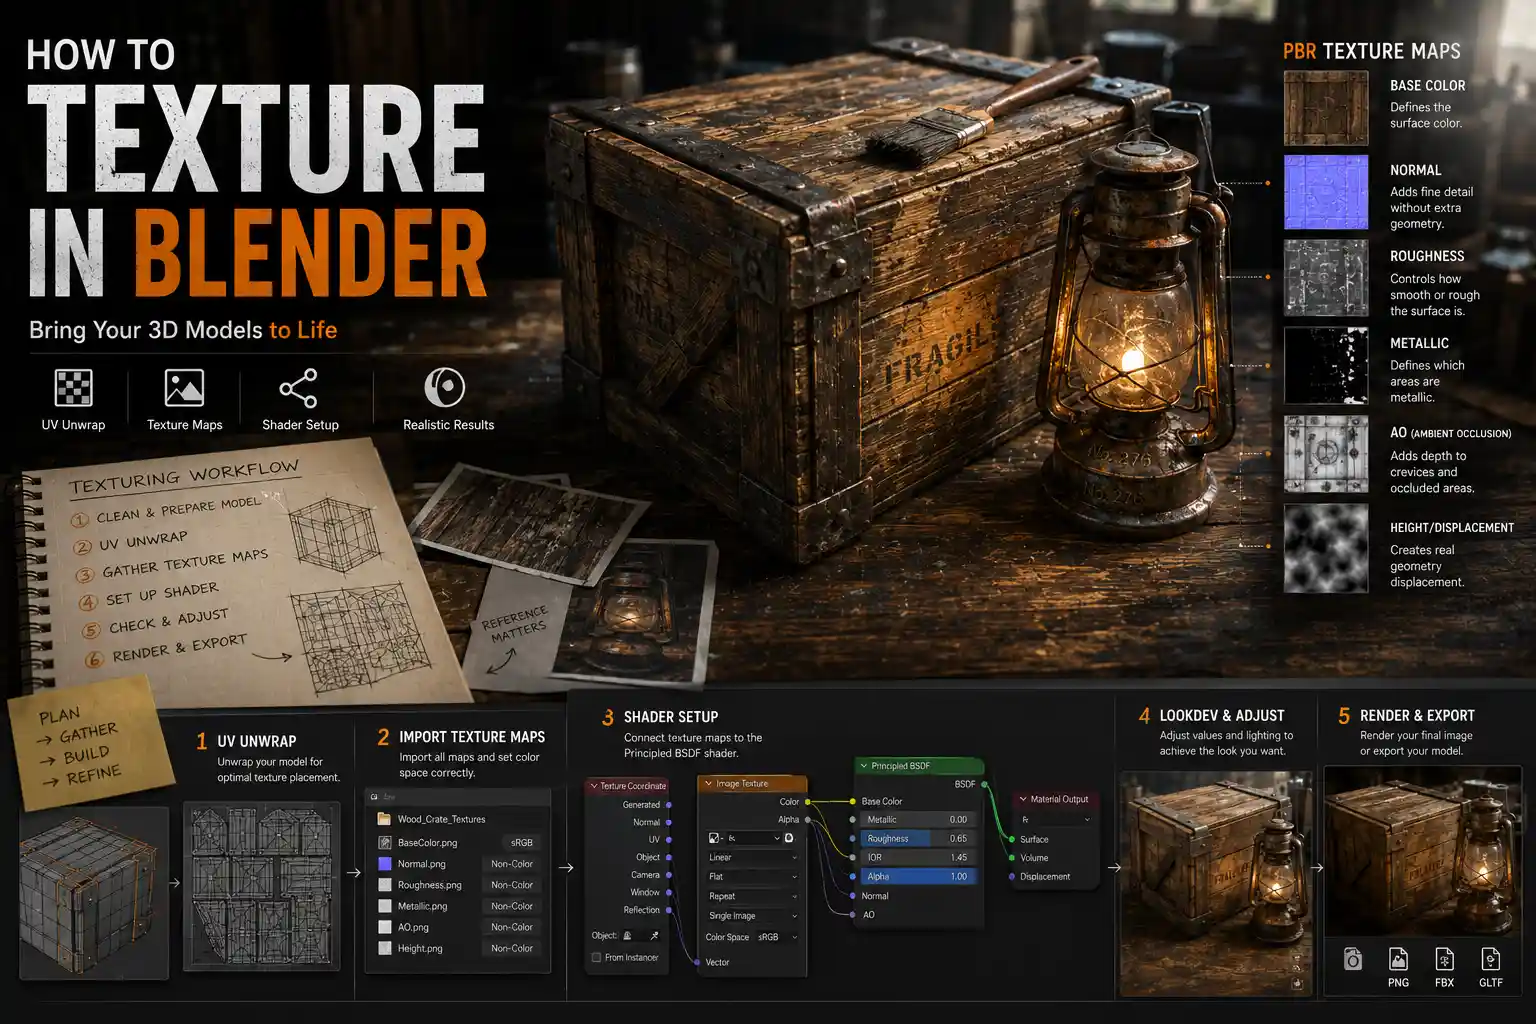
Texturing transforms a flat, sterile 3D model into a realistic, immersive object that feels tangible to viewers. Whether you’re designing a game asset, a product render, or a character for an animated short, a smooth gray default mesh tells no story—adding the right texture can turn a generic wooden bowl into a weathered antique passed down through generations, or a plain spaceship hull into a battle-scarred vessel that’s traveled across the galaxy. Blender, the free open-source 3D creation suite, offers a full set of professional texturing tools that work for beginners and advanced artists alike, from automatic quick textures to fully custom hand-painted details. In this guide, we’ll walk through every step of the process, from planning your texture to exporting your final finished model.
Preparing Your Model and UV Unwrapping
Before you even touch a texture image, you need to make sure your 3D model is ready for texturing. Textures are 2D images wrapped around a 3D surface, so the way your model is “unfolded” into 2D space will directly impact how your texture looks. This process is called UV unwrapping, and it’s one of the most critical steps to get right before adding texture. A bad UV unwrap can leave your texture stretched, blurry, or misaligned, even if you have the highest quality texture image available.
Clean up your model first
Start by fixing any geometry issues that will interfere with texturing. Check for non-manifold edges (edges connected to more or fewer than two faces), overlapping faces, and loose vertices that don’t contribute to the shape. You can find these issues quickly in Blender by going to the Edit Mode menu, selecting Select All by Trait, and choosing non-manifold geometry. Fixing these problems early will prevent issues when unwrapping and rendering later. Also consider your polygon count: while high-poly models can capture fine surface detail, most game or render workflows use a low-poly base model with baked detail from a high-poly source. If you’re working on a game asset, keep your base mesh optimized to avoid performance issues later.
UV unwrapping best practices for clean textures
For most new users, Blender’s automatic unwrapping tools work well for simple shapes, but it’s worth taking the time to adjust your UVs for even texture distribution. The goal of UV unwrapping is to have the same texture resolution across every part of your model, so a face on the side of a crate doesn’t look more stretched or blurry than any other face. Follow these practical tips for a clean unwrap:
- Mark seams where the texture fold will be least visible, such as along the back of a model or under an object where it won’t be seen. Use Blender’s Cut Seam tool in Edit Mode to draw these lines on your mesh before unwrapping.
- Use the UV Packing tool to arrange your UV islands (the unfolded pieces of your mesh) to fill the entire 0-1 UV space. Wasted space means lower texture resolution, so packing islands tightly maximizes the detail you can fit into your texture.
- Check for stretching by enabling the Stretch display option in the UV Editor. Blue areas are fine, while red areas indicate heavy stretching that needs to be fixed by adjusting your seams and unwrapping again.
- For symmetric models like characters or cars, unwrap one half and mirror the UVs to save texture space and keep your texture symmetric without extra work.
Once your UVs are clean and packed correctly, you’re ready to start adding textures. Blender’s default workflow uses the Shader Editor to connect texture maps to your material, so understanding how to navigate this space is key to getting the result you want.
Understanding Texture Maps and Shader Setup
Most modern textures aren’t just a single image—they’re a collection of texture maps, each designed to control a different property of your material. A wooden material, for example, might have a base color map that shows the brown grain, a roughness map that tells Blender where the wood is shiny or matte, and a normal map that adds subtle bumps to the surface without extra geometry. Understanding what each map does will help you combine them correctly for a realistic result.
Common texture maps and their uses
Here are the most common texture maps you’ll work with in Blender:
- Base Color (Albedo) Map: This is the “base” texture that defines the base color of your model. It doesn’t include any lighting or shadow information—just the pure color of the surface, from the red of a brick to the green of a leaf.
- Normal Map: This map adds fine surface detail like bumps, scratches, or grooves by modifying the surface normals (the direction each face faces) without adding extra polygons to your model. This is critical for adding detail to low-poly game assets.
- Roughness/Glossiness Map: Controls how rough or smooth a surface is. A value of 0 (black) is completely smooth and reflective (like polished metal or glass), while a value of 1 (white) is completely rough and diffuse (like concrete or fabric). Most PBR (physically based rendering) workflows use roughness maps, which is Blender’s default.
- Metallic Map: Defines which parts of the model are metallic and which are non-metallic. Black values are non-metallic, white values are fully metallic. This works with the roughness map to create realistic physically based materials.
- Ambient Occlusion (AO) Map: Adds subtle darkening to crevices and gaps where light would naturally be blocked, adding depth and realism to your model.
- Height/Displacement Map: Actually modifies the geometry of your model to create larger bumps and depth, unlike a normal map which only fakes the detail. Displacement is used for high-quality renders, while height maps are often used for real-time applications.
Setting up a PBR shader in Blender
Blender uses the Principled BSDF shader as its default for physically based rendering, which is the industry standard for games and visual effects today. Setting up a textured PBR material only takes a few simple steps. First, create a new material for your model in the Properties panel under the Material tab. Delete any default connections if needed, and keep the Principled BSDF node connected to the Material Output node. Next, open the Shader Editor, and add an Image Texture node for each of your texture maps (press Shift+A to open the add menu). Connect each Image Texture node to the corresponding input on the Principled BSDF node: connect the base color image to the Base Color input, the roughness image to the Roughness input, the normal image to the Normal input, and so on. For normal maps, you’ll need to add a Normal Map node between your Image Texture and the Principled BSDF’s Normal input to convert the color data to normal data. Once connected, you can adjust the strength of any map to fine-tune the result. For example, if your roughness map makes your wood too matte, you can lower the overall roughness value in the Principled BSDF to make it a little more shiny.
“Good texturing isn’t about adding a bunch of random detail—it’s about understanding how light interacts with a real surface, and using each texture map to tell that story accurately.”
Once your shader is set up, you can start working with your textures. You can use pre-made texture maps from free or paid sites, or you can create your own textures from scratch, depending on your project needs.
Three Methods to Add Texture: From Quick PBR to Custom Hand-Painting
There’s no single “right” way to add texture to a 3D model in Blender. The method you choose will depend on your timeline, your project goals, and how custom you need your final texture to be. Below, we’ll break down three common methods, from the fastest automated option to full custom hand-painting, so you can choose what works for you.
Method 1: Quick Texture with Blender’s Built-in Procedural Textures
Procedural textures are generated mathematically within Blender, so you don’t need any external image files to use them. They’re perfect for quick tests, simple materials, or when you need a texture that can scale infinitely without getting blurry. Blender comes with a library of built-in procedural textures like Clouds, Noise, Musgrave, and Voronoi that you can combine to create almost any material. For example, to create a simple rough concrete texture: start with a gray base color, add a Noise texture connected to the Roughness input to create variation in the roughness, and add another Noise texture connected to the Displacement input to create subtle bumps on the surface. You can adjust the scale of the noise to make the bumps larger or smaller, and mix multiple noise textures to get more natural variation. Procedural textures are non-destructive, so you can adjust any setting at any time without losing quality. One downside is that they can be slower to render than image-based textures, and they’re harder to export for use in game engines, since most real-time engines don’t support Blender’s procedural textures natively.
Method 2: Using Pre-Made PBR Texture Sets
If you need a realistic texture quickly and don’t want to create it from scratch, pre-made PBR texture sets are the way to go. There are dozens of websites that offer free and paid PBR textures, including Poly Haven, TexturingXYZ, CGTrader, and AmbientCG. Most texture sets come with all the maps you need (base color, normal, roughness, metallic, AO) ready to download and plug into your Principled BSDF shader, just like we covered in the previous section. This method is fast, produces high-quality results, and works for both renders and game exports. To get the best result with pre-made textures, follow these steps:
- Download a texture set that matches the scale of your model. A brick texture that’s designed for a 1-meter square will look wrong if you stretch it over a 10-meter wall, so adjust the tiling in the Image Texture node’s Mapping settings to match your model’s scale.
- Add subtle variation to avoid repeating patterns. If you’re texturing a large wall, a single tiled brick texture will look obviously repetitive. Add a second, higher-scale noise texture to the roughness or base color to break up the pattern, or use Blender’s Texture Paint tool to add random scratches or stains in different areas.
- Adjust the map strengths to match your reference. A downloaded metal texture might be too rough or too shiny out of the box, so tweak the overall roughness or metallic value to match a reference photo of the real material.
For example, if you’re texturing a wooden coffee table, you can download a oak wood PBR set, plug it into your shader, add a small amount of extra roughness to the tabletop where hands would touch it, and add a few scratch textures to the edges to make it look used. This takes less than 15 minutes and produces a professional result.
Method 3: Custom Hand-Painting Textures in Blender Texture Paint
If you need a completely custom texture—for example, a unique character skin, a hand-painted game asset for a stylized game, or a custom logo on a product—Blender’s built-in Texture Paint tool lets you paint directly onto your 3D model. This gives you full control over every detail of your texture. To start hand-painting, create a new image in the UV Editor (click New and set the resolution—most textures are 2048x2048 or 4096x4096 for high-detail work) and enable Texture Paint mode from the mode dropdown at the top of the viewport. You can use a pressure-sensitive graphics tablet for the most natural control, but you can also paint with a mouse if you don’t have a tablet. Blender includes all the standard brush options you’d expect: soft brushes for blending, hard brushes for sharp edges, clone brushes for copying details, and smudge brushes for blending. For stylized work, you can block in your base colors first, then add shadows and highlights, just like you would painting a 2D image. For realistic work, you can start with a base pre-made texture and paint custom details like scratches, stains, or logos on top of it to make it unique. One of the biggest advantages of painting directly in Blender is that you can see how your texture looks on the 3D model in real time, with lighting, so you don’t have to constantly switch between a 2D painting program and Blender to check your work.
Baking Texture Detail for High-Poly Models
If you’ve created a high-poly model with all the fine surface detail (like carvings in wood, scratches on metal, or wrinkles in fabric), you don’t have to leave that detail behind when you optimize your model for games or rendering. Texture baking is the process of transferring the detail from your high-poly model to a texture map that can be applied to a lower-poly version of the same model. This lets you keep all the fine detail while keeping your polygon count low, which is critical for real-time games and fast renders. Blender has a built-in Bake tool that makes this process straightforward once you understand the steps.
Preparing for baking
First, you’ll need both your high-poly and low-poly models in the same Blender scene. Make sure they’re aligned perfectly in the same position—if they’re offset, your baked texture will be misaligned. Most artists use a process called retopology to create the low-poly mesh over the high-poly shape, so the low-poly matches the overall shape of the high-poly exactly. Next, unwrap your low-poly mesh (the high-poly doesn’t need UVs for baking) and make sure your UVs are clean and packed, just like we covered earlier. Create a new image for your baked texture in the UV Editor, and select it in the Bake settings. Finally, select your low-poly mesh first, then shift-select your high-poly mesh so the high-poly is the active selection.
Baking different types of maps
Blender lets you bake several different types of maps, depending on what detail you want to transfer. For most workflows, you’ll bake the following maps:
- Normal Map: Bakes the high-poly surface detail into a normal map that can be applied to the low-poly mesh to add all the fine bumps and grooves.
- Ambient Occlusion Map: Bakes the shadow detail from crevices in the high-poly mesh to add depth to the low-poly version.
- Color/Albedo Map: If you’ve textured your high-poly model with different materials or vertex colors, you can bake those colors down to a single base color map for the low-poly.
- Displacement Map: Bakes the height detail from the high-poly to a displacement map that can modify the low-poly geometry for high-quality renders.
To start baking, go to the Render Properties tab, scroll down to the Bake section, and select the type of map you want to bake from the dropdown. Check the Selected to Active option, which tells Blender to bake from the selected high-poly to the active low-poly. Adjust the Ray Distance setting—this controls how far Blender will look for the high-poly surface. If your meshes are aligned correctly, a small ray distance (between 0.1 and 0.5 for most unit scales) will work. When you’re ready, click the Bake button, and Blender will generate your texture map and save it to the image you created. Once baking is done, you can save the image and connect it to your shader just like any other texture map.
Common issues to watch for when baking: if you see black spots or missing detail on your baked map, your ray distance is too small, or your meshes are misaligned. If you see blurry detail, increase the resolution of your baked image. If you see seams along UV edges, enable the Padding setting in the bake options to extend the edges of your UV islands and avoid gaps.
Finishing and Exporting Your Textured Model
Once you’ve added all your texture detail, there are a few final steps to polish your result and prepare it for export, whether you’re rendering it in Blender or using it in another program like Unreal Engine or Unity.
Polishing your texture
Start by checking your texture under different lighting conditions to make sure it looks right. Enable Cycles or Eevee rendering in Blender, and add a few lights to your scene to see how the texture reacts to light. If your roughness map is too extreme, you’ll notice that shiny areas are too reflective and rough areas are too dull. Adjust the strength of your maps to fix this. Next, check for stretching or misaligned textures. Rotate your model around and look at every angle to make sure no areas are blurry or stretched. If you find stretching, go back to your UV unwrap and fix it before proceeding. Finally, add small, subtle details to make your texture feel more realistic. Even if you started with a pre-made texture, adding a little dirt to the bottom of a model, scratches to edges that get touched often, or a small logo on a product will make the model feel more lived-in and believable. It’s these small details that separate a good textured model from a great one.
Packing textures and exporting
If you’re going to use your textured model outside of Blender, you need to make sure all your texture files are packed correctly so they don’t get lost when you export. Blender has two options for this: you can pack the texture images into the Blender .blend file, or you can export them as separate image files along with your model. To pack textures into the .blend file, go to File > External Data > Pack All Into .blend. This embeds all your texture images into the file, so you don’t have to keep track of separate image files. If you’re exporting your model to a game engine or another 3D program, you’ll usually export it as a .fbx or .gltf file, and export your textures as separate PNG or JPEG files. When exporting, make sure you enable the option to embed textures or include the UV coordinates in the export file, so the texture is mapped correctly when you import it into another program. For PBR textures, make sure you name your image files correctly (for example, wood_basecolor.png, wood_roughness.png) so the game engine can automatically recognize and connect them when you import the model.
Conclusion
Adding texture to a 3D model in Blender is a process that builds from simple foundational steps to creative custom detail. Starting with a clean model and a well-done UV unwrap sets you up for success, whether you’re using procedural textures, pre-made PBR sets, or hand-painting your own custom details. Understanding how different texture maps work with Blender’s Principled BSDF shader helps you create realistic, physically accurate materials that look great in both renders and games. Texture baking lets you transfer fine detail from high-poly models to optimized low-poly versions, opening up possibilities for everything from mobile games to feature film animation. Like any skill in 3D art, texturing gets easier with practice: start with simple models, experiment with different methods, and study reference photos of real materials to understand how surface detail works. Over time, you’ll develop the skills to create textured models that feel tangible, immersive, and full of character.