
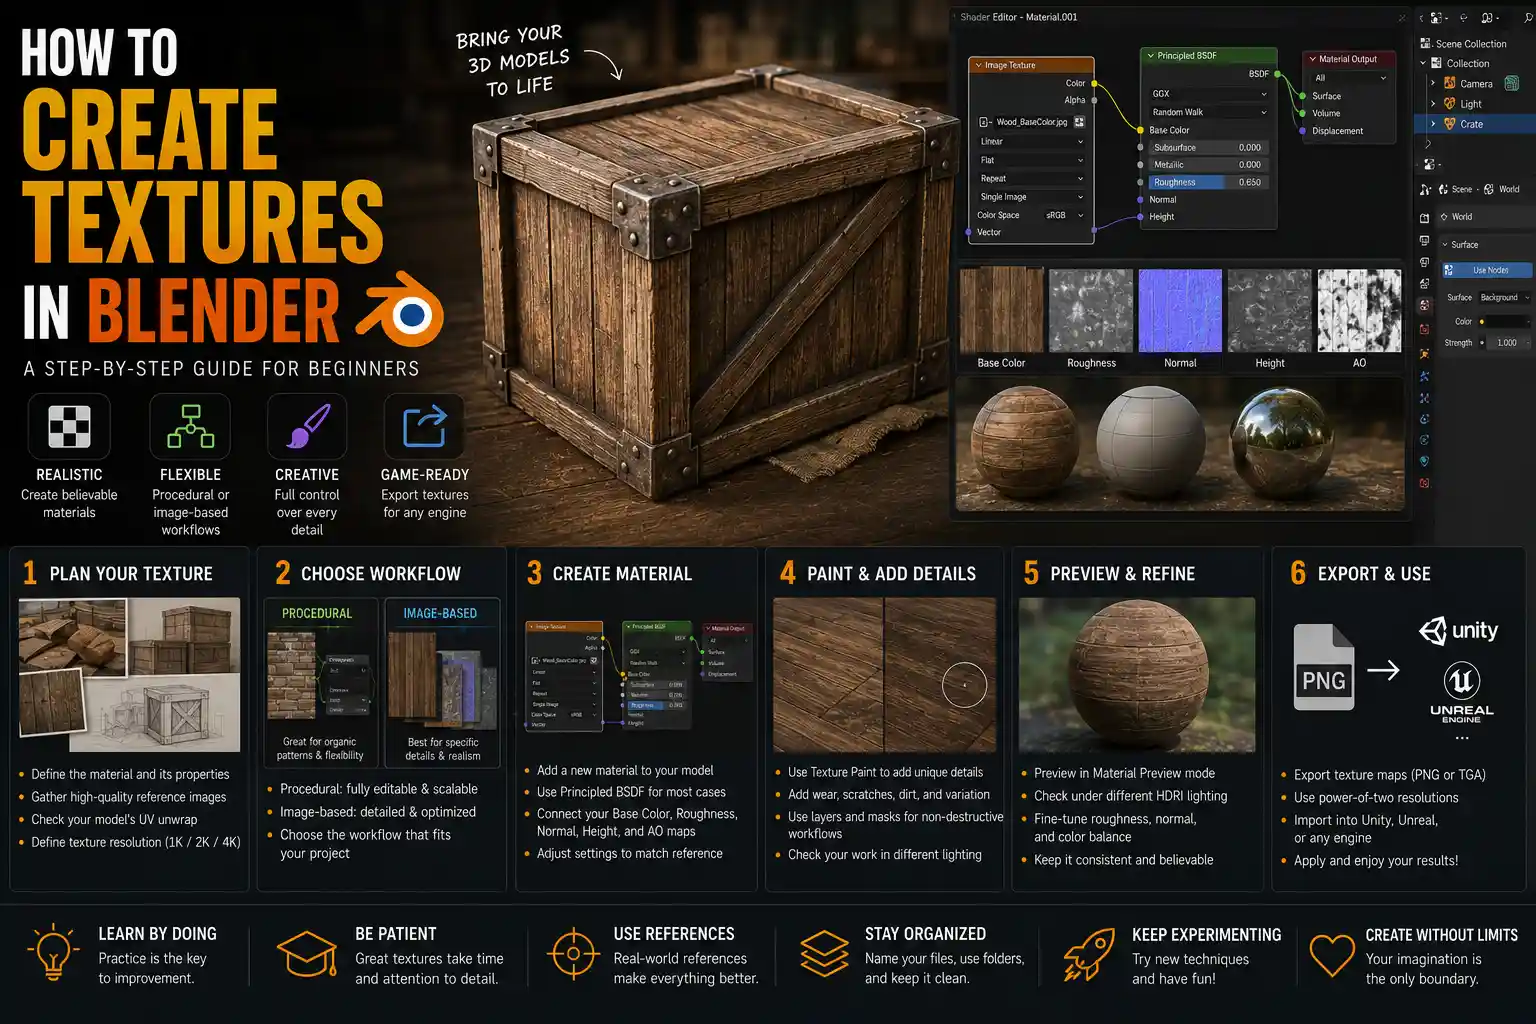
Whether you’re designing a game asset, creating a product visualization, or building a 3D scene for a short film, a great texture can turn a flat, lifeless 3D model into something that feels tangible and real. Blender, the free open-source 3D creation suite, comes with every tool you need to create, apply, and refine custom textures without expensive third-party software. Even if you’re new to 3D art, learning to texture in Blender is more accessible than ever, thanks to updated built-in features like the Shader Editor and Geometry Nodes. This step-by-step guide will walk you through every stage of the process, from planning your texture to exporting the final file-ready model.
Plan Your Texture Before You Start
Many new artists jump straight into the Shader Editor and start dragging nodes without a clear plan, which often leads to messy workfiles, inconsistent results, and hours of reworking. Taking 15 minutes to plan your texture will save you time and help you create a more believable final result. The planning stage is all about defining what your texture needs to accomplish, what resources you need, and how it will fit into your final project.
Define your material and reference gathering
The first step is to decide what material your model is made of, because every material has unique texture characteristics. A wooden crate, for example, needs visible grain, subtle scratches, and slight color variation, while a glossy ceramic mug needs a uniform base color, a smooth roughness map, and highlights that reflect light cleanly. If you’re texturing a character’s leather jacket, you’ll need to account for creases, wear around the cuffs, and subtle scuffs that come from repeated use.
Once you know your material, gather reference photos. Real-world references are non-negotiable for believable textures, even if you’re creating a stylized model. You can find high-quality free references on sites like Unsplash, Pexels, or Texture Haven, or take your own photos with a smartphone. For example, if you’re texturing a concrete wall, take a photo of a local sidewalk or building exterior to capture the unique cracks and stains that stock photos often miss. Aim to collect at least three to five references that show your material in different lighting and at different levels of close-up detail.
Check your UV unwrapping first
Before you even open the Shader Editor, confirm that your 3D model has a clean UV unwrap. UV unwrapping is the process of flattening your 3D mesh into a 2D map, which tells Blender how to wrap your 2D texture around your 3D model. A bad UV unwrap will stretch or distort your texture, no matter how good the texture image itself is.
To check your UVs, open the UV Editing workspace in Blender and enable the Stretch overlay. Blue areas mean your UVs are fine, while red or pink areas mean the texture will stretch in those spots. Fix any stretched areas by repacking your UV islands or pinning edges to get a more even distribution. For most projects, aim for consistent texel density—meaning one pixel of your texture represents roughly the same physical size across your entire model. This avoids having parts of your model look blurry while other parts look overly sharp.
Choose a Texturing Workflow That Fits Your Project
Blender supports two primary texturing workflows, and picking the right one for your project will save you time and help you get the result you want. The two main options are image-based texturing (using existing image files to build your texture) and procedural texturing (generating texture patterns using Blender’s node-based tools, no external image files required). Each has its own advantages and ideal use cases.
Procedural texturing for flexible, reusable results
Procedural textures are generated mathematically within Blender, so you don’t need any external image files to create them. This workflow is perfect for creating quick test textures, reusable materials, or organic patterns like clouds, stone, or wood grain. The biggest advantage of procedural texturing is that it’s fully non-destructive and infinitely adjustable: you can change the scale of a wood grain, adjust the intensity of scratches, or swap the base color at any time without starting over. Procedural textures are also resolution-independent, meaning you can scale them up for close-up renders without getting blurry pixelation.
Common uses for procedural textures in Blender include:
- Environment assets like rocks, trees, and ground terrain, where organic variation is key
- Prototyping and blocking out scenes, where you need a quick material to test lighting and composition
- Stylized materials, where you can control every pattern to match your art style
- Materials that need frequent adjustments, like product design assets where the client may request multiple color changes
The biggest downside of procedural texturing is that it can be harder to add specific, localized details (like a logo on a t-shirt or a crack in a specific spot on a wall) compared to image-based workflows. It can also be more GPU-intensive if you have a complex node setup, especially for large scenes.
Image-based texturing for detailed, specific assets
Image-based texturing uses pre-made or custom-painted image files to create your texture maps. This is the workflow you’ll need for game assets, photorealistic models, and assets that require specific hand-painted details. You can use scanned textures, stock texture maps, or paint your own directly in Blender using the Texture Paint workspace.
Image-based texturing is the industry standard for game development because it’s optimized for real-time rendering. Game engines load individual texture maps once, rather than calculating procedural patterns on the fly, which improves performance. This workflow is also better for adding specific details: if you need a coffee stain on the corner of a wooden table or a tear on the knee of a pair of jeans, you can paint that detail exactly where you need it.
For photorealistic work, image-based workflows let you use physically scanned PBR (physically based rendering) texture sets that come with pre-made base color, roughness, metallic, normal, and ambient occlusion maps. These sets are designed to react correctly to different lighting conditions, making it easy to get a believable result fast.
Good texturing isn’t about how many details you can add—it’s about adding the right details in the right places. Real-world materials get worn where they interact with other objects, so focus your texture details on areas that touch hands, tools, or other surfaces, and keep less-frequently touched areas smoother.
Build Your Texture in the Blender Shader Editor
Once you’ve planned your project and chosen a workflow, it’s time to build your texture in Blender’s Shader Editor. This is where you combine different texture maps, adjust material properties, and fine-tune how your material reacts to light. Whether you’re using a procedural or image-based workflow, the core node setup for PBR texturing (the current industry standard) follows the same basic structure.
Set up your base PBR node structure
Most modern texturing uses PBR, which stands for physically based rendering. PBR is a set of standards that ensures your texture looks consistent across different lighting conditions and different software, which makes it ideal for games, arch viz, and 3D printing. A standard PBR material uses five core maps, each of which controls a different property of the material:
- Base Color: Defines the overall color of your material. For metal, this is the color of the metal itself; for wood, this is the color of the grain.
- Metallic: Controls whether the material is metal or non-metal. Metals have a value of 1, non-metals have a value of 0, with a few exceptions like worn metal that might have a lower value in scratched areas.
- Roughness: Controls how smooth or rough the material is. A value of 0 is completely smooth (like glass or polished marble), while a value of 1 is completely rough (like concrete or unglazed clay).
- Normal: Adds fine surface detail (like bumps, grain, or scratches) without adding extra geometry to your model. This makes low-poly models look much more detailed than they actually are.
- Ambient Occlusion: Darkens crevices and small gaps where light would naturally be blocked, adding depth and realism to your texture.
To set up this structure in Blender’s Shader Editor, start with the default Principled BSDF shader that comes with every new material. This shader is already set up to accept PBR maps, so you just need to connect your texture maps to the correct input sockets. For an image-based workflow, add an Image Texture node for each map, then connect the color output of each node to the corresponding input on the Principled BSDF. For roughness and metallic maps, which are grayscale, you can set the Image Texture node to Non-Color in the color space dropdown to ensure Blender reads the values correctly.
Add detail and variation to your texture
Even if you’re using a high-quality stock PBR set, adding subtle variation will make your texture feel more natural and less generic. No two real-world materials are identical, so small changes will make your model feel unique. There are several easy ways to add variation that don’t require a lot of extra work:
- Add a subtle noise or Voronoi texture to the roughness input to break up uniform roughness. For example, a painted wall looks more realistic if some areas are slightly rougher than others, rather than having the exact same roughness across the entire surface.
- Use a grunge map (a free grayscale image of dirt and wear) to add dirt to the bottom of a model or scuffs to high-contact areas. Multiply the grunge map into your base color or roughness to darken colors and increase roughness in those spots, which mimics real-world wear.
- For procedural wood or stone, layer multiple noise textures at different scales to create natural variation. A large-scale noise for overall grain and a small-scale noise for fine surface detail will create a much more believable result than a single noise texture.
One common mistake new artists make is making textures too busy. Remember that the human eye only notices fine detail when it’s looking at a model up close. If your model is going to be in the background of a scene, you don’t need to add every tiny scratch and stain. Keep detail focused on focal points, and keep background assets simpler to avoid distracting from the main subject.
Paint Custom Textures Directly in Blender
If you need to add custom hand-painted details, or you want to create a full custom texture from scratch, you don’t need to export your UVs to a third-party program like Photoshop. Blender’s built-in Texture Paint workspace has all the tools you need to paint custom textures directly on your 3D model. This is perfect for adding logos, hand-painted details for stylized models, or fixing blemishes on existing textures.
Set up your texture for painting
Before you start painting, you need to create a new blank image to paint on. In the UV Editing workspace, select all your UVs and click New Image in the side panel. Name your image, set the resolution (for most projects, 2048x2048 or 4096x4096 is sufficient, depending on how close your model will be to the camera), and set the background to transparent or your base color. Click OK, and then save the image to your project folder to avoid losing your work.
Next, switch to the Texture Paint workspace. Blender will automatically set up your model for texture painting, so you can paint directly on the 3D model in the viewport. The most useful feature here is symmetry painting, which lets you paint one half of a symmetrical model (like a character face) and Blender automatically mirrors your strokes to the other half. This saves a ton of time when working on symmetrical assets.
Pro tips for better texture painting
Texture painting in Blender takes a little practice, but these tips will help you get better results faster:
- Use a pressure-sensitive graphics tablet if you have one. Blender supports pressure sensitivity for brush size and opacity, which makes it much easier to create natural, smooth strokes. If you only have a mouse, use low-opacity brushes and build up color gradually to get a softer result.
- Use texture brushes to add natural details. Blender comes with a set of default texture brushes that let you add grain, cloth patterns, or grunge in a single stroke. You can also download free custom brush packs from Blender artists online to expand your library.
- Use layers to keep your work organized. Blender supports layered texture painting, so you can add dirt on one layer, scratches on another, and adjust the opacity of each layer without messing up your base color. This is non-destructive, so you can always go back and change details later.
- Turn on Occlusion Culling in the Texture Paint sidebar. This feature prevents your brush from painting on faces that are hidden behind other parts of the model, so you don’t accidentally paint details on the inside of a mesh or on areas that are hidden from view.
After you finish painting, save your texture image by going to the Image menu in the UV Editor and clicking Save As. Save it as a PNG to preserve transparency, or as a JPEG for opaque textures to save file space.
Test, Refine, and Export Your Final Texture
Once your texture is built and any custom painting is done, the next step is to test it under different lighting conditions to make sure it looks good everywhere you need it. A texture that looks great in a bright studio light might look muddy in a dark night scene, so testing early helps you catch issues before you export.
Test your texture in different lighting
Start by doing a test render with Blender’s Cycles renderer, which is designed for photorealistic rendering and will accurately show how your PBR material reacts to light. Move your camera to the closest angle it will ever be in your final project to check that fine detail isn’t blurry or pixelated. Then, try different lighting setups: add a bright key light, a soft fill light, and a rim light to see how your texture reacts. If you’re texturing a game asset, import it into your game engine (Unity, Unreal, etc.) and test it in different in-game lighting environments to make sure it looks consistent.
Common issues to look for during testing include:
- Overly dark ambient occlusion that makes crevices look muddy instead of deep. If this happens, lower the strength of your AO map in the node setup by multiplying it with a RGB node to lighten it.
- Metallic values that are too high for non-metal materials. If your plastic or painted wood looks like shiny metal, lower the metallic value to 0 or close to 0.
- Roughness values that are too low, making every material look like shiny plastic. Most real-world materials are not perfectly smooth, so if your texture looks unnatural, try increasing the roughness value slightly.
- Stretched texture caused by bad UVs. If you notice stretching after rendering, go back to your UV unwrap and fix any stretched UV islands before you export.
After testing, make any small adjustments needed, then pack your texture into your Blender file or prepare it for export.
Export your texture correctly
How you export your texture depends on what you’re using the model for. If you’re keeping the model in Blender for your own render, you can just pack your texture into the Blender file by going to File > External Data > Pack Resources. This embeds the texture image into the .blend file, so you don’t have to worry about losing it if you move the file to another computer.
If you’re exporting the model for use in another program or a game engine, you need to export your texture maps as separate image files and export your model in a compatible format like FBX or GLB. When exporting textures, make sure to name each map clearly: for example, wooden_crate_basecolor.png, wooden_crate_roughness.png, etc. This makes it easy to connect the maps correctly in another program. For game development, you can also bake your procedural texture to image maps if you used a procedural workflow, so the game engine can load the texture correctly. To bake a texture in Blender, go to the Render Properties panel, select Bake, choose the maps you want to bake, and click Bake to save them as image files.
Conclusion
Creating textures for 3D models in Blender doesn’t require expensive software or years of experience to get great results. By starting with a solid plan, checking your UVs before you begin, choosing the right workflow for your project, and building your texture with physically based rules, you can create believable, professional-looking textures for any use case. Remember that the best textures are the ones that serve the story or purpose of your model: you don’t need to add every possible detail to make a texture great, just the right details that make the model feel real. The more you practice texturing different materials, the more intuitive the process will become, and soon you’ll be able to create custom textures that bring any 3D model to life.