
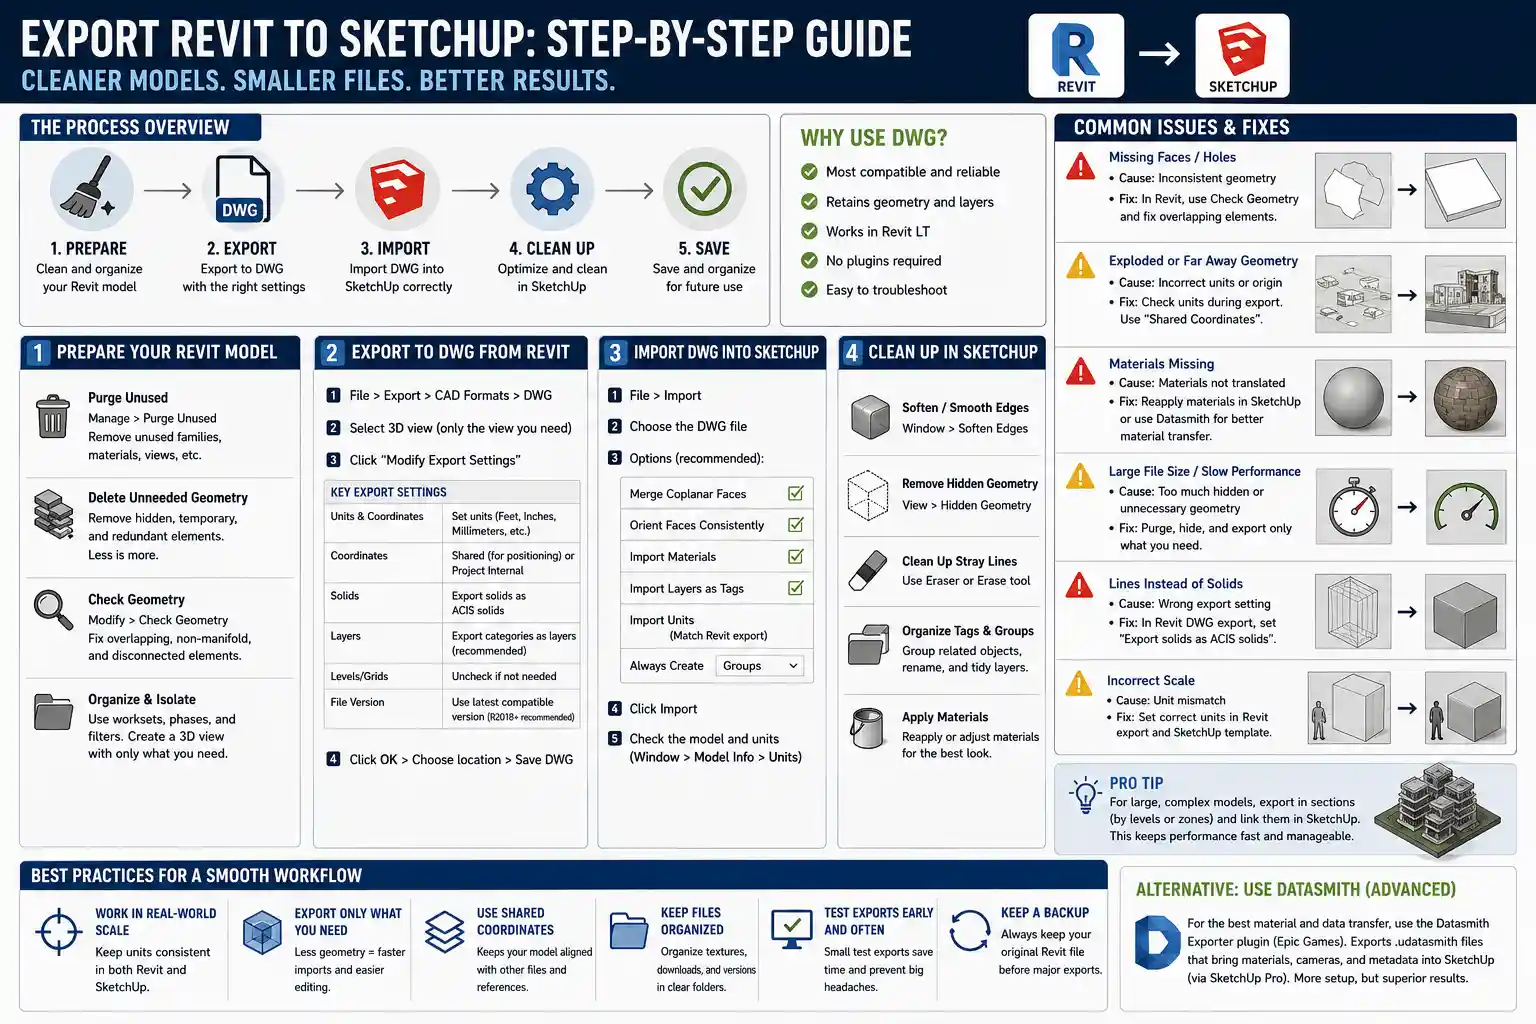
Autodesk Revit is the industry standard for architectural BIM (Building Information Modeling) work, storing every detail of a project from structural loads to furniture schedules in a single intelligent model. Trimble SketchUp, meanwhile, remains a favorite for quick conceptual design, 3D visualization, and collaborative editing thanks to its intuitive interface and low learning curve. If you’ve ever needed to move a Revit model to SketchUp to speed up a design iteration or share a simplified model with a client, you know the process can hit snags: missing faces, broken geometry, oversized file sizes, or misplaced materials. This step-by-step guide walks you through every method, from basic export to advanced troubleshooting, to get a clean, usable SketchUp model every time.
Pre-Export Preparation: Clean Up Your Revit Model First
One of the most common mistakes people make when exporting from Revit to SketchUp is skipping pre-export cleanup. A cluttered Revit model with unused layers, hidden geometry, and redundant detail will export as a bloated, difficult-to-edit SketchUp file that lags or crashes. Taking 10 to 15 minutes to prepare your model before export saves hours of fixing problems later.
Purge Unused Items and Delete Redundant Geometry
Revit accumulates a lot of unused data over the course of a project: imported CAD files, unused material styles, duplicated family types, and hidden groups that you forgot existed. All of this extra data gets included in your export, increasing file size and increasing the risk of geometry errors. To fix this, use Revit’s built-in Purge Unused tool:
- Go to the Manage tab on the Revit ribbon
- Click “Purge Unused” in the Settings panel
- Wait for Revit to scan your model, then check all unused categories you want to remove (most users can safely check all boxes unless you’re keeping unused assets for future edits)
- Click “OK” to remove the unused data
After purging, go through your model and delete any redundant geometry that isn’t needed for your SketchUp work. If you’re exporting a conceptual massing model for a client presentation, for example, you don’t need to include detailed MEP piping or interior electrical fixtures. Hiding elements isn’t enough—hidden geometry still exports with the file, so delete or temporarily unload worksets for unneeded components if you’re working on a collaborative project.
Check for Common Revit Geometry Errors
Revit is built to handle BIM data, not just raw 3D geometry, so it can tolerate small errors that will break your export to SketchUp. The most common issues are overlapping walls, non-manifold geometry (geometry with overlapping edges or faces that don’t enclose a volume), and incorrectly joined elements. Use Revit’s Check Geometry tool to find and fix these errors before you export:
- Go to the Modify tab > Check Geometry panel > Check Geometry
- Select the entire model to run a full scan
- Resolve any overlapping or intersecting elements that the tool flags by using the Join/Unjoin tool to correct connections
- Delete any empty or unplaced components that are floating far from your main model
Finally, organize your Revit model by worksets or phases if you only need to export a portion of the project. Isolate the section you need in a 3D view before you start the export process to avoid pulling in unwanted geometry from other parts of the building.
Method 1: Native Revit DWG Export (The Most Reliable Basic Workflow)
There are multiple ways to get a Revit model into SketchUp, but the native DWG export method is the most widely used and consistently reliable for most users. It doesn’t require any third-party plugins, works with both Revit LT and full Revit, and produces clean geometry when done correctly. This method is ideal for most architectural, interior design, and construction projects that need a straightforward export without advanced material or data retention.
Step-by-Step DWG Export from Revit
Before you start, create a dedicated 3D view for your export. This lets you control exactly what elements are included, and makes it easier to adjust export settings without affecting your working views. Once your 3D view is set up, follow these steps:
- Click the “File” menu in the top left corner of Revit
- Hover over “Export” > Click “CAD Formats” > Select “DWG”
- In the Export CAD Formats dialog box, select the 3D view you created from the view list. Make sure “Selected views/sheets” is checked, and only your target 3D view is selected
- Click “Modify Export Settings” to adjust the output parameters. This is the most critical step for a clean export
- In the Export Settings dialog, go to the “Units and Coordinates” tab. Set the export units to match your SketchUp project: if you work in imperial, use Feet or Inches; if you work in metric, use Millimeters or Meters. Set the coordinate system to “Shared” if you need to retain positioning for reference, or “Project Internal” if you just need the model geometry
- Go to the “Solids” tab and select “Export solids as ACIS solids”. This ensures your 3D geometry exports as a clean solid volume, not a mesh of disconnected lines and faces
- Under “Levels/Grids”, uncheck “Export levels and grids” if you don’t need them in SketchUp to reduce file size
- Click “OK” to save your export settings, choose a save location on your computer, and click “Save” to export the DWG file
Once your DWG is saved, open SketchUp to import it. Start a new SketchUp file with the correct template matching your units, then go to File > Import, select the DWG file, and adjust import settings if needed. For most models, leave the import settings at default, but check “Merge coplanar faces” to reduce redundant geometry. Click “Import” and wait for SketchUp to process the file. Depending on the size of your model, this can take a few seconds to several minutes.
Pros and Cons of the DWG Method
The biggest advantage of this method is its accessibility: you don’t need to pay for extra plugins or worry about compatibility between different software versions. It also produces solid geometry that is easy to edit in SketchUp, compared to mesh-based exports that can be difficult to modify. The main downside is that this method doesn’t retain Revit materials or object organization by default—your model will import as a single grouped block, and you’ll have to reapply materials manually in SketchUp. For most use cases, this is a minor tradeoff, but if you need to retain materials or layer organization, you may want to use a different method.
Method 2: Using the Free RVT Importer for SketchUp (Direct Import)
In 2021, Trimble released an official RVT Importer plugin for SketchUp that lets you import Revit files directly into SketchUp without exporting an intermediate DWG or FBX file. This tool is free for all SketchUp Pro users, and it’s a game-changer for users who regularly move models between the two programs. It retains more information from your Revit model, including materials, layers, and object categories, which saves time on post-import cleanup.
Setting Up and Using the Official RVT Importer
First, you need to install the plugin. For SketchUp 2021 and newer, the RVT Importer is available directly from the SketchUp Extension Warehouse: open SketchUp, go to Window > Extension Manager, click “Manage Extensions”, search for “RVT Importer” and install it. Note that the importer requires SketchUp Pro (it doesn’t work with SketchUp Make or the free web version) and it only supports Revit files from 2015 onwards.
Once installed, importing a Revit file directly is straightforward:
- Open SketchUp and create a new file with your desired unit template
- Go to File > Import, then select “Revit (*.rvt)” from the file type dropdown menu
- Select your Revit file and click “Import”
- In the import options dialog, choose which elements you want to import: you can select to include rooms, areas, materials, links, and CAD imports included in the Revit file. Uncheck any elements you don’t need to keep your SketchUp file small
- Adjust the import level of detail: if you’re importing a large full-building model, reduce the level of detail to speed up import and reduce file size. For small interior projects, you can use full detail
- Click “Import” and wait for the tool to process the Revit file. Trimble’s importer converts the Revit BIM data directly to SketchUp geometry, so it handles most common geometry errors automatically
A big advantage of this method is that it organizes your Revit model elements into SketchUp layers by category (walls, floors, roofs, furniture, etc.) automatically. That makes it much easier to turn elements on and off or edit specific parts of the model after import, compared to the DWG method that imports everything as a single block. It also retains material assignments from Revit, so you don’t have to reapply every material manually in SketchUp.
The biggest mistake new users make with direct RVT import is bringing in every single detail from the Revit model, even elements they don’t need. A 100,000 square foot commercial building with every light fixture and door handle imported will bring even the most powerful SketchUp session to a crawl. Be selective about what you import—most of the time, you only need the core architectural geometry for visualization or design work.
The main limitation of the official RVT Importer is that it’s only available for SketchUp Pro, which requires a paid subscription. It also sometimes struggles with very large Revit files or Revit files with a lot of linked models, so you may still need to use the DWG method for large projects. For most small to mid-sized projects, however, this is the fastest and most convenient method available today.
Method 3: Third-Party Plugins for Advanced Exports
If you need more control over your export or you’re working with specialized project types, there are several popular third-party plugins that simplify the Revit to SketchUp workflow. The most widely used is SketchUp Importer for Revit from CadsoftTools, which adds a direct export tool to Revit that converts Revit geometry to SketchUp’s .skp format directly without an intermediate file. Another popular option is the RVTPoly plugin, which is designed to handle large massing models with complex organic geometry.
Key Benefits of Third-Party Export Plugins
Third-party plugins like Cadsoft’s tool offer several features that aren’t available in the native DWG or official Trimble import method:
- Direct export to .skp format from Revit, so you don’t have to go through an intermediate DWG or FBX file. This reduces the risk of geometry errors that can happen during two-step conversion
- Automatic retention of materials, textures, and layer organization. Many plugins map Revit material types to SketchUp materials automatically, so you don’t have to spend hours reapplying textures after import
- Options to simplify complex geometry automatically. Plugins can reduce the polygon count of curved surfaces to keep your SketchUp file small without losing visible detail, which is especially useful for large projects
- Support for retaining linked Revit models. If your main Revit file has multiple linked architectural, structural, and MEP models, most third-party plugins can merge or separate them correctly in the SketchUp export, which is a common pain point with other methods
For example, if you’re an interior designer working on a residential project, a third-party plugin can export your full Revit model with all cabinetry, finishes, and furniture already organized into SketchUp layers and materials assigned correctly. That cuts down post-export work from hours to minutes.
What to Look for in a Third-Party Plugin
Before you purchase a third-party export plugin, check compatibility with your software versions. Revit updates annually, and older plugins may not work with the latest Revit or SketchUp releases. Also, check the license terms: some plugins are sold as perpetual licenses, while others require an annual subscription. For most occasional users, a one-time purchase is more cost-effective, but for firms that export multiple models a week, a subscription with regular updates is usually worth the cost.
Most third-party plugins offer a free trial, so test the plugin with a small sample model before you buy to make sure it works with your workflow and produces the results you expect. Avoid little-known plugins from untrusted sources, as they can contain malware or corrupt your Revit files.
Post-Import Cleanup and Troubleshooting Common Issues
No matter which export method you use, you’ll almost always need to do a small amount of cleanup in SketchUp after import to fix common issues. Knowing what to look for and how to fix these problems quickly saves you from frustration and ensures your model is usable for your project.
Fixing Missing Faces and Broken Geometry
Missing faces are the most common issue after export, especially if you used the DWG method with an older Revit version. This happens when Revit exports non-manifold geometry that SketchUp can’t interpret as a solid face. To fix missing faces:
- Turn on Hidden Geometry in SketchUp (View > Hidden Geometry) to see the edges that should form the missing face
- Use the Line tool to redraw the outline of the missing face. SketchUp will automatically generate the face once you close the outline
- Use the Eraser tool to delete any extra redundant edges that were created during export to keep your model clean
If you have multiple missing faces across a large model, use a free SketchUp plugin like Face Finder to automatically detect and fill missing faces in one click. This is much faster than fixing each face manually for large models.
Reducing File Size and Improving Performance
It’s common for exported Revit models to be much larger than necessary in SketchUp, leading to laggy performance and long save times. The main culprits are redundant coplanar faces and high-polygon curved surfaces. To fix this:
- Use SketchUp’s “Intersect Faces” > “With Model” command, then delete any overlapping redundant faces
- Use the “Solid Inspector²” plugin to find and fix non-manifold solid errors and delete empty groups
- For curved walls or complex organic forms, use the “Simplify Contours” tool or a plugin like QuadFaceTools to reduce the polygon count without losing visible detail
- Delete any unused materials, styles, or components from your SketchUp model using the “Purge Unused” tool (Window > Model Info > Statistics > Purge Unused)
Adjusting Materials and Organization
If you didn’t use a method that retains materials and layers, you’ll need to organize your model after import. Start by exploding the imported block, then group elements by category (walls, floors, roofs, furniture) and assign them to separate layers. Reapply materials to match your Revit model, or use SketchUp’s pre-built material library to update textures for visualization. If you’re exporting the SketchUp model to share with a client or third party, save a copy with all unused assets purged to keep the file small enough to email or share via cloud storage.
Conclusion
Exporting a 3D model from Revit to SketchUp doesn’t have to be a frustrating process full of broken geometry and bloated files. The right workflow depends on your needs: if you’re a casual user with a SketchUp Pro subscription, the official Trimble RVT Importer is the fastest and most convenient option, offering direct import with automatic material and layer organization. If you don’t have SketchUp Pro or you’re working with a large legacy model, the native DWG export method is reliable and doesn’t require any extra tools. For frequent exporters or firms that need advanced features, a paid third-party plugin can save hours of post-import cleanup work.
No matter which method you choose, the most important step is pre-export cleanup in Revit. Purging unused data, fixing geometry errors, and removing unneeded elements before you export prevents most common issues before they start. A little bit of preparation upfront saves hours of troubleshooting after import, leaving you with a clean, editable SketchUp model that’s ready for conceptual design, visualization, or collaboration.