
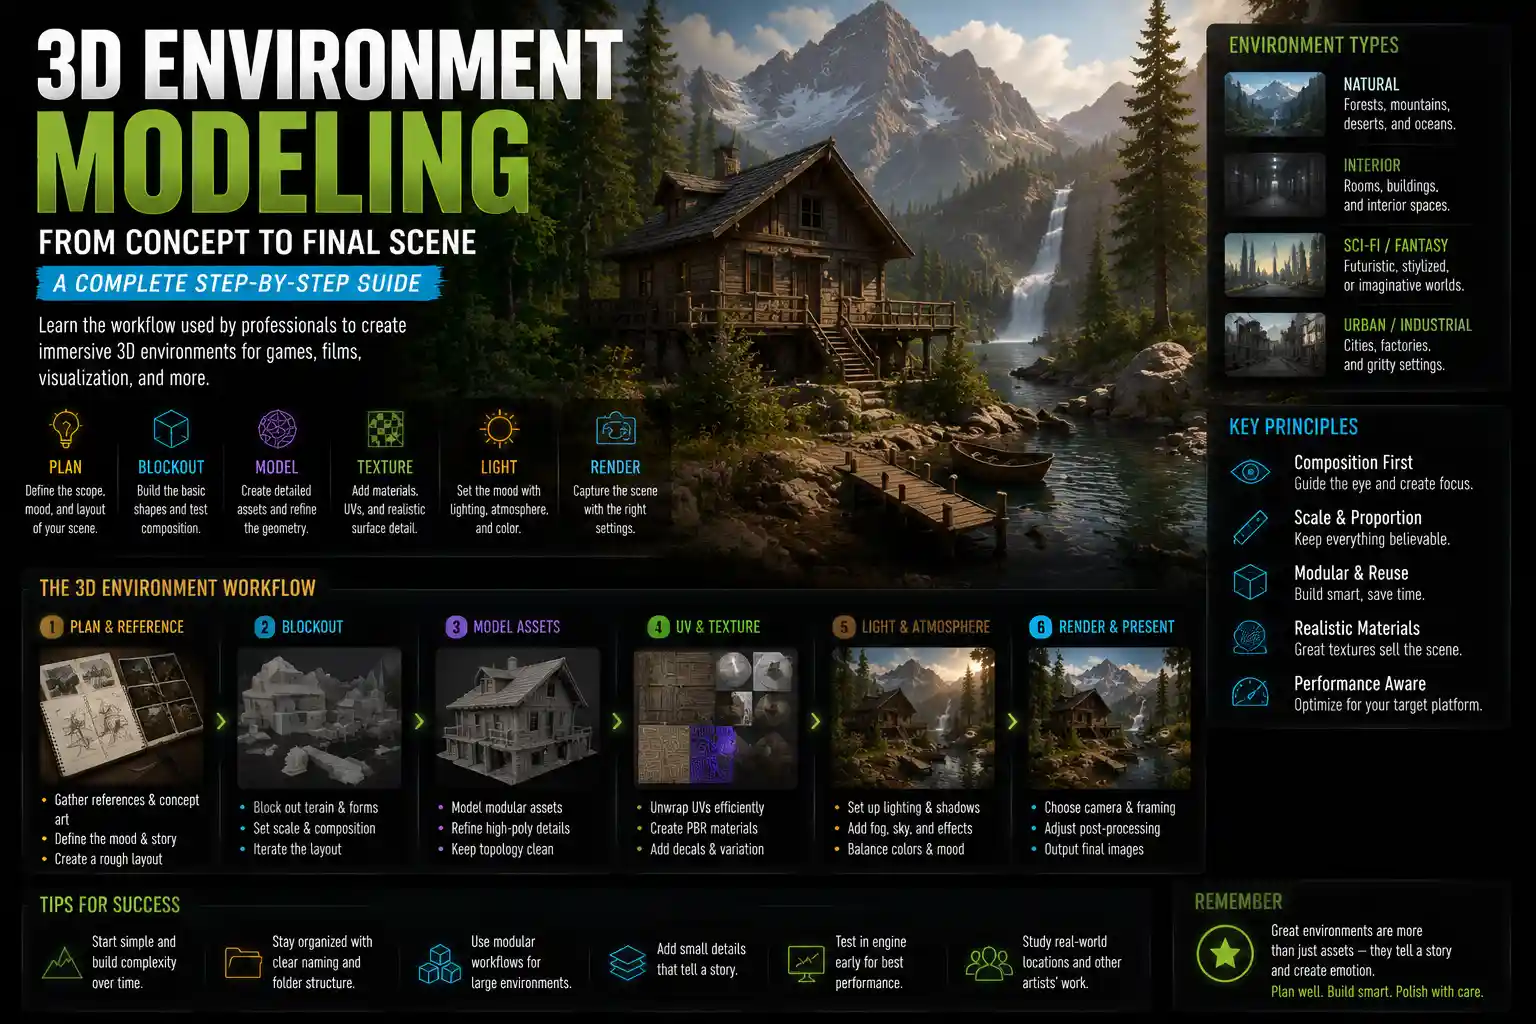
Whether you’re building a world for a video game, creating a background for a feature film, or designing a virtual tour for a real estate development, a high-quality 3D environment model brings immersive spaces to life. Unlike static 2D art, 3D environments let audiences explore from every angle, interact with objects, and feel like they’re stepping inside a real (or imagined) place. But starting out can feel overwhelming: between choosing software, blocking out geometry, adding textures, and optimizing for performance, there are dozens of steps that can trip up new creators. This guide breaks down the entire process, from initial concept to final export, with practical tips that work for beginners and experienced artists alike.
Pre-Production: Plan Your Environment Before You Model
Many new creators jump straight into 3D software without a clear plan, only to end up with a messy, unbalanced scene that requires hours of rework. Pre-production doesn’t have to take weeks, but it will save you time and frustration down the line. The goal of this stage is to define your environment’s purpose, mood, and layout before you touch any 3D tools.
Define the scope and purpose of your environment
First, ask yourself what your 3D environment is for. A 10-square-mile open world for an indie game has very different requirements than a small, detailed room for a product render. A real-time environment for a game needs to be optimized for smooth performance, while a pre-rendered environment for a film can handle millions of polygons and ultra-high-resolution textures. Clarifying your scope early helps you avoid overworking small details that won’t be seen, or underbuilding key areas that will be the focus of the scene.
For example, if you’re creating a 3D environment for a virtual reality (VR) experience, you’ll need to prioritize frame rates above 90 frames per second to prevent motion sickness. That means limiting the total number of polygons in your scene and using compressed textures, even if that means sacrificing some ultra-fine detail. If you’re creating a backdrop for a 3D animated film shot, you can get away with far more geometry because the scene will be rendered once, not every frame in real time.
Gather references and sketch your layout
Even the most experienced 3D artists rely on reference images to build realistic environments. References help you get proportions right, match real-world materials, and nail the mood you’re trying to create. Start by collecting:
- Photographs of real locations that match your concept (for example, if you’re building a foggy Pacific Northwest forest, save photos of tree bark, mossy rocks, and forest undergrowth)
- Concept art from similar projects (video games, films, or artStation portfolios are great sources of inspiration)
- Color palette references to keep your lighting and textures consistent throughout the scene
Once you have your references, sketch a quick 2D layout of your environment. You don’t need to be a master illustrator – a simple top-down map marking key features (a river, a cottage, a winding path) will help you arrange elements logically. For smaller scenes, like a medieval apothecary shop, sketch a rough floor plan with workbenches, shelves, and storage to make sure you don’t cram too many objects into a small space. This step also helps you establish a focal point: the area of the environment that will draw the viewer’s eye. Every good environment has a clear focal point, so make sure your layout leads the viewer toward it.
Blockout: Build the Basic Geometry of Your Scene
Once you have a plan, the next step is to create a blockout – a low-polygon version of your entire environment that defines the size, shape, and placement of all major elements. Blockout lets you test your layout and proportions without wasting time detailing every rock and tree right away. Most artists keep their blockouts simple, using basic primitive shapes like cubes, spheres, and planes to represent large objects and landscape features.
Choose the right software for your project
The 3D software you choose will depend on your budget, your project type, and your existing skill set. Some of the most popular options for environment modeling include:
- Blender: Free, open-source software that works for everything from modeling to rendering. It’s a great choice for beginners and professional artists alike, with a huge community and endless free tutorials.
- Autodesk Maya: The industry standard for film and game development, with advanced modeling and animation tools. It requires a subscription, but it’s widely used in major studios.
- Unity / Unreal Engine: While these are primarily game engines, both include built-in modeling tools for quick blockouts and editing, especially for real-time environments.
- 3ds Max: Popular for architectural visualization and game environment modeling, with strong tools for geometry manipulation and UV mapping.
For beginners, starting with Blender is almost always the best choice. It’s completely free, has a shallow learning curve compared to paid options, and supports every step of the environment modeling process from start to finish.
Create your blockout step-by-step
Start with the largest features first. If you’re building a forest environment, block out the overall landscape terrain first. If you’re building an interior room, block out the walls, floor, and ceiling before adding any furniture. Work from large to small: this ensures that your proportions are consistent across the entire scene. For example, a 2-meter tall wall should be the right size relative to a 1.8-meter tall human character, so it’s helpful to add a basic character model to your blockout to test scale as you go.
“As environment artists, 90% of our job is composition and scale. If your blockout is wrong, no amount of fancy textures or fine detail will fix it.”
Once your large features are in place, add placeholder blocks for medium and small objects: a cottage, a fallen log, a boulder, a park bench. Don’t worry about making these shapes detailed – just get their size and position right. After placing all objects, step back and view your scene from all angles, especially the angles the viewer will see most often. If you’re making a first-person game, walk through the blockout in your game engine to test how it feels to move through the space. Does the path flow naturally? Are any areas too cramped or too empty? Is your focal point clearly visible from the main viewing angle? This is the time to make adjustments – changing the position of a cube is far easier than moving a fully detailed, textured tree later.
Detailing and Modeling: Add Shape and Structure to Your Environment
Once you’re happy with your blockout, it’s time to add detail to your geometry. This is where you turn basic cubes into detailed rocks, turn flat planes into winding trees, and turn a simple terrain into a rolling landscape with hills and valleys. There are two main approaches to detailing: hand modeling, where you sculpt or model every detail yourself, and procedural generation, where you use tools to automatically create variation and detail across large areas. Most environments use a mix of both.
Landscape and large-scale detailing
For large outdoor environments, you’ll almost always start with a heightmap-based terrain. Most 3D software and game engines have built-in terrain tools that let you sculpt hills, valleys, mountains, and rivers by raising and lowering parts of a flat grid. For example, in Blender, you can use the Sculpt Mode brushes to add texture to your terrain, while in Unreal Engine, the Landscape tool lets you paint elevation and create large worlds in minutes.
One of the most common mistakes new artists make is adding too much detail too early across the entire terrain. Instead, focus detail on areas close to the viewer or along the main path. Areas in the far distance can stay very low-poly and simple, because the viewer won’t be able to see fine detail there anyway. To add natural variation, use alpha brushes when sculpting terrain. Alpha brushes let you stamp natural-looking ridges, rock formations, and erosion patterns with a single click, creating a more organic look than manually sculpting every bump.
Modeling small and medium assets
After finishing your large terrain or interior structure, it’s time to detail the individual assets that make up your environment: rocks, trees, furniture, decorations, and other props. For organic assets like rocks and trees, sculpting is the most popular approach. In sculpt mode, you can push, pull, and smooth the surface of your model to create natural, irregular shapes. For hard-surface assets like wooden cabinets, stone walls, or metal bridges, you’ll typically use polygon modeling techniques to create clean, precise shapes.
To save time, use the instancing or procedural scattering technique for repeated objects like grass, leaves, pebbles, and trees. Instead of modeling every tree individually, you can model 3-5 different tree variations, then use a scattering tool to place hundreds of copies across your terrain with random rotation, scale, and position. This creates a natural, varied look without the work of modeling each tree from scratch. Popular scattering tools include Blender’s Geometry Nodes, Unreal Engine’s Foliage Tool, and the third-party plugin Forest Pack for 3ds Max.
If you’re short on time or working on a large project, you don’t have to model every asset from scratch. There are thousands of free and paid 3D asset libraries online (like Sketchfab, TurboSquid, and Quixel Megascans) that offer pre-made, high-quality assets you can use in your scene. Just make sure you check the license terms to confirm you can use them for your intended project, and adjust any assets to fit the style and scale of your environment.
UV unwrapping for texturing
Before you can add textures to your models, you need to do UV unwrapping. This is the process of flattening your 3D model’s surface into a 2D image, so your software knows how to map 2D texture files onto your 3D geometry. For many new artists, UV unwrapping feels intimidating, but modern software has automated tools that make the process much easier than it used to be.
For environment models, follow a few simple rules for good UVs:
- Use more UV space for large objects that will be close to the viewer, and less UV space for small or distant objects. This ensures that textures look sharp in the areas that matter most.
- Avoid stretching: stretched UVs make textures look blurry or warped, so adjust your UVs to keep the scale consistent across the surface of your model.
- Pack your UVs efficiently to minimize wasted space. Packing multiple UV islands into a single texture file reduces the number of texture files your scene needs, which improves performance.
For large terrain objects, you can often use tiled textures instead of unique UVs for the entire landscape. Tiled textures repeat a small texture (like grass or dirt) across the entire surface, which saves memory and makes texturing faster. You can layer multiple tiled textures to create transitions between grass, rock, and dirt in different areas of your terrain.
Texturing and Lighting: Bring Your Environment to Life
Even the most perfectly modeled environment falls flat without good texturing and lighting. These two elements work together to create mood, highlight your focal point, and make your scene feel realistic or stylized, depending on your goal. Today, most artists use physically based rendering (PBR) texturing, which creates consistent, realistic-looking materials that work correctly in any lighting environment.
Adding PBR textures to your models
PBR textures use multiple maps to define different properties of a material: a base color map for the surface color, a roughness map to define how smooth or rough the surface is, a metallic map to define if the material is metal or non-metal, and a normal map to add fine surface detail without adding extra geometry. For example, a brick wall might have a rough roughness value, while a polished marble floor will have a very low roughness value (meaning it’s shiny and reflects light clearly).
There are several ways to get textures for your environment: you can create your own by photographing real surfaces and editing them in software like Adobe Photoshop, you can use procedural texture tools like Substance Designer to generate textures programmatically, or you can download free or paid PBR texture libraries from sites like Poly Haven, Quixel Megascans, or TexturingXYZ. For beginners, using pre-made PBR textures is a great way to get started, and you can adjust them to fit your scene by changing the base color or roughness to match your mood.
When texturing your environment, remember to add variation. A whole forest of trees with the exact same bark texture looks artificial. Add small variations to color and roughness across different objects to create a more natural look. For terrain, use texture painting to blend different materials together: for example, add dirt around the base of a tree, or add moss to the north-facing side of a rock, to match how these surfaces look in real life.
Lighting your environment for mood and clarity
Lighting is one of the most important elements of 3D environment art – it can make a good model look great, or a great model look terrible. The first step is to establish your key light, which is the main source of light in your scene. For an outdoor daytime scene, the key light is almost always the sun. For a nighttime cottage scene, the key light might be a fireplace or a candle inside the cottage.
After adding your key light, add fill lights to soften harsh shadows and ambient light to illuminate areas that would otherwise be completely black. For real-time environments, you can use baked lighting to pre-calculate shadows and ambient light, which improves performance without sacrificing quality. Baked lighting is especially useful for static environments where the light doesn’t change over time.
To make your environment feel more immersive, use lighting to guide the viewer’s eye to your focal point. Make your focal point brighter than the surrounding areas, and use shadows to darken less important areas. For example, if your focal point is an old ruined castle on a hill, you can position the sun so it hits the castle directly, while the surrounding forest is in soft shadow. This automatically draws the viewer’s eye to the most important part of your scene.
Don’t forget atmospheric effects! Fog, haze, god rays, and atmospheric scattering add depth to your environment, especially for large outdoor scenes. Distant objects become lighter and bluer, which creates a sense of depth and makes your world feel bigger than it is. Even small interior scenes benefit from atmospheric effects like dust motes floating in a beam of sunlight, which add life and realism to the space.
Optimization and Export: Prepare Your Environment for Use
Once your environment is fully modeled, textured, and lit, you need to optimize and export it for its final use. Optimization is especially important for real-time environments (games, VR, interactive web experiences) where poor performance will ruin the user experience, but even pre-rendered environments benefit from clean optimization to reduce render times and file size.
Optimize polygon count and geometry
The first step of optimization is reducing the number of polygons in your scene. More polygons mean slower performance, so you want to remove any extra geometry that doesn’t contribute to the final look of your scene. For example, if you have a rock that’s only ever seen from 10 meters away, you don’t need 100,000 polygons for that rock – you can use a normal map to add fine detail and reduce the polygon count to 5,000 without any visible difference.
Use the level of detail (LOD) system for objects that are seen at different distances. LODs are multiple versions of the same asset with different polygon counts: the closest version has full detail, while versions further away have fewer and fewer polygons. Most game engines automatically switch between LODs based on how far the camera is from the object, which can drastically reduce the total number of polygons the engine has to render every frame.
You should also remove hidden geometry: any polygons that are completely behind other objects and never visible to the viewer. For example, the back side of a wall that’s against the edge of the scene doesn’t need to be rendered, so you can delete it to reduce your polygon count.
Optimize textures and export your scene
Next, optimize your texture files. Use the smallest texture resolution that still looks good for your use case. A 4K (4096x4096) texture looks great, but it uses four times as much memory as a 2K (2048x2048) texture. Small objects and distant objects can use 1K or 2K textures without any noticeable loss of quality. You should also compress your textures to reduce file size and memory usage – most game engines and 3D software have built-in texture compression tools that do this automatically with minimal quality loss.
Another common optimization trick for large environments is culling, which means the engine only renders objects that are actually visible to the camera. Objects behind the camera or behind other large objects aren’t rendered, which saves processing power. Most modern game engines enable frustum culling by default, but you can set up occlusion culling for more complex scenes to get even better performance.
When you’re ready to export, make sure you export your files in the correct format for your intended use. If you’re exporting a model to use in a game engine, common formats are FBX or glTF, which support all of your geometry, UVs, and material information. If you’re exporting the entire scene for rendering, you can save it in your software’s native format, or export a rendered image or video in the resolution you need.
Conclusion
Building a 3D environment model is a process that combines planning, creativity, and technical problem-solving. By starting with a clear pre-production plan, blocking out your scene to get scale and composition right, adding detail strategically, and finishing with intentional texturing, lighting, and optimization, you can create immersive, high-quality environments that work for any project. You don’t need expensive software or years of experience to get started: even beginners can create a impressive small environment by following these steps, and each project you build will help you improve your skills. The most important thing is to start small, focus on one step at a time, and don’t be afraid to adjust your work as you go – the best 3D environments are the result of iteration, and every artist makes adjustments along the way.