
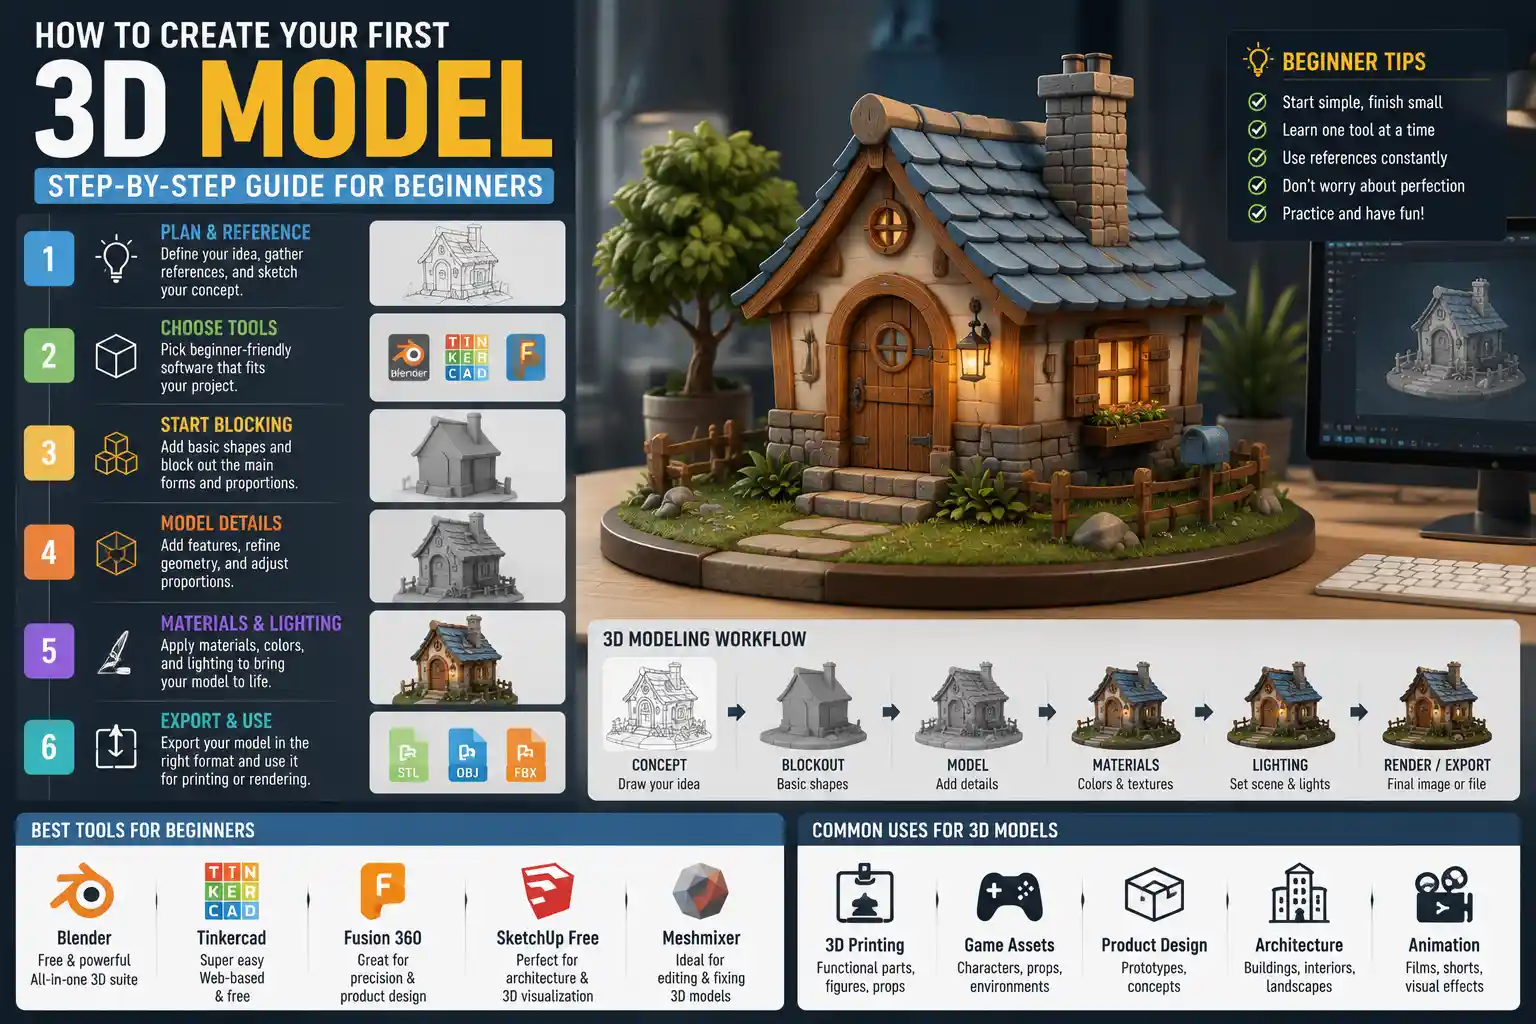
Whether you want to design a 3D-printed custom phone case, create assets for a video game, or visualize an architectural concept, 3D modeling is no longer the exclusive domain of professional industrial designers and Hollywood VFX teams. Today, free and affordable software, endless online learning resources, and accessible 3D printing have put this powerful creative skill within reach of any hobbyist or aspiring creator. This step-by-step guide will walk you through the entire process, from pre-planning your first model to exporting a finished file ready for 3D printing or rendering.
Preparing for Your First 3D Model: Planning and Tools
Before you open any 3D modeling software, a little preparation will save you hours of frustration later. Many new creators jump straight into clicking and dragging, only to end up with a messy, unworkable model that doesn’t match their original goal. Taking the time to define your project and choose the right tools sets you up for success from the start.
Define your project scope and goal
Not all 3D models are created equal. A model designed for 3D printing has very different requirements than one built for an animated short film or a product visualization render. Start by answering two key questions: What do you want to make, and what will you use it for?
If your goal is 3D printing, for example, you’ll need to focus on creating watertight geometry with appropriate wall thickness and no overlapping faces. If you’re making a model for a video game, you’ll need to keep polygon counts low to ensure the model runs smoothly in-engine. For product renders, you can prioritize detail over technical efficiency, since the model will only be used for static images. For your first project, start small: a simple mug, a keychain, or a decorative box is far more manageable than a full-scale 10-piece robot model.
Choose the right 3D modeling software
There are dozens of 3D modeling tools on the market, ranging from free open-source options to professional suites that cost thousands of dollars. For beginners, the best choice is usually a tool that balances power, accessibility, and a large online community for troubleshooting. The most popular options for new creators include:
- Blender: Free, open-source, and fully featured for almost any 3D modeling project, from 3D printing to animation. It has a steep learning curve initially, but there are millions of free tutorials and a massive global community to help you learn.
- Tinkercad: A browser-based free tool from Autodesk designed for absolute beginners. It uses simple primitive shapes and boolean operations, making it perfect for learning the basics of 3D modeling without overwhelming new users. It’s ideal for simple 3D-printable projects.
- Fusion 360: Free for hobbyists and students, this parametric modeling tool is the industry standard for product design and mechanical engineering. It’s great for projects that require precise dimensions and editable features, like functional 3D-printed parts.
- SketchUp: Popular with architects and interior designers, SketchUp has a free web version that’s intuitive for modeling buildings and large structural projects.
For this guide, we’ll assume you’re using either Blender, Tinkercad, or Fusion 360, as these are the most common starting points for new 3D modelers. Once you pick a tool, stick with it for at least a few projects – switching tools early on will slow down your learning progress.
Gather reference materials
Even the most experienced 3D modelers don’t work from memory. Gather reference images of your object from multiple angles before you start. If you’re designing a custom mug, for example, take photos of a similar mug from the front, side, and top, or find product photos online to use as a size and shape guide. For organic shapes like a plant pot or a character figurine, references help you match proportions correctly, which is one of the hardest parts of beginner 3D modeling.
Learning the Core Concepts of 3D Modeling
Before you start building your model, it helps to understand a few basic core concepts that apply to almost all 3D software. Learning these terms will make it easier to follow tutorials and troubleshoot problems when they come up.
Geometry and coordinate systems
All 3D models are built on a 3D coordinate system, with three axes: X (horizontal left-right), Y (horizontal front-back), and Z (vertical up-down). Every point, or vertex, in your model has a specific coordinate along these three axes, which defines its position in 3D space. Most software also lets you work in different viewing modes, including perspective (which mimics how the human eye sees the world) and orthographic (which shows flat, undistorted views from the front, side, or top).
Your model’s geometry is made up of three core components:
- Vertices: Single points in 3D space that act as the building blocks of your model.
- Edges: Lines that connect two vertices, forming the outline of a shape.
- Faces: Flat surfaces enclosed by three or more edges. A group of connected faces makes up the full surface of your 3D model.
When you hear modelers talk about polygon counts, they’re referring to the number of faces in a model. More faces mean more detail, but also larger file sizes and slower performance.
Modeling types: Polygon vs parametric vs implicit
There are three main approaches to 3D modeling, and each is better suited for different types of projects:
Polygon (mesh) modeling is the most common approach for free-form design, animation, and game assets. It works by building up a shape by editing individual vertices, edges, and faces. Blender uses this approach, and it’s great for organic shapes like characters, animals, or abstract art. The downside is that it can be harder to make precise changes to dimensions later in the process, compared to parametric modeling.
Parametric modeling is the standard for engineering and product design. Instead of editing individual faces, you build your model by adding editable features defined by dimensions. If you design a 10cm-wide cube and later decide you want it to be 12cm wide, you just change the dimension – the software automatically updates all connected features. Fusion 360 uses this approach, and it’s ideal for functional parts that require precise measurements, like 3D-printed brackets or replacement parts for household items.
Implicit (solid) modeling is the simplest approach for beginners, used by Tinkercad. It works by combining basic primitive shapes (cubes, spheres, cylinders) by adding or subtracting them from each other (called boolean operations). It’s easy to learn, but less flexible for complex or highly detailed projects.
"The biggest mistake new 3D modelers make is trying to add too much detail too early. Great modeling is about building a strong foundation of big shapes first, then refining small details once the overall proportions are correct."
— Grant Abbitt, popular Blender educator and professional 3D artist
Step-by-Step Process to Build Your First 3D Model
Now that you’ve prepared your project and understand the core concepts, let’s walk through the step-by-step process of building a simple 3D model. We’ll use a custom 3D-printed mug as an example, but these steps apply to almost any beginner project.
Step 1: Block out your basic shape
Start by blocking out the overall size and shape of your object, ignoring small details. For a mug, that means creating a basic cylinder that matches the approximate height and width of your final mug. If you’re using parametric software, input the exact dimensions from your reference – for example, 10cm tall and 8cm in diameter. If you’re using mesh modeling, use reference images to scale your cylinder to match the right proportions.
This step is all about getting the big picture right. Don’t worry about the handle, the rim, or any decorative details yet. Just focus on getting the main body of the mug correct. This approach, called "blocking in," is the same whether you’re modeling a mug or a full character – it helps you avoid wasting time detailing a shape that has the wrong overall proportions.
Step 2: Refine the main form and add cutouts
Once your basic block is correct, refine the main form and add any major cutouts or openings. For our mug, that means hollowing out the inside to make space for liquid. How you do this depends on your software:
- In Tinkercad: Create a second cylinder that’s slightly smaller than your outer cylinder, move it inside the first one, and use the "hole" tool to subtract it from the main shape.
- In Fusion 360: Use the shell tool to remove the top face of your cylinder and set a uniform wall thickness (usually 2-3mm is ideal for 3D printing).
- In Blender: Enter edit mode, select the top face of the cylinder, delete it, then use the inset tool to create a new inner face that matches your wall thickness, then extrude that face downward to hollow out the inside.
Next, refine any large details to the main shape. For our mug, you can slightly round the top rim to make it more comfortable to drink from, and widen the base slightly for stability. Again, check your reference photos to make sure the shape matches what you want.
Step 3: Add secondary details
Now it’s time to add secondary features like the mug handle. Start by blocking out the basic shape of the handle, just like you did for the main body. For a mug handle, a stretched half-cylinder or curved rectangular shape works well. Position it on the side of the mug, then join it to the main body of the model.
Check for intersections between the handle and the main body – you want the two shapes to connect cleanly, with no overlapping gaps or extra geometry. For 3D printing, this is especially important, because overlapping geometry can cause errors when slicing your model.
Step 4: Add small details and clean up your geometry
Once all major features are added and positioned correctly, you can add small decorative details like a logo, a textured pattern, or a custom rim shape. For example, you might add your name to the side of the mug by creating raised text and joining it to the main body.
This is also the time to clean up any messy geometry. Common issues that can cause problems later include:
- Ngons (faces with more than 4 sides): While ngons don’t always cause problems, they can lead to rendering or 3D printing errors for beginners. Most software has tools to automatically split ngons into triangles or quads.
- Non-manifold geometry: This is geometry that has edges connected to more than two faces, or faces with no thickness. It’s a common cause of 3D printing errors, so most slicers have tools to check for and fix non-manifold geometry.
- Overlapping faces: Two faces occupying the same space can cause rendering errors and 3D printing artifacts. Delete any extra overlapping faces once you’ve joined two shapes together.
If you’re modeling for 3D printing, double-check your wall thickness at this stage. Most consumer 3D printers require a minimum wall thickness of 1.5-2mm to print correctly, so check all parts of your model to make sure none are thinner than that.
Step 5: Apply materials and test render
Once your geometry is clean, you can add materials, colors, and textures to preview how your finished model will look. Most 3D software comes with basic pre-made materials – for a mug, you can add a matte ceramic material, change the color to blue or white, and add a glossy finish if you want. If you added a raised logo, you can change that material to a different color for contrast.
Do a quick test render to see how your model looks with lighting. Even if you’re only planning to 3D print the model, a test render helps you spot small errors in your geometry that you might have missed in the default viewport, like gaps between the handle and main body or uneven edges.
Checking and Fixing Common 3D Model Errors
No matter how careful you are, your first model will almost certainly have small errors that need fixing before you can use it. The specific errors you need to check for depend on what you’re using the model for, but there are a few common issues that trip up almost all new modelers.
Errors for 3D printing
3D printing is one of the most common uses for beginner 3D models, and it’s also the most unforgiving when it comes to geometry errors. Slicer software (the tool that converts your 3D model into printer instructions) can’t handle messy geometry, so you’ll need to fix these common issues before slicing:
- Non-manifold edges: As we mentioned earlier, non-manifold edges occur when an edge is connected to more than two faces, or a face has no thickness. Most free tools like Meshmixer or Blender have automatic tools to fix non-manifold geometry in one click.
- Holes in the mesh: A missing face or a small gap between two joined shapes creates a hole in your model, which makes it non-watertight. 3D printers require watertight models to correctly calculate the solid interior of the print. Most slicers have an automatic "fix holes" option, but it’s better to fill holes manually in your modeling software if you can.
- Overhangs too steep for your printer: Most consumer FDM 3D printers can only print overhangs of 45 degrees or less without support material. If your model has steeper overhangs (like the handle of a mug, which often overhangs at 90 degrees), you’ll need to add support material in your slicer, or redesign the handle to have a shallower angle.
A great free tool for checking and fixing 3D models for 3D printing is Meshlab, which is open-source and can automatically repair most common errors with a few clicks.
Errors for rendering and game assets
If you’re creating a model for rendering or for a video game, the most common issues are different. For game assets, the biggest issue is usually too high a polygon count. A model with millions of polygons will slow down game performance, so you’ll need to reduce the polygon count (called retopology) while keeping as much detail as possible. For beginners, most modern software has automatic decimation tools that can reduce polygon count without ruining your shape.
For rendering, the most common issue is mismatched normals. Normals are directions that tell the renderer which side of a face is the outside and which is the inside. If your normals are flipped, your model will look transparent or black in the final render. Fixing flipped normals is usually as simple as clicking a "recalculate normals" button in your 3D software.
Exporting Your Finished 3D Model
Once your model is complete and all errors are fixed, it’s time to export it in the right file format for your intended use. Choosing the wrong file format can cause errors when you open it in another program, so it’s important to pick the right one for your project:
Common file formats by use case
For 3D printing: The standard file format for 3D printing is STL. Almost all 3D modeling software and slicers support STL, and it’s the universal format for consumer 3D printing. If you need to save more detailed information like colors or materials (for full-color 3D printing), use the OBJ or 3MF format. 3MF is a newer format that stores more information than STL and avoids many of the geometry issues common with STL files, but it’s not supported by all older slicers.
For rendering and animation: If you’re exporting your model to another software for rendering or animation, OBJ is a common format that preserves geometry and texture coordinates. If you need to preserve materials and animation data, use FBX, which is supported by almost all professional 3D and game development software.
For sharing online: If you want to share your model on a site like Sketchfab or Thingiverse, STL is the most common format for 3D printable models, while GLB/GLTF is the standard for shareable 3D models that can be viewed in a web browser.
Final checks before export
Before you export your model, do one last check to make sure everything is correct:
- Check the overall dimensions: If you need a 10cm tall mug, make sure your model is actually 10cm tall, not 10 meters. It’s easy to accidentally scale your model incorrectly, and a 100x oversized model will not print correctly.
- Remove any extra geometry: Delete any hidden objects or extra primitive shapes you used as reference that are still in your project file. Extra geometry can increase file size and cause errors when exporting.
- Check the exported file: Open the exported file in the software you’ll be using it in (your slicer, your game engine, your rendering software) to make sure it loads correctly and looks the way you expected. Catching an error early is much easier than re-slicing or re-printing a bad model.
Conclusion
Learning 3D modeling takes practice, but the process for every model follows the same basic steps: plan your project, block out your basic shape, refine the form, add details, clean up errors, and export for your intended use. The most important thing for beginners is to start small, don’t get overwhelmed by complex tools and features, and celebrate small wins. Your first model won’t be perfect – even experienced 3D modelers make mistakes and have to redo parts of their models all the time.
As you complete more projects, you’ll start to develop a feel for how to structure your models, how to avoid common errors, and which tools work best for your style of creation. Whether you want to build custom 3D prints, create game assets, or just explore a new creative skill, 3D modeling is a rewarding hobby that lets you turn ideas you can only imagine into tangible, usable objects. All you need to get started is a free software download and a simple first project.