
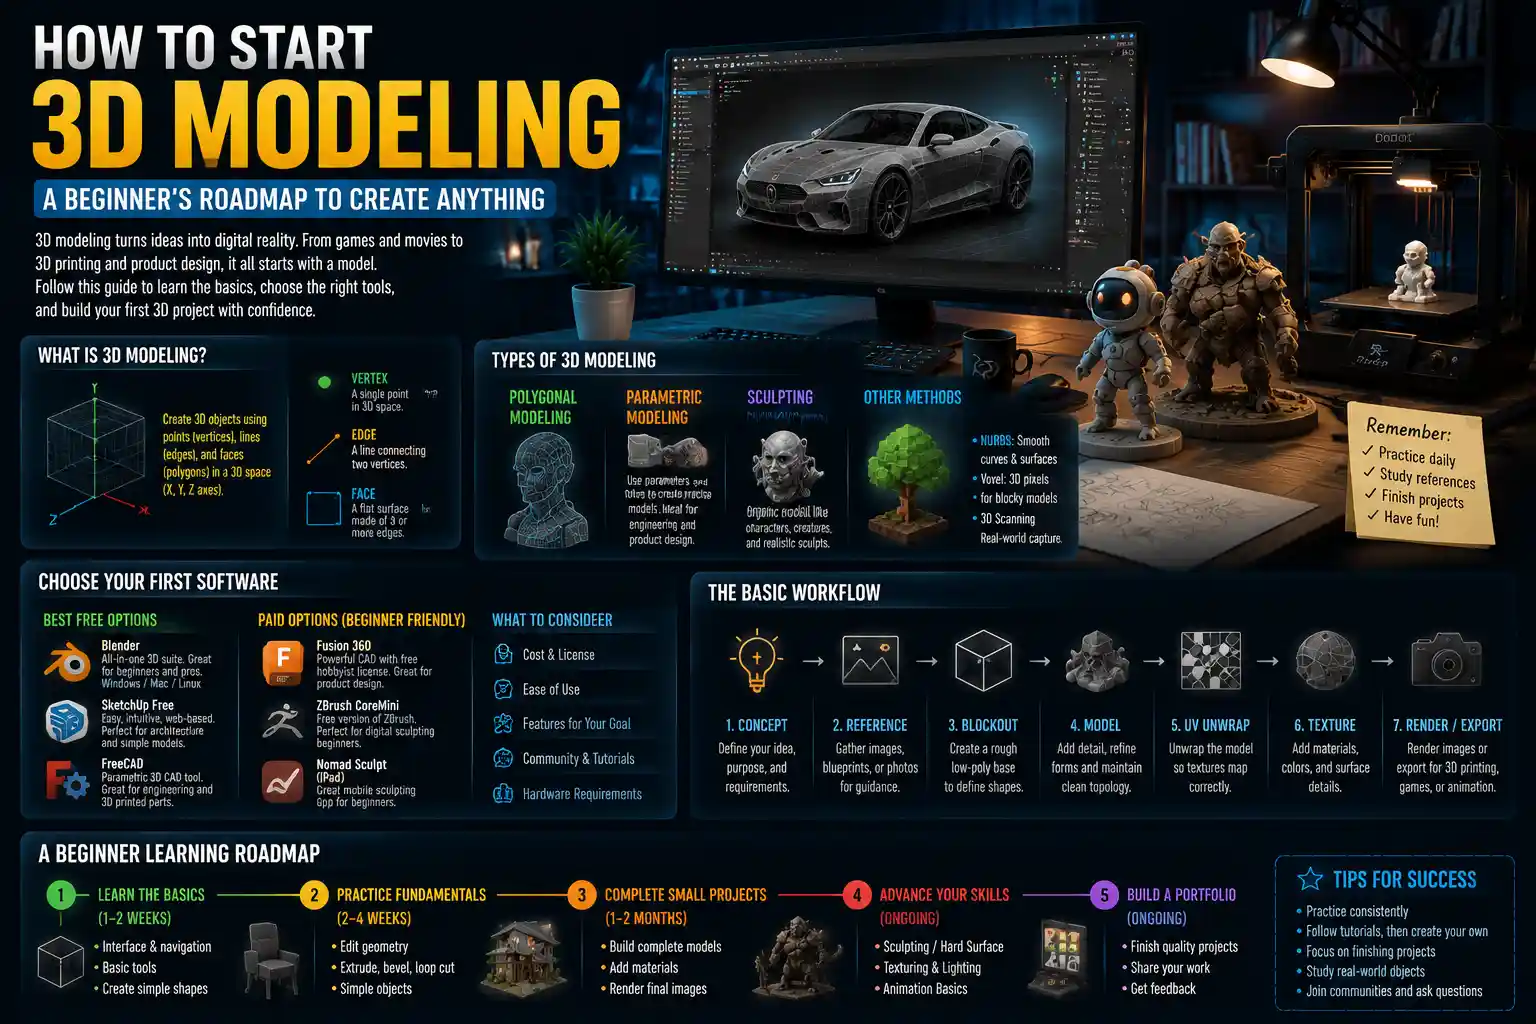
Whether you want to design custom 3D-printed figurines, create environments for indie video games, or visualize architectural designs for a client project, 3D modeling opens the door to a world of creative and professional opportunities. What once required expensive hardware and specialized industry training is now accessible to anyone with a laptop and an internet connection, but that accessibility can feel overwhelming. New creators are flooded with dozens of software options, conflicting terminology, and endless tutorials that jump straight to advanced techniques before the basics are covered. This guide breaks down everything you need to know to start 3D modeling the right way, from choosing your first tool to building your first finished project and growing your skills long-term.
Understanding the Basics: Key Concepts and Types of 3D Modeling
Before you download any software or open your first tutorial, it helps to understand core 3D modeling concepts and the different approaches that fit different projects. Unlike 2D art, which exists on a flat X and Y axis, 3D modeling creates objects with depth along a third Z axis, allowing you to rotate, view, and adjust the model from any angle. This three-dimensional data can then be used for 3D printing, animation, game development, visual effects, product design, and more.
Not all 3D modeling is the same, and different workflows are used for different end goals. It’s important to pick a starting niche that aligns with your interests, rather than trying to learn everything at once.
Polygonal Modeling
Polygonal modeling is the most common starting point for new 3D artists, and it’s widely used in game development, character design, and animation. This approach builds 3D objects from small flat shapes called polygons, usually triangles or quads, connected at points called vertices. You can push, pull, extrude, and smooth these vertices to shape complex organic forms like characters, animals, or natural landscapes. For beginners who want to create 3D models for games or 3D printing, polygonal modeling is an excellent first skill to learn.
Parametric Modeling
Parametric modeling is the go-to approach for engineering, product design, and architecture, where precise measurements are non-negotiable. Instead of shaping objects manually by moving vertices, you define models with mathematical parameters and rules. If you need to design a 10cm tall mug with a 2cm base thickness, changing the height parameter automatically updates all related dimensions of the model. This makes parametric modeling perfect for projects that require manufacturing accuracy, such as custom mechanical parts or prefabricated building components. Many industrial and product designers start with parametric modeling because it aligns with their technical workflow needs.
Sculpting
Digital sculpting works much like traditional clay sculpting: you start with a solid base mesh and push, pull, carve, and texture the surface to create highly detailed organic forms. It’s become the industry standard for high-end character design in film and games, and it’s a popular choice for artists who come from a traditional sculpting or painting background. Modern sculpting software includes powerful tools that simulate real clay, allowing you to add fine details like wrinkles, pores, or texture to a model that would be time-consuming to create with traditional polygonal modeling.
Other specialized types of 3D modeling include NURBS modeling, commonly used in automotive and industrial design for smooth curved surfaces, and voxel modeling, which uses 3D cubes similar to pixels to build blocky models popularized by games like Minecraft. For new creators, however, starting with one of the three core approaches above is more than enough to build a strong foundation.
Choosing Your First 3D Modeling Software
One of the biggest mistakes new 3D modelers make is jumping straight to the most advanced professional software before they’ve learned the basics. Tools like Autodesk Maya or ZBrush are powerful, but they have a steep learning curve and expensive subscription fees that don’t make sense for someone just testing the waters. The good news is that there are high-quality free and low-cost options that are perfect for beginners, no matter what your goal is.
When choosing your first software, prioritize these three factors: cost for your current skill level, compatibility with your end goal (3D printing, games, design, etc.), and the availability of beginner-friendly tutorials and community support. Below are curated recommendations for different niches and experience levels:
Best Free Beginner Options
- Blender: Blender is the undisputed king of free 3D modeling software, and it’s used by everyone from hobbyists to professional studios. It supports every type of 3D modeling (polygonal, sculpting, animation, rendering) and has a massive global community that creates free tutorials, assets, and add-ons. For new creators who don’t want to pay for software upfront, Blender is the best starting point by far. It works on Windows, Mac, and Linux, and receives regular major updates that add new features and improve usability.
- SketchUp Free: SketchUp Free is an incredibly intuitive browser-based tool that’s perfect for beginners interested in architecture, interior design, or simple product modeling. Its push-pull tool makes it easy to turn 2D shapes into 3D objects quickly, and the interface is far less overwhelming than full professional tools. The free version is limited for commercial use, but it’s ideal for hobbyists learning the basics of 3D spatial reasoning.
- FreeCAD If you’re interested in parametric modeling for engineering or 3D-printed parts, FreeCAD is a fully free open-source option that matches many of the features of paid professional tools like SolidWorks. It’s designed for precision mechanical design, and it exports files that are ready for 3D printing or manufacturing.
Best Low-Cost Paid Options for Beginners
If you have a specific niche in mind and are willing to invest a small amount upfront to get a tool tailored to your goals, there are several excellent options that won’t break the bank. For digital sculptors, Nomad Sculpt is a $15 one-time purchase available for iPad, Android, and desktop that offers powerful sculpting tools with an intuitive interface perfect for beginners. It’s especially popular for creators who like to work on a tablet with a stylus, and it exports models that are compatible with other tools for further editing.
For product designers and engineers learning parametric modeling, Fusion 360 from Autodesk is an industry-standard tool that costs only $60 per year for hobbyists, compared to hundreds of dollars per month for tools like SolidWorks. It combines parametric modeling, simulation, and rendering in one package, and it’s widely used by small product design teams and 3D printing enthusiasts.
“The best beginner 3D software is the one you’ll actually open and practice with. It doesn’t matter if it’s the most powerful tool on the market if the interface intimidates you so much you leave it closed for a month. Start simple, build confidence, then upgrade when you outgrow your first tool.”
Once you’ve chosen your first tool, take 15 to 30 minutes to explore the interface. Most beginner software includes a built-in welcome tour that points out where the core tools are located, and this small investment of time will save you frustration later as you follow your first tutorials. Avoid downloading three or four different tools to “try them out” at once—stick to one for your first month of practice, so you can build muscle memory and focus on learning core concepts instead of learning different interfaces.
Building Your Core Skills: A Step-by-Step Learning Plan
Learning 3D modeling is a cumulative process: you need to master basic skills before you move on to advanced projects, otherwise you’ll end up confused and frustrated. Too many new creators jump straight to designing a full character model before they learn how to properly manipulate a simple cube, and they give up when the project falls apart. This step-by-step plan is designed to help you build skills gradually and stay motivated by completing small projects as you learn.
- Week 1-2: Master navigation and basic manipulation
Start by learning how to navigate the 3D viewport: how to pan, zoom, and rotate your view around the object. This is the most basic skill, but it’s also the one you’ll use for every single project, so it’s worth building muscle memory early. Practice moving around the viewport until you can do it without thinking about which keyboard or mouse buttons to press. Then learn how to select vertices, edges, and faces, and how to move, scale, and rotate these components. Finish this stage by creating a simple model of a chair or a table using just basic cube primitives. You don’t need to add any fancy details—just focus on getting the proportions right and learning how the tools work.
- Week 3-4: Learn core modeling tools
Once you’re comfortable with navigation, learn the core tools you’ll use for most modeling projects: extrusion, beveling, loop cut, and subdivision surface. Extrusion allows you to pull a flat face out into a new section of your model, which is how you turn a simple circle into a cylinder or a mug. Beveling softens sharp edges, which makes your models look more realistic and prepares them for 3D printing. Loop cut adds new edges to your mesh, giving you more geometry to work with when you need to shape curves. Subdivision surface smooths a low-poly base mesh into a high-resolution curved shape, which is essential for creating organic models. Practice these tools by creating a simple mug, then a spoon, then a plate. By the end of this stage, you’ll be able to create simple everyday objects from scratch.
- Week 5-8: Learn topology and clean mesh habits
Topology is the arrangement of polygons in your 3D model, and clean topology is one of the most important skills to learn early. Bad topology can cause errors when you 3D print a model, animate it, or smooth it with subdivision surface. The most common rule for good topology is to use mostly quads (four-sided polygons) instead of triangles or n-gons (polygons with more than four sides) whenever possible, and to keep your polygon count as low as possible while still getting the shape you want. This doesn’t mean you need to become an topology expert overnight—focus on learning to avoid common mistakes like overlapping faces, non-manifold geometry, and extra unneeded vertices. Practice by retopologizing the simple models you made in the previous stage: take your high-poly mug and create a clean low-poly version that matches the shape. This practice will help you build good habits that will save you hours of frustration on larger projects later.
- Month 2-3: Complete your first full project
Once you’ve mastered the basics, it’s time to complete a full finished project that aligns with your interests. If you want to get into 3D printing, design a small planter or a keychain that you can print once it’s done. If you want to get into game art, create a simple 3D props like a sword or a chest. If you want to get into character design, start with a simple stylized head instead of a full body. Completing a full project from start to finish gives you a sense of accomplishment and helps you identify which skills you need to improve next. Don’t worry if your first project isn’t perfect—every 3D artist’s first model is messy, and that’s part of the learning process.
Learning Resources for Beginners
There are thousands of free 3D modeling tutorials online, but not all of them are designed for beginners. For Blender users, the Blender Guru Beginner Blender Tutorial Series is a classic starting point that walks you through creating a donut model from start to answer, and it explains every tool and concept along the way. For more structured learning, platforms like Udemy, Coursera, and Skillshare have affordable beginner courses that are organized into logical modules, so you can learn step-by-step. YouTube creators like Grant Abbitt, Northern Boyz, and Ryan King Art also create regular free beginner-friendly tutorials for a range of skill levels and niches. One of the best ways to learn is to follow along with a tutorial that creates a specific project you find interesting, rather than just watching generic tool explanations.
Avoiding Common Beginner Mistakes
Even with a solid learning plan, new 3D modelers often fall into predictable traps that slow their progress or kill their motivation. Being aware of these mistakes ahead of time can help you avoid them and stay on track.
Jumping to Advanced Tools Too Early
We mentioned this earlier, but it’s worth repeating: many new creators download full professional software like Maya before they understand basic 3D concepts. These tools are designed for experienced professionals who already know what they’re doing, and their complex interfaces can overwhelm beginners who are still learning how navigation works. Even if you eventually plan to work in an industry that uses a specific professional tool, starting with a simpler free tool like Blender or Fusion 360 for your first few months will help you build core skills without the distraction of extra tools you don’t need yet.
Starting With Overly Complex Projects
It’s great to have big goals, but starting with a full 10-character game environment or a 100-part mechanical engine as your first project is a surefire way to get frustrated and give up. Big projects require advanced skills like UV mapping, texturing, rigging, and problem-solving that you won’t have when you’re just starting out. Instead, break your big goal into small, manageable projects. If you want to create a full character for a game, start with a hand, then a head, then a full body, then add textures. Each small project teaches you a new skill, and by the time you start your big project, you’ll have all the skills you need to finish it.
Obsessing Over Perfection Too Early
It’s easy to get stuck trying to make your first model perfect, spending hours tweaking tiny details that no one but you will notice. When you’re learning, it’s far more important to finish a lot of small projects than it is to make one perfect project. Each model you make teaches you something new, and you’ll improve much faster by creating 10 bad models than you will by spending 10 weeks on one “perfect” model. Give yourself permission to make bad art at the beginning—it’s part of the learning process for every creative skill.
Ignoring Clean Mesh Habits
Bad topology and messy meshes can cause problems that only show up later in the process: when you go to 3D print your model, it throws an error. When you go to smooth it, it comes out with weird lumps and bumps. When you go to animate it, the mesh deforms incorrectly. Learning clean mesh habits early saves you hours of having to go back and fix mistakes later. It doesn’t mean you need to be perfect, but it does mean you should focus on avoiding common mistakes like non-manifold geometry, overlapping faces, and unnecessary extra vertices from the start.
Not Saving Versions of Your Work
This is a small mistake that can cause massive frustration. Many new creators only save one version of their model, and if the file gets corrupted or they make a change they can’t undo, they lose all their work. Get into the habit of saving incremental versions of your project as you go: for example, mug_v1.blend, mug_v2.blend, mug_v3.blend. Most 3D software also has an auto-save feature, so turn that on and set it to save every 10 to 15 minutes. That way, if something goes wrong, you only lose 15 minutes of work instead of hours.
Next Steps to Grow Your Skills and Build Your Portfolio
Once you’ve completed your first few projects and mastered the core basics, it’s time to grow your skills and start building a body of work if you want to pursue 3D modeling professionally or sell your models online.
The best way to improve your 3D modeling skills is to practice consistently, even if it’s only 30 minutes a day. Regular practice builds muscle memory and helps you internalize core concepts, and you’ll improve much faster with 30 minutes a day than you will with 8 hours once a week. Try to set a regular practice schedule that fits into your life—for example, 30 minutes after work every weekday, or a longer 2-hour session on weekends.
One of the most effective ways to practice and get feedback is to join a 3D modeling community. There are active communities on Reddit (like r/blender and r/3Dmodeling), Discord, and ArtStation where new creators can share their work, ask questions, and get feedback from more experienced artists. Doing monthly community challenges, like the popular #BlenderJanuary challenge, is also a great way to push yourself to learn new skills and create new work on a regular schedule.
If you want to expand your skills beyond basic modeling, add these skills one at a time after you’re comfortable with core modeling:
- UV Mapping: Unwrapping your 3D model’s mesh into a 2D template so you can add custom textures to it. This is essential for game models and characters that need custom surface details like wood grain or skin pores.
- Texturing and Materials: Adding color, roughness, metallicity, and other surface properties to your model to make it look realistic or stylized. Modern tools like Substance Painter make texturing much more accessible than it used to be, and many beginner creators pick it up quickly after learning modeling basics.
- Rendering: Generating a final 2D image or video of your 3D model with lighting, shadows, and camera settings. Rendering is how you get a finished image to show off your work to clients or post it online.
- Exporting for your end use: Learning how to export your model in the correct file format for 3D printing (usually STL or OBJ), games (usually FBX), or client delivery. Different use cases require different file types and settings, so it’s important to learn the correct export workflow for your niche.
If you’re interested in turning your 3D modeling skills into income, start building a portfolio of your best work as you learn. You don’t need 20 finished projects to start—even 5 to 10 high-quality finished projects is enough to get started with freelance work or sell models on marketplaces like CGTrader, TurboSquid, or Etsy. Many new 3D modelers start by taking small freelance projects on platforms like Upwork or Fiverr to build experience, or sell 3D printable files on Etsy to generate passive income.
Conclusion
Starting 3D modeling doesn’t have to be overwhelming, even if you’ve never tried any kind of 3D design before. The key is to start simple: pick one beginner-friendly tool that aligns with your goals, master the core basics one at a time, and complete small projects to build confidence and skills. Avoid common beginner mistakes like jumping to complex projects or advanced tools too early, and give yourself permission to make bad models as you learn. Every professional 3D artist started exactly where you are now, and the only way to get better is to practice consistently and keep creating. Whether you just want to design fun 3D-printed projects for your home, build a career in game design or product design, or create digital art to share online, 3D modeling is a rewarding skill that will open up endless creative opportunities for years to come.