
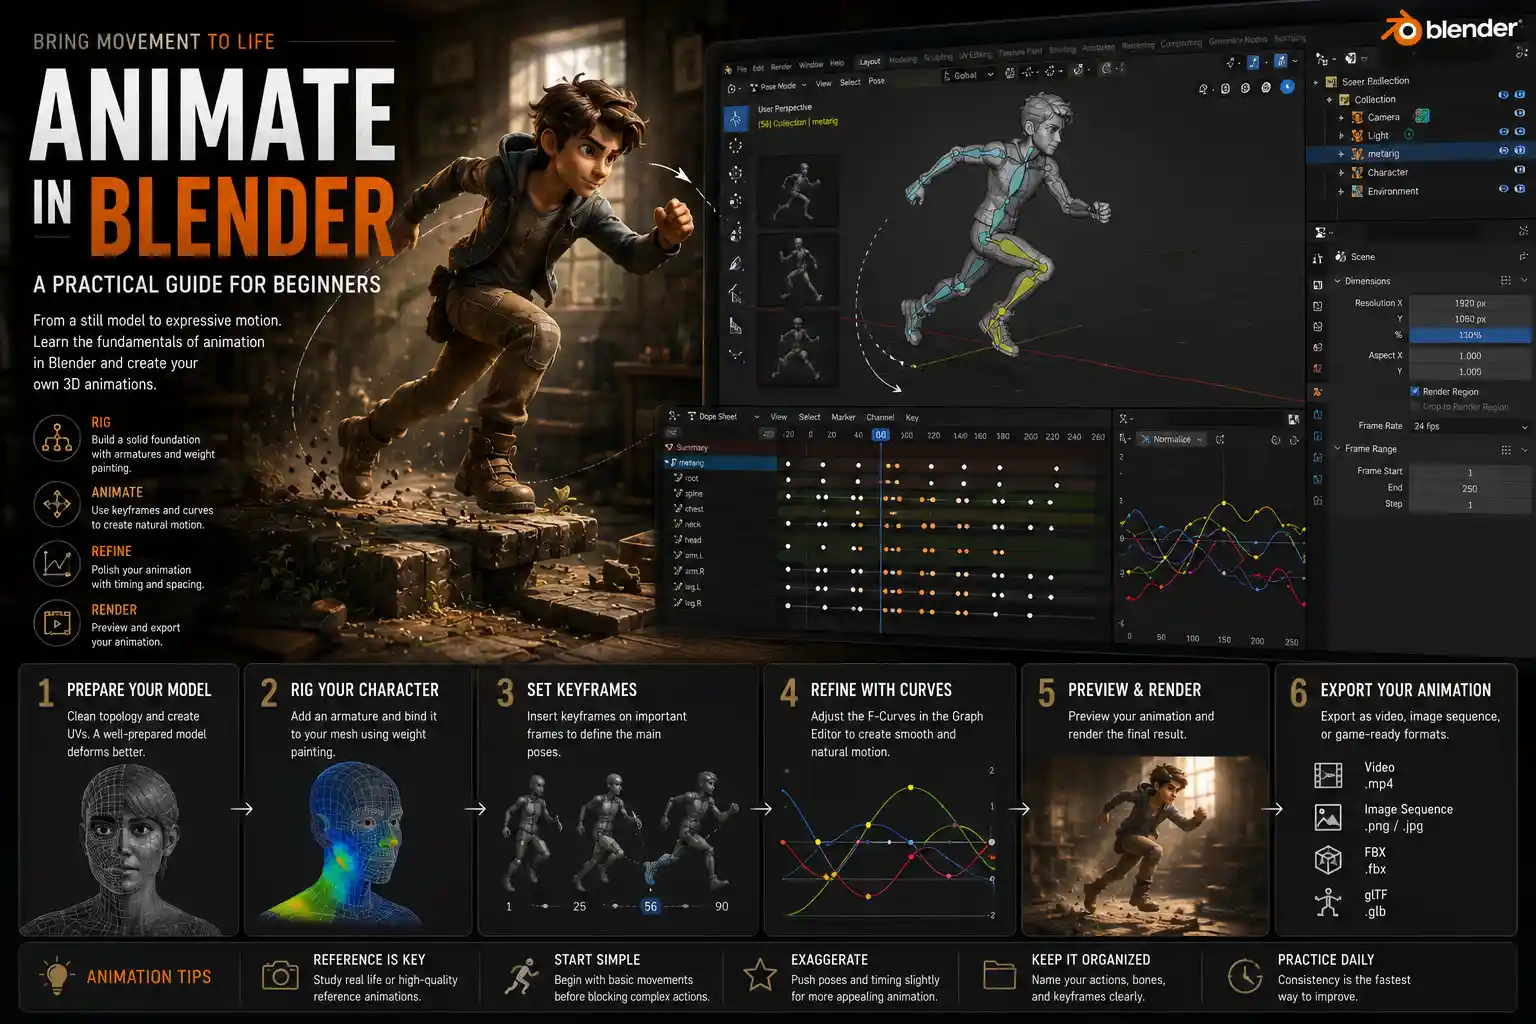
Whether you’re a game developer building a playable character, a 3D artist creating a short film, or a hobbyist bringing a custom 3D print design to life, animating a 3D model in Blender can feel like jumping into the deep end. Blender, the free open-source 3D creation suite, packs a staggering number of animation tools, from basic keyframing to advanced motion capture retargeting, and it’s easy to get overwhelmed before you even make your first movement. But once you break the process down into simple, manageable steps, you’ll find that even complex animations are within your reach. This guide walks you through every stage of the process, from prepping your model to exporting a finished animation that’s ready to share.
Prepping Your 3D Model for Animation
Before you can add any movement to your model, you need to make sure it’s structured correctly for animation. Blender supports two primary animation workflows: rigid body animation for objects that don’t deform (think a bouncing ball or a falling bookshelf) and skeletal animation for deformable objects like characters, animals, or flexible props. Regardless of which workflow you’re using, prepping your model correctly will save you hours of frustration later.
Clean Up Your Model Topology
Topology—the arrangement of polygons that make up your 3D model—directly impacts how smoothly it deforms when animated. A messy model with overlapping faces, non-manifold edges, or uneven polygon distribution will bend awkwardly, even if your rig is perfectly set up. For character models, focus on creating edge loops that follow the natural contours of the body: around joints like the shoulders, elbows, knees, and wrists, add extra edge loops to give the model enough geometry to bend without pinching or stretching. For static rigid objects, topology is less critical, but you should still remove any hidden geometry or duplicate faces to keep your file size manageable.
To check for common issues in Blender, use the 3D Print Toolbox add-on (enabled in the preferences menu) or the Select Non-Manifold tool under the Select menu in Edit Mode. Fixing these issues early prevents glitches when you start moving your model later.
Rigging: The Foundation of Skeletal Animation
If you’re animating a deformable model like a character, you’ll need a armature—Blender’s term for the digital skeleton that drives movement. The armature is made up of connected bones, and each bone controls a specific section of your model. For new users, the fastest way to get a working rig for a humanoid character is to use Blender’s built-in Meta-Rig system via the Rigify add-on, which comes pre-enabled with most Blender installations.
The basic process for rigging with Meta-Rig is straightforward:
- Position the default meta-rig to match the proportions of your character, adjusting bone lengths for arms, legs, and the torso.
- Generate the fully functional rig with a single click, which adds automatic controls for movement, rotation, and IK (inverse kinematics) for natural limb positioning.
- Bind the rig to your model using automatic weights, which assigns each part of the model to the corresponding bone.
Even with automatic weighting, you’ll almost always need to adjust a few problem areas, like the armpits or the base of the neck, where the model may deform incorrectly. Use Blender’s Weight Paint mode to paint weight influences manually: white means the bone fully controls that area, while black means the bone has no influence. A little bit of adjustment here goes a long way toward creating smooth, natural movement.
Prepping for Rigid Body Animation
If you’re animating non-deforming objects—like a stack of boxes falling over, a ball rolling down a ramp, or a door swinging open on its hinges—you don’t need a full armature rig. Instead, you’ll use Blender’s rigid body physics system, which automatically calculates movement based on real-world physics properties. For this workflow, the only prep you need is to separate individual objects, make sure each has a closed, solid mesh, and assign the correct object type (active for objects that move, passive for stationary objects like the ground or a wall that moving objects collide with).
Setting Up Your Animation Workspace
Blender’s default interface is designed for general 3D modeling, so taking a few minutes to set up your workspace for animation will speed up your workflow and reduce confusion. Blender actually has a built-in Animation workspace preset, but it’s worth customizing it to fit your workflow, especially if you’re working on a complex project like a full character animation.
Arrange Your Viewports for Efficiency
A common animation workspace setup splits your screen into three main areas:
- A large 3D Viewport in the top half of the screen, where you can see your model and preview movement in real time. Switch this to Object Mode (or Pose Mode if you’re working with a rigged character) and enable X-Ray mode if you need to see bones through your model.
- A Dope Sheet in the bottom left, where you can edit keyframes and adjust the timing of your animation.
- A Timeline or Graph Editor in the bottom right, where you can adjust the curvature of your movement to make it look more natural.
This setup lets you see your model, your keyframes, and your motion curves all at once, so you don’t have to keep switching between different workspaces as you work. If you’re working on a laptop with a smaller screen, you can collapse the Dope Sheet to a tab and switch between it and the Graph Editor as needed.
Set Your Animation Frame Range and FPS
Before you add your first keyframe, you need to set the correct frame range and frames per second (FPS) for your project. FPS determines how smooth your animation will play back: 24 FPS is standard for film and YouTube, 30 FPS is common for games and online content, and 60 FPS is used for high-frame-rate videos or smooth game animations. To change your FPS, go to the Output Properties tab and select your desired frame rate in the Frame Range section.
Next, set your start and end frames. If you’re creating a 2-second walk cycle at 24 FPS, for example, you’ll set your start frame at 1 and end frame at 48. It’s a good idea to add a little extra time at the end of your range (5-10 extra frames) to give yourself room for adjustments later.
Enable Onion Skinning for Reference
Onion skinning is a classic animation trick that lets you see semi-transparent previews of the keyframes before and after your current frame. This is especially helpful for 2D animation, but it’s just as useful for 3D character animation, as it helps you see how movement flows from one pose to the next. To enable onion skinning in Blender, click the onion icon in the header of the 3D Viewport and adjust the opacity and range of frames to show. For most projects, showing 2-3 frames before and after your current frame is enough to guide your posing without cluttering up your view.
Keyframing: Core Animation Techniques
Keyframing is the foundation of almost all Blender animation, regardless of whether you’re working with a rigged character or a rigid body object. At its simplest, keyframing involves setting a pose or position for your model at specific points in time, and Blender automatically calculates the movement between those keyframes. Mastering keyframing is the difference between a stiff, robotic animation and one that feels natural and alive.
The 12 Principles of Animation for Blender Artists
Developed by Disney animators in the 1930s, the 12 principles of animation are still the gold standard for creating believable movement, even in 3D. You don’t need to apply all 12 to every small animation, but keeping a few core principles in mind will instantly improve your work:
- Squash and Stretch: Deform objects slightly when they move or impact another object to give them a sense of weight and flexibility. A bouncing ball squashes when it hits the ground and stretches as it bounces back up, for example.
- Anticipation: Add a small opposite movement before the main action to make it feel more natural. A character will crouch down slightly before jumping up, for example, instead of just launching straight into the air.
- Slow In and Slow Out: Movement speeds up in the middle of a motion and slows down at the start and end, rather than moving at a constant speed. This is one of the biggest fixes for stiff, robotic animation.
- Follow Through and Overlapping Action: Different parts of the body move at different speeds. When a character stops walking, their hair or clothing will keep moving for a few frames after the body has stopped.
"Animation is not the art of drawings that move but the art of movements that are drawn. What happens between each frame is much more important than what exists on each frame."
— Norman McLaren, legendary animator and filmmaker
How to Add and Edit Keyframes in Blender
For a rigged character, start by posing your model at the first frame of your animation. To set a keyframe for all bone transformations, press I in Pose Mode and select LocRotScale (location, rotation, scale) from the menu. This saves the current position of every bone as a keyframe at your current frame. Then move the Timeline slider to your end frame, adjust your character to the final pose, and press I again to add a second keyframe. Blender automatically generates the movement between the two poses.
To adjust how Blender interpolates movement between keyframes, use the Graph Editor. The Graph Editor shows you the speed and acceleration of your movement as a curve. By default, Blender uses a Bezier curve interpolation, which creates a smooth slow in and slow out, but you can adjust the handles of the curve to make movement faster or slower at any point. For example, to create a sudden stop, you can flatten the end of the curve so the movement slows down very quickly. To create a sudden start, you flatten the start of the curve.
For rigid body animation, you rarely need to manually keyframe movement—Blender’s physics system calculates all the positions automatically. You will still need to keyframe initial properties, like setting an object to be active (moving) only after a certain frame if you want it to start falling when another object hits it. For example, if you want a domino to start moving only when the previous domino hits it, you can keyframe its rigid body type to change from passive to active at the correct frame.
Creating a Walk Cycle: A Practice Project for Beginners
A walk cycle is one of the best first animation projects for new Blender users, because it teaches you keyframing, timing, and weight all in one simple project. A basic looping walk cycle at 24 FPS only needs 24 frames (one second of animation) to work. The core steps are:
- At frame 1, pose your character with their left foot forward, right foot back, and arms in the opposite position (left arm back, right arm forward) to match natural walking gait. Add a keyframe for all bones.
- At frame 12, pose the character with the opposite foot forward, mirroring the first pose. Add a second keyframe.
- At frame 24, copy the pose from frame 1, so the cycle loops seamlessly. Add a third keyframe.
- Adjust the body position to add weight shift: the character’s body should lower slightly when a foot hits the ground and raise slightly when it swings forward. This small adjustment makes the walk feel far more natural.
- Use the Graph Editor to adjust the timing so each step speeds up through the swing and slows down when the foot hits the ground, following the slow in and slow out principle.
Once you’re done, you can set the timeline to loop playback and see how your walk cycle looks. Don’t worry if it feels stiff at first—even professional animators tweak walk cycles for hours to get them right.
Adding Polish and Refining Your Animation
Once you have your basic keyframed movement down, it’s time to add the small details that turn a good animation into a great one. This stage is where most new animators cut corners, but the extra 10-15 minutes of refinement will make your animation look significantly more professional.
Fixing Deformation Issues
Even with a well-weighted rig, you’ll often get small deformation glitches when you move your model into extreme poses: a shoulder might pinch, the elbow might get a weird bump, or the neck might stretch unevenly. Blender has several tools to fix these issues quickly. For small problems, you can adjust the weight painting in Weight Paint mode, as we mentioned earlier. For more stubborn issues, you can use Corrective Smooth Shaping, a Blender feature that automatically smooths out deformed geometry when you bend a joint. If you’re using Rigify, most corrective shapes are added automatically when you generate the rig, but you can add custom ones for your specific model if needed.
Adding Secondary Motion
Secondary motion is any movement that’s not part of the main action of your animation: hair swinging as a character walks, clothing jiggling as they run, or a tail wagging as they walk. Adding secondary motion is what makes an animation feel alive, and Blender has several tools to automate most of this work so you don’t have to keyframe every strand of hair by hand.
For simple secondary motion, you can use Blender’s Soft Body physics system, which makes parts of your model act like flexible fabric. For example, you can assign a character’s ponytail to be a soft body, pin it to the character’s head, and let physics automatically calculate how it swings as the character walks. For more complex secondary motion, like clothing or long hair, you can use the Cloth simulation, which calculates realistic fabric movement based on gravity and collisions with the character’s body. Both of these simulations are easy to set up and require almost no manual keyframing once they’re configured correctly.
Using Motion Capture to Speed Up Workflow
If you’re working on a complex animation with a lot of movement, like a full dance sequence or a fight scene, you don’t have to keyframe every pose by hand. Blender supports motion capture (mocap) retargeting, which lets you take pre-recorded motion capture data and apply it to your own custom character rig. There are thousands of free mocap libraries available online (like the CMU Motion Capture Library, which is free for non-commercial use), and Blender’s built-in Motion Capture Retargeting add-on makes it easy to adjust the mocap data to fit your character’s proportions.
Even if you use mocap for your base animation, you’ll almost always need to tweak the movement to fit your project. Mocap data is often very clean, but it can feel lifeless without small adjustments to add personality. Add small secondary motions or adjust the timing of certain movements to match your character’s personality—for example, a nervous character will move faster and have more small fidgets than a calm, confident character.
Exporting Your Finished Animation
Once you’re happy with your animation, you need to export it in the correct format for your intended use. The export process varies a lot depending on whether you’re exporting a video for YouTube, an animated asset for a game, or a file to share with another animator.
Exporting a Video File
If you’re creating a finished animation to share online or as a video, you’ll render your animation out as a sequence of image files first, then combine them into a single video file. Rendering as an image sequence protects you from losing your work if Blender crashes mid-render—you can just restart the render from the last completed frame. To set up your render, go to the Output Properties tab:
- Set your output folder to a location on your computer where you can find it easily.
- Set the file format to PNG (for transparent backgrounds) or JPEG (for smaller file sizes if you have a solid background).
- Set your resolution to match your project (1920x1080 for full HD, 3840x2160 for 4K).
- Click Render Animation, and Blender will render all your frames to the output folder.
Once all your frames are rendered, you can use Blender’s built-in Video Editing workspace to combine them into a single MP4 file, add audio, and export the final video. MP4 H.264 is the most widely compatible format for online sharing, so it’s the best choice for most users.
Exporting Animated Assets for Games
If you’re exporting your animation for use in a game engine like Unity or Unreal Engine, the most common format is FBX. When exporting an FBX from Blender, make sure you enable the Bake Animation option, and set the start and end frames to match your animation’s frame range. You also need to make sure you export both the armature and the mesh, so the game engine can import the rig and the animation correctly. Most game engines support multiple animations in a single FBX file, so you can export your walk cycle, idle animation, and jump animation all in one file if you’ve set them up as separate nla strips in Blender’s Non-Linear Animation editor.
Exporting for Further Editing
If you’re going to edit your animation later in Blender or share the working file with another artist, just save your work as a standard Blender .blend file. To reduce file size, you can pack all external textures into the blend file using the Pack Resources option in the File menu, so the recipient doesn’t have to track down missing texture files when they open the project.
Conclusion
Animating a 3D model in Blender is a skill that builds with practice, and even experienced animators still learn new tricks years after they start. The key to getting better is to start small: don’t try to animate a 10-minute short film as your first project. Instead, start with a simple bouncing ball to learn keyframing and the 12 principles, then move on to a walk cycle, then a short dialogue clip. Each project will teach you new skills and help you develop an eye for natural movement.
Blender’s biggest advantage for new animators is that it’s completely free, with all the professional-level tools you’d find in expensive software like Maya or 3ds Max. Whether you’re animating for fun, building assets for a game, or creating a short film to share online, the process we’ve broken down here will give you a solid foundation to build on. With a little patience and practice, you’ll be creating smooth, believable animations that bring your 3D models to life in no time.