
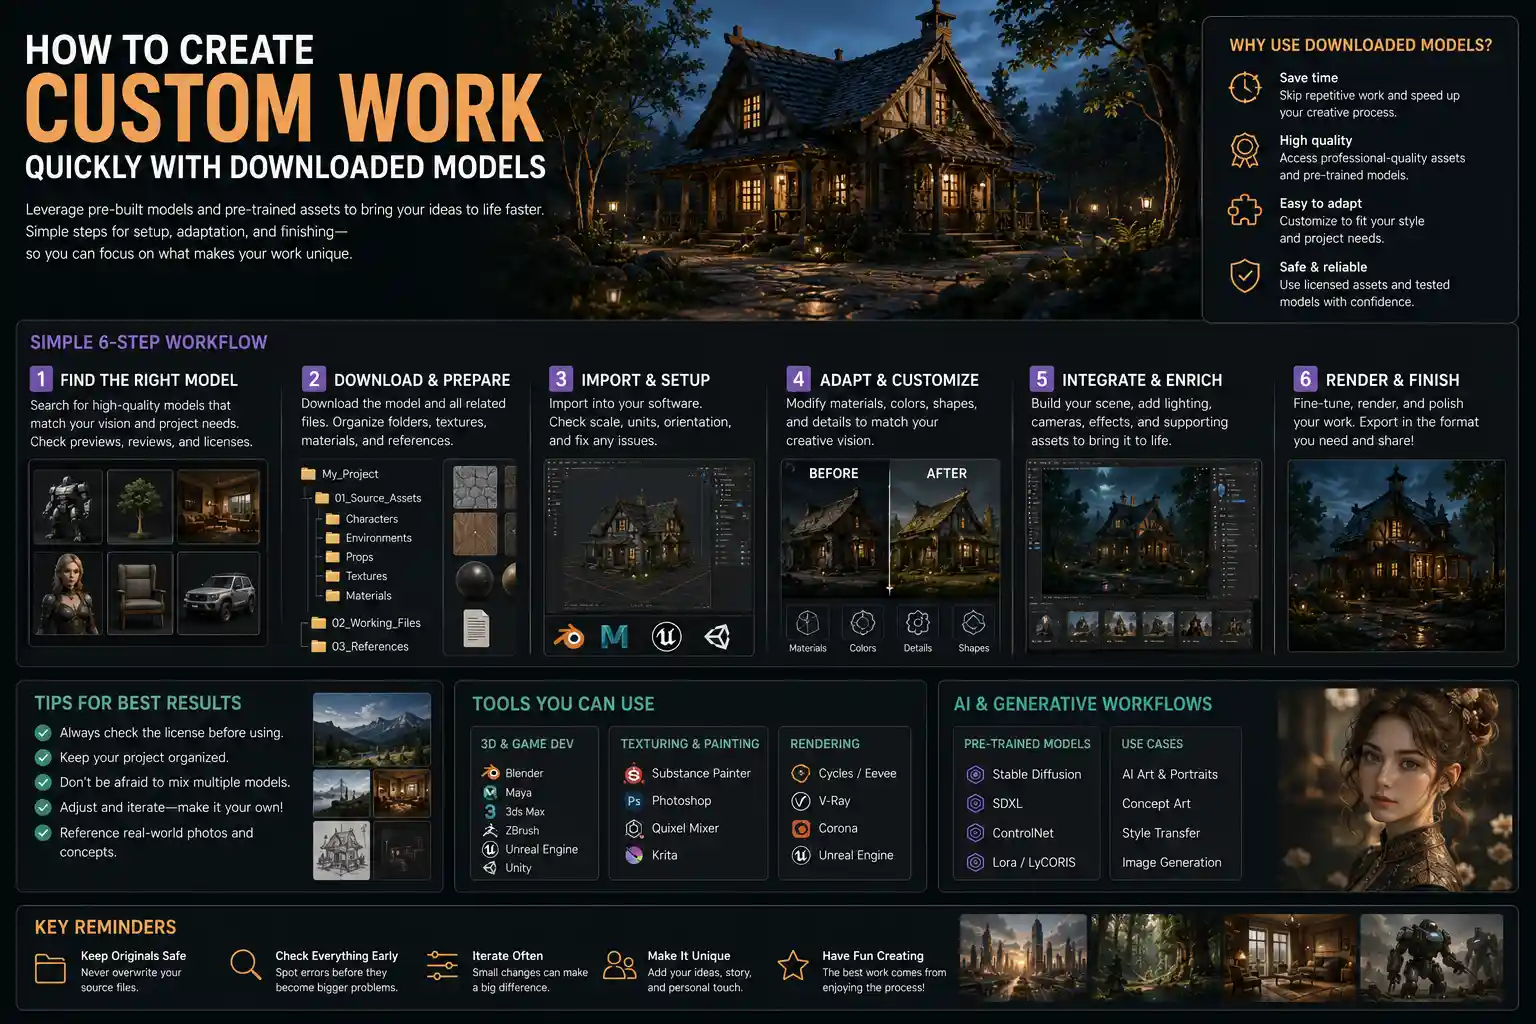
Five years ago, creating a polished 3D animated short film or a custom AI-generated portrait required years of technical training, thousands of dollars in software, and weeks of manual modeling work from scratch. Today, anyone with a basic laptop and a creative idea can build a professional-quality work in days – even hours – by leveraging pre-trained, downloadable models. Whether you’re a digital artist, indie game developer, content creator, or hobbyist, pre-built models cut out the most labor-intensive parts of creative production, letting you focus on what matters most: bringing your unique vision to life. This guide breaks down how to find, customize, and integrate downloaded models into your original work without legal headaches or quality loss.
Understanding What Downloadable Models Are (And What They Can Do For You)
Before diving into the workflow, it’s important to clarify what we mean by downloadable models, and what types of creative projects they can enhance. At their core, downloadable models are pre-built digital files that contain ready-to-use data for your creative work. The exact nature of the model depends on your medium: for 3D artists and game developers, they might be polygonal models of objects, characters, or environments with pre-applied textures and rigging. For AI content creators, they are pre-trained neural networks that can generate images, video, audio, or text in a specific style. For graphic designers, they might be vector models of logos, packaging mockups, or illustration elements. What unites all of these is that someone else has already done the heavy lifting of building the base, so you don’t have to start from a blank canvas.
Downloadable models aren’t just for beginners, either. Even professional studios rely on them to speed up production. A VFX house working on a tight deadline for a commercial might download a 3D model of a car instead of modeling it from scratch, freeing up their 3D artists to work on custom effects. A indie musician can use a pre-trained AI audio model to generate backing tracks, so they can focus on writing lyrics and recording vocals. The biggest benefit of working with downloaded models is speed: what used to take weeks can now take hours, letting you experiment more and finish more projects. It also lowers the barrier to entry for new creators: you don’t need a four-year degree in 3D modeling or machine learning to make something that looks professional.
Common Types of Downloadable Models for Creative Projects
Depending on what kind of work you want to make, you’ll encounter a few common categories of downloadable models:
- 3D models: Pre-built polygonal objects, characters, environments, and props for animation, game development, 3D printing, and architectural visualization. Most come with ready-to-use textures, and many professional-quality models are already rigged for animation.
- AI generative models: Pre-trained neural networks for generating images, video, text, or audio. These include fine-tuned diffusion models for art, large language models (LLMs) for writing, and voice cloning models for narration.
- Design mockups and templates: Pre-built layered models for graphic design, including poster templates, website wireframes, product packaging models, and social media layouts.
- Sound and music models: Pre-trained AI models for generating background music, sound effects, or voiceovers, as well as pre-built sample packs formatted for digital audio workstations.
No matter what your creative niche is, there’s a good chance downloadable models exist to speed up your workflow.
Finding High-Quality, Legally Safe Downloadable Models
One of the biggest mistakes new creators make is downloading models from random websites without checking the license terms. A great-looking model that you can’t legally use in a public or commercial project is worse than no model at all. The first step to working with downloaded models is knowing where to find reliable, licensed files that fit your needs.
Trusted Repositories for Different Model Types
Different types of models live on different platforms, and some platforms are far more reliable than others. For 3D models, some of the most popular trusted sources include:
- Sketchfab: One of the largest 3D model repositories, with a huge range of free and paid options, all clearly labeled with their license terms. Many models even support direct in-browser preview, so you can check the quality before downloading.
- TurboSquid: A professional marketplace for 3D models, focused on high-quality assets for commercial use. Every model is checked for quality before it’s listed, so you know you’re getting a well-built file.
- CGTrader: Another popular marketplace that also connects you with freelance 3D artists if you need a custom model modified to fit your needs.
For AI generative models, the most popular hub is Hugging Face, which hosts hundreds of thousands of free and open-source pre-trained models from independent developers and major companies like Meta and Google. Civitai is another leading platform specifically for fine-tuned AI art models, with a huge community of creators sharing models trained on everything from anime to comic book art to realism. For design templates and mockups, sites like Canva, Creative Market, and Freepik offer thousands of options, with clear licensing for both personal and commercial use.
Understanding Licenses to Avoid Legal Trouble
Once you’ve found a model you like, always check the license before you use it in your work. Licenses fall into a few broad categories:
- Personal use only: You can use the model for private projects, hobbies, or work that you don’t share publicly or make money from. You can’t use it in commercial projects, public content, or anything that generates revenue.
- Commercial use (with attribution): You can use the model in commercial projects, but you have to credit the original creator somewhere in your work, usually in the credits or description.
- Royalty-free commercial use: You can use the model in personal or commercial projects without crediting the creator, and you don’t have to pay ongoing royalties if your work makes money. This is the most common license for paid models.
- Public domain / Creative Commons Zero (CC0): The model is completely free to use for any purpose, including modification and commercial redistribution, with no restrictions at all.
“The difference between a good downloaded model and a bad one isn’t just the quality of the mesh or the training data – it’s the license. A free model that gets your project taken down for copyright infringement will cost you far more time and money than a $20 properly licensed model ever could.”
If you’re ever unsure about what a license allows, reach out to the original creator or platform to clarify. It’s always better to spend five minutes checking than to deal with a copyright strike later.
Preparing and Organizing Your Downloaded Model Before Editing
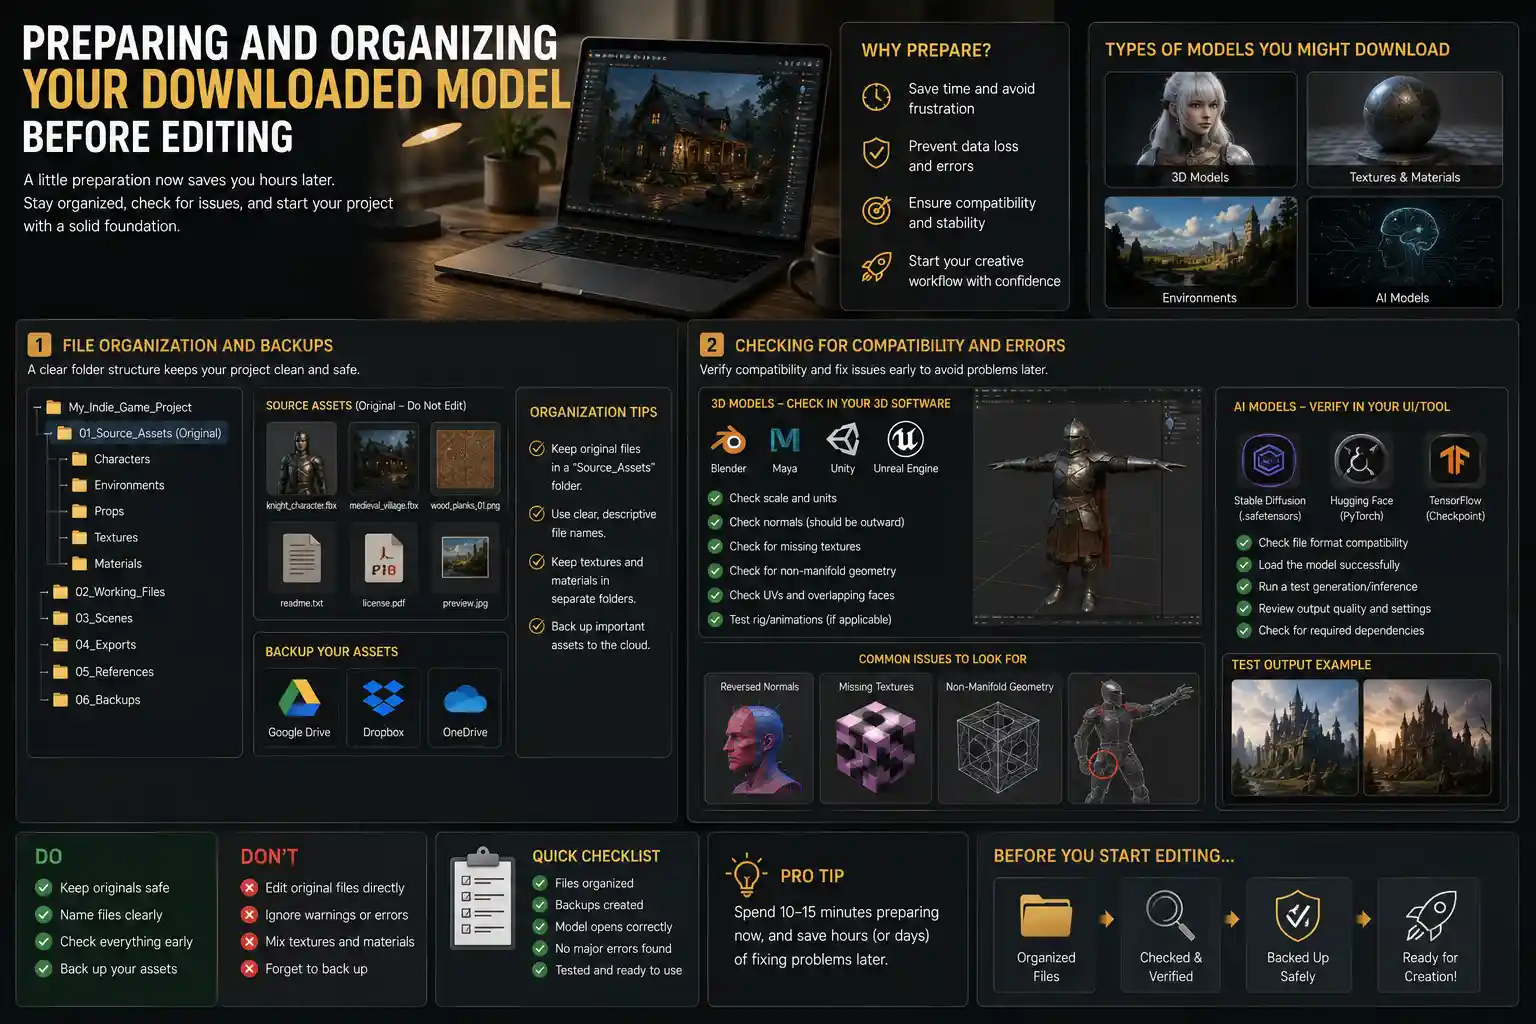
Once you’ve downloaded your model, don’t jump straight into editing. Taking a few minutes to prepare and organize your files will save you hours of frustration later. This step looks a little different depending on what kind of model you’re working with, but the core principles are the same.
File Organization and Backups
First, create a clear folder structure for your project, and keep all your downloaded assets organized from the start. For example, if you’re working on an indie game, you might have a main project folder, with subfolders for characters, environments, props, and textures. Save the original downloaded model file in a separate “source assets” folder, so you always have the unmodified original if you mess up your edited version. This is especially important for paid models, which you may not be able to re-download if you lose the file.
It’s also a good idea to back up your source assets to a cloud service like Google Drive, Dropbox, or OneDrive, so you don’t lose them if your laptop breaks. Name your files clearly, too: instead of leaving it as “model_v3_final_final.obj”, rename it something like “wooden_kitchen_table_1024px.obj” so you can find it six months later when you’re working on a new project.
Checking for Compatibility and Errors
Next, check that the model is compatible with the software you’re using, and that it doesn’t have any hidden errors. For 3D models, this means opening the file in your 3D software (Blender, Maya, Unity, Unreal Engine, etc.) and checking for common issues like reversed normals, missing textures, non-manifold geometry, or broken rigging. If you’re using an AI model, check that it’s formatted correctly for the UI you’re using (for example, a .safetensors file for Stable Diffusion, or a PyTorch checkpoint for Hugging Face) and that it runs without errors when you generate a test output.
Many free models come with small errors that are easy to fix, but it’s better to find them before you spend hours building your project around the model. For example, if you download a 3D character model for an animation, test the rig by moving the arms and legs before you start animating your scene. If the shoulder mesh distorts when you lift the arm, you can fix it or choose a different model early on, instead of redoing all your animation work later.
Customizing the Model to Make It Your Original Work
Many new creators worry that using a downloaded model means their work isn’t original. That’s only true if you just repost the model as-is. The key to making the work your own is customizing the downloaded base to fit your unique vision. With a few simple changes, you can turn a generic pre-built model into something that’s completely unique. Below is a step-by-step workflow for customizing most types of models:
- Start with a base that matches your vision, but doesn’t fill all the details. Don’t look for a model that’s exactly what you want – look for one that’s close, so you have room to add your own changes. For example, if you want to make a portrait of a fantasy elf wizard, don’t download a finished elf wizard model. Instead, download a generic human base model, then modify it to add pointy ears, a beard, and a custom robe. That way, the final product is your creation, not just a copy of someone else’s work.
- Adjust core structural elements to fit your project. For 3D models, this might mean scaling the model to fit your scene proportions, changing the shape of key features, or combining parts from multiple downloaded models to make a new whole. For example, you could take the body from one character model, the head from another, and the armor from a third to create a completely original character. For AI models, this means fine-tuning the base model on a small set of your own sketches or reference images to adjust the style to match your vision.
- Replace or modify textures and materials. One of the easiest ways to make a generic model your own is to change the surface details. A generic wooden chair model can become a unique antique chair by swapping out the default wood texture for a custom texture you created yourself, or adjusting the roughness and reflectivity to match the lighting of your scene. For an AI art model, you can add custom embeddings or LoRAs (Low-Rank Adaptations) to teach the model to draw specific characters, objects, or styles that aren’t in the base training data.
- Integrate the model into a larger unique project. Even if you only make small changes to the model itself, placing it in an original context makes the entire work your own. A downloaded 3D model of a car becomes your original work when you place it in a custom environment you built, light it to match your creative vision, and animate it to fit your story. A pre-trained AI text model becomes your original work when you use it to generate first drafts, then edit and rewrite the text to match your unique voice and story idea.
Combining multiple downloaded models is another great way to create something original. For example, a digital artist creating a book cover might download a pre-trained AI model for backgrounds, a LoRA for a specific character type, and a template for text layout, then combine all three to create a completely unique cover. The base models are just building blocks – the final composition and vision is all yours.
Leveling Up Your Customization: Advanced Tips for More Originality
If you want to take your customization a step further, there are a few simple techniques that don’t require advanced skills:
- For 3D models: Use sculpting tools in Blender or ZBrush to add small custom details like scratches, scars, or unique facial features that make the model your own. Even 10 minutes of sculpting can turn a generic model into a unique character.
- For AI models: Use inpainting or outpainting to add custom details to generated images, or combine outputs from multiple different models to get the best of each. For example, you could generate a character base with one model, then generate the background with another, then combine them in Photoshop.
- For all models: Add hand-made elements on top of the downloaded base. If you’re working with a 3D model, you can paint a custom texture by hand. If you’re working with an AI-generated image, you can touch it up in Procreate to add hand-drawn details. Mixing pre-built models with hand-made work guarantees your work is original.
The goal of customization isn’t to completely rebuild the model from scratch – it’s to add enough of your own creative input that the final work reflects your vision. Even small changes make a big difference.
Integrating Your Customized Model Into Your Final Workflow
Once you’ve customized your model, the next step is integrating it into your final project. This step requires paying attention to technical details to make sure the model fits seamlessly with the rest of your work.
For 3D and game development projects, the most important thing is matching scale and lighting. If your character model is twice the size of your door model, or the lighting on the model doesn’t match the lighting in your scene, the final result will look jarring and unprofessional. Take time to adjust the scale of your model to fit your scene’s units, then adjust the model’s materials to react correctly to your scene’s lighting. For game development, you’ll also need to optimize the model’s polygon count to make sure it runs smoothly on your target platform. A high-poly 3D model that looks great in a render might cause your game to lag on a mobile phone, so you may need to reduce the polygon count or use level-of-detail (LOD) settings to keep performance high.
For AI and generative art projects, integration usually means post-processing to match your desired style. Even a perfectly generated image needs small adjustments to fit your project: you might need to change the color balance to match the rest of your collection, add a grain filter to give it a hand-made feel, or crop it to fit the dimensions of your canvas. If you’re combining multiple generated elements into one piece, use layer masks and color correction in Photoshop or GIMP to make sure all the elements have matching lighting and color temperature. For text generated with a pre-trained LLM, integration means editing for flow, voice, and accuracy: pre-trained models can generate coherent text, but they often make factual errors or use generic phrasing, so editing is essential to turn the generated draft into your original work.
For design projects using template models, the key is to deviate from the default enough to make your design stand out. Don’t just use the default fonts and color palette that come with the template: swap in your own brand colors, choose a different font that fits your tone, and rearrange the layout to highlight your most important content. A template is just a starting point – the best designs use the template to speed up layout, then completely rework the visual details to match the creator’s unique brand.
Conclusion
Downloadable models aren’t a shortcut that replaces creativity – they’re a tool that frees you to focus on the creative parts of your work, instead of spending weeks on the technical labor of building a base from scratch. By finding legally safe, high-quality models, preparing your files properly, customizing the base to fit your vision, and integrating it seamlessly into your project, you can turn pre-built assets into original, professional-quality work in a fraction of the time it would take to start from zero.
Whether you’re a hobbyist working on your first project or a professional working on a tight deadline, working with downloaded models lets you experiment more, finish more projects, and grow your skills faster. The next time you’re staring at a blank canvas, don’t start from scratch – start with a pre-built base, and spend your time bringing your unique vision to life. That’s the real power of downloadable models: they don’t just make creation faster – they make more creativity possible.