
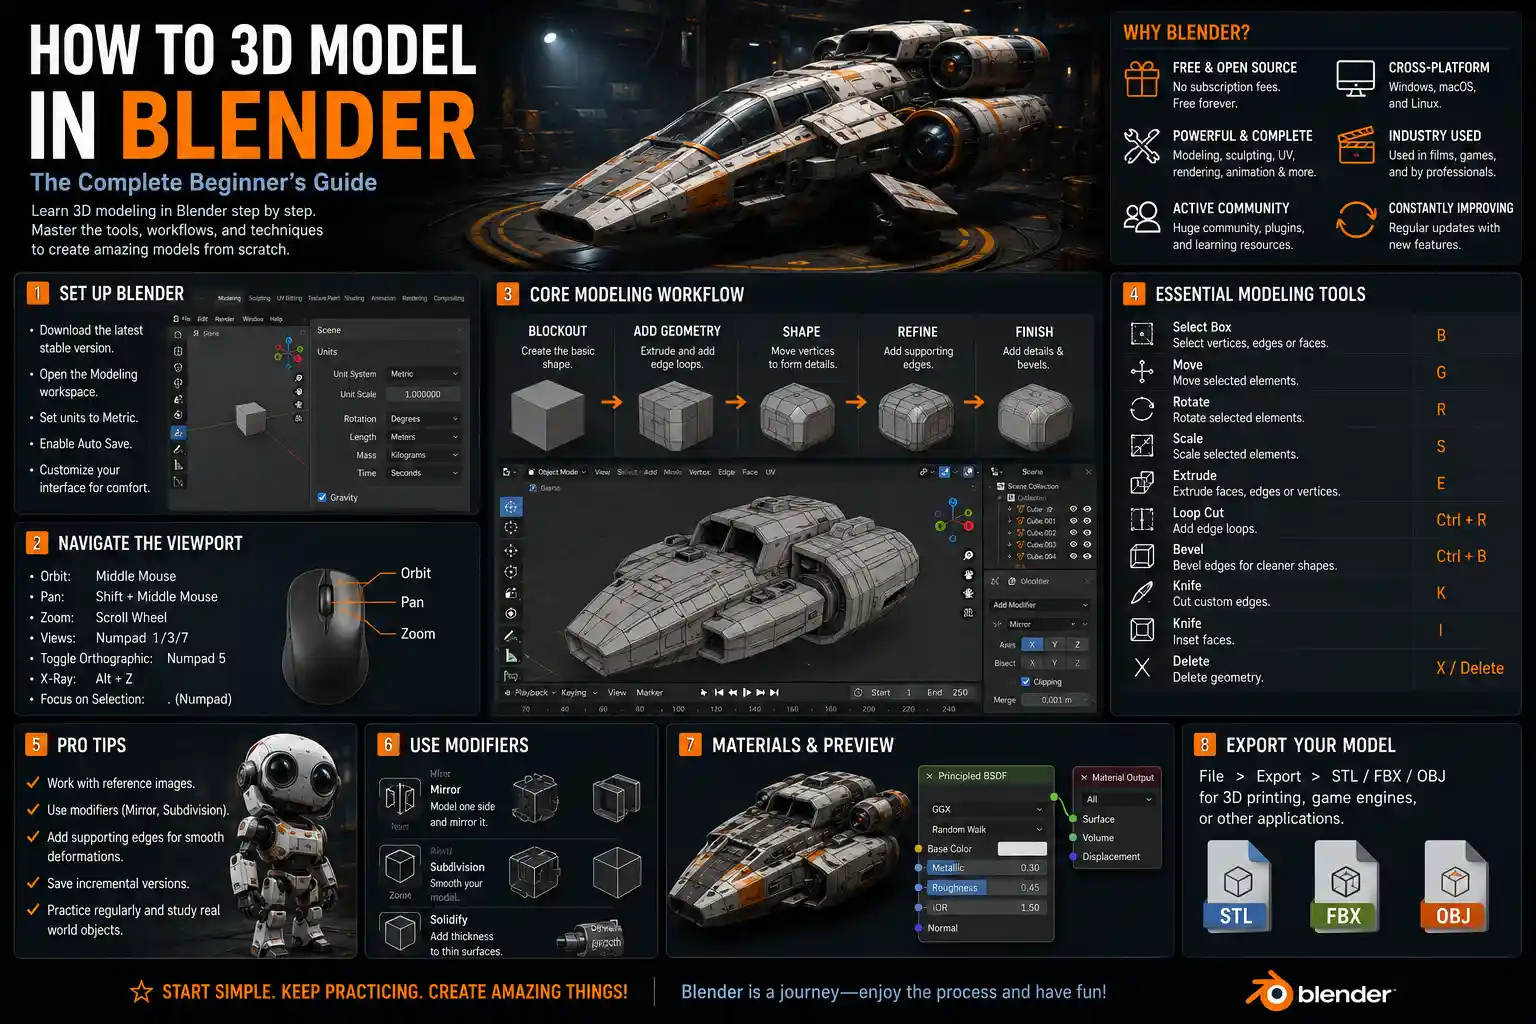
If you’ve ever scrolled through Instagram Reels of intricate 3D animations, browsed Etsy for custom 3D printed figurines, or wondered how Hollywood creates those seamless CGI worlds, you’ve likely encountered work made in Blender. The free, open-source 3D creation suite has exploded in popularity over the last decade, turning amateur hobbyists into professional 3D artists and democratizing access to tools that once cost thousands of dollars in licensing fees. Learning to 3D model in Blender can feel intimidating at first: the interface is packed with menus, buttons, and tools that look like nothing you’ve used before, and the sheer range of capabilities—from modeling to animation, rendering, and even video editing—can leave new users paralyzed by choice. But with a structured approach, core foundational skills, and a few practical tips, anyone can learn to create clean, usable 3D models in Blender. This guide walks you through every step, from setting up your first project to refining a model ready for 3D printing or rendering.
Setting Up Your Blender Workspace for Modeling Success
Before you start pulling vertices and extruding faces, you need to configure Blender for efficient 3D modeling. Out of the box, Blender loads a generic workspace with a perspective camera, a light, and a default cube—and while that cube is a great starting point, the default layout can be adjusted to cut down on clicking and speed up your workflow.
Install the Latest Stable Version
Blender updates every few months with new tools, bug fixes, and interface improvements, so always start by downloading the latest stable build from the official Blender website. Avoid experimental alpha or beta builds for learning: new features can be unstable, and most tutorial content is built around stable releases. Blender is compatible with Windows, macOS, and Linux, and it runs well even on mid-range laptops—though if you plan to work on complex models with thousands of polygons, a dedicated graphics card with at least 4GB of VRAM will make navigation and previewing much smoother.
Customize Your Modeling Workspace
Blender comes with a pre-built "Modeling" workspace, and it’s actually very good for most users. To access it, just click the "Modeling" tab at the top of the screen. That said, small customizations can make a huge difference in how quickly you work. Many new users leave the default right-click selection, but Blender lets you switch to left-click selection (more similar to other design software) in the Edit > Preferences > Selection menu. I also recommend enabling auto-save and setting it to save a backup every 5 minutes: Blender is stable, but accidental crashes do happen, and losing an hour of work is a avoidable mistake.
Another useful tweak is splitting your viewport to see both a perspective and orthographic view at the same time. To do this, hover your cursor over the edge of the viewport, right-click, and select "Split Area." You can set one view to Front Orthographic and the other to Perspective, so you can check proportions while you work without constantly toggling between views. This is especially helpful for modeling hard-surface objects like furniture or mechanical parts, where accuracy matters.
Mastering Core Blender Modeling Tools and Workflows
Blender offers several different modeling approaches, but nearly all beginners start with polygon modeling, the most common and accessible method for most projects. Polygon modeling works by manipulating vertices, edges, and faces—the three basic building blocks of every 3D model. Before you start building anything complex, take the time to get comfortable with these core tools and how they work together.
Understand the Core Building Blocks
Every 3D model in Blender is made up of three core components:
- Vertices: Single points in 3D space that are the foundation of all geometry. Two vertices connected make an edge.
- Edges: Lines connecting two vertices, forming the outline of a shape.
- Faces: Flat surfaces enclosed by three or four edges, which give your model its volume and surface.
When you enter Edit Mode (the mode you use to edit geometry, opposed to Object Mode where you move and organize whole models), you can toggle between Vertex, Edge, and Face selection by pressing 1, 2, or 3 on your keyboard. Mastering this shortcut will cut your editing time in half: switching selection modes with a single key press is far faster than clicking the icons at the top of the screen every time.
Essential Tools Every Blender Modeler Needs to Know
You don’t need to memorize every tool in Blender to start creating great models. Focus on mastering these five core tools first, and you’ll be able to build almost any basic shape:
- Extrude (E): Extrusion pulls a new face out from an existing face, edge, or vertex, adding volume to your model. For example, if you start with a flat square face, extruding it upward turns it into a cube. This is the most used tool in any modeler’s toolkit.
- Loop Cut (Ctrl + R): A loop cut adds a new ring of edges evenly across your model, letting you add more geometry where you need it to shape curves or add details. If you want to round the corner of a cube, for example, you’d add two loop cuts near the corner to give you extra vertices to work with.
- Bevel (Ctrl + B): Beveling softens sharp edges by cutting them off and replacing them with a new flat face. Almost every real-world object has slightly soft edges, so beveling makes your models look far more realistic and polished.
- Knife Tool (K): The knife tool lets you cut custom edges through existing geometry, which is perfect for adding irregular details or cutting shapes out of a solid model.
- Grab/Move (G), Rotate (R), Scale (S): These three transformation tools are used constantly. Memorize their keyboard shortcuts now—you’ll use them dozens of times a minute while modeling.
Once you’re comfortable with these tools, you can start practicing the difference between subdivision surface modeling and hard-surface modeling, the two most common polygon modeling workflows. Subdivision modeling is used for organic shapes like characters, animals, or curved furniture: you start with a basic low-poly shape, then use the Subdivision Surface modifier to smooth it into a curved, high-resolution shape. Hard-surface modeling, on the other hand, is used for objects with sharp, defined edges like cars, buildings, or tools, and relies more on precise edge placement and beveling to get clean results.
“The biggest mistake new 3D modelers make is adding too much detail too early. Start with the big basic shapes, then work your way down to smaller details. A great model is built from the general to the specific, not the other way around.”
This advice from Blender foundation instructor Jonathan Williamson sums up the most important rule for new modelers. It’s tempting to jump straight into adding small details like buttons or engravings before you get the overall shape right, but fixing a proportion error later means redoing all that detailed work. Always start with your largest shapes, block out the overall form, then refine and add details step by step.
Step-by-Step: Model a Simple Object to Build Your Skills
The best way to learn Blender modeling is to do it. Let’s walk through modeling a simple wooden coffee mug, a common beginner project that teaches you all the core skills you’ll use for every future project. By the end of this 10-step process, you’ll have a finished model ready to render or 3D print.
Step 1: Delete the Default Cube and Add Your Base Shape
When you open a new Blender file, you’ll see a default cube in the middle of the viewport. Press Delete to remove it, then press Shift + A to open the Add menu. Hover over Mesh, then select Cylinder. This will be the base shape of your mug. In the Object Data Properties panel on the right, set the number of vertices to 32—this will give you a smooth round shape without unnecessary geometry.
Step 2: Scale and Position Your Base
Press Tab to enter Edit Mode, then press A to select all vertices. Press S to scale the cylinder, dragging your mouse outward until it’s about the size of a real coffee mug (around 8cm in diameter if you’re working with real-world units). Press Enter to confirm the scale, then press S and Z to scale only on the Z-axis, dragging inward to flatten the cylinder until it’s about 10cm tall, which is a standard mug height. Press Enter again.
Step 3: Extrude the Inner Wall
Switch to Face selection mode by pressing 3, then click the top circular face of your cylinder to select it. Press E to extrude it downward, but don’t click yet: press Z to lock the extrusion to the Z-axis, then drag the cursor down until you’re about 0.5cm from the bottom of the mug. Don’t extrude all the way to the bottom—you need to leave a base. Press Enter to confirm.
Step 4: Scale the Inner Opening
With the new inner top face still selected, press S to scale it inward slightly—this makes the inner wall of your mug thinner, so it’s not super thick ceramic. For a standard mug, 0.5cm to 0.75cm of wall thickness is perfect. Press Enter to confirm.
Step 5: Extrude the Base Closed
Press E again to extrude this face straight down, all the way to the bottom of the mug. This closes off the base, so your mug is hollow inside with a solid bottom. If any vertices are misaligned at the bottom, switch to Vertex selection, select the bottom vertices, press S to scale them down to zero to snap them all to the same plane, then press G and Z to move them to the exact bottom of the mug.
Step 6: Add the Handle with a Curve
Now for the handle. Go back to Object Mode by pressing Tab, then press Shift + A and select Curve > Bezier Curve. This will create a smooth curved line that we’ll turn into the handle. Move the curve to the side of the mug with G, then enter Edit Mode for the curve and adjust the control points to make a C-shaped curve that matches the shape of a standard mug handle. Once you’re happy with the shape, go to the Object Data Properties panel and set the "Radius" to about 1.5cm to get the right thickness for the handle.
Step 7: Convert the Curve to Mesh and Join It to the Mug
With the curve selected, go to Object > Convert > Mesh. This turns the smooth curve into a polygon mesh we can edit. Now select the mug body first, then hold Shift and select the handle (the order matters here). Press Ctrl + J to join the two objects into one.
Step 8: Bevel Your Edges for a Polished Look
Enter Edit Mode for your joined mug model, press A to select all edges, then press Ctrl + B to bevel. Drag your mouse to get a small bevel (about 0.2cm is perfect for a mug) and scroll your mouse wheel up to add more segments to the bevel for a smoother round edge. Press Enter to confirm.
Step 9: Add a Subdivision Surface Modifier to Smooth It Out
Go to the Modifiers Properties panel (the wrench icon on the right) and add a Subdivision Surface modifier. Set Levels to 2, and check the "Optimal Display" box. This will smooth out any blockiness and give you a clean, round mug.
Step 10: Check for Errors
The last step is to check for non-manifold geometry—errors where your mesh has overlapping edges or open faces that will cause problems when 3D printing or rendering. Go to Edit Mode, click Select > Select All by Trait > Non Manifold. Blender will automatically select any problem geometry, so you can fix it by merging overlapping vertices or closing open edges. If nothing is selected, your mesh is clean and ready to go.
This simple project teaches you all the core skills: adding base meshes, extruding, scaling, working with curves, joining objects, and checking for errors. Once you finish a mug, try modeling a spoon, a plate, or a simple chair to practice the same skills with different shapes.
Pro Tips to Improve Your Blender Modeling Workflow
Once you’ve mastered the basics, small habit changes and advanced tricks can turn a slow, frustrating process into a smooth, efficient one. These are the tips that turn beginner modelers into confident creators, and they’re all easy to implement.
Use Keyboard Shortcuts Consistently
It’s tempting to click every tool from the sidebar when you’re new, but memorizing even the most common shortcuts will cut your modeling time in half. We’ve already covered the core shortcuts (G, R, S, E, Tab for mode toggle, 1/2/3 for selection modes), but here are a few more worth memorizing right now:
- Shift + A: Add new object
- Z: Toggle wireframe view to see through your model
- Ctrl + Z: Undo (Blender has unlimited undo, so don’t be afraid to experiment!)
- Shift + Alt + Scroll: Zoom the viewport without changing your focal point
- M: Move selected vertices/objects to a different collection for organization
Over time, you can customize shortcuts to match your workflow, but sticking to the defaults when you start makes it easier to follow along with tutorials.
Keep Your Poly Count Low Early On
A common mistake new modelers make is adding too many polygons from the start. A high-poly model is slow to navigate, harder to edit, and unnecessary when you’re still blocking out the basic shape. Always start with as few polygons as possible, and only add more geometry when you need it to shape a detail. For example, your mug only needed 32 vertices for the base cylinder—you didn’t need 128. If you’re working on a character, start with a basic sphere for the head and a cube for the body, then add loop cuts only when you need to shape the jaw or cheeks. When you’re done, you can use subdivision to get a smooth high-poly result, but you’ll still have a clean, editable base mesh.
Use Modifiers Instead of Editing Manually
Blender’s modifiers are automatic tools that change your geometry without you having to edit every vertex by hand. We already used the Subdivision Surface modifier in the mug project, but there are dozens of useful modifiers for modeling. The Mirror modifier, for example, lets you model one half of a symmetrical object (like a character face or a car) and automatically mirrors it to the other half, cutting your work in half and guaranteeing perfect symmetry. The Solidify modifier automatically adds thickness to a flat model, which is far faster than extruding manually. Get in the habit of checking the modifier list first before you edit something by hand—there’s probably a modifier that can do it for you in seconds.
Organize Your Scene with Collections
As your models get more complex, it’s easy to end up with dozens of separate objects that are hard to sort. Blender’s collections let you group related objects together: for example, if you’re modeling a full kitchen scene, you can put all your mug objects in one collection, your cabinets in another, and your appliances in a third. You can hide or select entire collections at once, which makes editing much faster. It’s a small habit that pays off big time as you work on larger projects.
Learn From Other People’s Files
One of the best ways to improve is to download free Blender models from sites like Sketchfab or Blender Market, open them up, and see how other modelers built their geometry. You can see how they organized their mesh, where they placed edge loops, how they used modifiers, and what tricks they used to get clean results. Most modelers share their files for free for non-commercial use, and it’s a far more effective learning tool than just following pre-written tutorials.
Common Blender Modeling Mistakes (And How to Fix Them)
Even experienced modelers make these common mistakes, but catching them early saves hours of frustration later. Here are the most frequent issues new users face, and how to fix them right away.
Non-Manifold Geometry
Non-manifold geometry is any mesh that has errors like overlapping vertices, open edges, or faces with more than four sides that confuse rendering and 3D printing software. We already mentioned how to select non-manifold geometry in Blender, but the fix is usually simple: merge overlapping vertices (press M then select "At Center") to combine two vertices in the same spot, close any open faces by selecting the open edges and pressing F to fill them, and split any faces that have more than four edges with the Knife tool.
Too Many Ngons
An ngon is any face with more than four sides. While Blender can handle ngons most of the time, they cause problems when you subdivide or export your model for 3D printing or other software. If you have a large ngon, you can fix it by adding an edge from one vertex to another to split it into multiple quads (four-sided faces), which are clean and compatible with every workflow.
Uneven Edge Loops
When you add a loop cut, it’s easy to end up with uneven spacing that makes your mesh look lumpy when you subdivide. To fix this, select the edges you want to even out, go to Edge > Equalize Edge Lengths, and Blender will automatically space them evenly for you. This is especially useful for curved shapes like character models where even edges give you a smoother result.
Forgetting Real-World Scale
If you’re modeling a product for 3D printing or architectural visualization, forgetting to work in real-world units will leave you with a mug that’s 10 feet tall instead of 10 centimeters when you export it. Go to the Scene Properties panel, set your units to Centimeters or Inches, and check the "Length" setting so Blender uses real-world measurements. It only takes a second, and it saves you from having to rescale your entire model later.
Conclusion
Learning to 3D model in Blender is a process, not something you can master in a single weekend. The key is to start small, master the core fundamentals before moving on to complex projects, and practice consistently. Start with simple objects like mugs, chairs, or boxes to get comfortable with the tools, then gradually work your way up to more complex projects like characters or architectural scenes. Don’t get discouraged by early mistakes—every 3D modeler you admire started exactly where you are, with a confusing interface and a default cube. With the structured approach we’ve covered here, you’ll be building clean, polished 3D models faster than you think. Blender’s biggest advantage is that it’s free to use, so you can experiment, make mistakes, and learn without investing hundreds of dollars in software upfront. All you need is time, practice, and a willingness to learn one new skill at a time.