
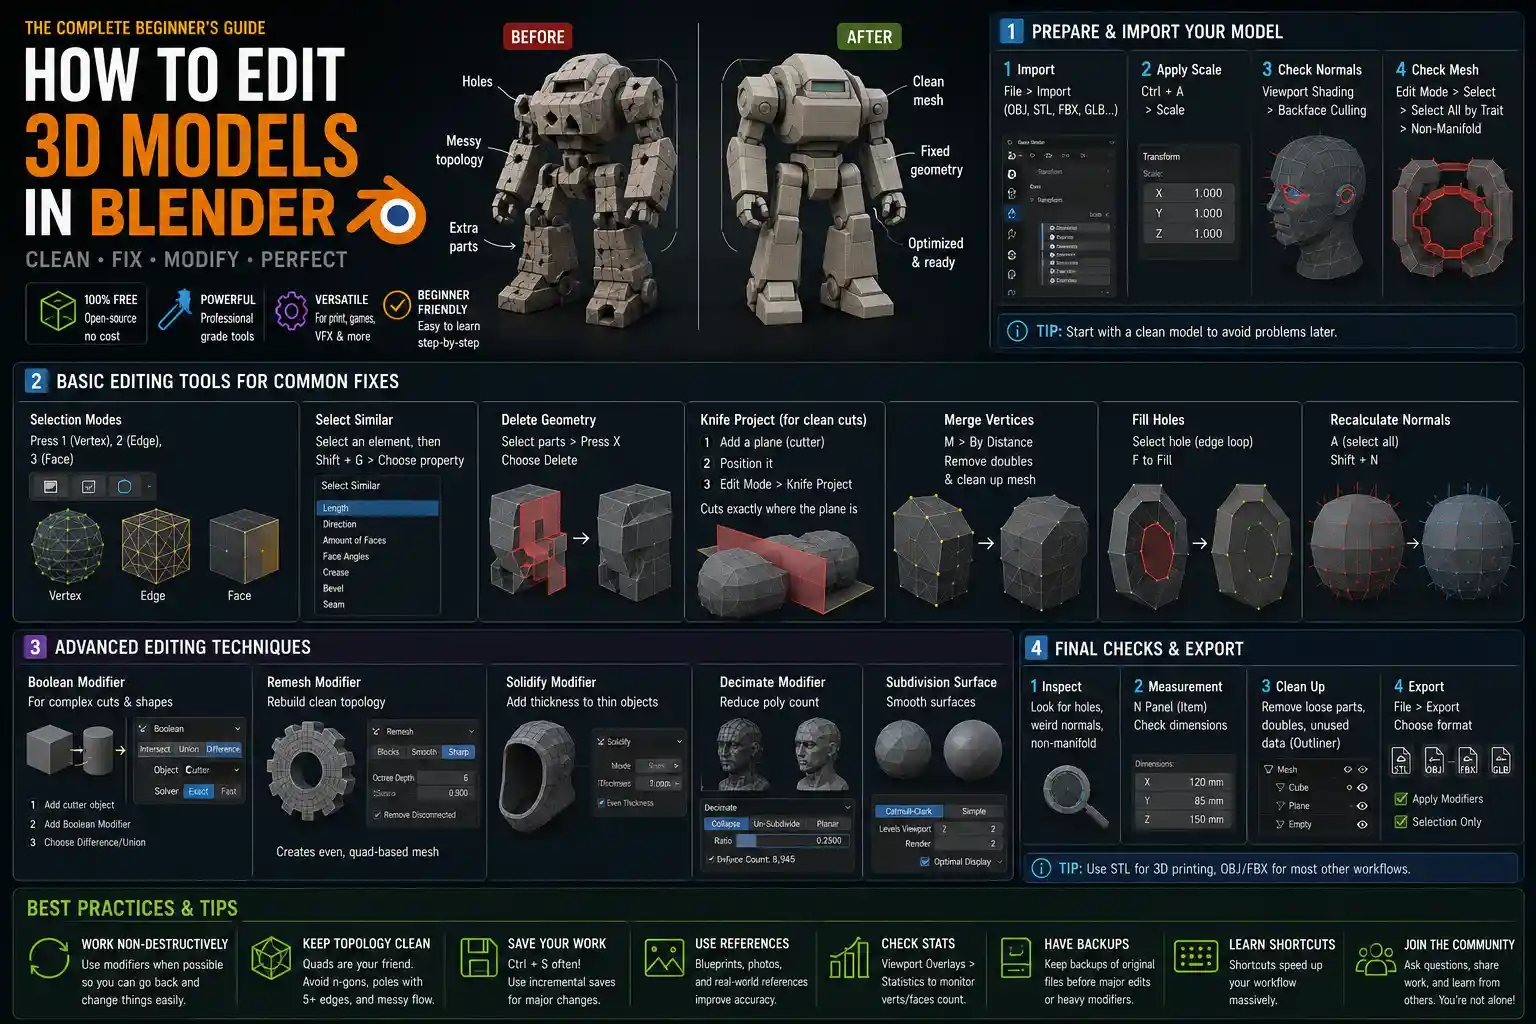
If you’ve ever downloaded a 3D model from an online marketplace like Sketchfab or TurboSquid, or exported a rough scan from a 3D printer, you’ve probably encountered a problem: the model isn’t quite right. Maybe it has missing faces, messy topology, or a shape that just doesn’t fit your project. For beginners and professional creators alike, Blender has emerged as the go-to free, open-source tool for fixing, modifying, and refining 3D models, regardless of whether you’re working on 3D printing, game development, visual effects, or architectural visualization. Unlike expensive paid 3D editing suites, Blender puts professional-grade editing tools in the hands of any creator, and learning the basics of model editing can turn a flawed asset into a finished, production-ready piece in just a few hours. In this guide, we’ll walk through the end-to-end process of editing a 3D model in Blender, from importing your file to exporting your final edited version.
Preparing Your Workspace and Importing the Model
Before you start making changes to your 3D model, you need to set up Blender correctly and get your model into the software without errors. Many new users skip this step and end up dealing with broken normals, hidden meshes, or scaling issues that derail their editing process later. Taking 10 minutes to prepare your workspace and check your imported model will save you hours of frustration down the line.
Setting Up Blender for Model Editing
When you first open Blender, you’ll see a default scene with a cube, light, and camera. For model editing, you don’t need these default objects, so you can clear them easily. Press A to select everything in the scene, then press X and confirm deletion to get a blank workspace. Next, switch to the Edit Mode Workspace from the top menu bar – this preset workspace automatically arranges your tools, properties, and viewport to prioritize mesh editing, so you don’t have to rearrange panels manually.
One useful adjustment for new users is to enable vertex size markers so you can clearly see individual points on your mesh when editing. Go to Edit > Preferences > Themes > 3D Viewport, and adjust the vertex size slider to 3-5 pixels, depending on your screen resolution. This makes it much easier to select small vertices when working on detailed models.
Importing and Checking Your Original Model
Blender supports nearly every common 3D file format, including OBJ, FBX, STL, GLB, and STEP. To import your model, go to File > Import, then select the file type matching your model, navigate to your file, and click Import. Most default import settings work fine for standard models, but if you’re importing an STL for 3D printing, you may want to check the “Split by Object” box to separate multiple meshes in a single file.
Once your model is imported, the first thing you should do is check three critical properties that cause common editing issues:
- Check object scale: With your model selected, go to the Object Properties panel (the small orange square icon on the right sidebar) and look at the Scale values. For editing, all scale values should be set to 1.0. If they’re not, press
Ctrl+Aand select Scale to apply the current scaling to the model. This prevents weird distortions when you start pushing and pulling vertices later. - Check for flipped normals: Flipped (or inverted) normals make parts of your model look transparent when rendered or 3D printed. To check this, enable Backface Culling in the Viewport Shading menu (the circle icon at the top right of the viewport). If any parts of your model disappear when you enable this, your normals are flipped. We’ll fix this later in the editing process.
- Check for separate meshes: If your model is made up of multiple disconnected parts, make sure they’re separate objects or joined correctly. You can join multiple selected objects by pressing
Ctrl+J, or separate disconnected parts into their own objects by pressingPin Edit Mode and selecting “By Loose Parts.”
With these checks complete, your model is ready to edit.
Basic Editing Tools for Common Fixes
Most 3D model editing projects don’t require complex sculpting or retopology – you just need to fix common issues like removing unwanted parts, merging objects, or filling holes. Blender’s basic editing tools are designed to handle these tasks quickly, and mastering just three core tools will let you complete 80% of common editing projects.
Selecting the Right Components
Blender Edit Mode has three selection modes, each for working on different parts of your mesh: Vertex Selection (select individual points), Edge Selection (select lines between vertices), and Face Selection (select whole polygons on the surface of the model). You can switch between these modes using the small icons at the top left of the viewport, or by pressing 1, 2, or 3 on your keyboard for quick switching.
For most editing tasks, you’ll use Blender’s default selection tools, but one underrated tool for new users is the Select Similar tool. If you need to select all faces of the same size, or all edges of the same length, just select one example, then press Shift+G and choose the property you want to match. This saves tons of time when cleaning up messy imported models with hundreds of redundant edges.
Deleting Unwanted Parts of the Model
One of the most common editing tasks is cutting away unwanted parts of a model – for example, removing a stand from a 3D scanned figurine, or cutting a full character model in half to 3D print it as a wall mount. To do this, enter Edit Mode, select the parts you want to delete, then press X and select “Delete” to remove them. If you want to cut a clean slice through a model, the Knife Project tool is far more accurate than selecting faces manually.
To use Knife Project: first, create a plane object that aligns with where you want to cut your model. Position the plane so it intersects your model exactly where you want the cut. Select your model, enter Edit Mode, select all vertices, then go to Mesh > Knife Project. Blender will automatically cut the mesh along the plane, creating a clean edge that you can select and delete. This leaves a perfectly straight cut that’s far easier to refine than a manual selection.
Filling Holes and Fixing Common Mesh Errors
Almost all imported models and 3D scans come with errors like holes, missing faces, or flipped normals. Fixing these is straightforward with Blender’s built-in tools:
- Filling holes: For small holes, select all the edges around the hole in Edge Selection mode, then press
Fto create a new face. For more complex holes with irregular edges, use the Fill Hole tool: select one edge on the edge of the hole, then pressCtrl+Shift+Fand Blender will automatically fill the entire hole. - Fixing flipped normals: If you found flipped normals during your initial check, select all vertices in Edit Mode, then go to Mesh > Normals > Recalculate Outside. This will automatically flip all inward-facing normals to face outward, fixing the transparent appearance. For meshes that need to be double-sided (like thin walls for 3D printing), you can add a Solidify modifier later to create thickness.
- Removing duplicate vertices: Many imported models have overlapping vertices that cause issues when 3D printing or rendering. To fix this, select all vertices in Edit Mode, then press
Mand select “By Distance.” Blender will automatically merge all overlapping vertices into one, cleaning up your mesh without changing its shape.
The biggest mistake new Blender users make is overcomplicating simple edits. You don’t need to rebuild the entire mesh to fix a small hole or cut off an unwanted part. Master the basic selection and cleanup tools first, and you’ll finish most edits in less time than it takes to open a more complex toolset.
This quote from Blender Foundation certified instructor Jonathan Lampel highlights a common trend: new users often jump to advanced retopology or sculpting when a simple delete and fill would solve their problem. Start with basic tools, and only move to advanced edits if the basic tools don’t get the result you want.
Advanced Shape Adjustments and Refinements
Once you’ve fixed the basic errors in your model, you may need to adjust the shape to fit your needs. Whether you want to resize a specific part, smooth out a rough 3D scan, or adjust proportions to match a reference, Blender has a range of tools for non-destructive and destructive shape edits. For most projects, non-destructive edits (edits that you can adjust later without redoing all your work) are the best choice.
Proportional Editing for Smooth Shape Adjustments
If you need to pull or push a part of your model to change its shape without creating hard edges, Proportional Editing is your go-to tool. Proportional Editing lets you move a single vertex, and it automatically pulls surrounding vertices with it, creating a smooth, natural transition. You can enable it by clicking the small circle icon at the top of the viewport, or by pressing O on your keyboard to toggle it on and off.
To use Proportional Editing effectively, enter Edit Mode, select the vertex or group of vertices you want to move, activate the Move tool (press G), then scroll your mouse wheel to adjust the falloff radius. A larger radius will affect more of the surrounding mesh, creating a smoother change, while a smaller radius will only change the area right around your selection. You can choose different falloff types (like Smooth, Sharp, or Inflate) from the Proportional Editing menu to get different effects. This tool is perfect for adjusting character proportions, reshaping organic models like plants or animals, and smoothing out bumps in 3D scans.
Using Modifiers for Non-Destructive Edits
Blender’s modifiers are automatic tools that change your mesh without permanently editing the original geometry. This means you can adjust the settings of the modifier at any time, even after you’ve done other editing work, which makes them ideal for common shape adjustments. Some of the most useful modifiers for 3D model editing include:
- Solidify Modifier: Adds thickness to thin, flat meshes. This is essential for 3D printing, where solid models with volume are required, and for creating double-sided surfaces for rendering. You just adjust the Thickness slider to get the exact width you need.
- Subdivision Surface Modifier: Smooths out a low-poly mesh by subdividing each face multiple times, creating a high-resolution smooth surface. You can keep your base mesh low-poly and easy to edit, while getting a smooth final result. For even better control, enable “Optimal Display” to keep your viewport wireframe clean while editing.
- Decimate Modifier: Reduces the number of polygons in a high-resolution mesh, which is perfect for taking a high-poly 3D scan and turning it into a lower-poly model that’s easy to work with for games or 3D printing. The Planar Decimation option is particularly useful for cleaning up architectural models with lots of flat surfaces.
- Lattice Modifier: Lets you reshape an entire model or a large part of a model using a simple grid of control points, without editing individual vertices manually. This is ideal for adjusting the overall proportions of a character or object while keeping the original surface detail intact.
When you use modifiers, your original mesh stays unchanged, so you can go back and adjust the modifier settings at any point. If you’re happy with the result and want to make the change permanent, you can click the “Apply” button on the modifier to bake the change into your mesh.
Sculpting for Organic Refinements
If you need to make detailed organic changes to your model – like adding muscle definition to a character, smoothing out a rough 3D scan, or adding small details like wrinkles or texture – Blender’s Sculpt Mode is the perfect tool. To enter Sculpt Mode, just click the mode selection menu at the top left of the viewport and select Sculpt, or press Ctrl+Tab and choose Sculpt from the menu.
For editing existing models, the most useful sculpt brushes are the Clay Strips brush for adding volume, the Smooth brush for smoothing out rough areas, the Pinch brush for pulling edges closer together to sharpen details, and the Flatten brush for evening out surfaces. You can adjust the size and strength of your brush using the F and Shift+F shortcuts, respectively, so you can work on large areas or small details quickly.
One key tip for sculpting on existing models is to enable Dynamic Topology only if you need to add or remove a lot of detail. If you’re just refining the existing shape of your model, you can leave Dynamic Topology off and sculpt on the existing mesh, which keeps your topology clean and easy to edit later.
Cleaning Up Topology for Final Use
After you’ve finished editing the shape of your model, you need to clean up its topology (the arrangement of vertices, edges, and faces) to prepare it for its final use, whether that’s 3D printing, game development, or rendering. Bad topology can cause issues like distorted textures, rendering errors, and failed 3D prints, so taking the time to clean it up is a critical step that many new users skip.
Checking for Common Topology Issues
Before you start making changes to your topology, check for these common issues that can cause problems:
- Non-manifold geometry: Non-manifold geometry is mesh that has edges connected to more than two faces, or faces with no volume. This is a common problem for 3D printing, as slicer software can’t process non-manifold meshes correctly. To check for non-manifold geometry in Blender, enter Edit Mode, select all vertices, then go to Select > Select Non-Manifold. Blender will automatically select all problematic vertices, and you can fix them by deleting extra faces, filling holes, or merging overlapping vertices.
- Ngons: Ngons are polygons with more than four sides. Most modern game engines and 3D printing software can handle a small number of Ngons, but large numbers of Ngons can cause distortion when you subdivide or texture your model. To find Ngons, go to Select > Select By > Number of Sides, enter 5 and higher, and Blender will select all Ngons in your mesh. You can fix them by selecting the Ngon and pressing
Ctrl+Tto triangulate it, or by using the Knife Tool to cut it into quadrilaterals. - Extra vertices and edges: Mesh decimation or manual editing can leave extra vertices and edges that aren’t needed. You can remove these by using the Remove Doubles tool (as we covered earlier) or by dissolving edges that don’t contribute to the shape of the model. To dissolve an edge, select it and press
X, then select “Dissolve Edge” – this removes the edge without creating a hole in your mesh.
Retopology for High-Poly Models
If you’ve edited a high-poly 3D scan or sculpted a high-poly model for a game or animation, you’ll probably need to do a simple retopology to create a clean, low-poly base mesh that’s easy to animate and texture. Retopology is the process of rebuilding a new clean mesh over the top of your existing high-poly shape, so you get the shape you want with clean, organized topology.
Blender has a built-in Retopology Tool that makes this process straightforward. First, select your high-poly model and shift it slightly along one axis to make it semi-transparent, then add a new plane object as your base for the new low-poly mesh. Enable the Snap tool, set the snap target to “Face Project,” so every new vertex you add automatically snaps to the surface of your high-poly model. Then use the Connect Vertex Pairs tool to draw new quads over the surface of your high-poly model, gradually building up a clean mesh that matches the shape of your original.
Once you’ve finished your retopologized mesh, you can use a Displacement or Normal Map to transfer all the high-resolution detail from your original model to your new clean low-poly mesh, so you get the best of both worlds: a clean, lightweight mesh for animation and the high detail of your original sculpt.
Exporting Your Edited Model for Final Use
Once you’ve finished editing and cleaning up your model, the last step is to export it in the correct format for your intended use. Blender’s export options are customizable, and choosing the right settings will ensure your model works correctly in whatever software you use next.
Choosing the Right File Format
The file format you choose depends on what you’re going to do with your model:
- STL: The standard format for 3D printing. When exporting STL, make sure the “Selection Only” box is checked if you only want to export your selected edited model, and adjust the “Scale” setting to match the units you used in Blender. Most 3D printing slicers expect STLs in millimeters, so if you modeled in meters, adjust the export scale to 1000 to get the correct size.
- OBJ: The most common format for exchanging 3D models between different software programs. OBJ supports texture coordinates, so it’s good for models that you’re going to texture later. When exporting OBJ, check the “Write Normals” box to export your corrected normals with the model.
- FBX/GLB: The standard formats for game development and interactive media. FBX is compatible with all major game engines like Unity and Unreal, while GLB is a lightweight format for web-based 3D content. When exporting FBX, make sure to set the “Forward” axis to “-Z Forward” and “Up” to “Y Up” to match the coordinate system used by most game engines, which prevents your model from being imported upside down or sideways.
Final Checks Before Export
Before you click export, run through this quick checklist to catch any last-minute issues:
- Apply all modifiers you want to include in the exported model. Unapplied modifiers won’t be exported with the mesh in most file formats, so if you added a Solidify modifier for 3D printing, make sure to click Apply before exporting.
- Check the overall scale of your model one last time in Object Mode. Confirm that the dimensions match what you need for your project – for example, a 10cm tall figurine should measure 10cm in Blender’s dimensions panel before export.
- Delete any extra objects or unused meshes from your Blender file. Extra objects won’t hurt anything if you use Selection Only when exporting, but cleaning up your file keeps it organized and prevents accidental export of extra geometry.
Conclusion
Editing a 3D model in Blender doesn’t have to be intimidating, even for new users. Starting with preparation and basic cleanup, moving on to shape adjustments, finishing with topology cleanup and export, the process follows a clear, logical flow that works for almost any editing project, from fixing a broken STL for 3D printing to reshaping a character model for a game. The key is to start simple: master the basic selection and cleanup tools first, then gradually incorporate modifiers, sculpting, and retopology as you need them. Blender’s active community and constant development mean that there are more tutorials and tools available than ever before, so don’t be afraid to experiment with different tools to find what works for your project. With a little practice, you’ll be able to edit any 3D model to fit your needs, all without spending a dime on expensive 3D software.