
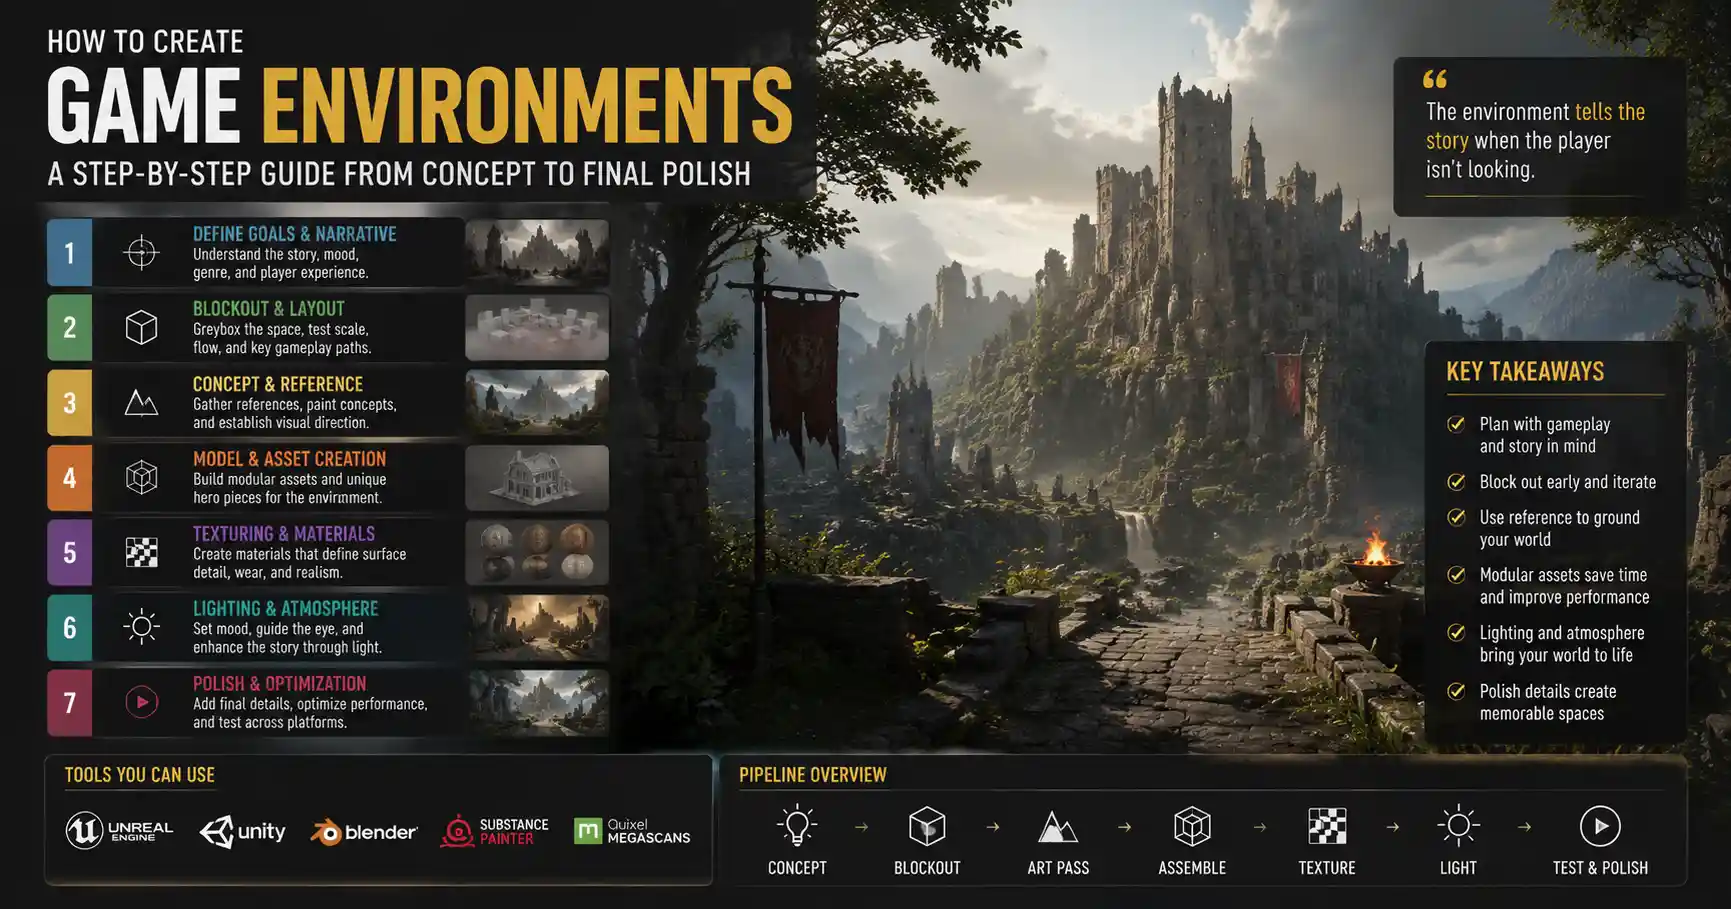
Whether you’re building a cozy cottage for a cozy farming simulation or a sprawling, post-apocalyptic wasteland for an open-world survival game, a great game environment does more than just fill space behind playable characters. It sets mood, drives story, guides player behavior, and creates memorable moments that stick with players long after they’ve turned off their console. Creating a compelling game environment is equal parts art, storytelling, and technical problem-solving, and it requires careful planning at every stage of development. This guide breaks down the full process, from initial concept to final polish, to help you build immersive, functional worlds that players will love exploring.
Start with Pre-Production: Define Core Goals and Narrative Context
Many new environment designers jump straight into 3D modeling before they’ve answered the most basic questions about their world, leading to inconsistent design, wasted work, and environments that feel unconnected to the game’s core identity. Pre-production is where you align your environment with the game’s story, genre, and player experience goals, and it’s the most important step in the entire process.
Align the environment with the game’s core genre and experience
Every genre has different expectations for environment design, and your choices should reflect what players want from your game. A fast-paced first-person shooter needs open sightlines, clear cover points, and navigation paths that keep combat flowing, while a slow-burn horror game relies on tight corridors, obscured visibility, and ambiguous shapes that build tension. A mobile puzzle game, by contrast, needs a simple, uncluttered environment that doesn’t distract from core gameplay mechanics.
For example, the 2023 indie hit Baldur's Gate 3 builds its environments around player freedom: every area includes multiple entry points, hidden paths, and interactable objects that let players approach encounters in stealth, combat, or diplomacy, matching the game’s core promise of unlimited choice. By contrast, the linear psychological horror game Silent Hill 2 uses narrow, fog-shrouded streets and confusing building layouts to intentionally disorient players, amplifying the game’s unsettling tone.
Build narrative into the environment from day one
Environmental storytelling is the art of telling a story through the world itself, rather than through dialogue or cutscenes. A broken playground swing in an abandoned town tells a story of a sudden evacuation far more effectively than a text log explaining it. Before you start building, write a brief narrative brief for your environment that answers key questions:
- Who lived or worked here, and what were they doing?
- What major events changed this place, and when did they happen?
- What mood do you want players to feel when they explore this area?
- What secrets or hidden story beats can you reveal through environmental details?
Even open, non-linear environments benefit from this level of planning. In The Legend of Zelda: Breath of the Wild, the ruined castles and abandoned stables scattered across Hyrule all carry subtle hints of the war that destroyed the kingdom 100 years before the game’s start, giving players context for the world without forcing exposition on them.
Block out your space for gameplay first
Once you have your narrative and genre goals defined, the next step is to create a graybox: a simple, untextured 3D blockout of your environment that maps out the overall scale, key paths, and major landmarks. The goal of a graybox is to test gameplay before you invest time in detailed art, so it’s made of basic primitive shapes like cubes and cylinders rather than finished assets. Testing scale here is critical: a mountain that looks impressive on paper might be frustratingly slow to climb for players if its slope is too steep or its distance is miscalibrated for your game’s movement speed.
Reference Gathering and Concept Development
Even the most creative designers can’t build a believable world out of thin air. Reference gathering is how you ground your environment in reality (or, for fantasy settings, in consistent internal logic) and avoid generic, unmemorable design. This step also helps your entire team align on the visual style you’re aiming for.
Where to find high-quality reference material
For real-world locations, the easiest place to start is free photo resources like Google Street View, Flickr Creative Commons, Unsplash, and Pexels, which let you browse thousands of photos of everything from Alaskan rainforests to 1950s American diners. For historical or culturally specific environments, look to museum archives, academic publications, and travel blogs written by people who live in the region you’re depicting. If you’re building a fantasy or sci-fi world, collect reference for the real-world materials and architectural styles that inspired your concept, then blend them to create something unique.
“Reference is not copying. Reference is understanding how the world works, so you can bend its rules intentionally instead of accidentally.”
Once you’ve collected your references, organize them into a mood board that you can refer back to throughout the process. Tools like Pinterest, Miro, or PureRef make it easy to sort images by type: for a medieval village, you might have separate folders for roof textures, timber framing, village layout, and surrounding landscape. This keeps your design consistent as you work, and helps catch inconsistencies early.
Refine the concept with player navigation in mind
Good concept art doesn’t just look good—it communicates how players will move through the space. When you’re developing your final concept, mark key landmarks and navigation cues that will help players orient themselves. Landmarks are large, unique objects or structures that players can see from multiple points in the world, like a mountain peak, a tall clock tower, or a glowing tree. They’re critical for open-world games, where players can easily get lost without clear visual cues to guide them.
For example, in Red Dead Redemption 2, the distinctive mountain shape of Mount Shaman is visible from almost every area of the game’s map, giving players a constant point of reference to orient themselves as they travel across the fictional state of New Hanover. For smaller, indoor environments, navigation cues can be as simple as a consistent texture for main paths, or a warm light that draws players toward key objectives.
Building the Environment: Modeling, Texturing, and Composition
With pre-production and concept work complete, you can move into the actual creation of your environment. This stage combines technical asset creation with artistic composition to bring your concept to life while keeping performance and gameplay in mind.
Modular design for efficiency and consistency
Most modern game environments are built using modular asset creation, where you create a set of reusable building blocks (like wall segments, roof pieces, floor tiles, and decorative props) that you can arrange and rearrange to build larger spaces. This approach is far more efficient than building every section of a large environment from scratch, and it helps keep your design consistent across the entire world.
When building modular assets, follow these practical guidelines:
- Stick to a consistent grid snap size for all assets, so they fit together cleanly without gaps or overlapping geometry.
- Include multiple variations of common pieces (like three different brick wall segments, or four different roof trims) to avoid visible repetition that pulls players out of the experience.
- Add small, unique set pieces for key areas to break up the pattern of modular pieces and add visual interest.
- Test all assets in your game engine early to make sure they render correctly and don’t cause performance issues.
For linear, story-driven games with small to medium-sized levels, modular design cuts development time dramatically while keeping quality consistent. For open-world games, it’s essential—without modular assets, building a map the size of Grand Theft Auto V would take dozens of artists years of extra work.
Texturing for realism and mood
Textures are what give your environment depth and character, and modern PBR (physically based rendering) workflows make it easier than ever to create textures that react realistically to light. When texturing, always prioritize clarity over detail: a highly detailed texture that distracts from gameplay or obscures key paths is worse than a simple, clear texture that serves the player experience.
One common mistake new designers make is using the same texture across a large surface, leading to visible repeating patterns. To avoid this, use texture blending to mix multiple different textures across large areas, add small decals (like stains, cracks, or graffiti) to break up uniformity, and adjust the brightness and contrast of texture edges to create subtle variation. For outdoor environments, add variation based on geography: dirt near pathways that gets worn down by foot traffic, moss on the north side of trees that doesn’t get much sun, and fallen leaves that gather in low spots all add believability without requiring extra modeling work.
Composition and spatial hierarchy
Composition is how you arrange elements in your environment to guide the player’s eye and emphasize important areas. Spatial hierarchy means making key elements (like a quest objective, a hidden treasure chest, or an exit) stand out visually from the background. A few simple rules help create clear, engaging composition:
- Use the rule of thirds to place key landmarks off-center, creating a more natural, visually interesting layout.
- Contrast size and brightness: make important objects larger or brighter than the surrounding environment to draw attention.
- Use framing: doorways, archways, and gaps in trees naturally frame key points of interest in the distance.
- Leave negative space: don’t fill every inch of your environment with props and detail. Empty space can create tension, emphasize isolation, or give the player’s eye a place to rest between key encounters.
For example, in the post-apocalyptic game The Last of Us Part I, the ruined Seattle skyline is framed by the windows of an abandoned apartment building early in the game, immediately drawing the player’s eye to their main objective and creating a sense of scale that makes the world feel vast and dangerous.
Lighting, Atmosphere, and Performance Optimization
Bad lighting can ruin even the most beautifully modeled and textured environment, while great lighting can elevate a simple space to something memorable. Lighting and atmospheric effects set mood, reinforce navigation, and create immersion, but they also need to be balanced with performance to keep the game running smoothly across different hardware.
Use lighting to reinforce mood and narrative
Lighting is one of the most powerful tools you have to shape how players feel in your environment. Warm, golden sunlight filtering through tree leaves creates a peaceful, inviting mood for a fantasy meadow, while cool, flickering fluorescent light that flickers in and out creates tension in an abandoned lab. For horror games, hard, high-contrast lighting that leaves large areas in deep shadow makes players uncertain of what’s hiding out of sight, while flat, even lighting in a suburban home can create an uncanny, unsettling effect by making everything look too normal.
You also can use lighting to guide players without explicit UI prompts. A warm glowing light around a quest objective will naturally draw players toward it, even if there’s no on-screen marker pointing the way. This creates a more immersive experience by letting players feel like they’re discovering the path on their own, rather than being led by a game designer’s hand.
Add atmospheric effects for depth
Atmospheric effects like fog, mist, smoke, dust motes, and rain add depth to your environment by creating layers of distance. A thick fog in a mountain environment doesn’t just build mystery—it also hides distant geometry, improving performance by reducing how much the game engine needs to render at once. Volumetric lighting, which makes light rays visible as they pass through dust or fog, adds a sense of depth and realism that flat lighting can’t match.
Just like with detail, it’s important not to overdo atmospheric effects. Too much fog can obscure key paths and frustrate players, and too many particle effects (like smoke or falling leaves) can drag down performance and distract from core gameplay. Always test effects with actual gameplay to make sure they add to the experience rather than detracting from it.
Optimize for performance without sacrificing quality
Even the most beautiful environment is useless if it causes the game to drop to 15 frames per second on mid-tier hardware. Optimization is a core part of environment design, not a final afterthought. Key optimization steps include:
- Using level of detail (LOD) models: create lower-polygon versions of distant assets that the engine switches to when the player is far away, reducing the number of polygons the GPU needs to process.
- Culling hidden geometry: use occlusion culling to stop the engine from rendering objects that are hidden behind walls or other structures, which cuts down on unnecessary processing.
- Combining textures: pack multiple small textures into larger texture atlases to reduce draw calls and improve rendering speed.
- Testing on target hardware early: don’t wait until the end of development to test performance on the minimum hardware your game supports. Catch performance issues early when they’re easier to fix.
For indie developers working with limited resources, prioritizing optimization early helps avoid the heartbreak of having to cut large sections of your world or reduce visual quality late in development. Even for large AAA teams, poor optimization can lead to delayed launches or negative player reviews, so it’s a critical part of the process.
Playtesting and Final Polish
No matter how much planning you do, you won’t know how your environment feels until actual players explore it. Playtesting is where you catch navigation issues, inconsistent design, performance problems, and missed opportunities for storytelling that you wouldn’t notice working on the environment alone.
What to test for during playtests
When you watch players test your environment, pay attention to these key questions:
- Do players get lost? If multiple players stop and ask “where do I go next?”, you need to add clearer navigation cues like landmarks or lighting to guide them.
- Do players notice the environmental storytelling details you placed? If players walk right past the broken family photo you added to tell a story, you may need to adjust lighting or placement to draw attention to it.
- Is the pace right? Do players get bored walking across large empty areas, or feel rushed when they want to explore? Adjust scale and movement speed to match your desired pace.
- Are there any technical bugs? Does geometry clip through other objects, do textures load slowly, or do light sources cause screen flickering?
It’s important to get playtesters who aren’t part of your development team. You know every inch of your environment, so you’ll automatically know where to go and what to look for—external playtesters bring a fresh perspective that will catch issues you’ve become blind to after months of work.
Polish small details that make a big difference
After playtesting, the final polish stage is where you fix issues and add small, immersive details that make the world feel alive. These don’t have to be big or expensive: small touches like swaying grass in the wind, the sound of wind chimes outside a cottage, footprints that appear in snow, or scattered coffee mugs on a desk all add up to a more immersive experience. One of the most impactful small details is adding wear and tear to your environment: scuffs on baseboards, chipped paint, and cracks in concrete make spaces feel lived-in rather than like a newly built video game level.
Just remember the rule of “less is more”: every detail you add should serve a purpose, whether that’s building mood, telling a story, or guiding the player. Random props scattered around just to fill space will just clutter the environment and distract from what matters.
Conclusion
Creating a great game environment is a iterative process that combines creativity, planning, and technical skill. It starts with defining your core goals and narrative in pre-production, gathering reference to ground your design in consistency, building the environment with modular assets and intentional composition, then refining it with lighting, optimization, and playtesting. The best environments don’t just look good—they serve the game’s core experience, tell a story without words, and make players feel like they’re exploring a real, living world. Whether you’re building a small puzzle room for an indie game or a sprawling open world for a AAA title, focusing on player experience and intentional design will help you create an environment that players will remember for years.