
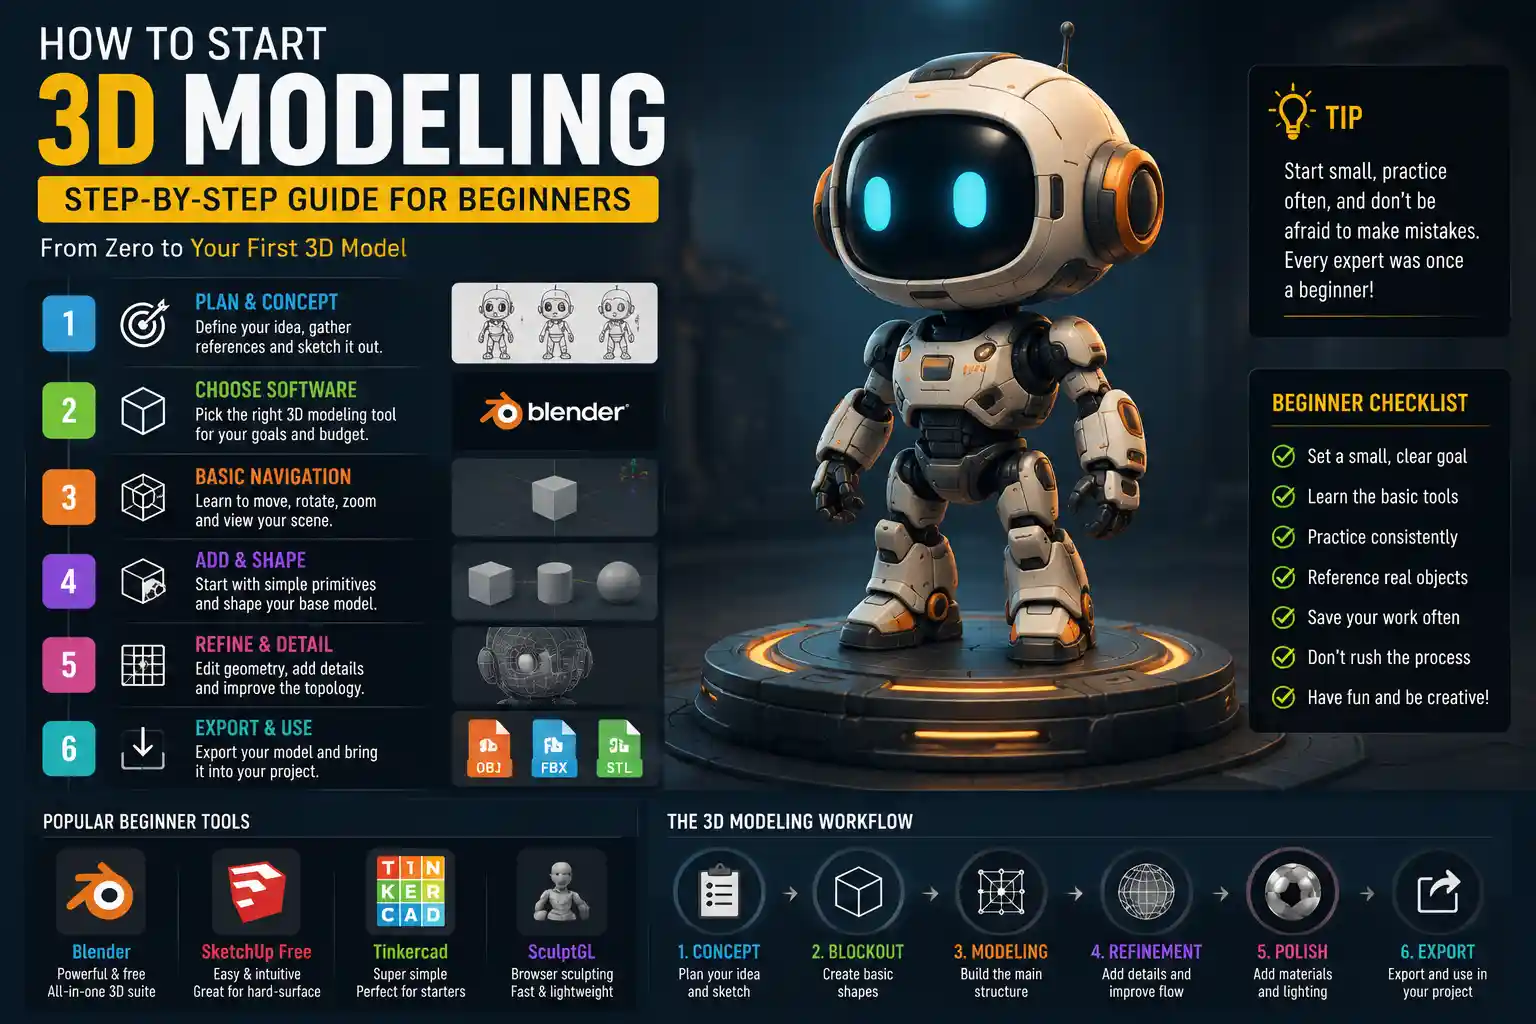
If you’ve ever scrolled through a 3D-printed figurine of your favorite video game character, admired the visual effects in a blockbuster movie, or wondered how product designers create prototypes for new gadgets, you’ve encountered the work of 3D modelers. What was once a specialized skill reserved for professional animators and engineers is now accessible to anyone with a laptop and a bit of curiosity. Modern tools have lowered the barrier to entry dramatically, turning complete beginners into capable creators in a matter of weeks, not years. This step-by-step guide will walk you through everything you need to know to start making your own 3D models, from choosing the right software to exporting your first finished project.
Understanding the Basics of 3D Modeling
Before you open any software, it helps to understand what 3D modeling actually is. At its core, 3D modeling is the process of creating a mathematical representation of any three-dimensional object or surface using specialized software. Unlike 2D art, which only has height and width, a 3D model exists in three dimensions, meaning you can rotate it, view it from any angle, and scale it up or down for different uses, from 3D printing to video game development.
As a beginner, you’ll encounter two primary types of 3D modeling that you should understand before you start: polygon modeling and sculpting. Polygon modeling is the more common of the two, used for everything from product design to hard-surface assets in games. It works by building objects out of vertices, edges, and faces that connect to form a mesh. The more polygons you use, the more detailed your model can be, though more polygons also slow down your computer and complicate editing. Sculpting, by contrast, works more like digital clay: you push, pull, smooth, and carve a digital surface to create organic shapes like characters, creatures, or detailed sculptures. Many beginners find sculpting more intuitive at first, since it mimics physical art processes they may already be familiar with.
Common Use Cases for Beginner 3D Models
Your intended use for your 3D model will shape every decision you make as you work, from what software you choose to how detailed you need to make your model. Some of the most popular beginner projects include:
- 3D printing: Functional parts, cosplay props, figurines, and home decor require solid, water-tight models that can be sliced for printing. For this use case, clean topology (the arrangement of polygons in your mesh) is non-negotiable.
- Video game assets: Independent game developers often create their own 3D assets for indie projects. Game assets require optimized polygon counts to run smoothly, so beginners learn to balance detail and performance early on.
- 3D art and animation: If you want to create characters for short films, social media reels, or digital art displays, you can afford more polygons and higher detail, since you won’t be constrained by 3D printing or game engine performance limits.
- Product prototyping: Inventors and small business owners use 3D modeling to test product designs before mass production. These models need to be dimensionally accurate to work correctly as physical prototypes.
Even if you don’t have a specific project in mind right now, starting with a small, simple goal will help you stay motivated. Most beginners start with something like a mug, a keychain, or a simple cube-based sculpture to learn the basics before moving on to more complex projects.
Choosing the Right Beginner 3D Modeling Software
One of the biggest advantages of getting into 3D modeling today is the range of free and low-cost tools available for beginners. You don’t need to spend thousands of dollars on professional software to get started. The best choice for you depends on what kind of models you want to make and how much you’re willing to learn, but these options are consistently the most popular for new creators.
Free Beginner-Friendly Options
For most beginners just testing the waters, free software is the perfect starting point. You can learn the fundamentals without investing any money, and many free tools are powerful enough to use even as you gain experience.
- Blender: Blender is the gold standard for free 3D modeling, and it’s used by professionals and hobbyists alike. It includes every tool you need for modeling, sculpting, animation, rendering, and even video editing, all completely free with no subscription or licensing fees. It supports both polygon modeling and sculpting, and has one of the largest online communities, meaning you can find hundreds of thousands of free tutorials for any project. The interface can be intimidating at first, but once you learn the basics, it’s incredibly powerful. This is the most recommended starting point for 90% of beginners.
- SketchUp Free: SketchUp is famous for its intuitive, easy-to-learn interface, making it a favorite for architectural modeling, product design, and simple 3D prints. It’s great for beginners who want to create hard-surface models without dealing with the steep learning curve of Blender. The free web version works right in your browser, so you don’t even need to download anything to get started. It’s less useful for organic sculpting or character modeling, but for simple, geometric projects, it can’t be beaten for ease of use.
- SculptGL: If you’re primarily interested in digital sculpting and want to start small, SculptGL is a free, browser-based sculpting tool that’s perfect for beginners. It only has the core sculpting tools you need, with no complicated extra features to overwhelm you. It’s a great way to practice sculpting organic shapes before moving on to more advanced tools like ZBrush or Blender’s sculpt mode.
- Tinkercad: Tinkercad is a browser-based 3D modeling tool designed specifically for beginners and students. It uses simple shape-building that’s easy to learn, making it a great first step for kids or anyone who wants to make simple 3D printable models quickly. It’s very limited compared to other tools, but it’s a great way to get a feel for how 3D space works before moving on to more advanced software.
Low-Cost Paid Options for Beginners
If you’re willing to spend a little money to get a more streamlined experience, there are some great affordable options for beginners:
- Autodesk Fusion 360: Fusion 360 is a professional-level computer-aided design (CAD) tool that’s free for hobbyists, students, and small businesses making less than $100,000 per year. It’s the go-to tool for mechanical design, product prototyping, and functional 3D prints, because it lets you create dimensionally accurate models with moving parts. It has a steeper learning curve than Tinkercad or SketchUp, but it’s incredibly powerful for anyone interested in engineering or product design.
- ZBrush Core: If you’re focused on organic sculpting for characters or art, ZBrush Core is a stripped-down, affordable version of the industry-standard ZBrush. It’s more intuitive for beginners than the full version, and it costs a fraction of the price, with a one-time fee instead of a subscription.
For most beginners starting out, we recommend starting with either Blender (if you want to do any kind of modeling or sculpting) or Tinkercad (if you just want to make simple 3D prints and learn the basics). There’s no wrong choice, and you can always switch software later as your skills grow.
Planning Your First 3D Model Project
Even with the right software, jumping into 3D modeling without a plan can leave you feeling overwhelmed and stuck. Planning your first project carefully will help you stay focused and finish something you can be proud of. The biggest mistake beginners make is starting with a project that’s far too complex: don’t try to model a full character for a video game as your first project. Start small, finish something simple, and build up your skills gradually.
Pick a Simple, Manageable First Project
Great first projects are small, have simple geometry, and don’t require a ton of detail. Some perfect beginner projects include:
- A coffee mug or drinking glass
- A keychain with your initials
- A simple desk organizer
- A cube with carved details
- A basic tree or plant
- A chess piece (pawn, knight, or rook)
Once you’ve picked your project, gather reference images. Reference images are photos or drawings of the object from multiple angles that you can use as a guide while you model. Even experienced 3D modelers use reference images all the time—no one works from memory alone. For example, if you’re modeling a coffee mug, take photos of your own mug from the front, side, and top, then import those images into your 3D software to use as a background guide.
Reference is not cheating. Reference is how you learn what things actually look like, not what you think they look like.
Learn the Core Navigation Tools First
Before you start adding vertices or sculpting any clay, spend 15-30 minutes just learning how to navigate your 3D software’s viewport. The viewport is the window where you create and view your model, and being able to pan, zoom, and rotate the camera quickly and comfortably is the most fundamental skill you can learn. It will feel awkward at first, especially if you’re using keyboard and mouse shortcuts, but it becomes second nature with a little practice.
The core navigation commands you need to master are:
- Pan: Move the camera horizontally or vertically without rotating or zooming
- Zoom: Move closer to or farther away from your model to work on small details or see the whole object
- Orbit: Rotate the camera around your model to view it from any angle
Many beginners try to skip this step and jump straight to modeling, but fumbling with navigation every time you want to check a new angle will slow you down and make the process far more frustrating than it needs to be. Spend the time to get comfortable moving around your 3D space first—it will pay off later.
Step-by-Step Workflow for Your First Model
While every 3D modeler has their own workflow, most beginners can follow this simple step-by-step process to create their first finished model. We’ll use polygon modeling (the most common starting point) as our example, but the core principles apply to sculpting as well.
1. Block Out the Basic Shape
Blocking out is the process of creating a very simple version of your model that captures the overall proportions and major shapes, without any fine detail. For example, if you’re making a coffee mug, you’d start with a basic cylinder, scale it to the right height and width, then delete the top and bottom faces to create a hollow shell. Blocking out helps you get the proportions right early on, before you spend time adding detail that you might have to change later.
Most 3D modeling starts with primitive shapes: cubes, cylinders, spheres, and planes. These are the building blocks of all more complex models. Instead of trying to build your model one vertex at a time, start with a primitive that matches your overall shape and modify it from there. This is far faster and easier for beginners than building from scratch.
2. Refine the Shape and Add Major Details
Once your basic block-out looks right, it’s time to refine the shape and add major details. For a coffee mug, this would mean adding the handle. You might start with another small cylinder, bend it into the right shape, and attach it to the side of the mug. This is also the time to adjust proportions: if you realize your mug is too tall or too narrow, you can scale it before adding any fine details.
As you work, remember to check your model from all angles. It’s easy to make a model that looks good from the front but is distorted from the side. Get in the habit of orbiting around your model often to check your work from every perspective.
3. Fix Your Mesh Topology
Topology is the term for how the polygons in your mesh are arranged. Bad topology can cause all sorts of problems later: it can make your model hard to smooth, cause errors when 3D printing, or make it difficult to add textures or animate your model. For beginners, the most important rules of good topology are:
- Don’t leave any extra vertices or faces that you don’t need. Clean up any stray points or overlapping faces.
- Avoid n-gons (polygons with more than four sides) if you can. Stick to triangles and quads (four-sided polygons) for most modeling, especially if you plan to 3D print your model.
- Make sure your model is solid and watertight if you’re 3D printing. There should be no holes in the mesh, and no overlapping parts that will confuse the slicer software.
Most modern software has automatic tools to fix common topology problems, so you don’t need to be a topology expert as a beginner. Blender, for example, has a "remesh" tool that can clean up messy geometry with one click.
4. Add Fine Detail
Once your overall shape is right and your topology is clean, it’s time to add fine details. For a coffee mug, this might be adding a logo to the side, rounding the edges of the rim and base, or adding a texture to the surface. Details are what make your model feel realistic and polished, but it’s important to add them last—if you add details early, you’ll just have to redo them if you change the overall shape of your model.
There are two main ways to add detail: you can model it directly into your mesh, or you can add it as a texture. For 3D printing, you need to model all details directly into the mesh, because the printer will only print what’s in the 3D model. For digital art or games, you can often add small details as textures, which saves polygons and keeps your model lightweight.
5. Add Materials and Render Your Model
Once your model is complete, you can add materials (which control how the surface looks: is it ceramic, wood, metal, or plastic?) and render it to create a 2D image or video of your finished work. Rendering is the process that the software uses to calculate lighting, shadows, and surface colors to create a realistic final image.
As a beginner, you don’t need to worry about creating photorealistic renders for your first project. Just add a simple material that matches your object, set up a basic light, and render a preview to see what your finished model looks like. Blender has a built-in render engine called Cycles that makes it easy to get great results with minimal setup, even for beginners.
Tips to Avoid Common Beginner Mistakes
Even with a good workflow, all beginners make mistakes. Learning to avoid the most common ones will save you hours of frustration and help you progress faster. Here are the most frequent pitfalls new 3D modelers face, and how to avoid them:
Don’t use too many polygons too early. One of the most common mistakes beginners make is adding way too many polygons to their model from the start. More polygons don’t automatically make a better model, and too many polygons will slow down your computer, make editing slower, and cause problems when you 3D print or export your model. Start with as few polygons as possible, and only add more when you need them for detail.
Save your work often, and save multiple versions. 3D software can crash, just like any other program. Get in the habit of saving your work every 10-15 minutes, and save incremental versions of your project (for example, "mug_v1.blend", "mug_v2.blend") so you can go back to an earlier version if you mess something up and can’t fix it. Most software also has an autosave feature, but don’t rely on it alone—manual saves are still the best safety net.
Don’t compare your first work to professional finished work. It’s easy to scroll through Instagram or ArtStation and see incredible 3D models made by professionals with years of experience, then get discouraged when your first model doesn’t look that good. Every professional started exactly where you are: with a lopsided cube or a wonky coffee mug. Progress takes time, and every model you make will teach you something new. Celebrate small wins: finishing your first model, no matter how simple it is, is a big achievement.
Use the community and free learning resources. You don’t have to learn 3D modeling alone. There are thousands of free high-quality tutorials available online for every software and every project. Blender, for example, has official free tutorials on the Blender YouTube channel that are perfect for beginners, and sites like Udemy and Skillshare have affordable in-depth courses if you want a more structured learning experience. Reddit communities like r/blender are also great places to ask questions and get feedback on your work—most experienced modelers are happy to help beginners who are willing to learn.
Learn keyboard shortcuts. It’s tempting to use your mouse to click every button in the interface, but learning the most common keyboard shortcuts will cut your modeling time in half. You don’t need to learn all of them at once—just learn 2-3 new shortcuts every week, and soon you’ll be navigating your software without even thinking about it.
Conclusion
Learning to make 3D models is an incredibly rewarding skill that opens up doors to 3D printing, game development, digital art, product design, and more. While it can feel intimidating at first, the key is to start small, master the basics, and build up your skills one project at a time. Start by choosing free software like Blender or Tinkercad, pick a simple first project, and spend time getting comfortable with navigation before you start building. Follow a clear workflow: block out your basic shape, refine your proportions, clean up your mesh, add detail last, and don’t be afraid to ask for help when you get stuck.
The most important thing you can do as a beginner is to finish what you start. It’s easy to start 10 different projects and never finish any of them, but finishing even one simple model will teach you more than a dozen half-finished projects ever can. With a little practice and patience, you’ll go from a complete beginner to creating 3D models you can be proud of in just a few weeks. The only thing left to do is open your software and start building.