
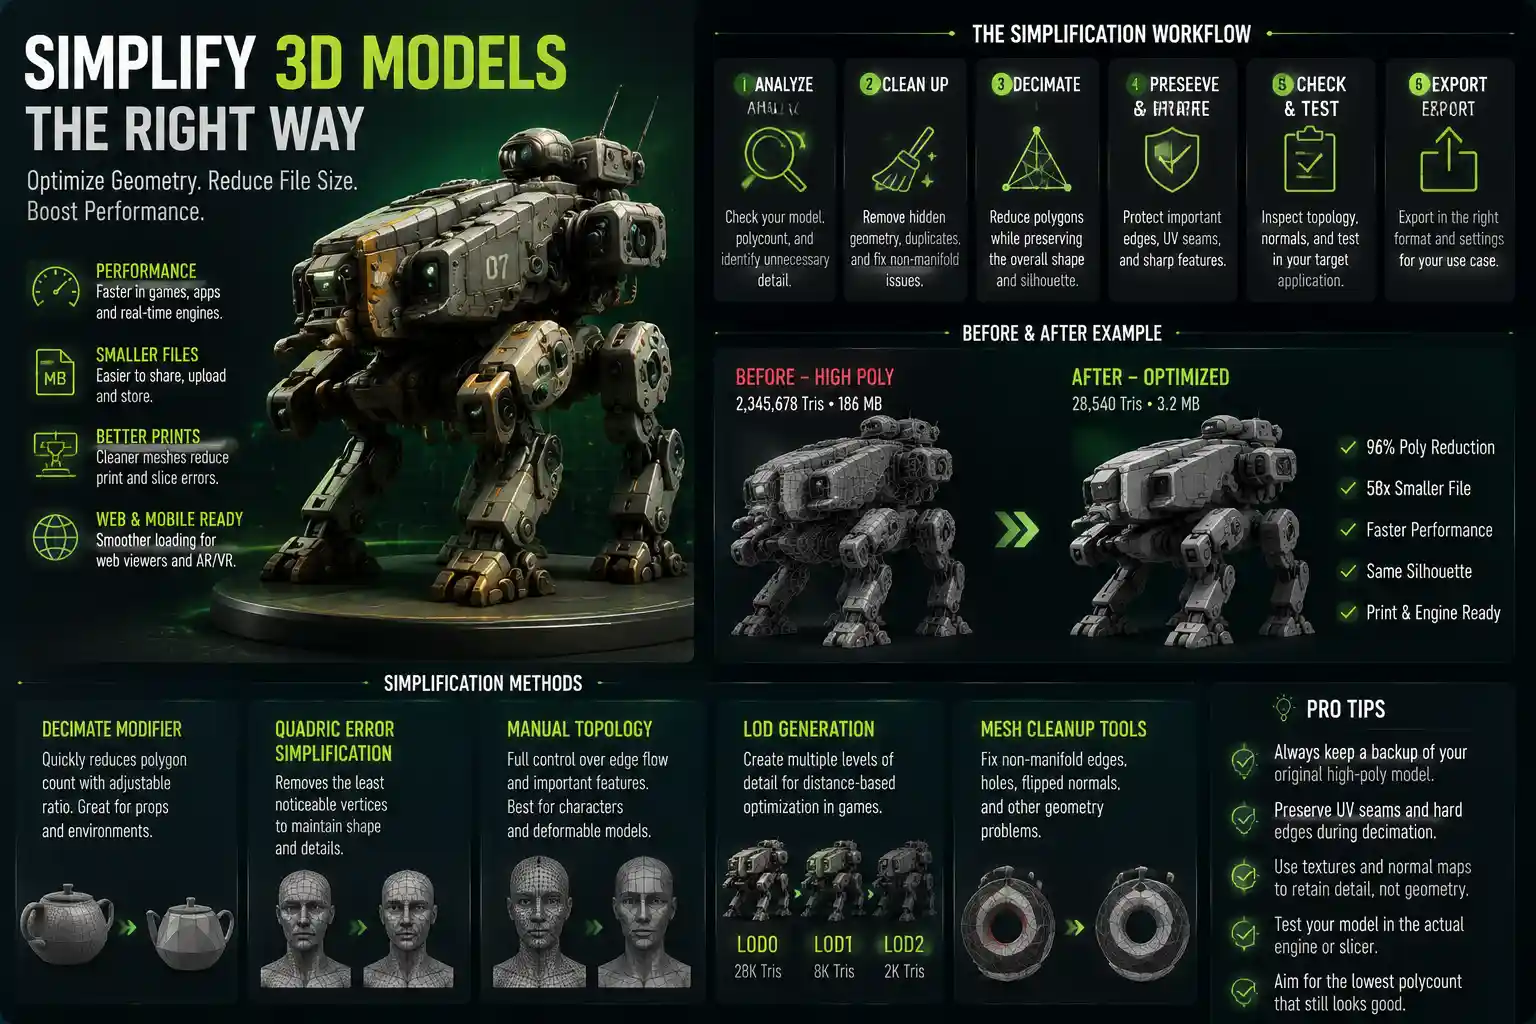
If you’ve ever waited 10 minutes for a 3D model to load, struggled to export a file small enough to share online, or watched your 3D printer stutter through a job because of excess geometry, you know why 3D model simplification matters. Whether you’re a game developer optimizing assets for a mobile release, a 3D printing enthusiast troubleshooting a failed print, an architect sharing a design walkthrough with clients, or a hobbyist posting models to Sketchfab, excess polygons and unnecessary detail can turn a smooth workflow into a frustrating mess. Simplifying 3D models doesn’t mean ruining your original design—it means stripping out redundant geometry that doesn’t add visual or functional value, making your model faster to process, easier to share, and more versatile across use cases. In this guide, we’ll break down the core principles, step-by-step methods, and practical tips to simplify 3D models effectively without sacrificing quality.
Why Simplify 3D Models? Common Use Cases
Before diving into how to simplify, it’s important to understand why simplification matters for different workflows. A model that works perfectly for one application may be entirely unsuitable for another, and matching your polygon count to your end goal saves time, storage, and processing power. Let’s look at the most common scenarios where 3D model simplification is non-negotiable.
Game Development and Interactive Media
Real-time interactive applications, from indie mobile games to AAA console titles and AR filters, depend on consistent frame rates. Every polygon a GPU has to render draws on processing power, and high-poly models can cause frame drops, stuttering, or even app crashes on lower-end devices. For example, a background prop like a park bench doesn’t need 50,000 polygons—simplifying it to 1,000 polygons leaves GPU headroom for more important assets like character models or special effects. AR and VR applications are even more demanding, requiring 90 frames per second or higher to avoid motion sickness, so efficient polygon budgeting is critical.
3D Printing and CNC Machining
It might seem counterintuitive that 3D printing, which produces physical objects with fine detail, needs simplified models, but excess geometry is one of the most common causes of failed prints. Most consumer 3D slicer software struggles to process models with millions of tiny, overlapping polygons, leading to long slicing times, incorrect toolpaths, or errors that ruin a print mid-job. Simplification also helps repair non-manifold geometry—edges connected to more or fewer than two faces, which can break slicing and machining workflows. For CNC routing, the same logic applies: simplified toolpaths generated from clean, low-poly models reduce machining time and wear on cutting tools.
Architectural Visualization and Client Presentations
Architects and interior designers often create extremely detailed models of entire buildings or neighborhoods to share with clients. A full, high-poly model of a 10-story building can have tens of millions of polygons, making it impossible to navigate in a real-time walkthrough or load on a client’s personal laptop. Simplifying non-critical elements like repeating roof tiles, landscape textures, or distant furniture lets designers share interactive 3D walkthroughs that load quickly and run smoothly, without sacrificing the overall design intent.
Web-Based 3D Viewing and Sharing
With the rise of platforms like Sketchfab, Google Poly, and embedded 3D product previews on e-commerce sites, 3D models are increasingly shared online. Large file sizes mean long load times, high bandwidth usage, and higher bounce rates for customers waiting for a product model to load. Simplifying 3D product models to keep file sizes under 10MB, for example, ensures that customers can interact with the model regardless of their internet connection or device.
Pre-Simplification Preparation: Plan Before You Edit
Jumping straight into decimating your model without preparation often leads to wasted work or lost detail. A little planning upfront helps you retain the features that matter most while removing redundant geometry efficiently. Below are the core steps to prepare your model for simplification.
Define Your End Goal and Polygon Budget
Before you make any edits, clarify what your model will be used for, because that determines how much simplification you need. A polygon budget is the maximum number of polygons your model can have and still perform well for its intended use. To give you a sense of common benchmarks:
- Mobile game AR assets: 500–5,000 polygons per model
- AAA game background props: 1,000–10,000 polygons
- Main character models for mobile games: 5,000–15,000 polygons
- 3D printing hobby models: 50,000–200,000 polygons (most consumer slicers struggle with over 1 million)
- Web-based e-commerce product previews: 10,000–50,000 polygons
These are flexible guidelines, but having a target in mind keeps you from over-simplifying and losing quality, or under-simplifying and still dealing with performance issues.
Clean Up Your Original Model First
Simplification tools work best on clean models, so remove any unnecessary elements before you start reducing polygons. Common issues to fix include:
- Delete hidden or internal geometry: Any faces that are never going to be seen—like the interior of a closed mug, or the back of a wall-mounted shelf—can be deleted entirely. This is one of the easiest ways to cut polygon count without affecting the final result.
- Merge overlapping vertices and remove duplicate faces: Thousands of duplicate faces stacked on top of each other add unnecessary bulk and cause errors in simplification tools. Most 3D software has a built-in "remove duplicates" function to fix this in one click.
- Repair non-manifold geometry: Non-manifold edges, disconnected faces, and holes in your mesh can break automatic simplification algorithms. Use your software’s built-in repair tools to fix these issues before you start.
- Separate connected models: If you have multiple objects in one file (for example, a table with four legs), separate them into individual meshes. This lets you simplify each object based on its importance—for example, simplifying the legs more than the tabletop that users will see up close.
Retain High-Poly Source Files
Always save a copy of your original high-poly model before you start simplifying. This gives you a backup if you make a mistake, and lets you go back to re-simplify the model for a different use case later. For example, you might first simplify a character model for mobile, then need a slightly higher-poly version for a console release—having the original saved means you don’t have to rebuild it from scratch.
Core Methods for Simplifying 3D Models
There are multiple approaches to simplifying 3D models, from fully automatic algorithms to manual retopology. The right method for you depends on your model type, your skill level, and the quality you need. Let’s break down the most common methods, their pros and cons, and when to use each.
Automatic Decimation
Automatic decimation is the most common method for simplifying 3D models, and it’s built into almost every popular 3D software tool, including Blender, Maya, 3ds Max, ZBrush, and Meshmixer. Decimation algorithms work by systematically removing vertices and faces from a mesh while preserving the overall shape of the model as much as possible. Most tools let you set a target percentage of the original polygon count, or a target number of polygons, and the algorithm does the rest.
Modern decimation tools are surprisingly effective, especially for models with relatively uniform curvature. For example, if you have a scanned 3D model of a rock with 2 million polygons, decimating it to 200,000 polygons will rarely produce noticeable changes to the shape. Most tools also include options to preserve boundary edges (like the edges of a flat surface or the opening of a bottle) to prevent distortion around sharp features.
Pros of automatic decimation: It’s fast, requires minimal manual work, and works well for scanned models, organic shapes, and assets that don’t need perfectly clean topology. Cons: It can produce messy, irregular topology that’s hard to edit later, and it can distort sharp edges or small important features if you reduce the polygon count too much. Automatic decimation is best for 3D printing, scanned models, background assets, and web-based viewing where speed is more important than clean topology.
Manual Retopology
Retopology is the process of manually rebuilding a new, low-poly mesh over the surface of your original high-poly model. Unlike decimation, which edits the existing mesh, retopology creates a completely new mesh with clean, organized geometry that matches the shape of the original. 3D artists usually start by projecting the high-poly model as a reference background, then draw new edges and faces to trace over the shape, focusing on putting polygons only where they’re needed to define the shape.
For character models or other assets that will be animated, clean topology is critical—irregular polygons from decimation can cause bending and distortion when you move the model’s rig. Retopology also lets you intentionally prioritize polygons where they matter most: for example, adding more geometry around a character’s face to preserve facial expression detail, while using far fewer polygons on the back of the character’s hair that’s rarely seen.
“Good simplification isn’t just about removing polygons—it’s about placing them where they add the most value. Retopology forces you to make intentional decisions about detail, rather than letting an algorithm do it blindly.”
Pros of manual retopology: Produces clean, animatable topology, gives you full control over which details to preserve, and results in a smaller file size than decimation for the same visual quality. Cons: It’s time-consuming, requires significant 3D modeling skill, and isn’t practical for large models like entire building interiors. Manual retopology is best for main character models, animated assets, and any model that will need further editing after simplification.
Retopology with Automatic Tools
For artists who want clean topology without the time investment of full manual retopology, many modern tools offer semi-automatic retopology that combines automation with manual control. Tools like Blender’s Remesh, TopoGun, RizomUV, and Instant Meshes can generate a clean quad-based mesh from a high-poly input in seconds, with options to adjust the polygon density and preserve sharp features. You can then touch up any distorted areas manually to fix issues the algorithm missed.
This method is a great middle ground for most users: it’s far faster than manual retopology, and produces cleaner, more predictable results than basic decimation. It’s especially useful for hard-surface models like furniture, cars, or architectural assets where clean edge flow matters more than it does for organic shapes.
Level of Detail (LOD) Groups
For game development and interactive media, you don’t need to use a single simplified version of your model. Instead, most artists create a level of detail (LOD) group: a set of several simplified versions of the same model that the engine swaps out automatically based on how far the camera is from the model. When the model is close to the camera, the engine uses the high-poly version with full detail. When it’s far in the background, the engine switches to a heavily simplified version with just a few hundred polygons.
Creating LOD groups is a very efficient way to balance visual quality and performance. Most modern game engines like Unity and Unreal Engine can automatically generate LOD groups from your original high-poly model, making this process almost entirely automatic. This method has become standard in game development because it delivers the best of both worlds: maximum detail up close, and maximum performance when the model is far away.
Pro Tips to Preserve Detail While Simplifying
The biggest mistake new users make when simplifying 3D models is reducing polygon count so aggressively that they lose important features, resulting in a blocky, low-quality model. With a few simple techniques, you can cut your polygon count dramatically without sacrificing the detail that matters. Here are practical, actionable tips to get great results.
Use Normal Maps to Bake Detail
One of the most effective ways to retain fine detail without adding polygons is to bake high-poly detail into a normal map or a displacement map. When you bake a normal map, you capture all the fine surface detail from your high-poly model (like scratches on a knife, pores on a character’s skin, or texture on a brick wall) as a 2D image that you apply to your low-poly model. The GPU uses the normal map to fake the lighting and surface detail, so the model looks just as detailed as the original high-poly version, but with a fraction of the polygon count.
For example, a brick wall can be simplified to just two polygons (one front, one back) with a normal map that adds all the individual brick and mortar detail. The result looks identical to a high-poly wall with thousands of polygons, but it runs far faster in real-time applications. This technique is standard in game development and 3D visualization, and it’s easy to do with built-in tools in Blender, Substance Painter, or Marmoset Toolbag.
Prioritize Detail With Weighted Simplification
Most modern simplification tools let you assign weight maps or vertex colors to tell the algorithm which areas of the model need to retain more detail, and which areas can be simplified more aggressively. For example, if you’re simplifying a character model, you can paint a high weight on the character’s face and hands (where detail matters most) and a low weight on the character’s torso and the back of the hair (where detail is less visible). The algorithm will remove far more polygons from the low-weight areas, preserving detail where it makes the most visual difference.
This is a game-changer for organic models, as it lets you cut total polygon count by 50% or more without any noticeable loss of quality. Even for hard-surface models, you can use weighted simplification to preserve sharp edges around holes, corners, and features like door handles, while simplifying large flat areas that don’t need much geometry.
Remove Repeated Geometry and Use Instancing
If your model has repeated elements (like a picket fence, a row of buttons, or a grid of roof tiles), you don’t need to model every element individually. Instead, model one instance of the element, simplify it once, then duplicate it with instancing. Instancing tells the GPU to only load one copy of the geometry and repeat it across the model, so 100 fence posts only take up the polygon count of one fence post. This is far more efficient than modeling 100 separate posts, and it keeps your total polygon count dramatically lower.
For architectural models in particular, this trick can cut your total polygon count by 70% or more. Even for 3D printing, most slicers support repeating patterns with instancing now, so you don’t need to add redundant geometry for repeated features.
Simplify Large Flat Areas Aggressively
A large flat surface like a wall or a tabletop doesn’t need more than two polygons to look perfect. Many new 3D models (especially scanned models) have hundreds or thousands of unnecessary polygons on flat surfaces, because the scan picked up tiny surface imperfections that don’t matter for the final use. You can remove almost all of these polygons without any visible change to the model. Most decimation tools have an option to flatten planar areas automatically, which merges all those extra polygons into a few large faces.
Check Your Model At Its Expected Viewing Size
Always check how your simplified model looks at the size it will be used in the final application. If you’re creating a small icon model for a mobile app, it will be displayed at just a few hundred pixels across—you can simplify it far more aggressively than you would if it was going to be displayed full-screen. A small amount of distortion that’s invisible at small sizes will be very obvious when the model is viewed close up, so testing at the right size keeps you from over-simplifying or wasting polygons on detail that no one will ever see.
Best Tools for Simplifying 3D Models (For Every Budget)
There are dozens of tools available to simplify 3D models, from free open-source options to professional paid software. Here’s a breakdown of the most popular options for different needs and budgets:
- Blender (Free, open-source): Blender has built-in decimation, automatic remeshing, manual retopology tools, and normal map baking, making it a fully featured option for any simplification task. It’s the best choice for most hobbyists and independent creators on a budget, and it’s powerful enough for professional work too.
- Meshmixer (Free): Autodesk’s Meshmixer is designed specifically for working with triangle meshes, and it has extremely powerful automatic simplification and repair tools. It’s a favorite among 3D printing enthusiasts for cleaning up and simplifying scanned models quickly.
- Instant Meshes (Free): Instant Meshes is a lightweight, open-source tool that generates clean quad-based retopology from high-poly inputs in one click. It’s perfect for fast semi-automatic retopology when you don’t need the full features of a larger 3D modeling suite.
- TopoGun (Paid, ~$150): TopoGun is a professional tool dedicated specifically to retopology and map baking. It’s widely used in game development for creating clean low-poly models from high-poly sculpts in ZBrush.
- Meshroom (Free, open-source): Meshroom is a photogrammetry tool that includes simplification options for 3D scanned models, making it a good choice if you’re working with models created from photos.
- Unity/Unreal Engine (Free for indie developers): Both leading game engines have built-in automatic LOD generation tools that can simplify your models directly in the engine, so you don’t need to do it in a separate modeling program.
For most new users, starting with Blender or Meshmixer is the best choice—they’re free, have huge communities of users creating tutorials, and can handle almost any simplification task you throw at them.
Conclusion
Simplifying 3D models is a core skill for any 3D workflow, and it doesn’t have to mean sacrificing quality to get better performance. The key to effective simplification is planning ahead: defining your end goal, cleaning up your model before you start, and choosing the right method for your use case. Automatic decimation works great for 3D printing and scanned models, semi-automatic retopology gives you clean topology for hard-surface assets, and manual retopology is ideal for animated characters. By using techniques like normal mapping, weighted simplification, and LOD groups, you can cut polygon count by 80% or more while retaining all the detail that matters to your final result.
Whether you’re a hobbyist troubleshooting a 3D print or a professional developer optimizing a game for mobile, the goal of simplification is to create a model that fits its purpose: it looks good, loads fast, and works reliably without wasting processing power or storage. With the steps and tips we’ve covered here, you’ll be able to simplify any 3D model efficiently while getting the quality you need.