
3D modeling used to be the exclusive domain of professional designers with high-end workstations, years of training, and thousands of dollars worth of software. Today, whether you want to 3D print a custom phone case, design a prototype for a small business, build assets for a video game, or just explore a new creative hobby, you can create high-quality 3D models without a steep learning curve or a big budget. The rise of user-friendly tools, cloud-based platforms, and automated generation techniques has opened up 3D design to everyone, regardless of technical skill. In this guide, we’ll walk through the easiest, most accessible ways to create 3D models, from choosing the right tool for your project to turning your digital idea into a finished file ready for 3D printing or rendering.
Choose the Right Easy 3D Modeling Tool for Your Needs
The first step to creating a 3D model easily is picking a tool that matches your skill level, project goals, and budget. Many new tools are designed specifically for beginners, with intuitive interfaces and pre-built assets that cut down on work. The best easy 3D modeling tool isn’t always the most popular one—it’s the one that fits what you want to create.
Beginner-Friendly Browser-Based Tools
Cloud-based tools require no downloads, no powerful hardware, and no complex installation, making them perfect for beginners testing out 3D modeling for the first time. Most offer free tier plans that include enough features for small projects, so you can start creating without paying anything upfront.
One of the most popular options is Tinkercad, developed by Autodesk. Tinkercad uses a simple “block building” approach that lets you combine basic shapes (cubes, spheres, cylinders) to create almost any object. It’s designed for students and hobbyists, and the learning curve is so gentle that most people can create their first simple model in under an hour. It exports standard STL files, the universal format for 3D printing, so you can take your design straight to a printer or print service.
Another great browser-based option is SketchUp Free. SketchUp has been around for decades, and the free web version retains all the core ease-of-use that made it famous. It’s particularly good for architectural models, furniture design, and larger objects, with a simple push-pull tool that lets you turn 2D shapes into 3D volumes with one click. Thousands of free pre-built 3D models are available in the SketchUp 3D Warehouse, so you can import existing assets instead of building everything from scratch.
Free Desktop Tools for Beginners
If you prefer working offline or need more features than most free browser tools offer, there are several powerful free desktop options built for new users. Blender is the most well-known free 3D tool, and while it’s used by professionals for animated films and game design, recent updates have added a streamlined interface and beginner-friendly workflows that make it much more accessible than it used to be. It has a massive global community that creates free tutorials, add-ons, and assets, so you can always find help when you get stuck. For beginners focused on 3D printing, Meshmixer is a great free tool from Autodesk designed to edit and prepare existing models, with simple tools to combine objects, fix errors, and add custom details.
AI-Powered 3D Generators for Ultra-Fast Creation
The newest category of easy 3D modeling tools uses artificial intelligence to generate full 3D models from simple text prompts or 2D images. For people who don’t want to manually shape every part of a model, AI tools can cut hours of work down to minutes. Popular options include Luma AI, 3DFY.ai, and DreamFusion, which let you type a description like “a wooden coffee table with curved legs” and get a usable 3D model in seconds. While AI-generated models often need small tweaks to be ready for 3D printing, they’re perfect for game assets, architectural visualizations, or starting a custom design that you can refine later.
Start Simple: Beginner Workflow for First-Time Creators
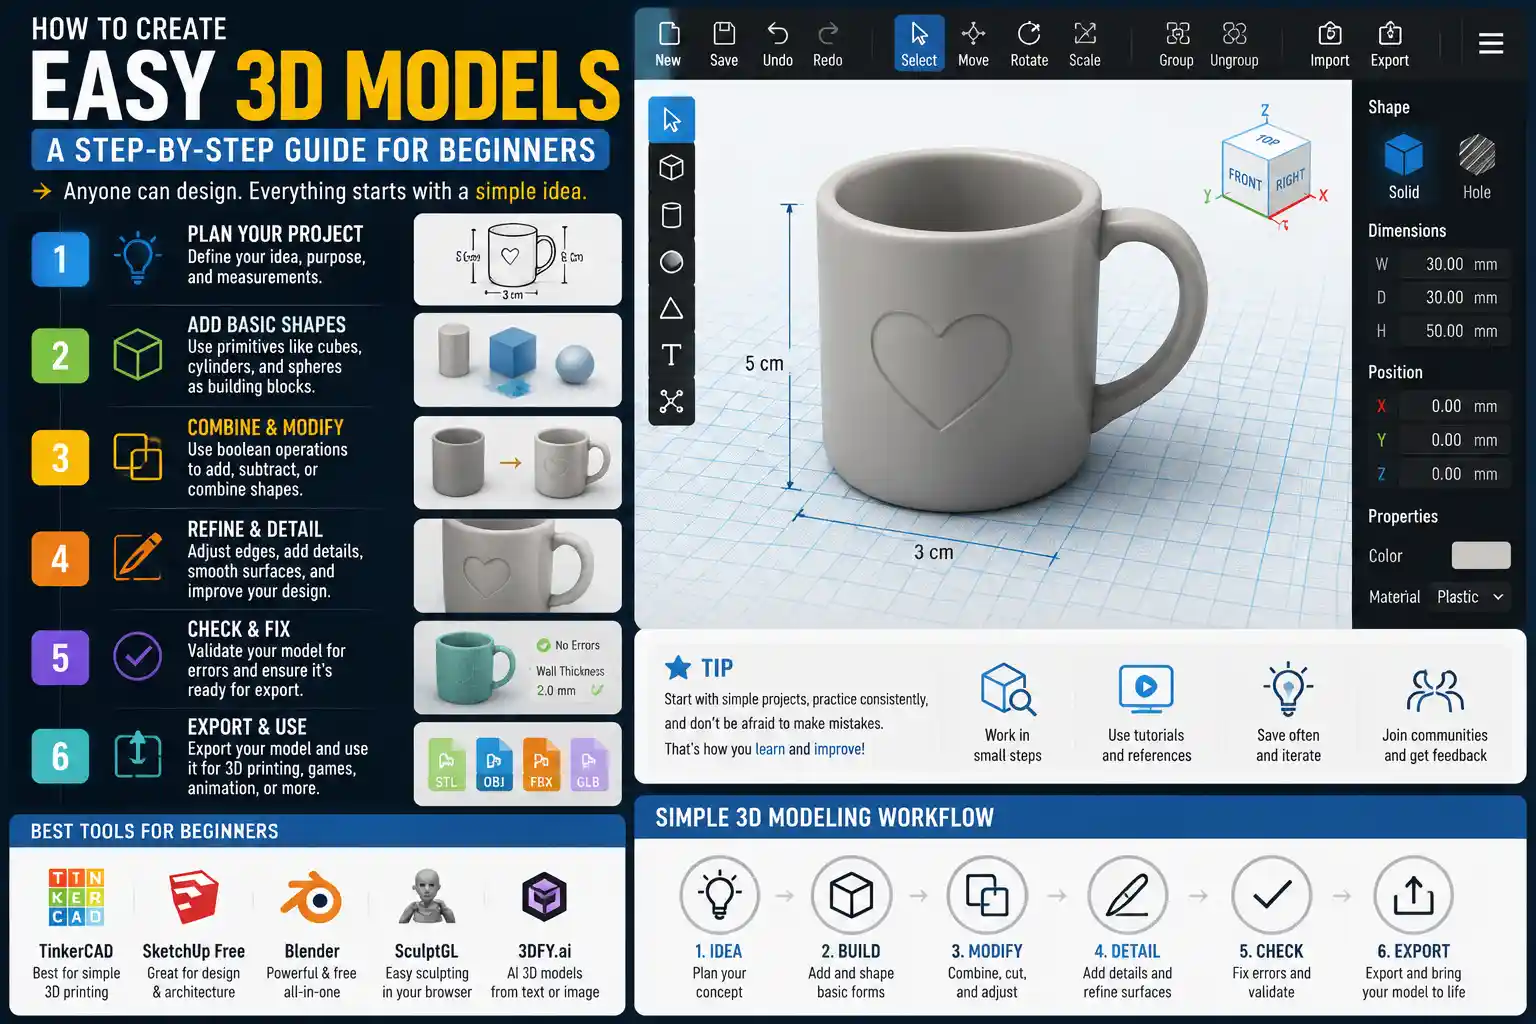
If you’ve never created a 3D model before, it’s easy to feel overwhelmed by the different tools and terminology. A simple, step-by-step workflow will help you avoid common mistakes and finish your first project in a few hours, building confidence as you go. This workflow works for most beginner projects, from custom keychains to small decorative objects for 3D printing.
- Define your project goal and measurements. Before you open any 3D modeling software, write down what you’re making and what size it needs to be. If you’re making a keychain, for example, decide that it will be 5cm tall and 3mm thick, with a 5mm hole for the keyring. Having clear measurements ahead of time keeps you from guessing later and ensures your model will work for 3D printing.
- Start with basic primitive shapes. Almost every complex 3D model can be broken down into combinations of basic shapes: cubes, spheres, cylinders, and cones. Instead of trying to draw a custom shape from scratch, start with these primitives and move them into position. For a mug, for example, start with a large cylinder for the body and a smaller curved prism for the handle.
- Combine or cut shapes to add details. Easy 3D tools use Boolean operations (simple terms like “group,” “combine,” “subtract,” and “hole”) to modify shapes. If you want to make a hollow mug, you can subtract a smaller cylinder from the inside of the main cylinder to create the empty space. If you want to add a name engraved on the side, you can subtract thin rectangular letters from the front of the mug body.
- Check for common errors. For 3D printing, the most common beginner errors are non-manifold edges (edges connected to more or less than two faces), overlapping shapes, and walls that are too thin. Most beginner tools like Tinkercad and SketchUp will flag these errors automatically, and many have one-click tools to fix them. For AI-generated models, you can use free tools like MeshLab to clean up messy geometry.
- Export your model in the right format. If you’re 3D printing, export as an STL or OBJ file. If you’re using the model for a game or animation, export as GLB or FBX. Double-check that your export settings match what your end use requires—most beginner tools default to the correct settings for common uses, so this is usually a one-click step.
This workflow is intentionally simple, and it works because it leverages the core strength of easy 3D modeling tools: building up complex objects from simple parts instead of drawing everything from scratch. Even advanced designers use this approach for quick prototypes, so you’re in good company.
Time-Saving Tips for Easy Custom 3D Models
You don’t have to build every 3D model from scratch to get a custom result. One of the easiest ways to create a custom 3D model is to start with an existing free model and modify it to fit your needs. This approach cuts hours off your work and still gives you a unique finished product.
Use Free Public Domain 3D Model Repositories
There are dozens of websites that offer thousands of free, downloadable 3D models that you can modify and use for personal or even commercial projects. Sites like Thingiverse, MyMiniFactory, and Printables are dedicated to 3D printable models, and almost any common object (from phone cases to planters) is already available for free. For game assets or architectural models, sites like Sketchfab and TurboSquid have large libraries of free models that you can edit.
For example, if you want a custom phone case with your favorite movie character on it, you can download a free generic phone case model that matches your phone size from Thingiverse, then download a 3D model of the character, combine the two in Tinkercad or Meshmixer, and export a new custom file. This process takes less than 30 minutes, compared to building the entire phone case from scratch which could take several hours.
Master a Few Simple Editing Tools
You don’t need to learn every feature in your 3D modeling tool to create great custom models. If you just master three core editing tools, you can modify almost any existing model to fit your needs:
- Scaling: Resizing a model to fit your needs. This is useful if you find a model that’s almost perfect but the wrong size for your 3D printer or project.
- Cutting and hollowing: Removing parts of an existing model or making it hollow to save 3D printing material. For example, you can cut a large statue in half to fit on your printer’s build plate, or hollow a decorative vase to reduce print time.
- Combining objects: Merging two or more separate models into one. This is what lets you add a custom logo to a mug, or combine a character model with a keychain base.
Every easy 3D modeling tool has these tools, and they’re almost always intuitive to use. Spending 10 minutes watching a short YouTube tutorial on these three tools will save you hours of work down the line.
Use Photogrammetry for Real-World Objects
If you want to create a 3D model of an existing real-world object, the easiest way isn’t to model it by hand—it’s to use photogrammetry. Photogrammetry is a process that takes multiple photos of an object from every angle, then uses software to automatically stitch them together into a full 3D model. This used to require expensive professional software, but today there are free and easy mobile apps that do all the work for you.
Apps like Polycam and 3DFY Scanner let you use your smartphone camera to walk around an object, take 20-30 photos, and generate a full 3D model in a few minutes. The result is a detailed 3D model that matches the real object exactly, no manual modeling required. This is perfect for creating 3D models of sculptures, antique parts, or natural objects like leaves or rocks that would be very hard to model by hand. Most apps let you export the finished model as an STL or OBJ file ready for 3D printing, so you can make a copy of any physical object you have.
Photogrammetry has democratized 3D capture like nothing before. Now anyone with a smartphone can create an accurate 3D model of anything in their home in 10 minutes, something that required a $10,000 laser scanner just 10 years ago.
Fix Common Beginner Mistakes the Easy Way
Even when you use simple tools and workflows, it’s common to run into small issues that prevent your model from working as intended, especially for 3D printing. The good news is that most of these mistakes are easy to fix with simple tools, and you don’t need advanced skills to solve them. Here are the most common issues beginners face, and how to fix them quickly:
Overlapping and Non-Manifold Geometry
Non-manifold geometry is the most common reason 3D prints fail, and it happens when your model has edges that connect to more or fewer than two faces, or overlapping shapes that confuse the slicer software (the software that turns your 3D model into printer instructions). For beginners building models by combining shapes, this is extremely common.
The easiest fix for this problem is to use a free online tool like Meshmixer or 3D Slash that has one-click tools to repair non-manifold geometry. Just import your model, click the “make solid” or “repair” button, and export the fixed model. For most simple models, this fixes 90% of common geometry issues automatically. Tinkercad also automatically checks for errors when you export an STL, so it will usually flag and fix these issues before you even download the file.
Walls That Are Too Thin or Too Thick
If your walls are too thin, your 3D print will be fragile and might break during or after printing. If they’re too thick, you’ll waste material and your print will take much longer than necessary. Most beginner 3D printers work best with walls between 1.2mm and 3mm thick, depending on the material. If you’re not sure what thickness to use, 2mm is a safe default for most PLA prints.
Fixing wall thickness is easy in almost all beginner tools. In Tinkercad, you can use the “hole” shape to cut the inside out of a solid object, leaving a consistent wall thickness around the edges. In SketchUp, you can use the offset tool to create an inner wall that’s exactly the thickness you want. For existing models, Meshmixer has a “hollow” tool that automatically adjusts wall thickness with just a few clicks.
Models That Don’t Fit on Your 3D Printer Build Plate
It’s frustrating to finish a model only to realize it’s too big for your 3D printer’s build plate. The easy fix here isn’t to scale the whole model down (that will make details too small, and it changes the proportions of your design) — it’s to split the model into two or more parts that fit on the plate, then glue them together after printing.
Almost all easy 3D editing tools have a simple cut tool that lets you draw a straight line through your model and split it into separate pieces. Some tools even have automatic cut tools that split large models into the smallest number of parts possible to fit your build plate size. After printing, you can glue the parts together with super glue and sand the seam to hide it, resulting in a finished object that looks just as good as a single-piece print.
AI Model Cleanup for Generated Models
AI-generated 3D models are incredibly fast to create, but they often have messy geometry, extra floating faces, or incorrect proportions that need to be fixed before 3D printing. The easiest way to clean up an AI model is to import it into Meshlab, which is a free open-source tool that automatically removes redundant vertices, closes small holes, and smooths out messy geometry. For more complex issues, you can import the model into Tinkercad, align basic shapes over the messy parts, and use Boolean operations to replace the problem areas with clean geometry. This usually takes less than 10 minutes, and it leaves you with a solid model that’s ready to print.
Conclusion
Creating 3D models doesn’t have to be hard or expensive. Today’s tools make it possible for almost anyone to create a usable, high-quality 3D model in a few hours, even if you’ve never tried 3D design before. The key is to start with the right tool for your project: use Tinkercad for simple 3D prints, SketchUp for architectural or furniture designs, photogrammetry apps to copy real-world objects, and AI generators to get a quick base model that you can refine. By starting simple, modifying existing free models instead of building from scratch, and mastering a few basic editing tools, you can avoid most of the frustration that new 3D designers face.
The best way to get better at 3D modeling is to start small. Finish one simple project — like a custom keychain or a small planter — before you move on to more complex designs, and you’ll build the skills and confidence you need to take on bigger projects over time. Whether you want to start a new hobby, prototype a product for your small business, create assets for a game, or just 3D print custom objects for your home, easy 3D modeling tools put the ability to create anything you can imagine right at your fingertips.