
If you’ve ever scrolled through 3D-printed home decor, watched a modern animated film, or explored a user-created level in a popular video game, you’ve experienced the work of 3D modelers. And if you’ve ever wanted to create your own 3D assets but been put off by the high cost of professional software, Blender is the solution you’ve been waiting for. This free, open-source 3D creation suite has exploded in popularity over the last decade, boasting a global community of millions of creators and powerful tools that rival $1000+ commercial programs. Whether you want to design assets for 3D printing, build environments for games, or create animated short films, learning Blender 3D modeling is an accessible, rewarding skill that costs nothing to start. This guide will walk you through every step of the process, from your first launch to finishing your first polished model.
Setting Up Blender for First-Time Users
Before you start modeling, you’ll need to get Blender installed and configured to fit your workflow. Blender is completely free to download and use for any purpose—personal, commercial, or educational—so you don’t have to worry about licenses or subscription fees to get started.
Downloading and Installing Blender
The official Blender Foundation website is the only safe place to download the latest stable version of the software. Blender is available for Windows, macOS, and Linux, and the installation process is straightforward for all operating systems. For new users, the stable release is always the best choice; experimental daily builds have cutting-edge features but may include bugs that can derail your first projects. Once downloaded, follow the standard installation prompts for your system, and you’ll be ready to open Blender in less than five minutes.
Understanding the Default Blender Layout
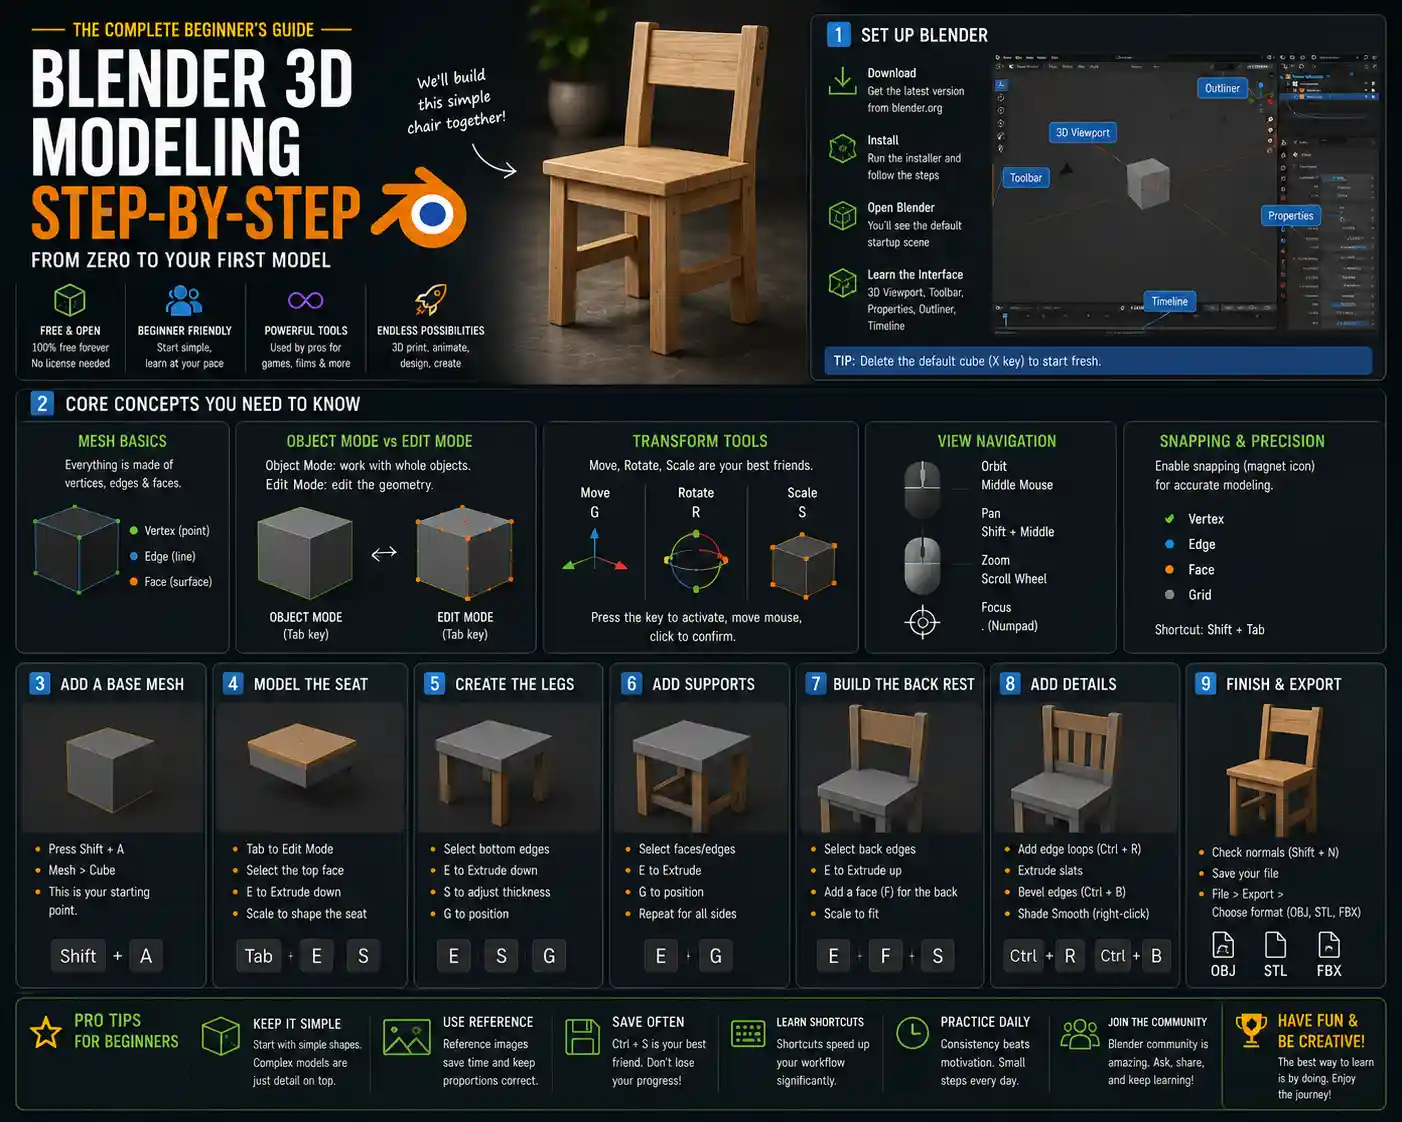
When you open Blender for the first time, you’ll see the default startup layout: a 3D viewport in the center with a cube, a light source, and a camera, a toolbar along the left, a properties panel along the right, and a timeline at the bottom. It can feel overwhelming at first, but breaking down the key areas makes it easier to navigate:
- 3D Viewport: This is where you do all your modeling work. It shows your model from your chosen perspective, and lets you orbit, pan, and zoom to inspect different angles.
- Toolbar: Located on the left side of the viewport, this holds all your core modeling tools, like select, move, rotate, scale, and draw.
- Properties Panel: On the right, this lets you adjust settings for your objects, materials, lighting, and render settings.
- Outliner: A small panel in the top right that lists every object in your scene, making it easy to select and organize individual parts of complex models.
To start fresh, you can delete the default cube by selecting it (it will be highlighted orange when active) and pressing the Delete key. This leaves you with just a camera and light, ready for you to start building your own model.
Customizing Navigation for New Users
Blender’s navigation uses keyboard and mouse controls that are different from other 3D programs, so taking a few minutes to learn the basics will save you hours of frustration later. The most common navigation controls for a three-button mouse are:
- Hold the middle mouse button and drag to orbit your view around the scene
- Hold Shift + middle mouse button and drag to pan your view
- Scroll the middle mouse wheel to zoom in and out
If you’re using a laptop with a trackpad, you can customize Blender to support trackpad gestures in the Edit > Preferences > Input menu. Many new users also find it helpful to enable "Auto Perspective" which switches to orthographic view when you align your camera to a common axis, making it easier to model straight lines and uniform shapes.
Core Blender Modeling Concepts for Beginners
Before you dive into building complex models, it’s important to understand the core building blocks of 3D modeling in Blender. Unlike 2D drawing, where you work with lines and pixels on a flat plane, 3D modeling uses geometry defined by points in 3D space to create objects that can be viewed from any angle.
Understanding Mesh Modeling
The most common type of modeling in Blender is polygon mesh modeling, which uses three core components to create 3D shapes: vertices, edges, and faces. A vertex is a single point in 3D space. When you connect two vertices, you create an edge. Connect three or more edges creates a face, which is the solid surface that makes up your model. Most models use four-sided faces (quads) for flexibility, but three-sided faces (tris) are common for more complex shapes, especially when preparing models for 3D printing or games. Blender also supports other modeling types like sculpting, NURBS, and procedural modeling, but mesh modeling is the foundation that most new users will start with.
Object Mode vs. Edit Mode
One of the most important distinctions to understand in Blender is the difference between Object Mode and Edit Mode. These are the two most common modes you’ll use while modeling, and they serve very different purposes:
- Object Mode: In this mode, you work with entire objects. You can move, rotate, scale, duplicate, or delete whole objects in your scene, but you can’t edit individual vertices, edges, or faces.
- Edit Mode: In this mode, you can edit the geometry of a selected object. This is where you’ll spend most of your modeling time, adjusting individual components of your mesh to shape your model.
You can switch between modes quickly by pressing the Tab key, which is a shortcut that most Blender users rely on constantly. Getting comfortable with this toggle is one of the first milestones for new users.
Basic Transformation Tools
Three tools form the backbone of all Blender modeling work: Move, Rotate, and Scale. Each has a dedicated keyboard shortcut that you’ll use over and over: G for Grab/Move, R for Rotate, S for Scale. When you activate one of these tools, you can adjust your selection along any axis, or constrain it to a single axis by pressing X, Y, or Z after activating the tool. For example, if you want to move an object straight up along the Z-axis, you press G then Z, then drag your mouse to move the object. This makes it easy to keep your modeling precise, rather than moving objects freely in three dimensions.
Step-by-Step Guide to Your First 3D Model
The best way to learn Blender modeling is by doing. To help you get hands-on practice, we’ll walk through creating a simple, useful 3D model: a mug that you can later 3D print or use in a scene. This project introduces all the core tools you’ll use for more complex models later.
Step 1: Add a Base Mesh
To start, delete the default cube if you haven’t already. Now add a cylinder, which will be the base of our mug. You can add a new mesh object by clicking Shift + A anywhere in the viewport, then selecting Mesh > Cylinder. Once you add the cylinder, you can adjust its size in the properties panel that appears in the bottom left corner of the viewport. Set the number of vertices to 32—this gives you a smooth round cylinder without adding unnecessary geometry. Use the S (scale) tool to scale the cylinder up to roughly the size of a real mug (about 8 units in diameter in Blender’s default units), then use S + Z to scale it along the Z-axis to make it taller, around 10 units high. Press Enter to confirm your scale, then press Tab to enter Edit Mode.
Step 2: Shape the Mug Body
Now we’ll hollow out the inside of the mug. At this point, your cylinder is a solid shape with a top and bottom face. First, select the top face by switching to Face Selection mode (the icon that looks like a square in the top left corner of the viewport) and clicking the top face. Once it’s selected, press the X key to delete it, then accept the option to delete Faces. Next, we need to make the walls of the mug thicker. Blender has a tool called the Solidify Modifier that does this automatically, but for practice, we’ll do it manually with the Inset tool. With the inside of the cylinder still selected (all the inner side faces after deleting the top), press I to activate the Inset tool. Drag your mouse inward to create a new set of faces inside the original cylinder, making the wall about 0.5 units thick. Click to confirm the inset. Now select the inner bottom face (the base of the inside of the mug), press G + Z to drag it up slightly, so the base of the mug is thicker at the bottom than the sides. Press Enter to confirm.
Step 3: Add the Handle
The handle is the most interesting part of the mug. There are a few ways to make a handle, but the easiest for beginners is to use the Spin tool. Start by switching to Vertex Selection mode, then add a loop cut around the middle of the side of the mug on the side where you want the handle. You can add a loop cut by pressing Ctrl + R, then clicking the side of the cylinder to place the cut, and scrolling to increase or decrease the number of cuts. Press Enter to confirm the loop cut. Now, move into Side Orthographic view by pressing Numpad 3 (if you don’t have a numpad, you can go to View > Viewpoint > Right). Select three or four vertices in the loop cut where the handle starts, then extrude them outward by pressing E. Drag the extrusion out about 3 units to the side, then use the Scale tool to shrink the new vertices a little to make the handle taper slightly. Repeat this process four more times, extruding, moving, and scaling the vertices to create a curved C-shape for the handle, connecting the other end back to the body of the mug.
Once you have all the vertices in place for the handle, select all the vertices along the open sides of the handle, use the F (Fill) tool to connect them and create faces. Then use the Smooth tool to round the edges of the handle, so it doesn’t look jagged. If you have any gaps in the faces, use the F tool to fill them in manually.
Step 4: Add Finishing Touches
Now that the basic shape of the mug is done, we can add finishing touches to make it look more realistic. The easiest way to smooth out the whole model is to add a Subdivision Surface modifier. Go to the Properties panel, click the Modifiers icon (it looks like a wrench), then add Subdivision Surface. Increase the Levels of Subdivision to 2, and you’ll see your mug become smooth, with all the hard edges rounded out. If any part of the model looks distorted, you can go back into Edit Mode and adjust individual vertices to fix the shape. Next, add a material to your mug: go to the Properties panel, click the Material icon (it looks like a checkered circle), then click New to create a new material. You can adjust the base color to any color you like—we recommend a solid white or light blue for a classic mug look.
“The beautiful thing about Blender is that every mistake is just an undo away. Even experienced modelers don’t get everything right on the first try; the skill is in being willing to adjust, tweak, and experiment until your model looks the way you want it to.”
Advanced Modeling Techniques to Refine Your Work
Once you’ve mastered the basics of creating simple models like a mug, you can start using more advanced techniques to create more complex, polished assets. These tools are used by professional Blender modelers, and learning them will open up a huge range of new project possibilities.
Using Modifiers for Non-Destructive Workflow
Modifiers are one of Blender’s most powerful features, letting you make changes to your model without permanently altering the base mesh. This is called non-destructive modeling, and it makes it easy to adjust your work later without starting over. Some of the most useful modifiers for 3D modeling include:
- Subdivision Surface: As we used with the mug, this smooths your model by subdividing each face into smaller faces, creating a smooth curved surface from a simple low-poly base mesh.
- Solidify: This adds thickness to any flat mesh automatically, which is perfect for creating things like walls, bowls, or any hollow object without manually insetting faces.
- Mirror: This mirrors your model across an axis, so you only have to model half of a symmetrical object (like a face, a car, or a chair) and Blender will automatically create the other half. This cuts your modeling time in half for symmetrical projects.
- Boolean: This lets you cut or merge two objects together, making it easy to create complex holes or combined shapes that would be hard to model manually. For example, you can use a Boolean to cut a hole for a door in a wall model in one click.
The best part of modifiers is that you can adjust their settings or turn them off at any time, even after you’ve added other changes to your model. This makes experimentation much less risky than editing your mesh permanently.
Retopology for Clean Geometry
If you’ve ever tried sculpting a model in Blender, you know that sculpting creates very dense, messy geometry that’s hard to use for games or 3D printing. Retopology is the process of creating a new, clean low-poly mesh over the top of your high-poly sculpt or messy model, resulting in clean geometry that’s easy to edit and optimize for your use case. To do retopology in Blender, you can use the Shrinkwrap modifier to pull your new mesh to the surface of your high-poly model, then use the Pen tool to draw new quads one by one. For new users, the built-in Retopology tools in Blender 3.0+ make this process much easier than it used to be, with automatic snapping that keeps your new mesh aligned perfectly to the high-poly surface.
UV Unwrapping for Texturing
Once your model is done, you’ll need to unwrap it to add textures. UV unwrapping is the process of flattening your 3D mesh into a 2D image, so you can apply a 2D texture image to the 3D surface. Blender has a built-in UV Editor that lets you unwrap your model automatically with the Smart UV Project tool, which works great for simple models. For more complex models, you can manually place seams along edges where the flattening will be least noticeable, then unwrap the model to get a clean UV layout. Once your UVs are done, you can export the layout and paint textures in a program like Krita or Photoshop, or use procedural textures built right into Blender to create complex materials without any external software.
Common Blender Modeling Mistakes (And How to Fix Them)
Even experienced Blender users make common mistakes when modeling, but most of them are easy to avoid once you know what to look for. Here are the most frequent issues new users face, and how to fix or prevent them:
Too Much Geometry Too Early
One of the most common mistakes new users make is subdividing their model too early, creating thousands of extra polygons that make Blender run slow and make editing harder. The best practice is to keep your base mesh low-poly (with as few faces as possible) while you’re shaping the model, and only add subdivision at the end to smooth it out. This keeps your file size small, makes editing faster, and gives you more control over the overall shape of your model. If you already have too much geometry, you can use the Decimate Modifier to reduce the number of faces without changing the overall shape of your model too much.
Non-Manifold Geometry
Non-manifold geometry is geometry that doesn’t have a clear inside and outside, which causes problems when 3D printing, rendering, or exporting your model. Common causes of non-manifold geometry include:
- Three or more faces sharing a single edge
- Faces with zero area (two vertices in the same position connected to a face)
- Open edges where a face is missing, leaving a hole in the model
Blender has a built-in tool to find non-manifold geometry: in Edit Mode, go to Select > Select All by Trait > Non Manifold. This will select all the problematic parts of your mesh, so you can fix them by deleting extra faces, filling holes, or merging overlapping vertices. Blender also has a "Make Manifold" tool that can fix many common issues automatically.
Ignoring Reference Images
Many new users jump into modeling without using reference images, which makes it much harder to get accurate, realistic results. Whether you’re modeling a character, a piece of furniture, or a building, using reference images from multiple angles will help you get the proportions right much faster. Blender makes it easy to add reference images to your viewport: you can add an image as a background in the Properties panel under Background Images, or add it as a plane object in your scene that you can move and align to your model. Even professional artists use reference images for almost every project, so don’t feel like you have to model from memory.
Conclusion
Learning how to do 3D modeling in Blender takes time and practice, but it’s one of the most accessible and rewarding creative skills you can learn in 2024. Because Blender is free and open-source, you can start learning right now with no upfront investment, and the global community of Blender creators means there’s no shortage of free tutorials, assets, and support when you run into problems. Start with simple projects like the mug we walked through here, master the core tools and navigation, then gradually work your way up to more complex projects. Don’t get discouraged by mistakes—every Blender user, from beginners to professionals, makes mistakes and learns as they go. Over time, you’ll build the skills to create anything you can imagine, from 3D-printable home decor to game assets to animated characters. The only thing left to do is open Blender and start modeling.