
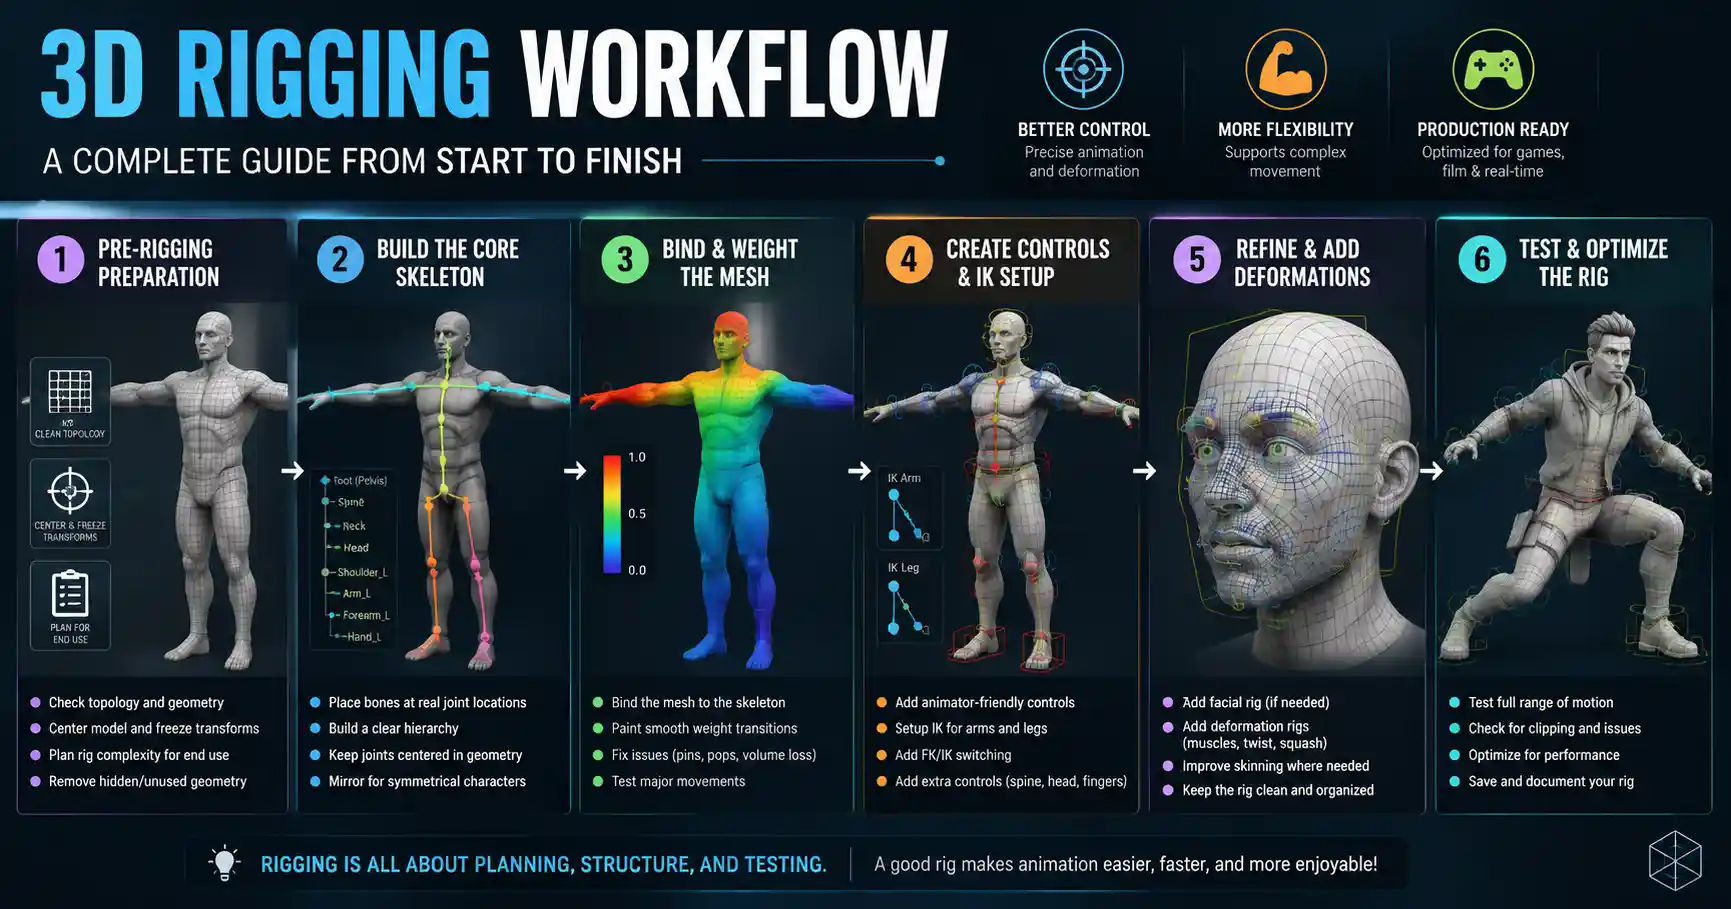
Whether you’re an aspiring game developer, a 3D animator working on your first short film, or a hobbyist bringing a custom character to life, rigging is the invisible backbone that turns a static 3D model into a moving, expressive creation. A good rig lets you bend a character’s arm, adjust a creature’s tail curl, or even tweak a face to show subtle emotion without distorting the model’s shape. While it can feel intimidating for beginners, rigging is a learnable skill that relies on a mix of foundational knowledge, careful planning, and incremental practice. This guide breaks down the entire process from prepping your model to testing your finished rig, so you can start rigging your own 3D assets with confidence.
Pre-Rigging Preparation: Set Your Model Up for Success
Many new riggers jump straight into adding bones without checking their base model, and that’s where most avoidable problems start. A messy, poorly optimized model will create extra work down the line, no matter how skilled you are at building the rig itself. Taking the time to prepare your model before you start rigging will save you hours of troubleshooting later.
Check Topology and Geometry
Topology—the flow of edges and vertices on your 3D model—directly impacts how smoothly your model deforms when you move the rig. For organic models like characters or animals, you want edge loops that follow the natural contours of the body and flow with the direction joints will bend. For example, a character’s elbow or knee needs concentric edge loops around the joint to prevent pinching or stretching when the limb bends. If your topology is messy, with poles placed in the middle of a bending joint or unevenly distributed polygons, your model will deform poorly even with a perfectly built rig.
For hard-surface models, like mechanical arms or vehicles that need to move, keep geometry clean and separate moving parts early. A robotic arm that needs to rotate at the shoulder should have distinct geometry for the shoulder, upper arm, forearm, and hand, rather than a single merged mesh. It’s also good practice to remove any unnecessary hidden polygons—vertices inside the model that don’t contribute to the outer shape add extra processing power and can slow down your animation workflow.
Center Your Model and Freeze Transformations
One of the most common beginner mistakes is leaving a model off-center or with unapplied scale, rotation, or position transforms. If your model is scaled unevenly (for example, one arm is 1.2x scale and the other is 0.8x), your bones will inherit that uneven scale, leading to weird deformations when you animate. Most 3D software programs let you "freeze" or "reset" transformations to set the model’s current position, rotation, and scale as the default zero values. This simple step prevents countless issues with bone orientation and weight painting later.
You should also center your model along the origin point of your scene, especially for symmetrical characters. Most human and creature characters are symmetrical along the X-axis (left to right), so centering the model along this axis lets you mirror your rig later, cutting your work time in half.
Plan Your Rig Based on End Use
Before you add your first bone, think about what the rig will be used for. A rig for a background character in a mobile game needs far fewer controls than a main character rig for a feature film. Ask yourself a few key questions to plan your rig complexity:
- Does the character need full-body movement, or just facial animation?
- Will the rig be used in real-time (games, interactive media) or rendered (animation, film)?
- What range of motion do you need? Does the tail need to curl tightly, or just sway gently?
- Are there any special deformations needed, like muscle bulging or soft belly movement?
Planning for your end use keeps you from overcomplicating a simple rig or underbuilding a rig that needs advanced controls. For example, a real-time game rig needs to be lightweight to run smoothly on lower-end hardware, so you’ll avoid adding extra unused bones that increase the model’s poly count. A film rig, by contrast, benefits from extra controls for subtle facial expressions that make the character feel alive.
Building the Core Skeleton: Bones and Hierarchy
The skeleton is the core of your rig—these are the "bones" that drive the movement of your 3D model. Just like a real skeleton, your 3D skeleton needs a clear hierarchical structure, where child bones move with their parent bones. For example, the hand bone is a child of the forearm bone, which is a child of the upper arm bone, which is a child of the shoulder bone, and so on up to the root pelvis bone. When you move the pelvis, the entire body moves with it, which is exactly the behavior you want.
Placing Bones for Organic Characters
For organic characters like humans or animals, the goal is to place bones where they would sit in a real skeleton, roughly centered inside the model’s geometry. Start with the root bone, which is almost always placed at the pelvis—this is the parent of all other bones in the body, so moving the root moves the entire character. From there, build up the spine: most rigs use 3-5 spine bones to let the back bend naturally, with additional neck bones leading up to the head.
For limbs, place one bone for each major segment: upper arm, forearm, hand for the arm; thigh, shin, foot, toe for the leg. Make sure the joint between two bones (the bone’s origin point) sits exactly where the bend would be—for example, the origin of the forearm bone should sit right at the elbow, and the origin of the hand bone should sit right at the wrist. Misplacing bone origins is a common mistake that causes the mesh to slide away from the joint when you bend it. If you’re working on a symmetrical character, you only need to place bones on one side of the body, then use your software’s mirror tool to duplicate them to the other side automatically.
Adding Helper Bones and Specialized Controls
Once your core skeleton is in place, you can add extra bones for specific movement needs. Common helper bones include:
- Twist bones: These help prevent pinching and stretching in long limbs like the forearm or thigh when the bone rotates. A twist bone along the length of the forearm will deform the mesh smoothly as the wrist twists, instead of causing ugly stretching at the elbow.
- Tail bones: For creatures with tails, add a chain of 5-10 small bones along the length of the tail to let it curl smoothly—more bones mean smoother curves, but too many add unnecessary complexity.
- Facial bones: For facial rigs, you can use small bones to control eyebrows, lips, and the jaw, instead of only relying on blend shapes (also called shape keys). Bone-based facial controls are popular for real-time games because they’re more efficient than multiple blend shapes.
- Soft tissue bones: Small bones placed in areas like the belly or breasts can help achieve natural soft tissue movement when the character walks or jumps, without requiring complex dynamic simulations.
Hierarchy and Bone Orientation
After placing all your bones, double-check the hierarchy to make sure every bone is parented correctly. A messed-up hierarchy will cause strange behavior—for example, if the thigh bone is accidentally parented to the head, moving the head will pull the thigh with it. Most 3D software lets you visualize the hierarchy in an outliner panel, so you can easily drag and drop bones to correct their parent-child relationships.
You also need to make sure each bone’s axis orientation is correct. The rotation axis should align with the natural movement of the joint: for example, a knee should bend along the X-axis, so rotating the bone on the X bends the knee the right way, instead of twisting it sideways. Taking the time to adjust bone orientation now makes animating much easier later, because you won’t have to fight weird rotation behavior when you pose your character.
Weight Painting: Binding Bones to Mesh
Weight painting (also called skinning) is the process of assigning each vertex on your model to one or more bones, determining how much each bone pulls on that part of the mesh when it moves. This is what makes your mesh deform correctly when you move the bones—bad weight painting leads to pinching, stretching, or parts of the mesh moving when they shouldn’t. It’s often considered the most tedious part of rigging, but it’s also the most important step for getting natural-looking movement.
Good rigging is 10% building bones and 90% fixing weight painting.
Automatic Weight Painting vs. Manual Adjustment
Almost all modern 3D software (Blender, Maya, 3ds Max, ZBrush) has an automatic weight painting tool that assigns weights based on the proximity of each vertex to the nearest bone. This is a huge time-saver, giving you a decent base that you can adjust manually instead of painting every vertex from scratch. Automatic tools work best for simple, clean topology, but they almost always get some areas wrong, especially around joints and overlapping body parts.
After automatic weighting, the next step is to manually adjust weights to fix deformation issues. The basic rule of weight painting is: vertices near the joint should be influenced by both adjacent bones, while vertices far from the joint should only be influenced by one bone. For example, the vertices right at the elbow should be 50% influenced by the upper arm and 50% influenced by the forearm, so the bend stays smooth. Vertices in the middle of the upper arm should be 100% influenced by the upper arm, so they don’t move when you bend the elbow.
Common Weight Painting Fixes
There are a few common issues that almost every rigger encounters when weight painting, and they all have straightforward fixes:
- Pinching at the joint: If your mesh folds into an ugly point when you bend the joint, you probably don’t have enough edge loops around the joint, or your weights are too heavily concentrated on one bone. Add a few extra edge loops around the joint if needed, then spread the weight more evenly between the two adjacent bones to smooth out the deformation.
- Sliding mesh: If part of the mesh pulls away from the joint when you bend it, your bone origin is probably misaligned, or the vertices around the joint aren’t weighted enough to the moving bone. Move the bone’s origin to the exact center of the joint, then increase the weight of the moving bone on those sliding vertices.
- Unwanted movement: If a part of the body you don’t want to move pulls along when you move a bone, that means those vertices have too much weight assigned to the moving bone. Use the weight brush to zero out the weight on those vertices so only the correct bone influences them. For example, it’s common for the chest to accidentally pull along when you move the arm—just remove any arm bone weight from the chest vertices to fix this.
For symmetrical characters, you can mirror your weight painting from the side you adjusted to the other side, which cuts your work in half just like mirroring bones. This only works if your model is perfectly symmetrical along the center line, so make sure you centered your model during pre-rigging for this to work correctly.
Using Advanced Deformation Tools
While basic weight painting works for most simple projects, advanced rigs use additional tools to get more natural deformations. Blend shapes (or shape keys) let you sculpt corrections for extreme poses—for example, if you get pinching at the elbow when the arm is bent 90 degrees, you can sculpt a corrected shape for that pose that the rig will blend into as the arm bends. Cluster deformers let you group a set of vertices together and control their movement as a unit, which is useful for adjusting areas like the shoulder or armpit that deform in complex ways. Jiggle deformers or dynamic weights add automatic secondary movement to things like hair, bellies, or floppy ears, so you don’t have to keyframe that movement manually. These tools add a layer of polish that makes your rig feel much more natural.
Creating Controls and Constraints for Animators
Once your skeleton is weighted and your deformations look good, you need to add animation controls. You don’t want animators to have to move individual bones every time they pose a character—well-designed controls make posing fast, intuitive, and prevent accidental mistakes. Controls are usually simple shapes (circles, squares, curves) that are connected to your bones via constraints, so moving the control moves the corresponding bone.
Designing Intuitive Controls
The best controls are simple, easy to select, and follow a consistent color scheme that helps animators quickly identify what each control does. A common convention is to use different colors for different types of controls: for example, red for the root control, green for spine controls, blue for left limb controls, and red for right limb controls. Large controls are easier to select than small ones, so make your control shapes big enough to click on easily in the viewport, even when the entire character is small on screen.
For most character rigs, you’ll want one control per movable bone. For example, the root pelvis has a big control that moves the entire character, each spine bone has a control to bend the back, and the hand has a control that lets the animator position the hand directly. For facial rigs, you’ll add individual controls for each eyebrow, each side of the mouth, the jaw, and the eyes so animators can adjust expressions quickly.
Adding Constraints to Automate Movement
Constraints are rules that tell one part of the rig how to move based on another part. They eliminate the need for animators to keyframe every single bone, which speeds up the animation process. Common constraints used in rigging include:
- Parent constraints: Make one object follow the position and rotation of another. For example, you can parent the hand control to an IK handle, so moving the control moves the entire arm correctly.
- Orient constraints: Make one object match the rotation of another. This is commonly used for head controls, so the head bone follows the rotation of the head control.
- Inverse Kinematics (IK) constraints: IK is a system that lets you position the end of a limb (like the foot or hand) and the software automatically calculates the rotation of all the bones in between. This is much more intuitive than Forward Kinematics (FK), where you rotate each bone individually, for posing limbs where the end point is fixed (like a foot on the ground). Most rigs include both IK and FK switching for arms and legs, so animators can use whichever works best for their shot.
- Limit constraints: Restrict the rotation or movement of a bone to a natural range of motion. For example, a knee can’t bend backward, so you add a rotation limit that stops the knee from rotating past its natural straight position. This prevents animators from accidentally creating impossible poses that break the model.
Organizing Your Rig for Easy Use
Once all your controls and constraints are set up, organize your rig so it’s easy to navigate. Hide the raw bones in the outliner so animators only see the controls, and group related controls together. For example, you can put all left arm controls in a group called "Left_Arm" and all facial controls in a group called "Facial_Controls". Many riggers also add a control panel (a set of custom buttons and sliders) that lets animators quickly switch between IK and FK, turn on or off special deformations, or adjust the strength of soft tissue movement. This is especially useful for complex rigs used in production, where multiple animators may be working with the same rig.
Testing and Troubleshooting Your Finished Rig
Even the most experienced riggers don’t get everything right on the first try. Testing your rig through a full range of motion is the only way to find hidden deformation issues or broken constraints that you missed during the build process. Skipping testing means you’ll end up with problems that pop up in the middle of animation, which is much harder to fix later.
Start by posing your rig in every possible extreme pose to test deformation. Bend the arm all the way to 180 degrees, bend the knee as far as it will go, twist the forearm all the way left and all the way right, and push the spine into extreme forward, backward, and side bends. For facial rigs, test every extreme expression: a wide open mouth, a closed tight lip smile, raised eyebrows, furrowed brows, and every combination of expressions. Anywhere the mesh pinches, stretches, or deforms incorrectly, you’ll need to go back and adjust your weight painting, add a blend shape correction, or adjust your bone placement.
Next, test your controls and constraints to make sure everything works as expected. Move the root control and confirm the entire character moves with it. Test IK and FK switching to make sure both modes work, and check that rotation limits stop bones from rotating into impossible positions. If you have dynamic jiggle deformers, move the character around to make sure the secondary movement looks natural and doesn’t overshoot or jitter. If you’re building a rig for real-time use, export it to your game engine and test it there to make sure all the bones and weights export correctly—sometimes software-specific features don’t translate to game engines, so you’ll need to adjust your rig to work in the target environment.
Common troubleshooting tips for frequent rig issues:
- If a whole part of the model doesn’t move at all when you move the bone, that means all the vertices in that part have zero weight assigned to the bone. Go back to weight painting and assign the correct weight to those vertices.
- If your controls don’t move the bones correctly, check your hierarchy and constraints—you probably parented something to the wrong object, or the constraint is connected to the wrong bone.
- If your model stretches unevenly when you move a bone, check if you forgot to freeze transformations on your base model. Uneven scale on the original model will cause uneven stretching that weight painting can’t fix.
- If you see weird flickering or overlapping geometry when you bend a joint, you probably have flipped normals or overlapping vertices in your base model. Go back to edit mode and fix the geometry before adjusting your rig.
Once you’ve fixed all the issues you find, do one final pass of testing with a simple animation—like a walk cycle or a idle pose—to make sure the rig works well for continuous movement, not just static poses. A walk cycle will reveal issues with weight painting on the legs and spine that you won’t see in a single static pose, and it lets you check that all the controls work smoothly as the character moves.
Conclusion
Rigging 3D models is a skill that rewards patience and practice. It’s easy to get discouraged by the first few rigs that end up with pinching, bad deformation, or broken controls, but every rigger goes through that learning curve. By starting with solid preparation, building a clear hierarchical skeleton, taking the time to refine your weight painting, and testing thoroughly, you’ll build rigs that work well and make animation a pleasure instead of a chore.
Start small: don’t try to rig a full hyper-detailed character with full facial animation as your first project. Start with a simple object like a stick or a robotic arm, then move on to a simple character, and build up your skills incrementally. As you practice, you’ll develop your own workflow and learn what techniques work best for the type of work you do. Whether you’re rigging for games, film, or personal projects, a well-built rig is the foundation of great animation, and the skills you learn rigging will serve you throughout your 3D work.