
If you’ve ever looked at a photorealistic 3D render of a brick wall, a leather jacket, or a weathered wooden crate and wondered how artists get every tiny bump, scratch, and groove to look so real without crippling your computer, the answer is almost certainly normal maps. These unassuming texture files are the unsung workhorses of modern 3D graphics, powering everything from AAA video games to product visualizations and animated feature films. Unlike high-poly 3D models that store millions of extra polygons to capture surface detail, normal maps pack all that information into a single image that lets a low-poly model look just as detailed, without slowing down render times or straining your graphics card. Let’s break down what normal maps are, how they work, and how to use them effectively in your own 3D projects.
What Are Normal Maps, and How Do They Work?
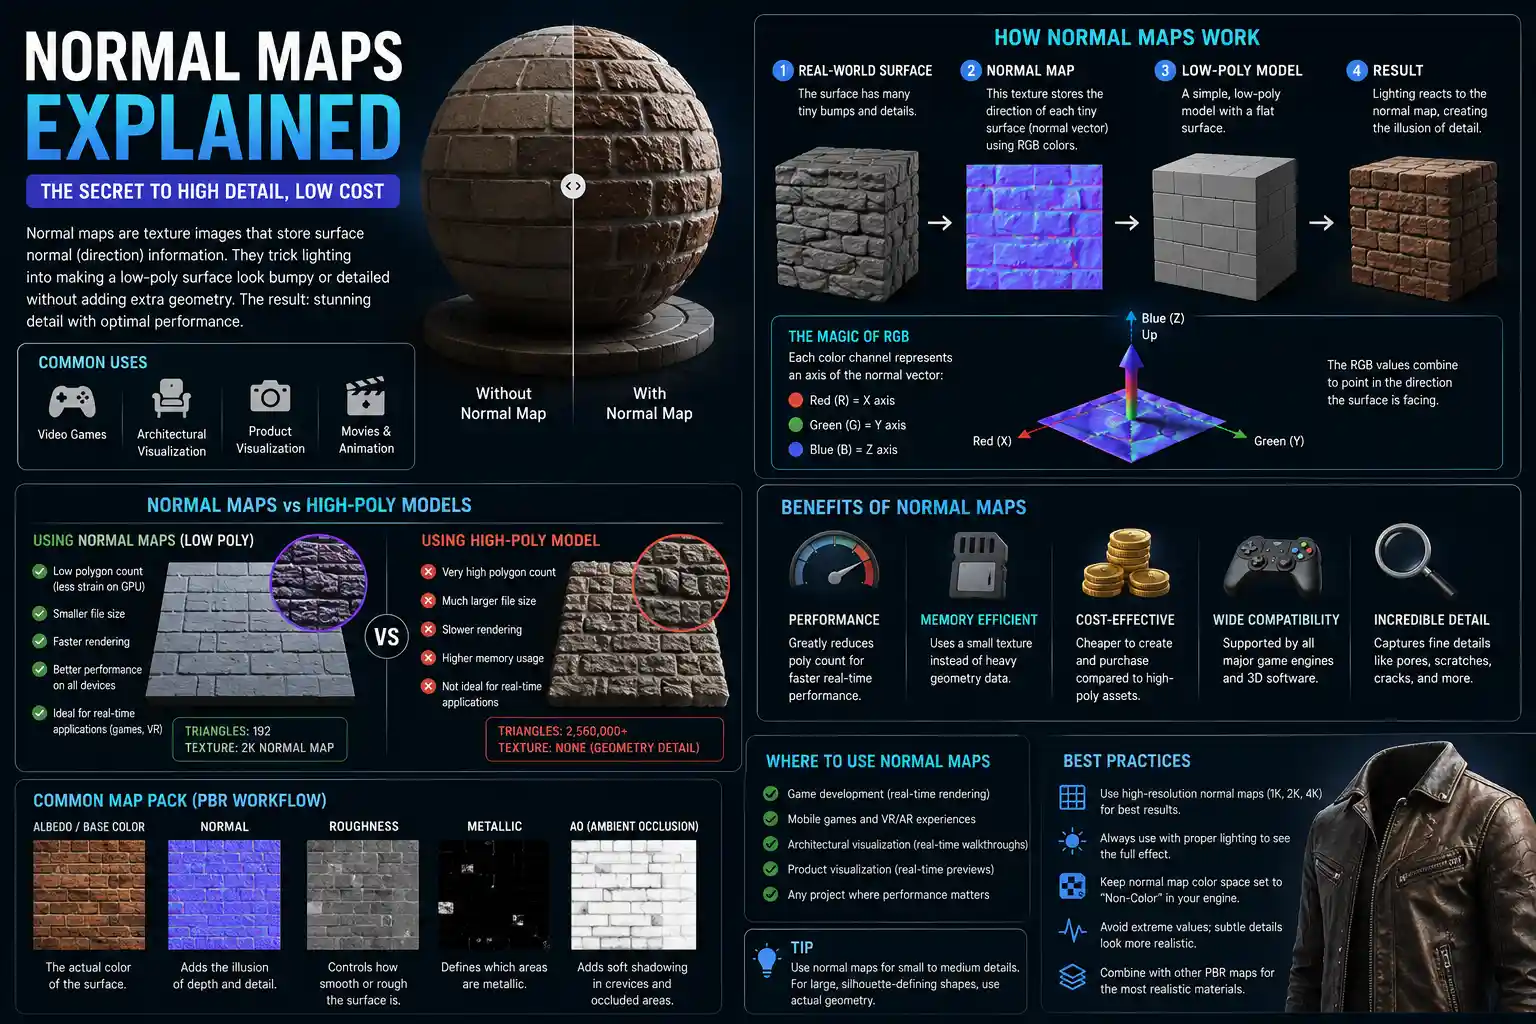
To understand normal maps, you first need to understand what a normal is in 3D graphics. Every surface in a 3D scene is made of polygons, usually triangles, and every triangle has a surface normal: a vector (a line with a direction) that points directly outward from the face, perpendicular to its surface. When your 3D engine or renderer calculates how light interacts with a surface, it uses the angle between the light source and this normal vector to determine how bright or dark that point should be.
On a plain low-poly cube, for example, each of the six flat faces has one uniform normal pointing straight out. When light hits the cube, the entire face is shaded evenly, giving it a perfectly smooth, blocky look. If you want that cube to look like it has a rough, bumpy surface, you have two options: add thousands of extra polygons to create each bump and groove physically, or store the direction of each small bump’s normal in a texture, and have the renderer adjust the shading per pixel to match. That texture is a normal map.
How Normal Maps Encode Direction
Normal maps are almost always RGB color images, where each color channel corresponds to the X, Y, and Z coordinates of the normal vector. By convention:
- The red channel stores the X-axis direction (left to right across the surface)
- The green channel stores the Y-axis direction (up to down across the surface)
- The blue channel stores the Z-axis direction (straight out from the surface)
Because the original normal of a flat surface points straight out, most of a normal map has a muted blue-purple hue: a value of around (128, 128, 255) in 8-bit RGB, which translates to a direction pointing straight out of the surface. Any shift in the red or green channels indicates the normal is tilted left/right or up/down, which changes how light reflects off that spot, creating the illusion of a bump or indentation.
Tangent-Space vs. Object-Space Normal Maps
Not all normal maps are created equal. The two most common types are tangent-space and object-space normal maps, and each is used for different use cases. Tangent-space normal maps are the industry standard for most applications, especially for moving models like game characters. Tangent space is relative to the surface of the model: the X and Y axes follow the curvature and orientation of the 3D mesh, so the normal map can be stretched, rotated, animated, and deformed without breaking. This also means you can use the same tangent-space normal map on different parts of a model, or even on different models entirely, which makes them ideal for tiled textures like brick or grass.
Object-space normal maps, by contrast, encode normals relative to the entire 3D object’s origin, not per-surface orientation. They usually have a rainbow of different colors instead of the uniform blue-purple look of tangent-space maps, because each face of the object has a different base direction. Object-space normal maps are slightly more efficient to render, because the engine doesn’t have to recalculate the tangent basis (the coordinate system relative to the surface) every frame, but they can’t be used on animated or deforming meshes, and they can’t be tiled. They’re most commonly used for static props in games or architectural visualizations.
Normal Maps vs. Other Height Maps: What’s the Difference?
New 3D artists often confuse normal maps with other texture maps that store surface height information, like height maps, displacement maps, and parallax maps. While all of these are used to add surface detail, they work very differently and produce different results. Let’s clear up the most common confusion.
Normal Maps vs. Height Maps
A height map is a grayscale image where each pixel’s brightness represents how high or low that point is on the surface: white is high, black is low. Height maps are the raw data most normal maps are generated from in the first place: when you create a normal map from a photo of a rough surface or a high-poly model, you’re usually starting with a height map. The key difference is that a height map only tells you how tall each point is, while a normal map tells you the direction each point is facing. The direction is what the renderer needs to calculate accurate shading, so height maps alone can’t create the illusion of detailed surface geometry on their own. Some render engines can use height maps with parallax occlusion to create a similar illusion of depth, but the shading still relies on normal information to look correct.
Normal Maps vs. Displacement Maps
Displacement maps are another type of height-based texture that actually moves the vertices of the 3D mesh to create real geometry, instead of just faking the shading. That means displacement maps actually change the silhouette of a model, while normal maps leave the silhouette completely flat. For example, if you have a flat plane with a normal map of a row of screws, the edge of the plane will still be perfectly smooth, and the screws won’t cast shadows on the rest of the surface unless you add extra occlusion. If you use a displacement map for the same screws, the mesh will actually deform to create the screws, so they’ll change the silhouette and cast real shadows. The downside of displacement maps is that they require a very high-poly mesh to get detailed results, which makes them much more computationally expensive than normal maps. Most of the time, normal maps are more than enough for small surface details like scratches, stitching, or grain—displacement is usually reserved for large-scale terrain or high-detail renders where the silhouette needs to be accurate.
“Normal maps are a lie we tell the lighting engine to make it think there’s more geometry than there really is. When that lie is consistent and physically based, it looks more real than most people can tell.”
Normal Maps vs. Roughness Maps: Do You Need Both?
A common mistake new artists make is thinking that normal maps are responsible for how shiny or dull a surface is. That’s the job of a roughness (or specular) map, which controls how much light reflects off the surface at different points. Normal maps affect how light is scattered across the surface by changing the direction of the normals, so they can make a surface look bumpy even if it’s uniformly rough. But you’ll almost always use a normal map alongside roughness, albedo, and metallic maps in a modern PBR (physically based rendering) workflow. Each map handles a different property of the material, and they work together to create a realistic result.
Common Workflows for Creating Normal Maps
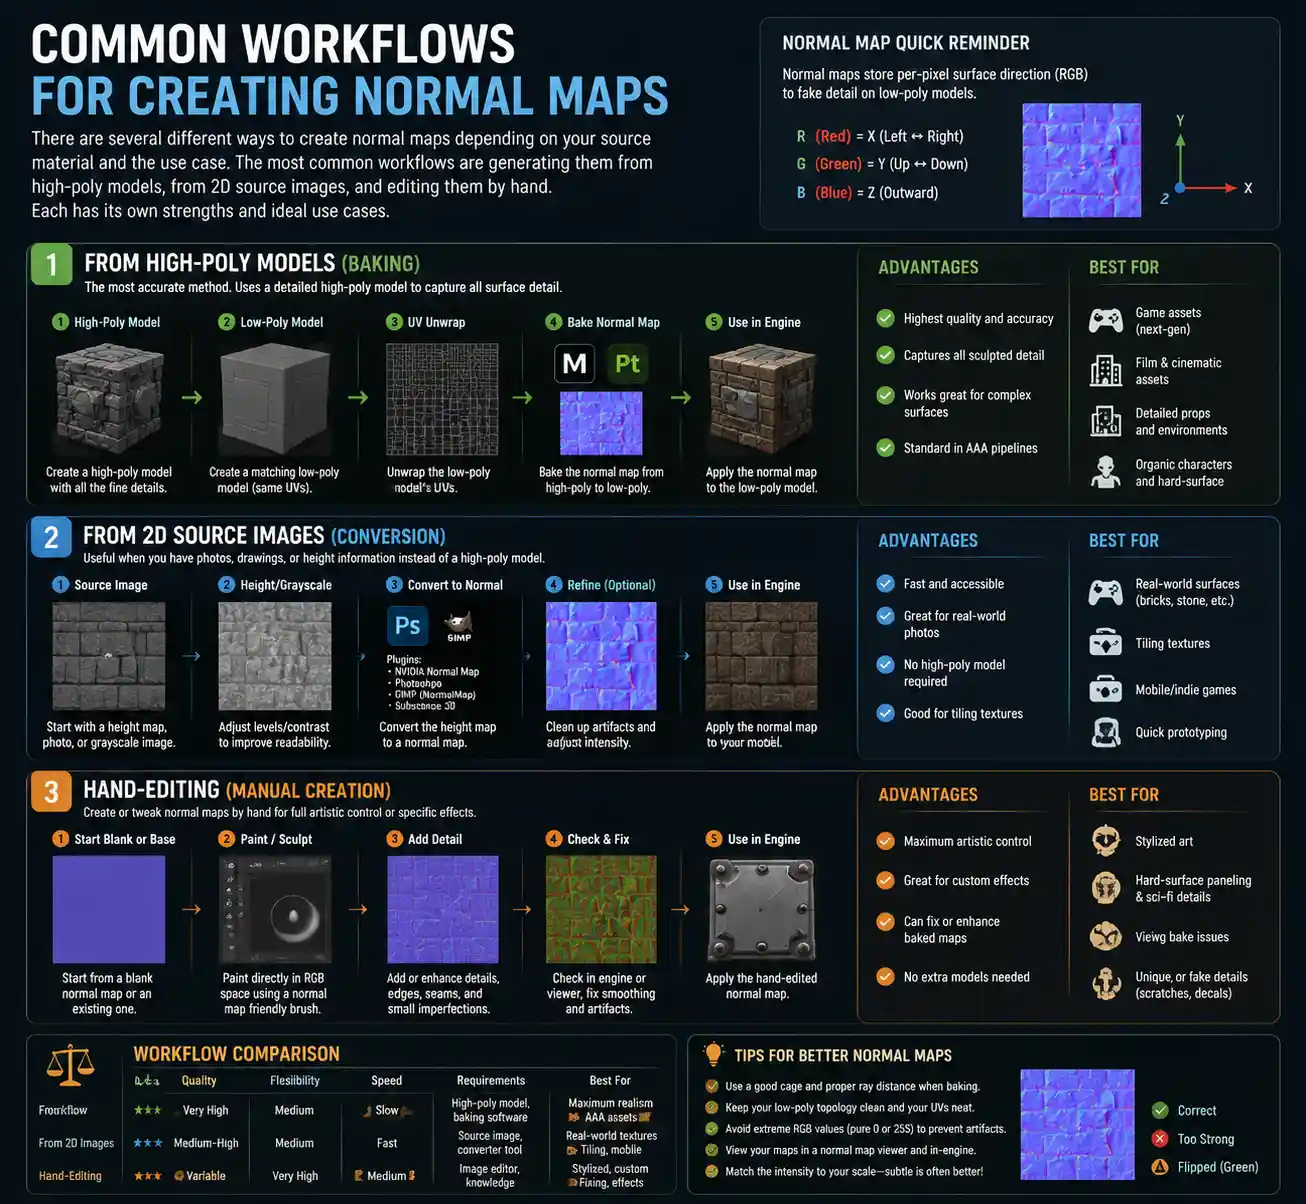
There are several different ways to create normal maps depending on your source material and the use case. The most common workflows are generating them from high-poly models, generating them from 2D source images, and editing them by hand. Each has its own strengths and ideal use cases.
Baking From High-Poly to Low-Poly
The highest-quality normal maps are almost always baked from a high-poly 3D model. This workflow is standard for game assets, characters, and product visualizations where you need maximum accuracy. The process works like this:
- Create a high-poly version of your model with all the fine surface detail sculpted in (for example, sculpting every wrinkle in a character’s face, every rivet on a machine, or every wood grain on a table).
- Create a cleaned-up low-poly version of the same model with only the major shapes, no fine detail. This is the model that will actually be used in your final scene or game.
- Use a baking tool (like Substance Painter, Blender, Marmoset Toolbag, or xNormal) to project the high-poly normal information onto the low-poly mesh’s UV map, saving the result as a normal map texture.
The big advantage of this workflow is that it captures all the subtle detail of your sculpt perfectly, and the normal map will match the underlying shape of the model exactly. It’s also very efficient for the end user: the low-poly model is fast to render or display in real time, while all the detail lives in the normal map. For game assets that need to run at 60 frames per second on consumer hardware, this is the gold standard.
Generating From 2D Textures and Photos
If you’re working with tiled textures (like brick, concrete, fabric, or asphalt) or using a photo of a real surface as a reference, you can generate a normal map directly from a 2D image. Most of the time, you start with a grayscale height map (either created by hand, extracted from a photo, or downloaded from a texture site like Poly Haven or Textures.com) and use a filter to convert it to a normal map. Tools like Adobe Photoshop, GIMP, Substance Designer, and Krita all have built-in filters to do this, and there are also free online generators that will convert your height map to a normal map in one click.
When generating a normal map from a photo, you can also use methods like photogrammetry to capture real-world surface detail directly. Photogrammetry software takes dozens of photos of a real object from different angles, reconstructs a 3D model, and bakes a normal map from that model. This is how many texture libraries get their incredibly realistic surface data: they capture a real piece of brick or fabric, turn it into a normal map, and let you use it in your own projects.
Hand-Painting Normal Maps
For small tweaks or stylized art, many artists choose to paint normal maps by hand. It’s much less common than baking or generation, but it can be useful for adding small details like extra scratches or bumps that don’t exist in your high-poly sculpt. Most 3D texturing software lets you paint directly onto the normal map, with brushes that tilt the normal in the direction you paint to create ridges or indentations. Some stylized art pipelines even use entirely hand-painted normal maps to get a specific non-photorealistic look.
Common Mistakes and Best Practices for Using Normal Maps
Even experienced 3D artists run into issues with normal maps from time to time. The good news is that most problems are easy to avoid if you follow a few simple best practices. Here are the most common mistakes we see, and how to fix them:
Ignoring UV Seam Issues
One of the most common problems with normal maps is visible seams where two UV shells meet. This happens when the normals on either side of the seam don’t match up, creating a visible line on the surface. To avoid this:
- Always make sure your UVs are laid out with minimal stretching, because stretching will warp the normal map data when it’s projected onto the mesh.
- Use the “marching cubes” or “seam fixing” features in your baking software to smooth out normals across UV borders.
- For tangent-space normal maps, avoid placing UV seams across sharp edges where the normal direction changes drastically, if possible.
Overloading Normal Maps With Too Much Detail
It can be tempting to pack every tiny scratch and pore into a 4K normal map, but more detail isn’t always better. If your detail is smaller than a single pixel on the screen at the model’s typical viewing distance, it won’t be visible, and it will just waste memory and processing power. For most game assets, a 2K or 4K normal map is more than enough for close-up models, and 1K is fine for background assets. If you’re working on a mobile game, you may even need to use 512x512 or 256x256 textures to keep performance up.
Another related mistake is adding large-scale height changes to a normal map. Remember that normal maps only fake shading—they don’t change the actual geometry. If you try to use a normal map for a large bump that sticks out far from the surface, the flat silhouette will give away the illusion, and the lighting will look wrong. For large-scale detail, use a displacement map or add the detail to your low-poly geometry directly.
Mixing Up Color Channels and GPU Compression
Not all image file types and compression settings work equally well for normal maps. The most common mistake here is using sRGB color compression for a normal map, which shifts the values of the color channels and distorts the normal directions. Almost all 3D engines and game platforms require normal maps to be stored as linear color space, not sRGB. If you save your normal map as an sRGB image, the lighting will be wrong, and your surface will look flat or distorted.
Block compression (like BC5 for normal maps on PC or consoles) is also preferred over full RGB compression for tangent-space normal maps. Because the Z channel can be reconstructed mathematically from the X and Y channels, BC5 compression only stores the red and green channels, which cuts the file size in half without losing any noticeable quality. Using full RGB compression can introduce artifacts that make your normals look grainy or blocky, so always use the correct compression setting for your target platform.
Forgetting to Adjust Normal Map Strength
Almost every 3D software and game engine lets you adjust the strength of your normal map to control how pronounced the bumps look. A common mistake is leaving the strength at 100% even when the detail is too intense or too subtle. If your brick wall looks like it’s covered in giant, lumpy bumps instead of subtle texture, turn the strength down. If you can’t see the scratches on your metal pipe at all, turn the strength up. This is a simple tweak that makes a huge difference in the final result, and it’s often overlooked by new artists.
Practical Tips for Using Normal Maps in PBR Workflows
Modern PBR workflows rely on multiple texture maps working together, and normal maps play a critical role in how your material interacts with light. Here are a few practical tips to get the best results:
- Always use tangent-space normal maps for animated or deforming meshes, and reserve object-space for static objects. The only exception is for point-cloud-based photogrammetry models, which often use object-space normals by default.
- If you’re using tiled textures on a large surface, use a detail normal map to add extra fine detail on top of your base normal map. For example, you can have a base normal map for large brick bumps, and a smaller tiled detail normal map for concrete dust and fine scratches on top of the bricks. This adds depth without requiring a huge base texture.
- Use ao (ambient occlusion) maps alongside normal maps to add darkening in crevices and indentations. Normal maps change the shading of bumps, but AO adds contact shadows that make the detail look more grounded and realistic. Most baking tools can bake AO at the same time as your normal map.
- If you get a normal map from an external source, always check the green channel orientation. Some older generators or photogrammetry pipelines flip the green channel, which inverts all the normals and makes bumps look like indentations and vice versa. If your normal map looks “wrong” or inverted, flipping the green channel will usually fix it.
- For close-up renders, consider adding a subtle tangent-space normal map to capture micro-surface detail like fabric grain or skin pores. Even if the detail is too small to see clearly, it scatters light slightly and makes the surface look much more realistic than a perfectly smooth normal map.
One of the most underused tricks for game development is to use multiple LODs (level of detail) for normal maps. For a distant model, you can use a lower-resolution normal map with less detail, which saves memory and improves performance without any visible quality loss. Most game engines will handle this automatically if you set up your LODs correctly, but it’s something to keep in mind when optimizing large scenes.
Conclusion
Normal maps are one of the most foundational tools in modern 3D graphics, bridging the gap between high-quality detail and real-time performance. By encoding the direction of surface normals in a simple RGB texture, they let artists create incredibly detailed materials and models that run smoothly on everything from high-end gaming PCs to mobile phones. Whether you’re baking a normal map from a sculpted high-poly character, generating one from a photo of a real-world surface, or tweaking the strength to get just the right amount of bump, understanding how normal maps work helps you make better, more efficient 3D assets that look great and perform well. While newer technologies like parallax occlusion mapping and nanite geometry have changed how we handle surface detail, normal maps remain the backbone of nearly every 3D workflow—and they’ll continue to be a core skill for any 3D artist for the foreseeable future.