
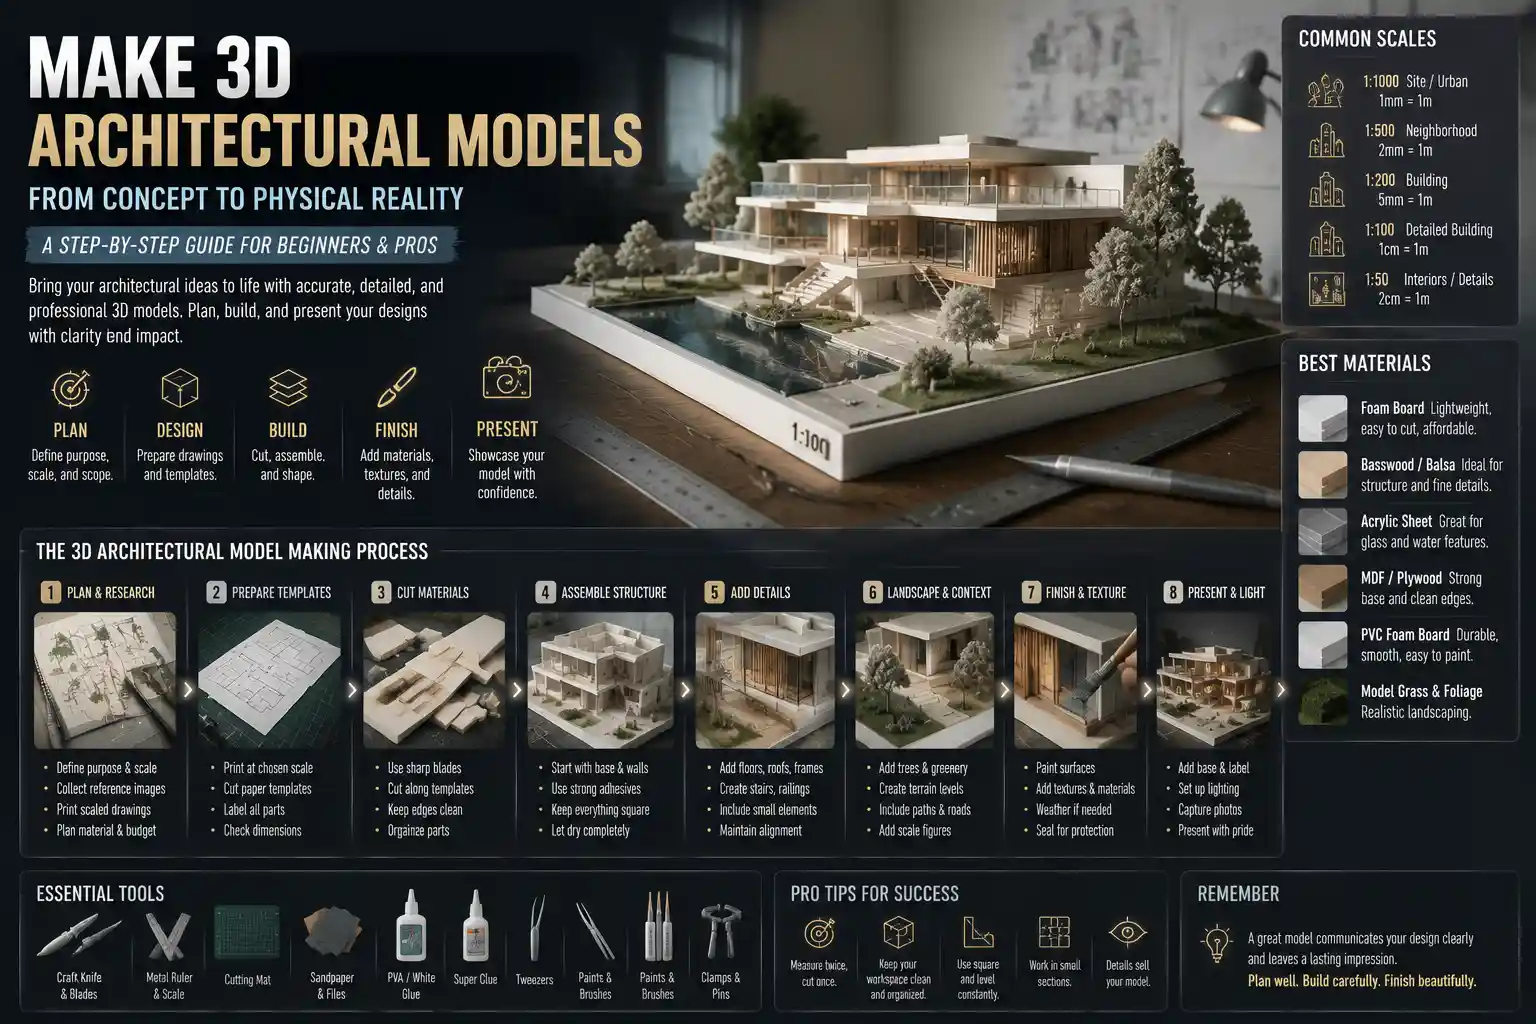
Whether you’re an architecture student presenting a final project, a small firm pitching a custom home to a client, or a hobbyist building a scale model of a historic building, a well-crafted 3D architectural model brings designs to life in a way digital renderings never can. Unlike flat blueprints or screen-based previews, physical 3D models let stakeholders walk around a design, feel the scale of spaces, and visualize how light and shadow interact with form long before breaking ground. Learning to make a professional, accurate 3D architectural model doesn’t require a fully equipped studio or decades of experience—with the right planning, materials, and techniques, anyone can build a model that communicates their design clearly and effectively.
Pre-Design Planning and Preparation
Before you cut a single sheet of foam board or measure a single timber beam, careful planning will save you hours of rework and ensure your final model matches your design intent. The most common mistake new model makers make is jumping straight to building without clarifying the model’s purpose and scope, which often leads to wasted materials or a model that doesn’t meet its core goal.
Define the model’s purpose and scale
Every 3D architectural model serves a specific goal, and that goal dictates every other decision you’ll make, from scale to level of detail. A conceptual massing model for an early-stage design workshop only needs to show overall form and site placement, so it can be built at a small scale with minimal detail. A presentation model for a client proposal needs to highlight room layouts, material finishes, and landscaping, requiring a larger scale and more intricate work. A working study model used to test structural changes or light flow might even be intentionally rough, designed to be modified quickly rather than displayed.
Choosing the right scale is one of the most critical steps in planning. Common scales for architectural models include:
- 1:1000 (1 millimeter = 1 meter) for large site plans and urban development projects
- 1:500 (2 millimeters = 1 meter) for neighborhood or multi-building campus plans
- 1:200 (5 millimeters = 1 meter) for full building presentation models
- 1:100 (1 centimeter = 1 meter) for detailed single-building or interior projects
- 1:50 (2 centimeters = 1 meter) for highly detailed room layouts or facade details
Always double-check your scale conversions before starting, and mark the scale clearly on your model base for reference. A small error in scale early on will compound into a major misalignment by the time you add walls and roofs.
Gather reference drawings and prepare a cutting plan
Once you have your scale finalized, convert your digital design drawings or blueprints to match the model scale, then print them at full size. These printed drawings become your cutting templates, ensuring every piece fits together correctly. For complex models, many model makers glue printed templates directly to their base material to cut straight through the paper, which eliminates measurement errors.
Before cutting, map out how you’ll arrange all your parts on your raw materials to minimize waste. Thicker materials like foam board and plywood are often more expensive than thinner options, so smart arrangement can cut your material costs significantly. It’s also a good idea to order 10-15% more material than you think you’ll need—mistakes are inevitable, and having extra material on hand avoids delaying your project to run to the store.
Choosing the Right Materials for Your Project
3D architectural models can be built from a huge range of materials, and the best choice depends on your model type, budget, and desired finish. From low-cost study models to high-end presentation pieces, there’s a material to fit every need.
Materials for concept and study models
Study models are designed for testing and iteration, so they prioritize low cost and speed over a polished finish. The most popular materials for study models include:
- Foam board: Lightweight, inexpensive, and easy to cut with a utility knife, foam board is the go-to for most beginning model makers and early-stage study models. It comes in a range of thicknesses, from 3mm for thin walls to 10mm for solid bases and massing. The only downside is that foam board can dent easily, so it’s not ideal for models that will be transported or handled frequently.
- Balsa wood: Balsa is a lightweight, soft wood that cuts cleanly and holds shape better than foam board. It’s perfect for small structural massing models and adding simple texture to facade designs. It’s slightly more expensive than foam board but still affordable for most small projects.
- Chipboard and cardboard: For ultra-low-budget quick studies, recycled cardboard and chipboard are perfectly serviceable. They’re easy to source, cut well, and hold glue effectively. The rough texture actually works well for conceptual models that prioritize form over finish.
Materials for presentation and display models
When your model is going to be seen by clients, judges, or the public, you’ll need materials that deliver a polished, professional finish. Common options for presentation models include:
- Acrylic sheet: Clear or colored acrylic is ideal for glass facades, interior partitions, and water features. It can be cut with a laser cutter or a specialty acrylic saw, and it polishes to a clear, professional finish. Tinted acrylic can also be used to create subtle shading for different building materials.
- MDF and birch plywood: Medium-density fiberboard (MDF) and thin birch plywood are perfect for solid bases, structural walls, and detailed facade elements. They cut cleanly with laser cutters or scroll saws, and they can be sanded and painted to match any finish. Birch plywood also has a subtle natural grain that works well for modern minimalist designs.
- PVC foam sheet (forex): PVC foam is a rigid, lightweight material that holds fine detail better than standard foam board. It resists dents and warping, making it ideal for transportable presentation models. It cuts easily with a utility knife or laser, and it accepts paint and adhesive very well.
Landscaping and finishing materials
Even the most well-built building looks unfinished without complementary landscaping. For site models, common materials include static grass flocking for lawns, fine gravel for pathways and driveways, and small scale model trees available from hobby shops. For water features, many model makers use clear resin or tinted acrylic to create a smooth, realistic water surface. For interior models, thin plastic sheets can be used for cabinetry, and fabric scraps work well for carpeting and upholstery at larger scales.
“A great architectural model isn’t just a miniature version of a building—it’s a communication tool. The materials you choose should serve that purpose, not just look pretty. If a plain white foam massing model communicates your design better than a hyper-detailed painted version, that’s the right choice.”
Essential Tools for Cutting and Assembly
You don’t need a $10,000 laser cutter to build a high-quality 3D architectural model, but having the right core tools will make the process much faster and produce cleaner results. Your tool kit will grow with your experience, but every model maker should start with these essentials.
Cutting tools
Clean, straight cuts are the foundation of a well-built model, so investing in good cutting tools is non-negotiable. For hand-cutting most materials, a sharp utility knife with replaceable blades is the most versatile tool. Dull blades leave ragged edges and cause slipping, so change your blade frequently—this is a small step that makes a huge difference in the quality of your cuts. For cutting curves and thin wood, a precision scroll saw or a coping saw works well for small workshops. A metal ruler with a non-slip backing is essential for cutting straight lines; a cork-backed ruler prevents slipping and protects your work surface.
For model makers working on multiple complex projects, a desktop laser cutter has become an increasingly affordable investment. Laser cutters can cut intricate facade details, custom window openings, and interlocking parts with perfect precision in a fraction of the time it takes to cut by hand. Even entry-level desktop models can handle most small to medium architectural model projects, and many makerspaces and community workshops offer laser cutting access by the hour for those who don’t want to buy their own.
Assembly and measurement tools
Accurate measurement is just as important as clean cutting. A digital caliper is ideal for measuring small parts at fine scales, while a metal tape measure or yardstick works for measuring larger bases and site elements. A triangular architect’s scale ruler takes the guesswork out of converting drawing measurements to model scale, eliminating conversion errors.
For assembly, you’ll need clamps to hold parts together while glue dries. Small spring clamps and binder clips work well for most small projects, and masking tape can hold temporary joints in place without damaging materials. A self-healing cutting mat protects your work surface and prevents your knife from dulling too quickly.
Adhesives: choosing the right glue for the job
Using the wrong glue can warp thin materials, leave visible stains, or fail to hold joints together over time. Match your glue to your material for the best results:
- White PVA glue (wood glue): Perfect for balsa wood, MDF, and cardboard. It dries clear and creates a strong bond, but it can warp thin materials if you use too much.
- Cyanoacrylate (super glue): Ideal for fast assembly of small plastic, acrylic, and foam parts. It dries in seconds, so it’s great for fixing small details, but it can fog clear acrylic if you use too much.
- Double-sided tape: Great for temporary assembly of study models and for mounting printed templates to cutting materials. It leaves no mess and can be repositioned easily.
- Solvent cement: Specifically for bonding acrylic and PVC. It melts the surface of the plastic to create a permanent, invisible bond that’s stronger than super glue.
Step-by-Step Assembly Process
Following a consistent assembly process helps avoid mistakes and ensures your model is square, stable, and accurate. Most architectural models follow the same core build sequence, from base to finishing details.
Step 1: Build the base and site
Always start with your base, as the entire building will be anchored to it. For most models, a 10-15mm thick MDF or foam board base provides enough stability. If you’re building a site model with uneven terrain, cut layers of foam board to match the contour lines of your site, then stack and glue them together to create a three-dimensional topography. Sand the edges of the foam layers to create smooth slopes, then add your landscaping material (grass, gravel, pathways) once the contour shape is complete. Mark the position of the building footprint on the base before you start building the structure to ensure it fits correctly.
Step 2: Assemble the structural core and walls
For most small-scale buildings, it’s easiest to pre-cut all your wall panels first, then assemble them into a box frame on the base. Start by dry-fitting all your wall panels together without glue to check for fit and square. Check the corners with a small speed square to make sure they’re 90 degrees—if one wall is out of square, the entire building will be lopsided. Once you’re happy with the fit, glue the corners one at a time, holding them in place with clamps or masking tape while the glue dries. For multi-story buildings, add the floor slab after the first set of walls is dry, then repeat the process for the upper floors. Interlocking joint designs (common with laser-cut parts) make assembly much faster, as tabs and slots hold parts in place without extra clamping.
Step 3: Add the roof and facade details
Once the core structure is dry, add the roof. For flat roofs, a single sheet of material cut to size is all you need. For pitched roofs, cut two rafter sections and a ridge piece, then glue them together before attaching to the top of the walls. Next, add facade details like window openings, doors, trim, and cladding. For scale windows, you can use pre-cut plastic window frames from hobby suppliers, or cut your own from thin acrylic or card. For textured cladding, thin strips of balsa wood can be glued to the facade to create brick or shiplap patterns, or you can use pre-textured PVC sheets for a more uniform finish.
Step 4: Add interior details (if required)
If you’re building an interior model or a cutaway model that shows room layouts, add interior details after the exterior is complete. Start by dividing the open floor plan into rooms with thin partition walls, then add fixed elements like staircases, cabinetry, and fireplaces. For larger scales, you can add small scale furniture, which is available pre-made from model hobby suppliers, or cut your own from thin card or balsa. Keep interior details proportional to your scale—oversized furniture will make the entire space feel wrong, so double-check measurements before adding.
Finishing and Refining for a Professional Result
The finishing step is what separates a hobbyist model from a professional presentation piece. Small tweaks and fixes will make your model look clean, polished, and intentional.
Sanding and filling gaps
After assembly, you’ll likely have small gaps at joints or uneven edges on cut parts. Use fine-grit sandpaper (200-400 grit) to sand down rough edges and uneven joints. For small gaps between walls or at corners, use a small amount of wood filler or spackling compound to fill the gap, then sand it smooth once it dries. Wipe away all sanding dust with a soft cloth before painting or sealing, as dust will leave a bumpy, uneven finish.
Painting and sealing
Painting unifies your model and hides small imperfections. For most presentation models, a matte or eggshell paint finish is preferred over gloss, as gloss creates distracting reflections when photographed or displayed. Spray paint delivers a smooth, even finish that’s hard to achieve with a brush, especially for large flat surfaces like walls and bases. If you’re painting multiple different parts, paint them before assembly to avoid getting paint on adjacent areas. For materials like MDF that absorb paint, seal the surface with a thin primer first to create a smooth base for your topcoat.
Adding final details and landscaping
Once the paint is dry, add the final small details that bring your model to life. For site models, glue down small model trees, shrubs, and street furniture like benches or lampposts. For urban models, you can add thin lines of paint for road markings, or use fine sand for asphalt roads. If you’re displaying the model with a title or label, add a small engraved plaque or printed label to the base corner to keep it looking professional. If your model needs to be transported, add a custom fitted foam case to protect it from damage during travel.
Common mistakes to avoid during finishing include over-detailing your model. It’s easy to get carried away adding tiny decorative elements, but too much detail can distract from the core design. Stick to details that support your design intent, and leave out anything that doesn’t add to the story you’re trying to tell.
Conclusion
Making a 3D architectural model is a process of problem-solving, patience, and attention to detail, but it’s also one of the most rewarding ways to communicate an architectural design. By starting with clear planning, choosing the right materials and tools for your project, and following a consistent assembly process, you can build a model that accurately reflects your vision and impresses clients, instructors, or audiences. Start small with simple study models to practice your cutting and assembly skills, then work your way up to more complex presentation projects as you gain confidence. Whether you build models by hand with basic tools or invest in a laser cutter for intricate details, the core principles of good model making remain the same: prioritize clarity of design, work carefully to avoid measurement errors, and let your model’s purpose guide every decision you make.