
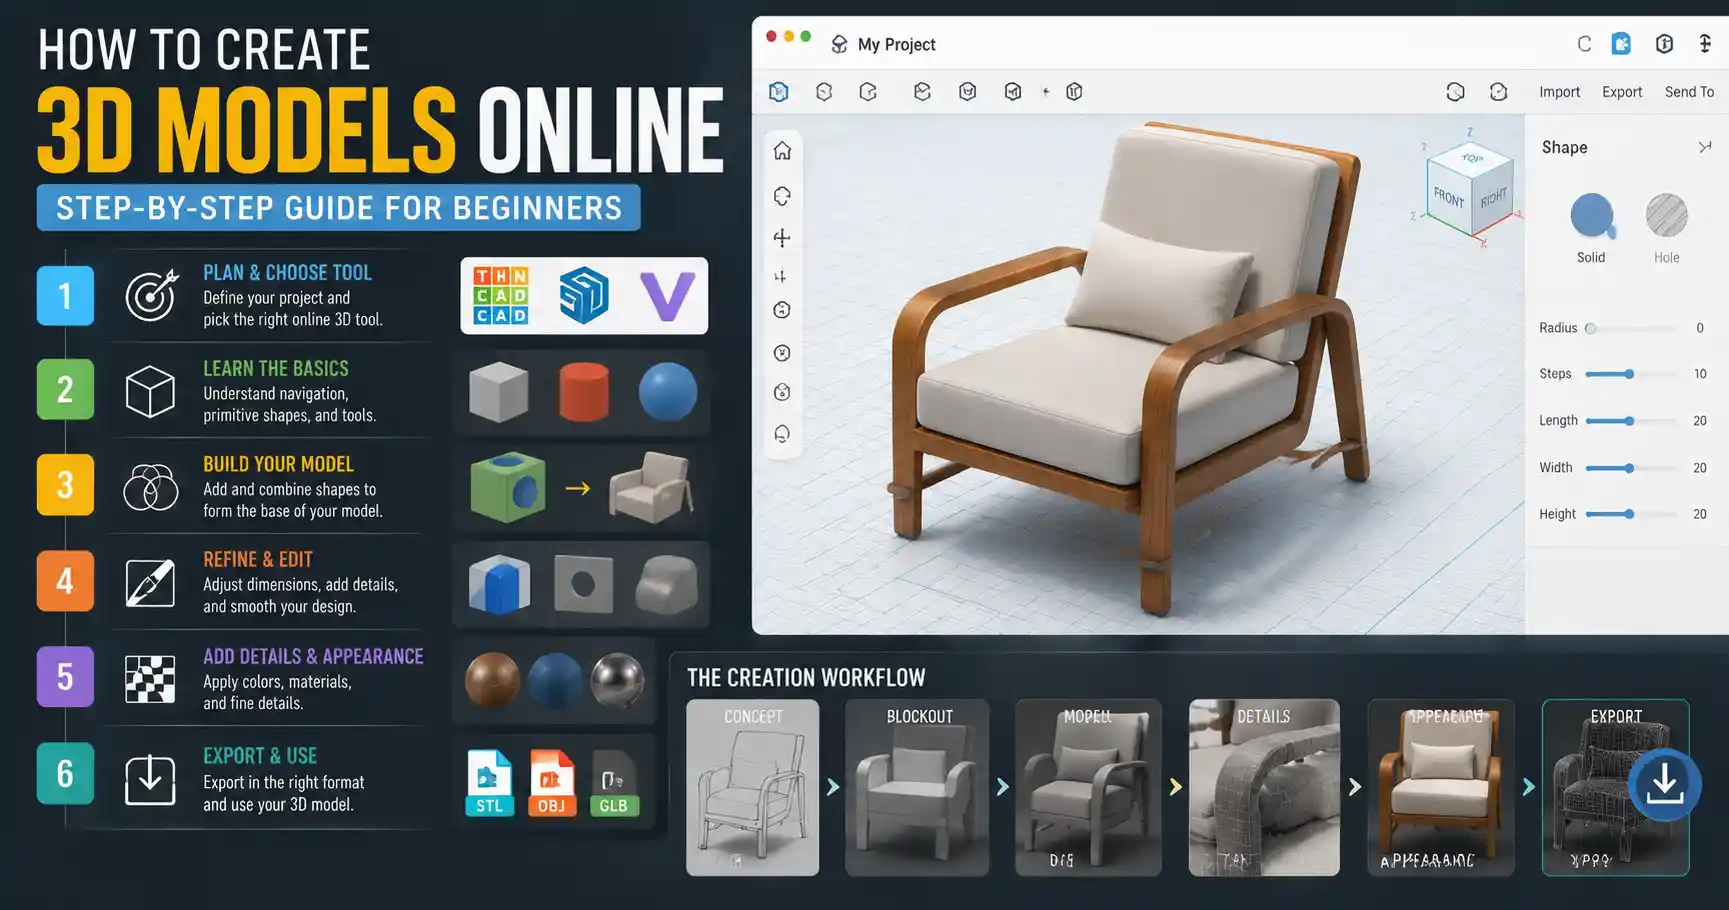
Not long ago, creating a 3D model required expensive desktop software, a powerful gaming computer, and months of training to master complex tools. Today, anyone with a laptop and an internet connection can design, prototype, and even 3D print a custom model entirely in their browser. Whether you’re a small business owner looking to prototype a new product, a hobbyist crafting a custom figurine for 3D printing, a teacher building interactive learning resources, or a designer expanding your skill set, online 3D modeling tools have lowered the barrier to entry dramatically. This step-by-step guide walks you through every stage of creating 3D models online, from choosing the right platform to exporting your finished design for use.
Step 1: Define Your Project Goals and Choose the Right Tool
Before you open any 3D modeling app, it’s critical to clarify what you want to create. The best tool for a 3D printable toy is very different from the best tool for a 3D model of a character for a video game. Your end goal will shape every choice you make, from the features you need to the budget you’ll allocate.
Common 3D modeling project types
Most online 3D modeling projects fall into one of four categories, each with different requirements:
- 3D printing: Requires models that are watertight, have correct wall thickness, and export as STL or OBJ files. Most hobbyist projects fall into this category, from custom phone cases to replacement parts for home appliances.
- Game design and animation: Requires low-poly models with clean topology and support for UV unwrapping and texture mapping, usually exported as GLB or FBX files.
- Product design and prototyping: Requires precise measurement tools, assembly features, and compatibility with computer-aided manufacturing (CAM) tools, often exported as STEP or STP files.
- Art and visualization: Prioritizes creative freedom over technical precision, with support for textures, lighting, and rendering for marketing or digital art projects.
Popular online 3D modeling tools by category
There are dozens of browser-based 3D tools available today, ranging from free beginner options to professional-grade platforms. Most are structured on a freemium model, with a free tier for casual use and paid subscriptions for advanced features or commercial use.
- Beginner/hobbyist 3D printing: Tinkercad is the gold standard for new users. Developed by Autodesk, it’s completely free for non-commercial use, uses a simple block-based building system that’s easy to learn, and exports directly to STL for 3D printing. Other top options include SketchUp Free, which is great for architectural models and furniture design, and 3D Slash, which uses a stone-carving metaphor that feels intuitive for many new users.
- Mid-range general use: Vectary and Spline are popular options for users who outgrow Tinkercad but don’t want to download heavy desktop software. Both support polygonal modeling, texture work, and rendering, with free tiers for personal projects. Vectary is particularly strong for product visualization, while Spline is optimized for interactive 3D web content.
- Professional product design: Onshape and Fusion 360 (which has a browser-based version) are the leading online tools for professional parametric modeling, which lets you adjust dimensions and features with automatic updates to the full model. They’re used by industrial designers and engineering teams for precise product development.
- 3D modeling from photos: If you want to create a 3D model of an existing physical object, tools like Polycam and 3DFY.ai let you upload photos taken with your phone and generate a 3D model automatically through photogrammetry, entirely online.
For most new users starting their first project, Tinkercad is the best starting point. It’s free, has zero installation required, and a massive library of community tutorials to help you get up to speed quickly.
Step 2: Master the Core Basics of Online 3D Navigation and Shaping
Once you’ve chosen your tool and created a new project, the first thing you’ll encounter is a blank 3D workspace. If you’ve never worked in 3D before, navigating three axes (X for width, Y for depth, and Z for height) can feel disorienting at first. But with a little practice, these core controls become second nature.
Learn basic navigation controls
Nearly all online 3D tools use the same standard navigation shortcuts that work with both a mouse and trackpad:
- Pan: Hold the right mouse button and drag to move the entire view around the workspace without rotating or zooming. On a trackpad, this is usually a two-finger drag.
- Rotate: Hold the left mouse button and drag to orbit your camera around the model. This lets you look at your work from every angle, which is critical for catching errors you can’t see from the default front view.
- Zoom: Scroll the mouse wheel to zoom in and out. On a trackpad, this is a pinch gesture. Zooming in lets you make precise adjustments to small details, while zooming out helps you check the overall proportions of your model.
Take 5 minutes to practice these controls before you start adding shapes. A common mistake new users make is only working from one angle, which leads to misaligned shapes or errors that only become visible when it’s time to 3D print. Get in the habit of rotating your view frequently to check your work from all sides.
Start with primitive shapes
Nearly all 3D models, even complex ones, are built from combinations of basic shapes called primitives: cubes, spheres, cylinders, cones, and tori (donut shapes). Online tools like Tinkercad and Vectary let you drag and drop these primitives directly into your workspace with a single click.
Once you add a primitive, you can adjust its dimensions to fit your needs. Most tools let you click and drag the edges of a shape to resize it freely, or type in exact measurements if you need precision for 3D printing or product design. For example, if you’re building a replacement shelf peg for a cabinet, you can type in an exact diameter of 5mm and length of 15mm to match the original part.
Learn boolean operations to combine and cut shapes
The most powerful feature of beginner-friendly online 3D modeling is boolean operations, which let you combine multiple shapes or cut holes into one shape with another. There are three core boolean operations you’ll use for almost every project:
- Union (Combine): Merges two or more overlapping shapes into a single solid model. This is how you build complex shapes from multiple primitives.
- Difference (Subtract): Cuts away the volume of one shape from another. This is how you create holes for screws, cut out windows in a house model, or hollow out a container to make it printable.
- Intersect: Keeps only the overlapping volume of two shapes and discards the rest. This is a more advanced operation used for creating custom curved shapes.
For example, if you want to create a custom keychain with your name on it, you would start with a flat rectangular base (union), add the individual letters for your name raised on top of the base (union again), then add a small circle where you want the keyring hole to go and subtract it from the base to cut the hole. That entire process takes less than five minutes in Tinkercad.
“The biggest mistake new 3D modelers make is trying to build something too complex too fast. Start with a simple keychain or a small box. Master the basics of navigation, resizing, and boolean operations first, and you’ll be building complex models in a fraction of the time.”
Step 3: Refine Your Model With Details, Measurements, and Error Checking
Once you’ve blocked out the basic shape of your model, it’s time to add details and check for common errors that can cause problems when 3D printing or exporting. This step separates usable, professional-looking models from messy, unprintable ones.
Check your measurements and alignments
If you’re creating a model for 3D printing or functional use, precision is non-negotiable. Most online 3D modeling tools let you snap shapes to a grid, which automatically aligns edges and makes it easier to keep your model symmetrical. Turning on grid snapping is one of the easiest ways to avoid misaligned shapes that can throw off your entire design.
For functional parts, always double-check your critical dimensions before moving on. If you’re designing a phone case, measure the length, width, and depth of your phone with a digital caliper, then input those exact measurements into your model. Even a 1mm error can mean the difference between a case that fits perfectly and one that’s too loose or too tight.
Most online tools also include alignment tools that let you center multiple shapes on an axis automatically. For example, if you’re adding two holes for screws to a bracket, you can use the align tool to make sure both holes are perfectly level and evenly spaced, instead of guessing and ending up with misaligned holes.
Add small details and textures
Once your basic shape and measurements are correct, you can start adding small details to make your model more functional or visually interesting. For 3D printing, this could mean adding text, beveling sharp edges to avoid injury, or adding small notches for assembly. For digital visualization, this could mean adding colors, textures, or bump maps to make your model look more realistic.
Most online platforms have built-in libraries of pre-made components you can add to your model, saving you from building common parts from scratch. For example, Tinkercad has a library of pre-made screws, nuts, hinges, and even electronics components like Arduino boards that you can drag and drop directly into your project. Vectary and Spline have libraries of PBR textures (physically based rendering) that let you add wood, metal, plastic, or fabric finishes to your model with one click.
A good rule of thumb for 3D printing is to avoid adding details smaller than the nozzle size of your 3D printer. Most consumer FDM printers have a 0.4mm nozzle, so any detail smaller than 0.5mm will likely not show up in the final print. Keep that in mind when adding small text or engravings, and scale details up accordingly.
Check for common errors
Before you export your model, it’s critical to check for common errors that can cause problems when 3D printing or importing into other software. The most common errors for beginner 3D modelers include:
- Non-manifold geometry: This means your model has edges that are connected to more or fewer than two faces, creating a "hole" in the model that makes it non-watertight. Non-watertight models can’t be sliced correctly for 3D printing.
- Overlapping faces: When two solid shapes overlap without being merged into a single union, it can create duplicate internal faces that confuse slicing software.
- Zero-thickness walls: All parts of a 3D printable model need to have a positive thickness. If you accidentally leave a part with zero thickness, it won’t print.
The good news is that most modern online 3D modeling tools automatically check for many of these errors as you build, and some even have automated repair tools to fix them with one click. For example, if you export an STL from Tinkercad, it automatically generates a watertight model for 3D printing. If you do end up with an error, tools like MeshLab (which also has a browser-based version online) can repair common STL errors for free.
Step 4: Use AI to Speed Up 3D Modeling Workflows
One of the biggest innovations in online 3D modeling in recent years is the rise of AI-powered generative 3D tools that let you create a complete 3D model from a text prompt or a single image, instead of building it by hand. These tools aren’t a replacement for manual modeling for precision projects, but they can cut down your workflow time dramatically for many use cases.
Generative 3D from text prompts
Tools like 3DFY.ai, Luma AI, and Meshy let you type a text description like "a low-poly dragon figurine for 3D printing" and generate a complete 3D model in a matter of minutes. You can then import that generated model into your favorite online editor to adjust dimensions, cut a hole for a keychain, or refine details before exporting.
This is a game-changer for hobbyists who want a custom model but don’t want to spend hours building it from scratch. For example, if you want a custom figurine of your favorite video game character for 3D printing, you can generate a base model with AI in 5 minutes, then just clean it up in an online editor instead of building the entire model by hand.
For more advanced users, AI can also help with repetitive tasks like retopologizing a high-poly model to make it lower poly for game design, or generating UV maps and textures automatically. Many online tools now integrate AI features directly into the editor, so you don’t have to switch between multiple platforms.
Photogrammetry: Generate 3D models from real-world objects
If you have a physical object you want to turn into a 3D model, online photogrammetry tools let you do this entirely with photos from your smartphone. Photogrammetry works by taking dozens or hundreds of photos of an object from every angle, then using software to match common points in the photos and reconstruct a 3D mesh of the object.
Tools like Polycam and Capture have fully online workflows that let you upload your photos from your phone to their website, process the 3D model in the cloud, then edit and export it directly in your browser. This is perfect for creating 3D models of existing parts for reverse engineering, or scanning sculptures or historical artifacts for digital archiving.
Best practices for AI-generated 3D models
AI-generated 3D models rarely come out perfect on the first try, especially for 3D printing. Follow these tips to get the best results:
- Be specific in your prompt. Mention that you need a "watertight model for 3D printing" or a "low-poly model for game design" to help the AI generate a model that fits your use case.
- Always check the model for errors after generation. AI often produces non-manifold geometry or extra floating parts that you’ll need to clean up in an online editor.
- Adjust the scale after generation. AI models are often created at an arbitrary scale, so you’ll need to resize them to match the dimensions you need for 3D printing.
It’s also important to check the licensing terms for AI-generated 3D models if you plan to use them for commercial purposes. Different tools have different terms, so make sure you have the right to use the model for your intended application.
Step 5: Export and Prepare Your Model for Its Final Use
Once your model is complete and free of errors, the final step is to export it in the correct file format for how you plan to use it. Choosing the wrong file format can lead to errors when importing into other software or 3D printing, so it’s important to pick the right one for your project.
Common 3D file formats for online models
Here are the most common file formats you’ll use, and when to use each:
- STL: The standard file format for 3D printing. STL files store the surface geometry of a solid model, and are compatible with every slicer program and 3D printer on the market. Use this if you’re printing your model at home or sending it to a 3D printing service.
- OBJ/GLB/FBX: These formats are used for digital 3D content like games, animation, and web visualization. They support textures, materials, and multiple objects in a single file, unlike STL. Use GLB for web-based 3D content, FBX for game development and animation, and OBJ for general digital use.
- STEP/IGES: These are standard file formats for professional engineering and product design. They store parametric data and precise dimensions, so they can be edited in other CAD tools for manufacturing. Use this if you’re sending your design to a machine shop for CNC machining or injection molding.
Most online 3D modeling tools let you export your model in all of these common formats for free on their paid tiers, and many even support STL export on free tiers for hobbyists.
Preparing for 3D printing
If you’re exporting your model for 3D printing, there are a few final steps you can take online to prepare it for slicing. Many online platforms like Thingiverse and MyMiniFactory have built-in online slicers that let you import your STL, adjust print settings, and generate G-code directly in your browser, without downloading any desktop software. This is perfect for beginners who haven’t set up desktop slicing software yet.
If you do find errors in your STL after exporting, you can use free online repair tools like MakePrintable or MeshLab Cloud to fix non-manifold geometry, thin walls, and other common errors automatically. Most of these tools have a free tier for small models, so you don’t have to pay to fix a simple hobbyist project.
Sharing your model online
One of the biggest benefits of creating 3D models online is that it’s easy to share your work with others. Most tools let you generate a shareable link to your model that anyone can view in their browser, even if they don’t have an account. You can also export your model and upload it to 3D model sharing platforms like Thingiverse, Sketchfab, or Printables to share it with the global 3D printing community, or sell it if you created a commercial design.
Conclusion
Creating 3D models online has never been more accessible, regardless of your previous experience or budget. By starting with a clear project goal, choosing the right tool for your needs, mastering the core basics of navigation and boolean operations, refining your design to avoid common errors, and leveraging AI to speed up your workflow, you can go from a blank workspace to a finished, usable 3D model in a single afternoon. The key is to start small: try building a simple keychain or a replacement part first to practice your skills, then work your way up to more complex projects as you get comfortable with the tools. With the wide range of free and affordable online platforms available today, the only limit to what you can create is your imagination.