
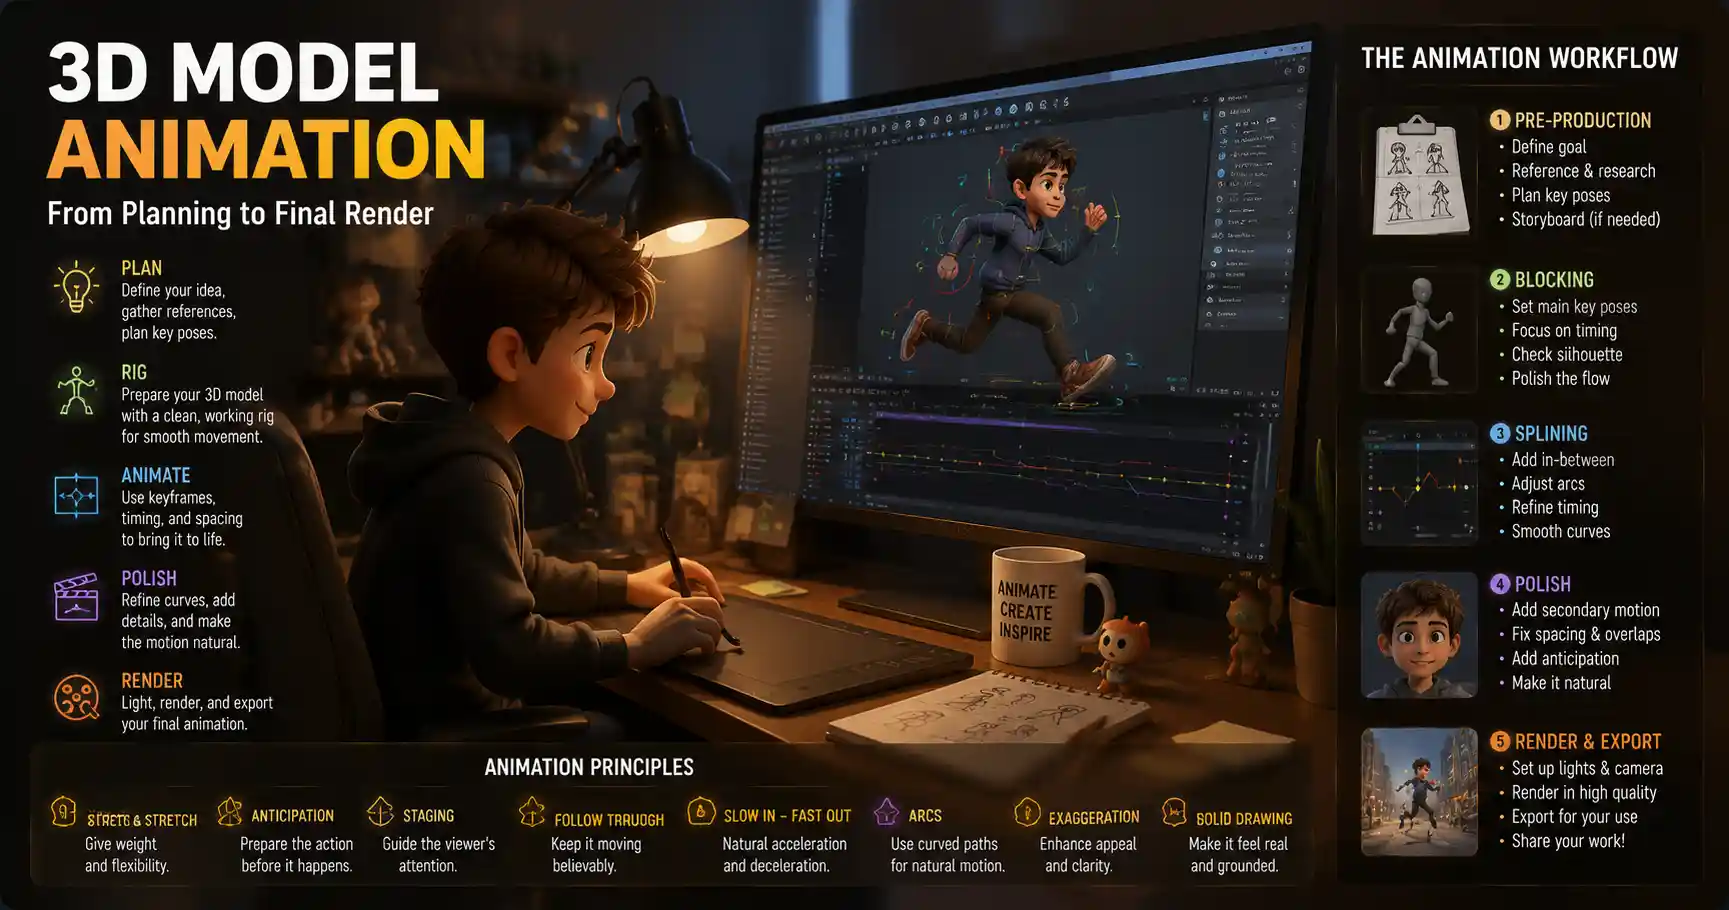
If you’ve ever paused to marvel at the fluid movement of a game character, the realistic gestures in a Pixar film, or the smooth product rotations in a modern website animation, you’ve experienced the impact of well-crafted 3D model animation. What once required expensive studio equipment and a team of specialized artists is now accessible to anyone with a decent computer and the willingness to learn. Whether you want to animate characters for an indie game, create dynamic marketing content, or build immersive interactive experiences for the web, mastering the basics of 3D animation unlocks a world of creative possibilities. This step-by-step guide breaks down the entire process, from planning your first keyframes to polishing the final render, for animators at any skill level.
Pre-Production: Plan Your Animation Before You Touch a 3D Model
Even the most powerful animation software can’t save a project that lacks clear planning. Jumping straight into animating without a roadmap often leads to messy keyframes, inconsistent movement, and hours of rework that could have been avoided. Pre-production doesn’t have to be lengthy, but it is non-negotiable for a polished final result.
Define your core goal and reference
Start by answering one simple question: what is this animation meant to do? A 3-second loop of a coffee mug rotating for an e-commerce page has very different requirements than a 2-minute character walk cycle for a narrative game. Your goal will shape every decision you make, from the level of detail you need to the frame rate you’ll render at. Once you know your goal, gather reference material. Professional animators rely on references more than any other tool, because human movement and natural motion are far too complex to invent from scratch.
If you’re animating a person walking, film yourself or a friend walking from the angle you need. If you’re animating a galloping horse, pull up slow-motion clips from wildlife documentaries or stock footage sites. For mechanical animations like a opening cabinet door, take apart the real object and note how each part moves relative to the others. Even rough sketches of key poses work as a reference for simpler projects.
Choose the right 3D model and rig it
Not all 3D models are ready to animate. A high-poly sculpt designed for 3D printing will need adjustments before you can add movement to it, so start by checking that your model is properly optimized and grouped logically. For character animation, the most critical step after sourcing or creating your model is rigging: the process of adding a digital skeleton and control handles that let you manipulate the model’s movement.
If you’re new to animation, you don’t need to rig your first model from scratch. Many marketplaces like TurboSquid or Sketchfab sell pre-rigged 3D models that are ready to animate, which lets you focus on practicing movement instead of learning complex rigging techniques first. For your first project, a simple low-poly character is the best place to start, as it will render faster and be easier to manipulate than a high-detail character with hundreds of blend shapes.
Once your model is in your chosen software (Blender, Maya, Cinema 4D, and Unreal Engine are among the most popular options for beginners and professionals alike), double-check that your rig works before you start animating. Test every control handle to make sure moving the shoulder doesn’t stretch the arm unnaturally, and that bending the knee doesn’t warp the model’s texture. Fixing rig issues early saves hours of frustration later.
Core Animation Techniques: Keyframing for Natural Movement
Keyframing is the foundation of almost all 3D animation. At its core, keyframing involves marking the position, rotation, and scale of your model at specific points in time, and letting the software fill in the movement between those points. For example, if you’re animating a ball bouncing, you’d place a keyframe when the ball is at the top of its arc, another when it hits the ground, and another when it bounces back up. The software handles the in-between frames automatically.
Start with blocking: your first rough keyframes
The first step to any good animation is blocking, where you lay out only the most important key poses, skipping all the small in-between details. This lets you test the timing and flow of your animation without getting bogged down in minor adjustments. For example, if you’re animating a character waving, your blocked keyframes would be: character standing at rest, character’s arm raised fully, character’s arm lowered back to rest.
"Animation is not the art of drawings that move but the art of movements that are drawn." — Norman McLaren, pioneering animator
When blocking, focus on two core principles of animation that separate stiff, unnatural movement from fluid, believable motion: timing and spacing. Timing refers to how many frames pass between your keyframes: more frames mean slower movement, fewer frames mean faster movement. Spacing refers to how far the object moves between each keyframe: close spacing creates slow, smooth movement, while wide spacing creates fast, dynamic movement.
Refine with in-betweens and spline interpolation
Once you’re happy with your blocked keyposes and the overall timing of your animation, it’s time to refine the in-between movement. Most modern 3D software automatically creates in-betweens using a method called spline interpolation, which creates smooth curves between keyframes. But that doesn’t mean you can leave it to the software: automatic in-betweens often create floaty, weightless movement that feels unnatural.
To fix this, add breakdown keyframes between your main keyposes to adjust the arc of movement. Almost all natural movement follows an arc: a character’s arm doesn’t move in a straight line when it waves, it follows a slight curved path. Adjust your in-betweens to match that curve, rather than the straight line the software might generate. For beginners, a common mistake is adding too many keyframes too early. Resist the urge to tweak every frame; too many keyframes can make movement look jittery and inconsistent.
Follow 12 basic principles of animation
Created by Disney animators in the 1930s, the 12 principles of animation are still the gold standard for creating natural, engaging 3D movement. You don’t need to master all 12 at once, but focusing on a few core principles will dramatically improve your work right away. The most important for new 3D animators are:
- Squash and stretch: Give objects a sense of weight and flexibility by squashing them when they hit a surface and stretching them when they move. A bouncing ball squashes flat when it hits the ground, then stretches as it bounces back up, making it feel soft and heavy instead of rigid.
- Anticipation: Prepare the audience for a movement before it happens. A character about to jump will first bend their knees and lean back, letting viewers anticipate the jump instead of it feeling sudden and jarring.
- Follow-through and overlapping action: Not all parts of an object move at the same time. When a character stops running, their hair, clothing, and arms will keep moving for a few frames after their body stops. This creates a much more natural feel.
- Slow in and slow out: Movement starts slow and speeds up, then slows down again before stopping, rather than moving at a constant speed. A door opening doesn’t instantly jump to full speed; it accelerates from rest then decelerates as it reaches fully open.
Advanced Tools for Realistic Animation: Blend Shapes and Inverse Kinematics
Once you’ve mastered keyframing for simple objects and basic character movement, you’ll want to explore more advanced tools that let you create complex, realistic movement like facial expressions, soft body movement, and natural arm and leg positioning. Two of the most useful tools for this are inverse kinematics and blend shapes.
Inverse kinematics for character limbs
When you first rig a character, you’ll usually start with forward kinematics, which means you rotate each bone starting from the root (the hip) down to the tip (the foot). If you want to move a character’s foot to place it on the ground, you have to adjust the hip, then the thigh, then the shin, then the foot one by one, which is time-consuming and imprecise.
Inverse kinematics (IK) flips this process around: you place the tip of the limb (the foot or hand) where you want it, and the software automatically calculates the correct rotation for all the bones above it (the knee and hip for a leg). This makes positioning limbs for walk cycles, running animations, and interactions with objects dramatically faster and more natural. Most modern animation software has built-in IK tools that you can activate with a single click once your rig is set up correctly.
Blend shapes for facial animation and soft movement
While rigs with skeletons work great for large body movement, they’re less effective for subtle movement like facial expressions, changing facial shapes, or soft body movement like jiggling belly fat or waving fabric. For this, animators use blend shapes (also called shape keys), which let you smoothly blend between different versions of the same 3D model.
For example, for a character’s face, you’d create a separate blend shape for a smile, a frown, a blink, and a raised eyebrow. Then you can adjust the weight of each blend shape to create thousands of different combinations: a half-smile with one raised eyebrow, for example, or a full frown with both eyes closed. This is the standard technique used for facial animation in every major animated film and video game today.
Procedural animation for dynamic, automatic movement
Not all animation has to be keyframed by hand. Procedural animation uses algorithms and physics simulations to generate movement automatically, which is perfect for effects like hair blowing in the wind, grass swaying, water flowing, or cloth moving as a character walks. Most 3D software has built-in physics engines that can simulate this movement automatically, saving you hours of manual keyframing.
For example, if you’re animating a character walking in a raincoat, you can set up a cloth simulation that automatically calculates how the fabric moves with the character’s steps, instead of keyframing every fold of the fabric by hand. Procedural animation is also widely used for crowd animation in films and games: instead of animating hundreds of individual people walking through a city street, you can use procedural tools to give each person unique, natural movement automatically.
Common Mistakes New Animators Make (And How to Fix Them)
Even the most talented new animators run into the same common pitfalls when they’re starting out. Recognizing and fixing these mistakes early will speed up your progress and help you create better animations faster.
- Moving everything at once: A common mistake new animators make is starting movement in every part of the model at the same time. A character reaching for a cup doesn’t move their shoulder, arm, hand, and head all at once; the movement starts from the core, then flows out to the limbs. To fix this, offset your keyframes by a few frames for different parts of the body to create overlapping action, which makes movement feel much more natural.
- Over animating: It’s tempting to add constant movement to every part of the model to make the animation feel “lively,” but this just makes it feel chaotic and distracting. Even the most active character spends most of their time holding still between movements. Leave periods of rest, and only add small subtle movements like breathing to keep the character feeling alive. Less is almost always more when it comes to animation.
- Ignoring weight and gravity: Stiff, floaty animation almost always comes from forgetting that every object has weight, and gravity affects all movement. A heavy character will move slower and hit the ground harder than a light character. When an object moves, it has to overcome inertia to start moving, and it has to slow down to stop. Add slight overshoot after a movement stops: when a character turns their head quickly, it will go slightly past the target rotation then settle back, which adds weight to the movement.
- Forgetting to check your work on a loop: If you’re creating a looping animation (like a walk cycle or idle animation for a game), it’s critical to check how the first and last frames connect. A common mistake is having a jump in movement when the loop restarts, which pulls the viewer out of the experience. Scrub back and forth between the last and first frame to check for any gaps, and adjust the keyframes to make the transition seamless.
How to get objective feedback on your animation
It’s almost impossible to see your own mistakes after working on an animation for hours. Even professional animators rely on feedback from other people to catch issues they’ve missed. A few simple tricks can help you get a fresh perspective even before you ask someone else for feedback:
First, flip your animation horizontally. Our brains get used to the image we’re looking at, and flipping it can make jarring movement or off-key poses much more obvious. Second, play your animation back at half speed and then double speed. Watching it at different speeds makes timing issues much easier to spot. Third, step away from your project for a few hours (or even a day) if you can. Coming back with fresh eyes will let you see problems you didn’t notice before.
When you do ask for feedback, don’t just ask “do you like it?” Ask specific questions: “Does the walk cycle look natural?” “Can you tell what the character is doing in this animation?” Specific questions get you useful feedback that you can actually use to improve your work.
Polishing and Exporting Your Final Animation
Once you’re happy with the movement of your animation, it’s time to polish it and export it for its final use. Polishing is where you add the final small adjustments that take your animation from good to great. Start by checking every frame for any odd warping, stretching, or clipping (when one part of the model moves through another part by mistake). Fix any small issues you find, then add subtle secondary movement: things like hair moving with a character’s head turn, clothing swaying with movement, or subtle breathing when a character is standing idle.
Adjust frame rate based on your final use case
Your frame rate (the number of frames per second, or fps, in your animation) should match the platform you’re exporting for. Different platforms have different standard frame rates:
- Film and high-end animation: 24 fps, which is the cinematic standard
- Video games: 30 or 60 fps, for smooth real-time movement
- Social media and web content: 30 fps, which balances smoothness and file size
Never export at a higher frame rate than you need, because it will just create a larger file size that takes longer to load and render without any visible benefit for most viewers.
Choose the right export format
The export format you choose depends on what you’re using the animation for. If you’re exporting a pre-rendered video for YouTube or social media, common formats like MP4 (H.264) or MOV work for almost every use case. If you’re exporting an animated 3D model to use in a game or interactive web experience (using tools like Three.js or React Three Fiber), you’ll need to export the model and animation data in a format like GLB/GLTF or FBX, which preserves the rig and animation data so it can be played back in real time.
Always test your exported animation in the environment it will be used in. An animation that looks great in your 3D software might be too large for a web page, or might play back at the wrong speed in a game engine. Testing early lets you adjust compression or frame rate before you deliver the final project.
Conclusion
Learning how to animate 3D models is a process that takes time and practice, but it’s one of the most rewarding creative skills you can master in the modern digital landscape. Start small: don’t try to animate a 10-minute short film as your first project. Instead, start with a simple animation: a bouncing ball, a rotating product, a basic walk cycle. Master the core principles of timing, weight, and movement before you move on to more complex projects like facial animation or full character performances.
Every professional animator you admire started exactly where you are now, making mistakes and learning from them. The most important thing you can do is keep practicing: animate something new every week, study the work of animators you love, and don’t be afraid to experiment with new techniques and tools. Over time, you’ll develop an intuition for natural movement that lets you bring any 3D model to life, whether you’re creating games, films, marketing content, or interactive web experiences.