
There’s something magical about 3D trees. Whether you’re building a fantasy forest for a video game, designing a landscape for an architectural render, or crafting a custom 3D print of your favorite backyard oak, a well-made tree adds life, depth, and realism to any project. But for new 3D artists, modeling a tree can feel intimidating: its organic, irregular shape doesn’t fit the clean geometric primitives most of us learn to work with first. The good news is that you don’t need a decade of experience to create a convincing 3D tree. With the right approach, the right tools, and a little observation of real trees, you can build a natural-looking model that fits your project’s needs. This guide walks you through every step, from planning your tree to adding the finishing touches that make it feel alive.
Plan Your Tree and Gather Reference Materials
Before you open your 3D modeling software, take 10 to 15 minutes to plan out what kind of tree you want to build. Not all trees are created equal: a slender birch with papery white bark looks nothing like a gnarled 100-year-old olive tree, and a palm tree has a completely different structure than a pine. Skipping this planning step often leads to generic, unconvincing trees that feel out of place in your final scene.
Define the purpose and style of your tree
First, consider what your tree will be used for. A tree that’s going to be 3D printed needs clean, closed geometry that won’t cause errors when sliced, while a tree for a background in a feature film only needs to look good from a distance. The art style also matters: a low-poly tree for an indie game uses far fewer polygons than a hyper-realistic close-up render for a car commercial. Ask yourself these questions to narrow down your requirements:
- Will the tree be a foreground focal point or a background element?
- Do you need photorealism, or is a stylized, cartoon look acceptable?
- What polygon count or file size limits do you have for your project?
- Does the model need to be 3D printable, or will it only exist digitally?
Gather accurate reference images
Even the most experienced 3D artists rely on reference images when modeling organic shapes like trees. Photos of real trees help you capture the small, irregular details that make a tree look natural, rather than a plastic-smooth fake. If you can, take your own photos of a tree that matches what you’re trying to build: get shots of the overall shape, the bark texture, the branching pattern, and the shape of individual leaves. If you can’t get your own references, free sites like Unsplash, Pexels, and Google Arts & Culture have thousands of high-resolution tree photos you can use for non-commercial and most commercial projects.
When you’re looking at references, pay attention to key structural details. Notice how main branches split off from the trunk: most trees follow a rule called apical dominance, where the central trunk grows taller than the side branches, creating that classic tapered shape. For deciduous trees, branches tend to grow upward toward the light, while older lower branches bend downward under their own weight. Conifers like pines have a conical shape, with shorter, more horizontal branches as you move up the trunk. Taking notes on these small details will save you hours of reworking your model later.
Choose the Right Modeling Method for Your Project
There’s no single “right” way to 3D model a tree. The method you choose will depend on your skill level, your software, and the requirements of your project. Let’s break down the most common approaches, so you can pick the one that works best for you.
Procedural generation with tree-specific software
If you need a quick, customizable tree and don’t want to model every branch by hand, procedural generation is the way to go. Programs like SpeedTree, PlantFactory, and Blender’s built-in Sapling Tree Gen use algorithms to generate tree geometry automatically based on parameters you set, like trunk height, branch count, leaf shape, and taper. This method is incredibly fast: you can generate a fully detailed tree in less than five minutes, and tweak parameters until you get exactly the shape you want.
Procedural generation is especially popular for game development and large environment projects, where you need dozens or hundreds of different trees to fill a forest. Most procedural tools also let you export LODs (level of detail) models, which means you can use a high-poly tree for close-ups and a low-poly version for distant trees to save on performance. The downside is that you have less control over the exact shape of the tree, and it can be hard to get a completely custom shape for a specific project. Still, for most use cases, procedural generation is a huge time-saver that produces great results.
Manual modeling for full custom control
If you need a one-of-a-kind tree, or you want to build your 3D modeling skills, manual modeling is the way to go. Manual modeling means you build the trunk and branches from scratch, using basic primitives like cylinders or curves, then shape them by hand. This gives you complete control over every detail of the tree, from the curve of the main trunk to the angle of each small branch. It’s also a great way to learn how tree structure works, which will make you a better artist overall.
Image-based and photogrammetry modeling for photorealism
For ultimate photorealism, many professional artists use photogrammetry to create 3D tree models from real tree photos. Photogrammetry software takes dozens or hundreds of photos of a real tree from every angle, then automatically reconstructs a 3D model with accurate geometry and real bark and leaf textures. The result is an incredibly detailed model that’s indistinguishable from a real tree in renders. The downside is that it requires a lot of photos, powerful processing hardware, and cleanup work to remove unwanted geometry like grass or other plants that were in the photos. It’s also more expensive, though some free tools like Meshroom make it accessible to hobbyists now.
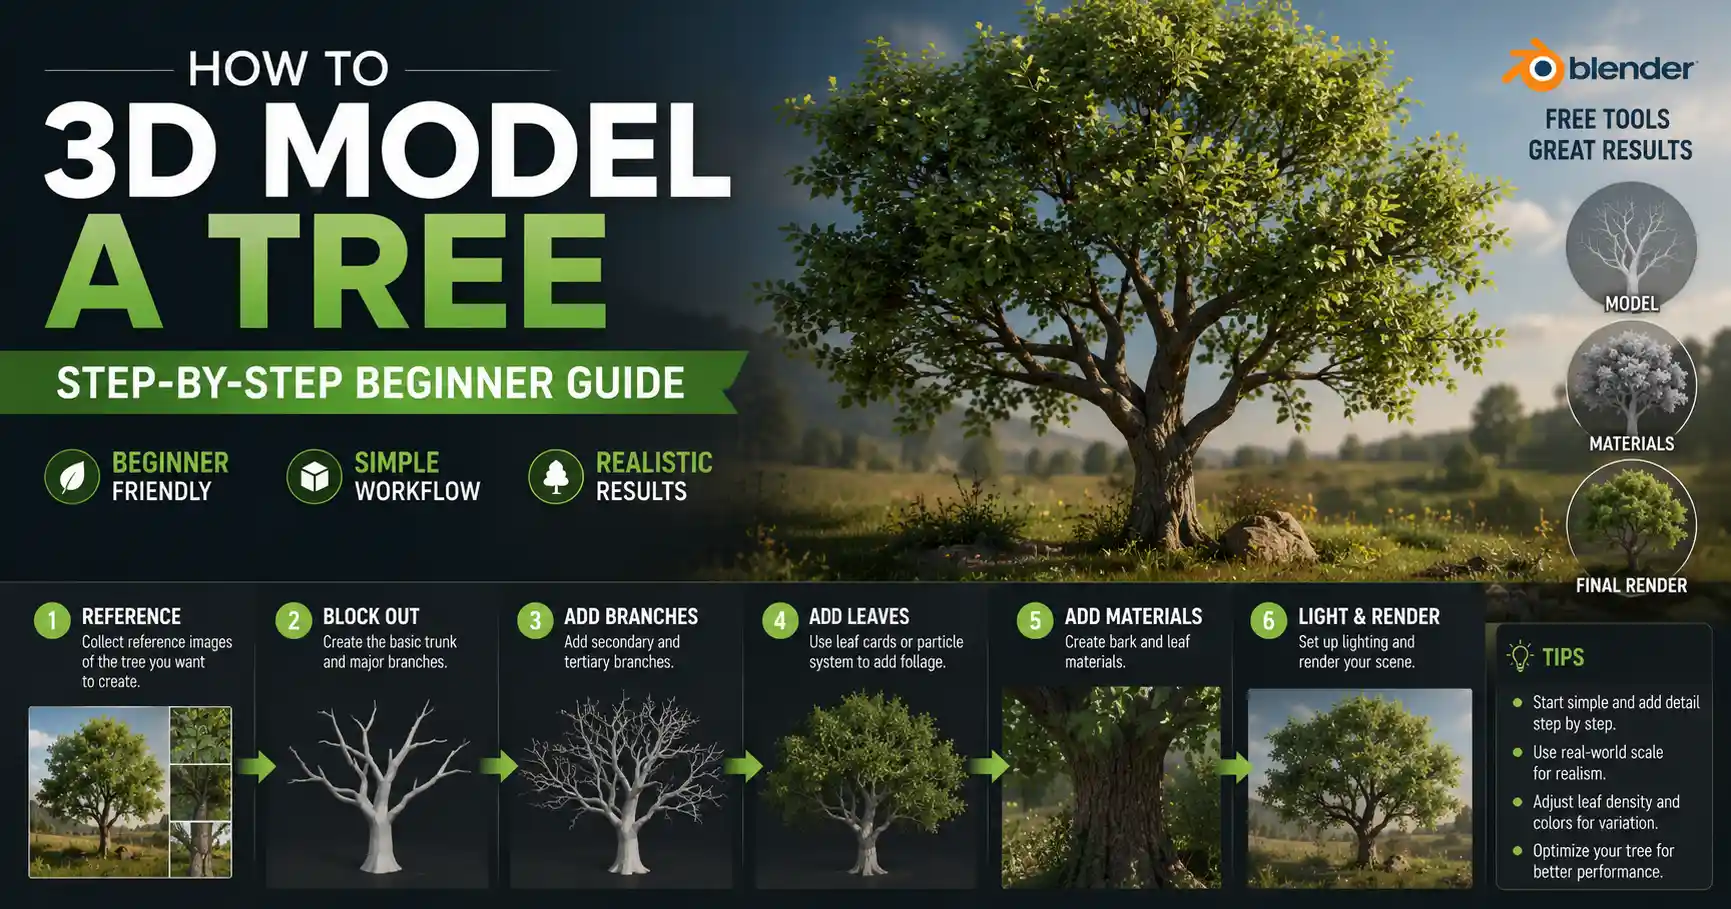
Step-by-Step Manual Modeling for a Custom Tree
If you’re new to 3D modeling and want to build your tree by hand to practice, this step-by-step guide will walk you through the process using common 3D software like Blender, Maya, or 3ds Max. We’ll build a common deciduous oak tree as an example, but you can adapt these steps to any type of tree.
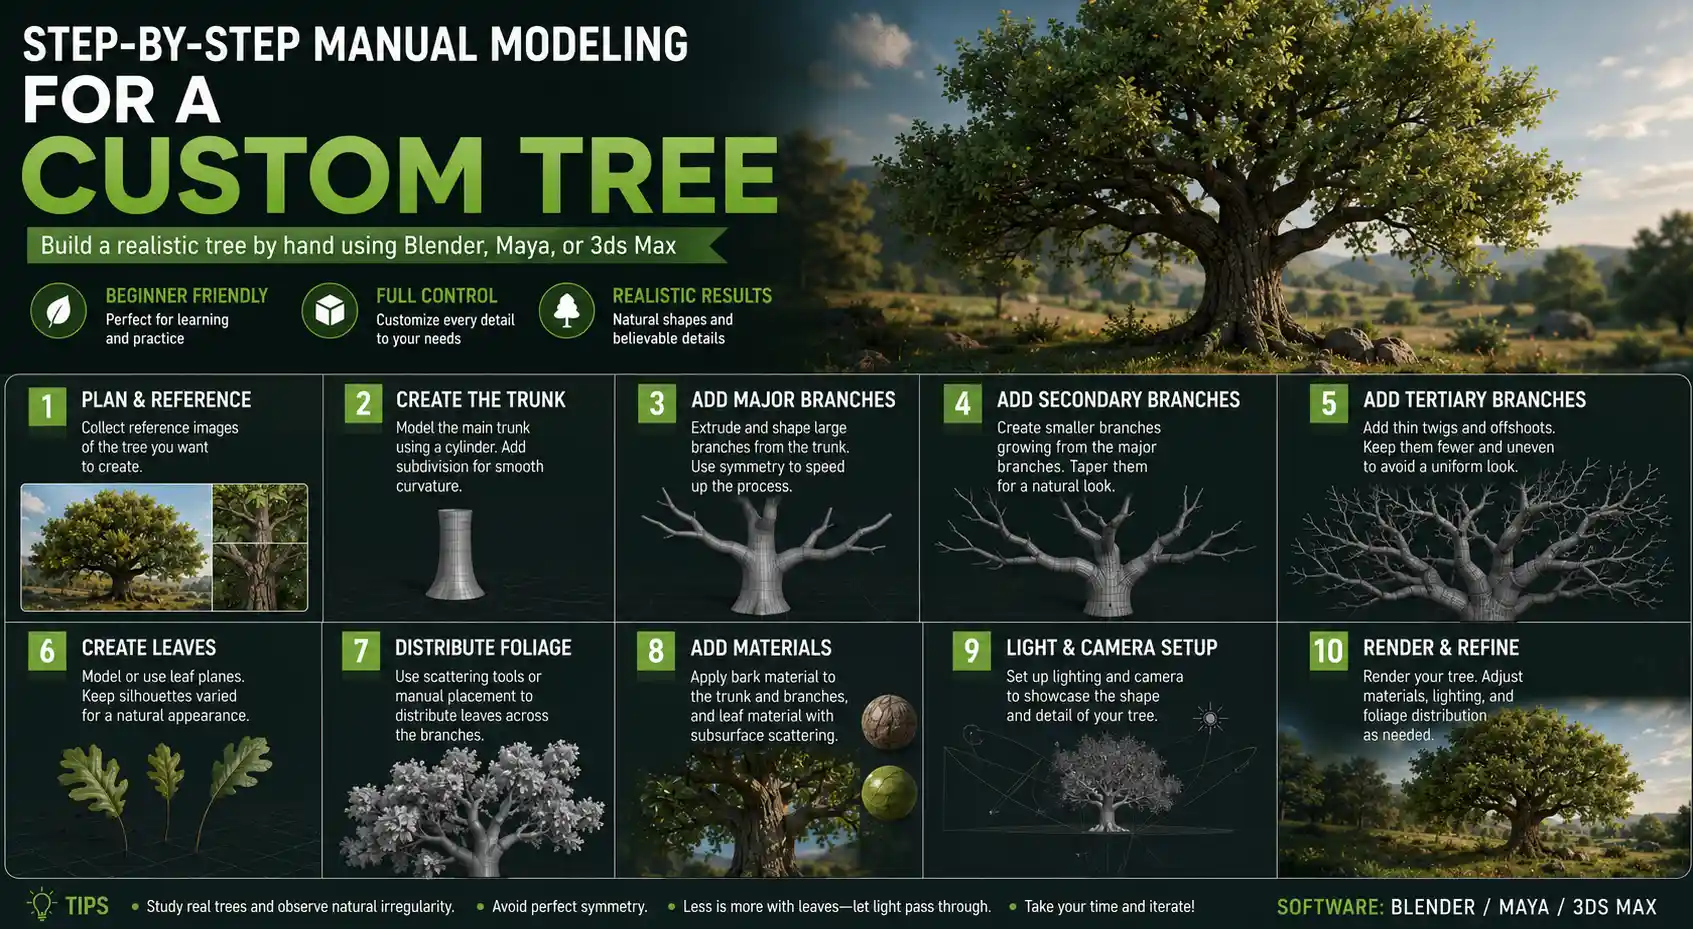
- Block out the main trunk shape
Start with a basic cylinder primitive, with around 8 to 12 sides for a low-poly tree, or 16 to 24 sides for a higher-poly tree. Scale the cylinder along the vertical axis to get the approximate height of your trunk. Next, add a taper to the cylinder: the trunk should be widest at the base, and gradually get narrower as it goes up. You can do this by scaling the top edge of the cylinder down, or use a taper deformer if your software has one. Now it’s time to add organic irregularity: no real tree has a perfectly straight, smooth trunk. Use the grab or sculpt brush to pull the trunk slightly off-center, add small bulges and dents, and create a subtle curve if your reference has one. Even a small amount of irregularity will make your tree look far more natural than a perfectly straight trunk.
- Add the main branches
Look at your reference and mark where the main branches will split off from the trunk. For most trees, main branches are spaced unevenly: don’t place them symmetrically, that will make your tree look fake. For each main branch, start with another smaller cylinder, match the base width to the opening where it connects to the trunk, then taper it as it extends out. Again, add subtle irregular curves and bulges to each branch. Remember that branches get narrower as they get further from the trunk, following the pipe model of tree branching: the sum of the cross-sectional area of all child branches is roughly equal to the cross-sectional area of the parent branch. This rule helps you get natural proportional branching.
Once all main branches are placed and connected to the trunk, join them to the trunk object. Use the sculpt or smooth tool to blend the connection between the branch and trunk, so it doesn’t look like you just glued two cylinders together. Real trees have a smooth, continuous transition at branch joints, so taking a minute to blend this area will make a huge difference in realism.
- Add smaller secondary and tertiary branches
Next, add smaller secondary branches that grow off the main branches, then even smaller tertiary branches off those. Follow the same rule: smaller branches have smaller bases, and taper toward their tips. Again, keep the spacing uneven, and vary the length and angle of each branch. Most new artists make the mistake of adding too many small branches: look at your reference and see how dense the branching really is. For a deciduous tree in leaf, most small branches will be hidden by leaves anyway, so you don’t need to add dozens of tiny branches that no one will ever see.
“The most convincing 3D trees aren’t the ones with the most polygons. They’re the ones that capture the subtle irregularity of growth that you see in real nature. Perfect symmetry and smoothness are the enemies of realism when you’re modeling organic life.”
- Add leaves or needles
There are two common ways to add leaves to your tree, depending on your project. For close-up, high-poly projects, you can model individual leaves as flat planes or slightly curved surfaces, then place them one by one or scatter them with a particle system. For most other projects, using alpha cards is the industry standard: an alpha card is a flat plane with a leaf texture and an alpha transparency channel that makes the area around the leaf invisible. You can cluster multiple leaves on a single alpha card to save on polygons.
To add leaves with alpha cards, create a plane roughly the size of your leaf cluster, assign a material with the leaf texture and alpha, then duplicate the plane and place it throughout the outer branches. Vary the rotation and size of each leaf cluster to avoid a repetitive pattern. For conifers, you can use the same method with alpha cards of needle clusters, or model small individual needles for close-up projects.
- Clean up your geometry
Once you’ve finished adding all branches and leaves, go through your model and clean up any extra geometry. Delete any hidden faces inside the trunk or behind branches that no one will ever see. Merge overlapping vertices to avoid errors when exporting or 3D printing. If you’re creating a game asset, reduce the polygon count using a decimation tool to keep your file size small without losing too much detail. For 3D printing, make sure your model is a closed mesh with no holes or non-manifold geometry, which will cause slicing errors.
Add Realistic Textures and Materials
A great shape is only half the battle: the right textures and materials are what make a 3D tree look real. Even a perfectly modeled tree will look fake if it has a blurry, generic bark texture. Let’s walk through how to texture your tree for maximum realism.
Texturing the trunk and branches
Start with the bark: you can find free high-resolution bark textures for almost any tree species on sites like Poly Haven, TexturingXYZ, and Quixel Megascans. If you want a custom texture, you can even take your own photo of tree bark and edit it to be tileable in Photoshop or GIMP. Once you have your texture, you’ll need to map it to your trunk and branches. For curved organic shapes like a trunk, use unwrap UV to create a UV map that stretches the texture evenly over the surface without stretching or distortion. Most 3D software has automatic UV unwrap tools that work well for trees.
To add extra depth, add a normal map or displacement map to your bark material. A normal map adds the illusion of small bumps and grooves in the bark without adding extra polygons, while a displacement map actually changes the geometry to create deep crevices for close-up renders. Adjust the roughness of your bark material: most tree bark is relatively rough and matte, not shiny, so lower the glossiness setting to get a natural look. Add subtle variation to the bark color: the base of the trunk is usually darker than the upper branches, because it’s shaded and accumulates more dirt and moisture. You can add this variation with a gradient map or by painting it by hand on a separate texture layer.
Texturing leaves and adding translucency
One of the most common mistakes new artists make with leaves is forgetting to add subsurface translucency. Real leaves are thin, so when light shines through them from behind, they glow slightly with a green or yellow tint. If your leaves are completely opaque, they’ll look flat and fake, even if you have a great texture. Most modern 3D software and render engines support subsurface scattering, which lets you add this translucency effect easily.
For leaf textures, you can get free alpha leaf textures from most texture sites, or scan your own leaves to get a custom shape. Vary the leaf color slightly: not all leaves on a tree are the same shade of green. Some will be lighter, some darker, some will have yellow or brown edges, which adds realism. For alpha cards, make sure your alpha channel is clean, with no jagged edges around the leaves. Feather the edge slightly to avoid a hard, unnatural outline when the tree renders.
Add small details for extra realism
It’s the small details that make a tree feel alive. Consider adding these small touches to your model depending on your project:
- Moss or lichen on the north side of the trunk (the side that gets less sun, where moss tends to grow)
- Small knots or scars where old branches have fallen off
- Veins on individual leaves for close-up renders
- Bark cracks that get wider near the base of the trunk, where the bark is older
- Autumn color variation if you’re creating a seasonal tree
You don’t need to add all of these, but even one or two small details will make your tree stand out from generic, mass-produced tree models.
Optimization for Different Use Cases
Once your tree is modeled and textured, you need to optimize it for how you’re going to use it. Optimization makes sure your tree works well without causing performance issues or errors.
Optimization for games and interactive environments
For game development, performance is key. If you have 100 trees each with 100,000 polygons, your game will run slowly on low-end hardware. Follow these tips for game tree optimization:
- Create multiple LOD (level of detail) versions: a high-poly version for close-ups, a medium-poly version for mid-range distances, and a low-poly version for distant trees. For very distant trees, you can even use billboards (flat planes with a tree texture) to save on polygons.
- Use texture atlases to combine all your tree textures into a single image, which reduces draw calls and improves performance.
- Remove invisible faces from the trunk and branches to reduce polygon count without hurting visual quality.
Optimization for 3D printing
3D printing has different requirements than digital use. For a 3D printable tree model:
- Make sure your model is a closed, watertight mesh with no holes or non-manifold geometry. Most slicer software will flag these errors, so check your model with a mesh repair tool like Blender’s 3D Print Toolbox before exporting.
- Add support structures for overhanging branches, especially if you’re printing with resin or FDM. Thin branches can break easily if they’re not supported during printing.
- Thicken thin branches to make them strong enough to print and handle without breaking. A 2mm minimum thickness is a good rule of thumb for FDM printing.
Optimization for architectural renders and animation
For still renders or high-end animation, you can afford more detail, but optimization still helps speed up render times. Use instancing or proxy objects for multiple copies of the same tree, so your software doesn’t have to load the full geometry for every tree in the scene. Use displacement mapping only for trees that are in the foreground, and use normal mapping for background trees to reduce render time.
Conclusion
3D modeling a tree doesn’t have to be complicated. Whether you use procedural generation to quickly spin up dozens of trees for a game forest or model a custom tree by hand for a one-of-a-kind 3D print, the key to a convincing tree is observation and attention to the small, irregular details that make real trees unique. Start with solid reference, plan for your project’s specific requirements, and don’t be afraid to experiment with different methods to find what works for you. With a little practice, you’ll be able to create natural, beautiful 3D trees that add life and depth to any project.