
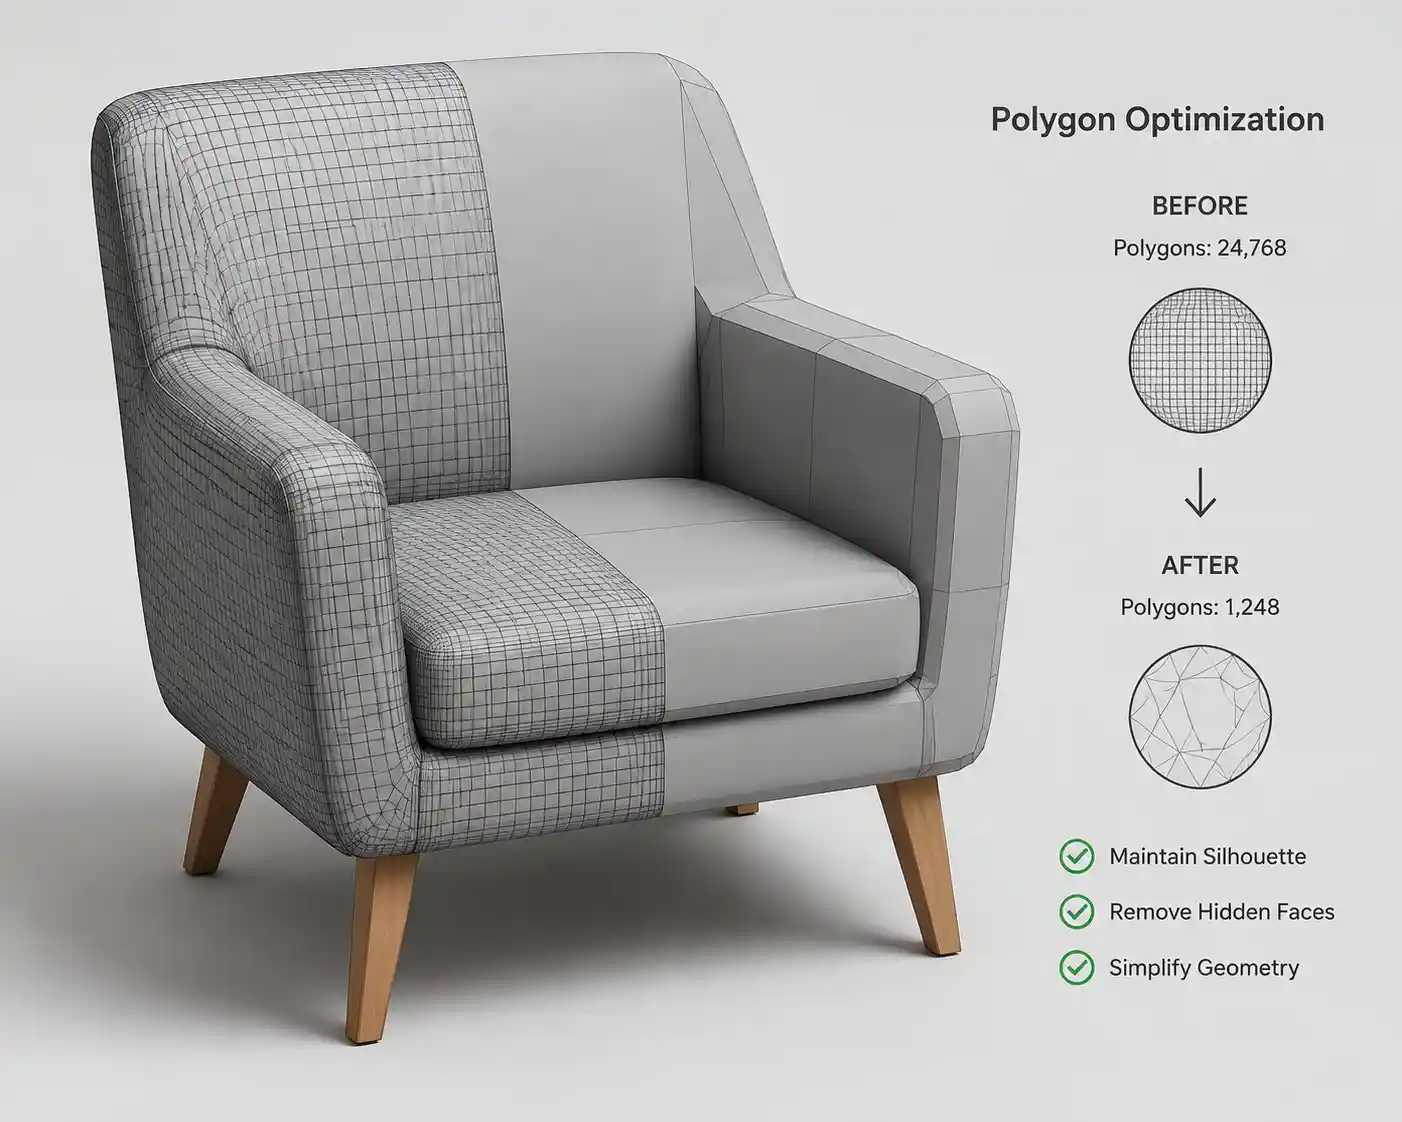
Whether you’re building a 3D model for a video game, architectural visualization, a VR experience, or a 3D printable asset, polygon count is one of the most critical factors affecting performance. A high-poly model with millions of faces might look stunning on your powerful workstation, but it can cause frame rate drops, long load times, and even crashes on mobile devices, consoles, or low-end PCs. Learning how to reduce polygon count without sacrificing visual quality is a core skill for any 3D artist, and it balances technical efficiency with artistic intent. This guide breaks down practical, proven strategies to cut unnecessary geometry while keeping your model looking exactly how you intended.
Understand When and Why Polygon Reduction Matters
Before diving into specific techniques, it’s important to understand what polygon count actually is and why keeping it within reasonable limits matters for your project. A polygon is the fundamental building block of 3D meshes, and most modern models use triangles (or quad faces converted to triangles at render time) to define surface shape. The total number of these polygons directly impacts how much processing power your device needs to display the model: more polygons mean more calculations for the GPU, which translates to worse performance.
That said, not every project needs an ultra-low polygon count. A 3D model for a cinematic close-up that will be rendered once can handle millions of polygons with no issues. A background prop in a mobile open-world game, by contrast, needs to be as efficient as possible to leave processing power for more important assets like player characters and interactive objects. Context is everything when setting polygon count targets.
Common Industry Polygon Count Benchmarks
To give you a starting point, here are general benchmarks for common use cases:
- Mobile game assets: Background props 100–1,000 polygons; player characters 1,000–5,000 polygons
- Console/PC indie game assets: Background props 500–5,000 polygons; main characters 5,000–20,000 polygons
- AAA game main characters: 15,000–50,000 polygons (before real-time tessellation, which adds detail dynamically)
- 3D printing: 50,000–200,000 polygons (most slicers can handle more, but higher counts increase processing time unnecessarily)
- AR/VR experiences: All assets need to stay 30% lower than comparable game targets to maintain 90fps+ required for comfort
One of the biggest mistakes new 3D artists make is over-modeling every detail from the start. It’s easy to get carried away adding tiny edges and surface details that will never be seen in the final product, even at close range. Understanding your project’s performance requirements early helps you set clear polygon budgets and avoid unnecessary work later.
Start With Clean Modeling to Avoid Excess Geometry
The best time to reduce polygon count is before you finish your model, not after. Bad modeling habits create excess geometry that you’ll have to clean up later, so building efficiency into your workflow from the start saves hours of retouching. Even if you plan to use automatic reduction tools later, starting with a clean base mesh will give you far better results.
Avoid Unnecessary Edge Loops
Edge loops are critical for defining shape and enabling smooth deformation when animating, but many new artists add far more than they need. A common example is adding multiple edge loops around a cylindrical object like a mug just because it’s round. For a mug that will be viewed from more than a foot away, 8 sides are often enough to look smooth, especially with normal mapping. 16 sides adds unnecessary polygons that don’t change the final silhouette.
Another common culprit is extra edge loops added “just in case” for animation that never ends up being needed. If you’re modeling a static environment prop that won’t deform, you only need enough edge loops to define its shape. You don’t need to add loops for facial articulation or joint bending on a rock, for example.
Merge and Remove Duplicate Geometry
Duplicate vertices, overlapping faces, and hidden interior geometry are common sources of hidden polygon bloat. When you combine multiple objects, extrude multiple times, or import models from other sources, you’ll often end up with duplicates that sit on top of each other. These don’t change the visual output at all, but they add to your total polygon count and can cause rendering glitches.
“On average, 15–20% of the polygon count in a typical unoptimized 3D model is made up of hidden, unseen, or duplicate geometry that serves no purpose at all.”
Most 3D tools have automatic functions to clean up duplicates: Blender has “Remove Doubles” (now called “Merge By Distance”), Maya has “Cleanup,” and 3ds Max has “Optimize.” Get in the habit of running this tool after blocking out your base mesh to eliminate hidden bloat early.
Delete Invisible Faces
How many times have you seen a 3D model of a house with fully modeled interior walls when the entire interior is hidden by the exterior shell? Or a character with a fully modeled back that’s always covered by a jacket? Any face that will never be seen in the final product is a waste of polygons.
For example:
- The side of a desk that’s pressed against a wall can be deleted
- The inner surface of a solid handle that will never be seen can be removed
- Background objects blocked by foreground assets can have their hidden faces cut
This is one of the simplest polygon reduction techniques, and it often cuts 10–30% of your total polygon count with zero negative impact on visual quality. Just make sure you close any gaps left by deleting faces to avoid rendering errors.
Manual Polygon Reduction Techniques for Maximum Control
Automatic reduction tools are convenient, but manual optimization gives you full control over which areas get simplified and which stay detailed. This is especially important for hero assets like main characters, where preserving small details that define the character’s look is critical. Manual reduction does take more time, but the result is almost always better than a one-click automatic simplification for important assets.
Retopology: Rebuilding Your Mesh for Efficiency
Retopology is the process of creating a new, low-polygon mesh over the surface of a high-poly original. This is the gold standard for reducing polygon count while preserving exact shape and silhouette, and it’s the most common workflow for game character assets. Artists start with a high-poly sculpt that has all the fine details like wrinkles, scars, and fabric texture, then build a clean low-poly mesh that matches the outer shape of the sculpt. The details are then baked down to a normal map that adds the fine detail to the low-poly mesh without extra polygons.
Key retopology tips to keep your count low while preserving quality:
- Focus more polygons on areas that deform or are close to the camera: A character’s face needs more edge loops than the back of their head, which is often out of frame.
- Use quad topology where possible: Quads deform better when animated and are easier to edit later than messy triangles.
- Align edges to the silhouette of your model: Adding a few extra edges along an curved silhouette (like the rim of a character’s hat) keeps it looking smooth while allowing flatter areas in the middle to stay low-poly.
- Use automatic retopology tools as a starting point, then clean up by hand: Tools like Blender’s Remesh or ZBrush’s ZRemesher can give you a base mesh to work from, cutting down manual work while still letting you fix problem areas.
Merge Vertices and Collapse Edges
For small adjustments to existing models, you don’t need to do a full retopology. Most 3D tools let you manually collapse edges or merge vertices to reduce polygons one by one, targeting only the areas that don’t need detail. This is perfect for static props where you just need to cut a few hundred extra polygons here and there.
For example, if you have a flat wall with 10 divisions that you don’t need, you can collapse every other edge to cut the polygon count in half without changing the shape of the wall at all. For curved surfaces, you can remove edges in flatter areas where there’s no detail, leaving more edges along the curves to preserve the silhouette.
Simplify Non-Critical Details
Many models have small decorative details that can be converted from modeled geometry to texture to save polygons. A belt with a raised buckle, for example, doesn’t need to have the buckle modeled as separate geometry if you can add the detail via a normal map or bump map. The same goes for buttons, stitching, engravings, or surface imperfections:
- Modeled detail adds polygons but gives you real depth that catches light correctly
- Textured detail adds no polygons, but only looks correct from a distance
For any detail that isn’t a core part of the model’s silhouette, replacing modeled geometry with baked texture detail is one of the most effective ways to reduce polygon count. The low-poly mesh keeps the overall shape, and the baked texture adds all the fine surface detail for a fraction of the cost.
Using Automatic Polygon Reduction Tools Effectively
For background assets, scanned models, or assets that don’t need a lot of manual tweaking, automatic polygon reduction tools can cut your workflow from hours to minutes. Modern automatic tools use smart algorithms to preserve edges and silhouettes while removing unnecessary polygons, but they still need careful use to avoid ruining your model. Using them correctly gives you fast, high-quality results with minimal manual work.
Popular Automatic Reduction Tools
Most major 3D software includes built-in reduction tools, and there are also dedicated third-party plugins for more advanced control:
- Blender: Built-in Decimate Modifier, with three modes: Collapse (targets a specific polygon count), Un-Subdivide (reverses subdivision surface operations), and Planar (simplifies flat areas into large faces)
- Maya: Built-in Reduce tool, with options to preserve vertex positions on hard edges and maintain UV layout
- 3ds Max: Built-in ProOptimizer, which lets you set exact polygon count targets and preserve specific parts of the model
- ZBrush: Decimation Master, a dedicated tool designed for simplifying high-poly sculpts while preserving detail
- Third-party tools: Simplygon, Instant Meshes, and Blender’s Remesh tool for more advanced automatic retopology and reduction
Best Practices for Automatic Reduction
Automatic tools aren’t foolproof, and if you just run a one-click reduction, you’ll often end up with messy geometry, distorted silhouettes, or lost detail in critical areas. Follow these rules to get the best results:
Lock Important Areas FirstNearly all good reduction tools let you mark certain parts of the mesh as “protected” so the tool doesn’t simplify them. If you have a character’s face that needs to stay detailed, you can select those vertices and lock them, letting the tool only simplify less important areas like the inside of the clothing or the back of the head. This preserves the details that matter while cutting as many polygons as possible from areas that don’t.
Preserve Hard Edges and UV SeamsHard edges (where two flat surfaces meet at a sharp angle, like the corner of a box) are the first thing automatic tools often mess up. Make sure you enable the “preserve hard edges” or “preserve boundaries” setting in your tool to stop the algorithm from merging vertices across hard edges, which would round out your sharp corners unnecessarily. The same goes for UV seams: merging vertices across UV seams can cause texture baking errors later, so locking those boundaries prevents mistakes.
Reduce in Small Steps, Check Silhouette First
It’s tempting to jump straight from 100,000 polygons to 10,000 polygons in one step, but that often leads to unexpected distortion. Instead, reduce in increments of 10–20% and check your model after each step, especially from the camera angles it will be viewed from in the final project. The most important thing to check is the silhouette: if the silhouette still matches the original high-poly model, you can cut more polygons. If the silhouette starts to get jagged or distorted, you’ve gone too far.
For example, if you’re reducing a scanned 3D model of a tree, the outer silhouette of the canopy is what viewers will notice most. If reducing too much makes the silhouette jagged, you can protect the outer vertices and let the tool simplify the inner branches that are hidden anyway. That way you keep the recognizable shape of the tree while cutting hundreds or thousands of hidden inner polygons.
Clean Up After Automatic Reduction
Even the best automatic reduction leaves messy geometry: non-manifold edges, inverted normals, or uneven vertex distribution. After running automatic reduction, always spend 5–10 minutes cleaning up the mesh: merge any remaining duplicate vertices, flip inverted normals, and fix any weird triangles that distort the shape. For assets that will be animated, you’ll also want to rearrange edges into clean quads where possible to make deformation smoother.
Advanced Optimization Tricks for Extra Savings
Once you’ve mastered the basics of manual and automatic reduction, these advanced tricks can help you cut even more polygons without losing quality, especially for large scenes or performance-critical projects.
Use Level of Detail (LOD) Systems
Level of Detail (LOD) isn’t exactly a polygon reduction technique for individual models, but it’s a system that lets you use multiple versions of the same model with different polygon counts depending on how far the camera is from the object. When an object is far in the background, you can swap the high-poly version for a very low-poly version that has just enough detail to look correct at that distance. This can reduce the total polygon count of a full scene by 50% or more, with zero visible quality loss.
Most modern game engines like Unity and Unreal have built-in LOD tools that can automatically generate lower-poly versions of your model from the high-poly original. A typical LOD setup for a character might look like this:
- LOD 0 (0–10 meters from camera): 10,000 polygons
- LOD 1 (10–20 meters from camera): 5,000 polygons
- LOD 2 (20–50 meters from camera): 1,000 polygons
- LOD 3 (50+ meters from camera): 100 polygons or a billboard sprite
Creating LODs is standard practice in all modern game development, and it’s one of the most effective ways to keep overall scene polygon count within performance limits without sacrificing close-up quality.
Use Instancing and Replication for Repeated Assets
If you have a scene with 100 identical trees, you don’t need 100 separate copies of the high-poly tree geometry. Modern engines can instance the same mesh multiple times, so the GPU only needs to load the polygon data once, no matter how many copies you place. This means you can keep the polygon count of the original tree reasonable, and adding 100 more copies doesn’t increase the total scene polygon count at all.
For scattered assets like grass or rocks, you can use a handful of different low-poly variations and instance them across the scene, creating a dense look with a fraction of the polygon count of modeling each one individually.
Replace Small Assets With Imposters or Billboards
For distant objects like trees, buildings, or small props that are far from the camera, you can replace the full 3D geometry with a 2D billboard (a flat plane with a texture of the object) that looks almost identical from a distance but only has 2 polygons. This is an extreme form of polygon reduction, but it’s perfect for distant background elements where no one will notice the difference. Many open-world games use billboards for distant terrain and vegetation to keep frame rates high.
Conclusion
Reducing polygon count isn’t just about cutting as many faces as possible—it’s about making intentional choices that preserve the visual quality that matters while eliminating unnecessary geometry that only hurts performance. By starting with clean modeling habits, using manual retopology for critical assets, leveraging automatic tools for less important objects, and combining your work with systems like LOD and instancing, you can create 3D assets that look great and run smoothly on any device.
The core rule to remember is that context always comes first: a polygon that adds to the final product’s quality is never a waste, but a polygon that no one will ever see is always unnecessary. With practice, you’ll develop an eye for identifying excess geometry and balancing efficiency with artistry, creating better-performing projects without sacrificing your creative vision.