
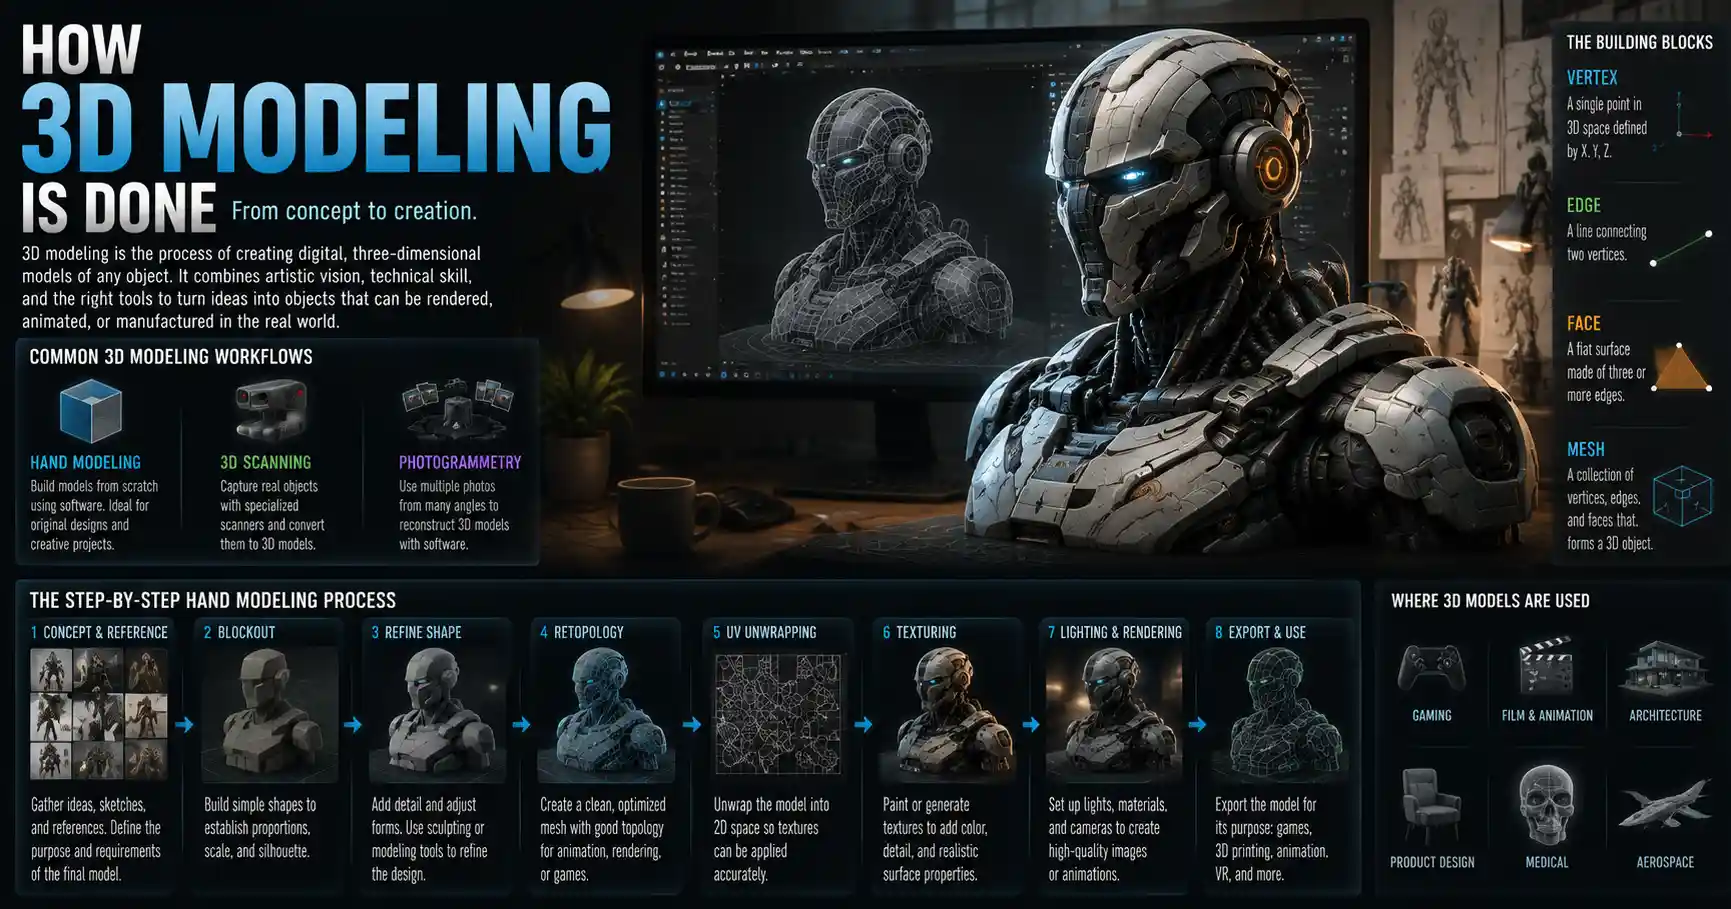
When you watch a modern animated film, design a custom 3D-printed phone case, or explore a virtual reality world, you’re interacting with 3D models. These digital representations of physical objects are the backbone of industries from video games and architecture to medical imaging and aerospace engineering. But how exactly do artists and engineers turn a blank digital canvas into a detailed, functional 3D object? The process combines creative intuition, technical skill, and specialized tools, with multiple pathways to suit different project goals. Whether you’re a beginner curious about starting 3D modeling or just want to understand the technology behind your favorite media, this guide breaks down the entire workflow from concept to finished model.
Common 3D Modeling Workflows: An Overview
Not all 3D models are created equal. The method an artist or engineer uses depends on what the model will be used for, how much detail it needs, and what tools the creator has access to. Broadly, 3D modeling workflows fall into three main categories: hand modeling (also called polygonal modeling), 3D scanning, and photogrammetry. Each has distinct advantages and use cases.
Hand Modeling: The Traditional Creative Approach
Hand modeling is the process of building a 3D model from scratch, vertex by vertex, polygon by polygon, using specialized software. This is the most common approach for creative projects like video game assets, character animation, and product design, where the creator has full control over every aspect of the model. Hand modeling lets artists refine shapes and add custom details that would be hard to capture with scanning methods, making it ideal for original designs that don’t exist in the physical world.
3D Scanning: Digitizing Existing Objects
For models that replicate real-world objects, 3D scanning is often faster and more accurate than building from scratch. This process uses specialized hardware to capture the shape, size, and surface details of a physical object, then converts that data into a digital 3D model. 3D scanning is widely used in industries like archaeology (to digitize fragile artifacts), automotive design (to reverse engineer existing parts), and film (to create digital doubles of actors).
Photogrammetry: 3D Models from Photos
Photogrammetry is a more accessible alternative to dedicated 3D scanning that uses hundreds or thousands of ordinary photos to generate a 3D model. By taking overlapping photos of an object from every possible angle, specialized software can match common features across the images and calculate the object’s 3D shape. This method is popular for capturing large objects like buildings, landscapes, or historical sites, since it only requires a standard digital camera rather than expensive scanning hardware.
The Step-by-Step Hand Modeling Process
Hand modeling remains the most flexible and widely taught 3D modeling method, so let’s break down the full workflow from initial concept to a finished, ready-to-use model. Every artist has their own workflow, but most follow these core steps to build a clean, functional 3D model.
- Concept and Reference Gathering
No successful 3D model starts with opening the software. Before creating any geometry, artists spend time gathering references and outlining what the final model needs to do. For a character model, this might include concept art, photos of people with similar body types, and reference images of clothing or accessories. For an architectural model, it would include blueprints, site photos, and material specifications. For product design, it includes engineering sketches and measurements of existing parts. This step avoids wasted time later: having clear references ensures the final model matches the intended design and meets any functional requirements.
- Blocking Out Base Geometry
The first step in the software is creating a blockout: a simple, low-detail version of the model that establishes its overall shape, proportions, and scale. Blockouts are usually made from basic primitive shapes like cubes, spheres, cylinders, and planes, which artists push, pull, and combine to match the reference. For example, to block out a character model, an artist might start with a large cube for the torso, a smaller sphere for the head, and four elongated cylinders for the arms and legs. This step lets artists adjust proportions quickly before adding any fine detail, which is much harder to change later.
At this stage, artists also focus on creating clean topology—the arrangement of vertices, edges, and faces that make up the 3D mesh. Good topology ensures the model deforms correctly (critical for animated characters) and is easy to edit later. Bad topology, with messy overlapping faces or irregular polygons, can cause problems when 3D printing, rendering, or animating.
- Refining Shape and Adding Detail
Once the blockout is approved, artists move on to refining the base shape and adding larger details. This might involve sculpting organic curves for a character’s face, adding panel lines to a spaceship model, or cutting out window openings in an architectural model. For organic shapes like characters or creatures, many artists use sculpting tools that work like digital clay: you can push, pull, pinch, and smooth the surface to create natural, flowing shapes. For hard-surface models like cars or furniture, artists use precise modeling tools to create sharp edges and clean geometric shapes.
- Retopology (If Needed)
If an artist uses digital sculpting to add high detail, they’ll often end up with a mesh that has millions of polygons—way too many for most uses like video games or 3D printing. That’s where retopology comes in. Retopology is the process of creating a new, clean low-poly mesh that fits over the high-detail sculpt. The new mesh has far fewer polygons, making it easy to work with, while still retaining the overall shape of the original sculpt. This step is essential for animated game characters, where performance (how quickly the model loads and moves in-game) is critical.
- UV Unwrapping
To add color, texture, and surface detail to a 3D model, artists need to create a 2D texture map that wraps around the 3D geometry. UV unwrapping is the process of flattening the 3D mesh into a 2D space, like peeling an orange and flattening the peel. Each point on the 3D mesh is assigned a coordinate (called a UV) on the 2D texture map, so the software knows how to apply the texture correctly. Good UV unwrapping avoids stretching or overlapping, which would cause textures to look distorted on the final model.
- Texturing and Shading
Texturing is where the model really comes to life. This step adds color, surface detail, and material properties to the model. For example, a wooden table model will get a brown wood grain texture and a slightly rough, matte shading, while a glass bottle will get a clear, reflective shading with subtle surface imperfections. Modern texturing workflows often use multiple maps to control different properties: base color maps for color, roughness maps for how shiny or dull the surface is, normal maps for fine surface detail like scratches or bumps, and ambient occlusion to add subtle shadow in crevices.
3D Scanning and Photogrammetry: Capturing the Real World
For projects that require an exact digital copy of an existing physical object, hand modeling is time-consuming and often less accurate than scanning-based methods. Both 3D scanning and photogrammetry capture real-world geometry, but they use different tools and processes to get there.
How 3D Scanning Works
Professional 3D scanners use one of several technologies to capture an object’s shape. The most common types are laser scanning and structured light scanning. Laser scanners emit a laser beam that moves across the object’s surface, measuring the distance to the object from the scanner at every point. Structured light scanners project a pattern of light onto the object, then use cameras to capture how the pattern distorts across the surface, calculating 3D shape from that distortion.
The basic workflow for 3D scanning is consistent across technologies:
- Prepare the object: Dark or reflective objects can confuse scanners, so creators often spray them with a temporary matte coating to improve accuracy.
- Scan from multiple angles: Most scanners can only capture one side of an object at a time, so you need to rotate the object or move the scanner around it to capture every surface.
- Align scans: Software aligns all the individual scans into a single 3D point cloud, which is a collection of data points representing the object’s surface.
- Convert to mesh: The point cloud is converted into a usable polygonal 3D mesh.
- Clean up: Artists remove noise (erroneous data points from reflections or background objects), fill in any holes where the scanner missed surface detail, and simplify the mesh if needed for its end use.
High-end professional 3D scanners can capture detail as small as a fraction of a millimeter, making them ideal for industrial design, quality control, and medical applications like creating custom prosthetics. However, the hardware can cost tens of thousands of dollars, putting it out of reach for many hobbyists and small creators.
How Photogrammetry Works
Photogrammetry brings 3D capture to creators with just a standard DSLR or even a smartphone camera. The core idea is simple: if you have multiple photos of the same object taken from different angles, software can identify the same feature in each photo and use trigonometry to calculate where that feature is in 3D space. The more overlapping photos you have, the more accurate the final model will be.
"Photogrammetry democratizes 3D modeling. Suddenly you don’t need a six-figure scanner to capture a 200-year-old cathedral or a rare fossil for digital preservation. All you need is a camera and patience."
A typical photogrammetry workflow looks like this:
- Plan your shots: For a small object, you can place it on a turntable and rotate it 5-10 degrees between shots, getting 36-72 photos all the way around. For large objects like buildings, you walk around the object, taking overlapping photos every few steps, making sure every surface is captured in at least two to three photos.
- Import photos into software: Programs like Agisoft Metashape, RealityCapture, or even free tools like Meshroom process the images automatically.
- Align photos: The software identifies common features across all images and calculates the camera position for each shot.
- Generate point cloud and mesh: Like 3D scanning, the software turns the feature data into a point cloud, then converts that into a 3D mesh.
- Generate texture: One of the biggest advantages of photogrammetry is that it automatically pulls color data from the original photos to create a high-resolution texture map for the model, so you get a fully textured model with no extra work.
- Clean up: Artists remove background geometry, fill holes, and simplify the mesh to reduce file size.
Photogrammetry isn’t perfect: it can struggle with shiny, transparent, or very small objects, and it can produce very large file sizes with millions of polygons. But for capturing large outdoor scenes, historical sites, or organic objects like plants or people, it’s unmatched in accessibility and accuracy.
Key Tools and Software for Every Budget
Whether you’re a hobbyist just starting out or a professional working on a big-budget film, there’s a 3D modeling tool that fits your needs and budget. The right tool depends on what kind of modeling you plan to do:
Free and Open-Source Options for Beginners
You don’t need to spend thousands of dollars on software to start making 3D models. There are several high-quality free options that rival paid software for many use cases:
- Blender: Blender is the gold standard for free 3D modeling, with a full set of tools for polygonal modeling, digital sculpting, UV unwrapping, texturing, rendering, and even animation. It’s used by everyone from hobbyists to professional studios, with a huge global community that creates free tutorials and add-ons. It supports both hand modeling and photogrammetry import, making it a great all-around choice for new creators.
- Meshroom: A free, open-source photogrammetry tool that lets you generate 3D models from photos without any subscription fees.
- SketchUp Free: A browser-based tool that’s ideal for beginners learning basic 3D modeling, especially for architectural or product design projects.
Professional Industry-Standard Software
For professional work in film, games, and engineering, most studios use paid software with advanced features and support:
- Autodesk Maya: The industry standard for character modeling and animation in film and games, with advanced tools for topology and deformation.
- ZBrush: The go-to tool for digital sculpting, used for everything from high-detail character models to production-ready 3D prints. It lets artists sculpt incredibly fine detail with a natural, clay-like workflow.
- Autodesk 3ds Max: Popular for hard-surface modeling, architectural visualization, and game asset creation.
- SolidWorks: The leading tool for engineering and industrial 3D modeling, designed for creating precision models that are ready for manufacturing or 3D printing.
- Substance Painter: The industry standard for texturing 3D models, with a node-based workflow that makes it easy to create complex, realistic materials.
Hardware Requirements
3D modeling is demanding on your computer, especially when working with high-poly models. For most hand modeling and 3D printing work, a modern mid-range desktop or laptop with a dedicated graphics card (at least 4GB of VRAM) and 16GB of RAM will work fine. For high-poly sculpting, photogrammetry, or rendering, you’ll want 32GB of RAM or more and a high-end graphics card with 8GB+ of VRAM to avoid slowdowns. For 3D scanning, you’ll need additional hardware ranging from affordable consumer handheld scanners (starting around $500) to professional industrial scanners that cost $50,000 or more.
Common Use Cases and Final Preparation
Once a 3D model is complete, it needs to be prepared for its specific end use, since different applications have different requirements. Let’s look at the most common use cases and what final steps are needed:
Video Games and Animation
For game assets and animated characters, performance is key. Game engines can only handle a limited number of polygons per frame, so models need to be optimized to keep frame rates high. This usually means reducing polygon count, baking high-detail details into normal maps (which add fine detail without increasing polygon count), and testing the model in the game engine to make sure it deforms correctly when animated. For animated characters, artists also add a rig—a digital skeleton that lets animators pose and move the model.
3D Printing and Manufacturing
3D models for 3D printing need to be watertight, meaning there are no holes in the mesh and all faces are oriented correctly. Any gaps or errors will cause the 3D printer to fail or produce a flawed part. Final preparation for 3D printing includes checking for errors in software like Meshmixer, scaling the model to the correct physical size, and orienting it correctly for printing. For industrial manufacturing, models also need to include precise tolerances and annotations for machinists, which are added in CAD software.
Architectural Visualization and Film
For still renders or high-end film animation, polygon count is less of a concern than detail and realism. Artists will add high-resolution textures, subtle surface imperfections, and lighting setups to create photorealistic renders. For architectural visualization, models often include interior details, furniture, and landscaping to create a realistic preview of a building before it’s constructed.
Conclusion
3D modeling is a versatile skill that blends creativity and technical problem-solving, with pathways for every interest and budget. Whether you’re building an original fantasy character from scratch with hand modeling, digitizing a historical artifact with 3D scanning, or capturing a mountain landscape with photogrammetry, the core goal is the same: turning an idea or a physical object into a flexible, reusable digital asset. As technology improves, 3D modeling is becoming more accessible than ever: free software like Blender and smartphone-compatible photogrammetry let anyone learn the basics without a huge investment, while professional tools continue to push the boundaries of what’s possible in film, engineering, medicine, and design. At its core, 3D modeling is just another way to turn ideas into something tangible—whether that tangible result lives on a screen or gets 3D printed into a physical object you can hold.