
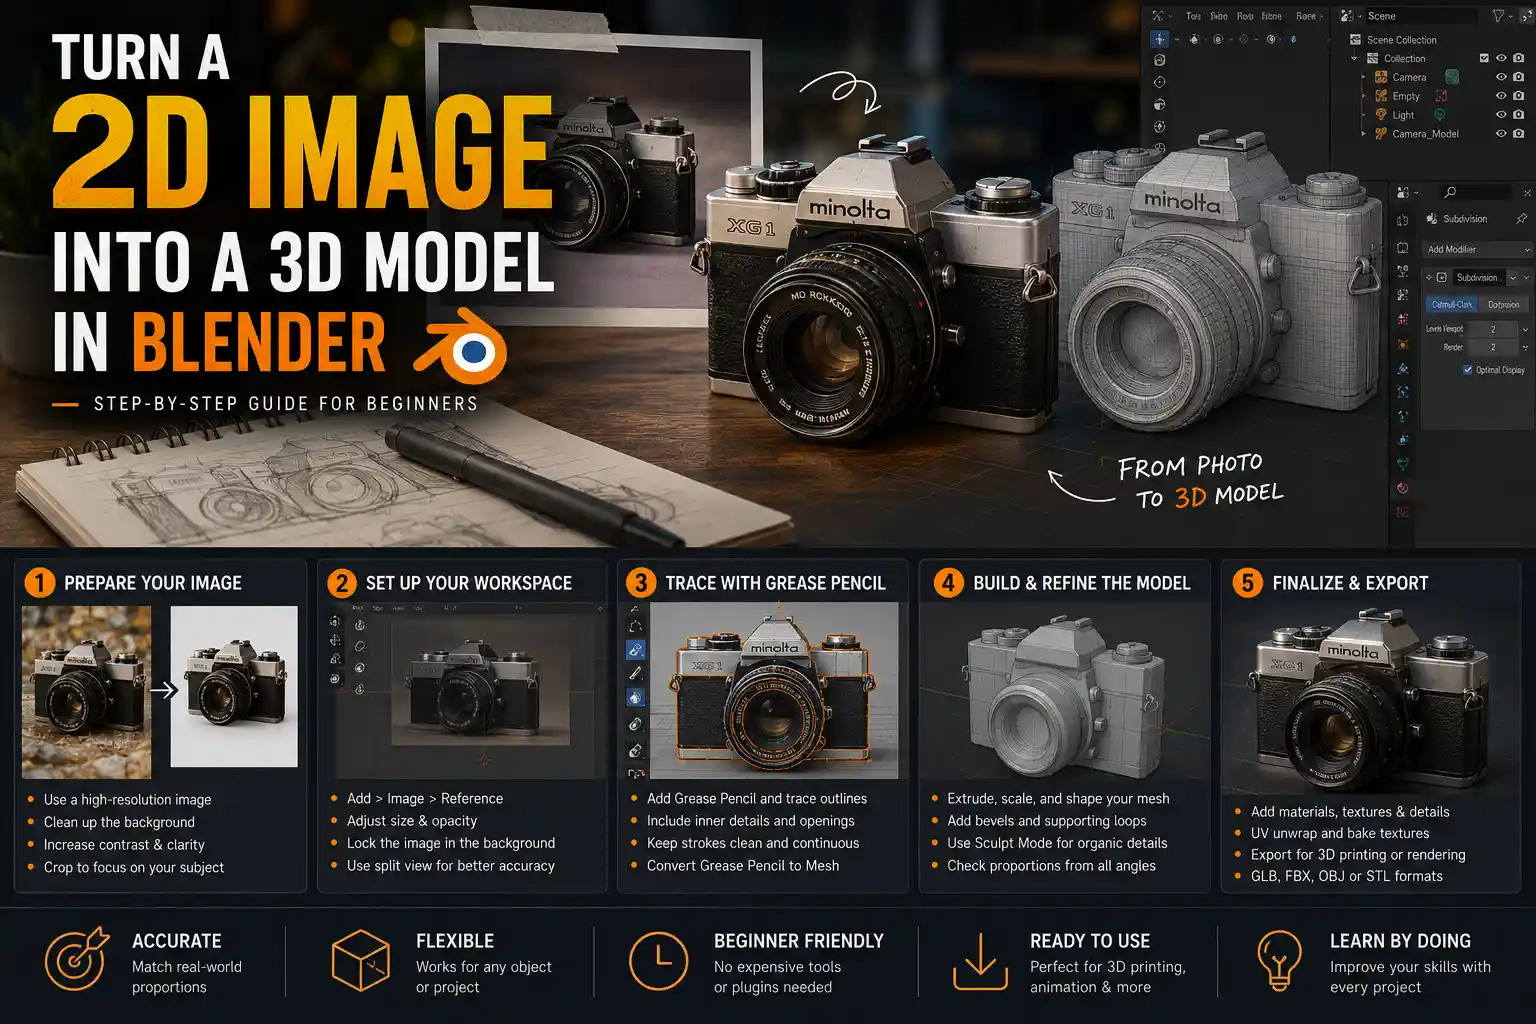
Turning a single 2D image into a fully realized 3D model sounds like a trick reserved for professional VFX artists or industrial designers, but Blender’s free, open-source toolset makes this process accessible to anyone with a computer and a bit of patience. Whether you want to turn a photo of your grandmother’s vintage teacup into a 3D printable replica, build a background prop for a short film from a reference shot, or just experiment with photogrammetry-adjacent workflows, you don’t need a dozen expensive plugins or a fancy 3D scanner to get started. This step-by-step guide walks you through every stage of the process, from preparing your source image to refining the final model for 3D printing, animation, or rendering.
Prepping Your Workspace and Source Image
Before you open Blender, the most important work you’ll do happens with your source image. Not all photos are created equal, and a poorly composed shot will lead to a messy, inaccurate 3D model no matter how skilled you are at modeling. The best images for single-image 3D modeling have clear, distinct edges, good lighting that avoids harsh shadows or overexposure, and a well-defined subject against a simple background. If you’re working from a photo you took yourself, avoid shooting into direct sunlight, and position your subject so that its main contours are easy to trace. If you’re using a stock image, make sure you have permission to use it for your project, and opt for high-resolution files (at least 1920 pixels on the longest edge) to capture fine detail.
Clean up your image before importing to Blender
Even the best photo needs a little touch-up before you use it as a reference. You can use free tools like GIMP, Photopea, or even Blender’s own image editor to remove unwanted background clutter, adjust contrast to make edges clearer, and crop the image to focus only on your subject. For example, if you’re turning a photo of a wooden chair into a 3D model, cropping out the grass and patio furniture in the background eliminates extra lines that will confuse you when you start tracing. If your subject has a lot of fine texture, you can also slightly blur the background to make the outer edges of the subject pop more.
Set up your Blender reference scene
Once your image is ready, open Blender and clear the default starting scene by pressing A to select all objects, then X to delete them. Next, import your image as a background reference: go to the Add menu, hover over Image, and select Reference. A pop-up will let you select your cleaned-up image from your computer. Once it’s imported, you can resize and position it to fit your viewport by clicking and dragging the corners, or adjust its opacity in the Object Data Properties panel if you want it to be less distracting while you work. For more precise alignment, lock the reference image to the background so you don’t accidentally select it while you’re modeling: right-click the image in the Outliner panel and select Lock Object.
For more accuracy, especially if you’re working on a symmetrical object like a bottle or a chair, you can split your Blender viewport into two panels: one showing the reference image as a background, and another showing a 3D view of your model as it develops. Just hover your mouse over the corner of the viewport, click and drag the split handle to create a second window, then set one window to Background view to keep your reference pinned in place. This helps you avoid distorting the proportions of your model as you build.
Choosing the Right Modeling Workflow for Your Project
There are two common approaches to creating a 3D model from a single image in Blender, and the right one for you depends on the type of object you’re working with and your end goal. Neither is inherently better—what matters is matching the workflow to your project to save time and get a clean result.
1. Tracing workflow for organic or freeform objects
Tracing is the most common method for beginners, and it works well for objects that are mostly flat or that you plan to sculpt into shape after laying out the basic outline. For this workflow, you’ll use Blender’s Grease Pencil tool to trace the outer and inner edges of your subject directly over the reference image, then convert those 2D strokes into a 3D mesh.
To start, add a new Grease Pencil object by going to Add > Grease Pencil > Blank. In the Stroke tab of the Grease Pencil properties, set your brush size to a thin, consistent width that makes it easy to follow the edges of your reference. Zoom in on your subject, and slowly trace the outer contour first, then add any inner lines that define openings, handles, or detailed features like carvings or buttons. Once you’ve traced all the key lines, you can convert your Grease Pencil strokes to a mesh: select the Grease Pencil object, go to Object > Convert > Mesh. This turns your 2D outline into a 3D shape that you can extrude, sculpt, and refine.
2. Photogrammetry-assisted workflow for realistic 3D objects
If you want a more accurate model that matches the real dimensions and texture of your subject, you can use Blender’s built-in Meshroom integration or the free COLMAP add-on to generate a 3D point cloud from your image, even with just one photo. This workflow works best for objects that have a lot of visible texture, because the software uses matching texture points to estimate depth. While a single image won’t give you the same level of detail as a full photogrammetry scan with 20+ photos, it’s still enough to get a solid base mesh that you can refine.
“Single-image 3D reconstruction is never going to be perfect, because you’re missing half the depth information. But you don’t need perfect to get a usable model—what matters is using the reference to get the proportions right, then filling in the missing details yourself.”
To use this workflow, install the free Photogrammetry Importer add-on from Blender’s official add-on repository, then import your image and run the depth estimation tool. The tool will generate a rough depth map that estimates how far different parts of the image are from the camera, then turn that depth map into a 3D mesh. The result will be messy, but it gives you a great starting point that’s already proportional to your reference image, which saves you the work of tracing every edge by hand.
Here’s a quick breakdown of which workflow to choose for common projects:
- Tracing workflow: Best for logos, 2D art, flat objects like signs, product designs with simple shapes, and stylized models for animation. It gives you full control over the final shape and is very beginner-friendly.
- Depth estimation/photogrammetry workflow: Best for realistic organic objects like sculptures, natural rock formations, furniture, and existing physical objects you want to replicate. It gives you a more accurate base mesh faster than tracing for complex shapes.
Building and Refining Your Base Mesh
No matter which workflow you used to get your starting shape, you’ll need to refine it into a clean, usable 3D model. This step is where most beginners get stuck, so we’ll break it down into simple, actionable steps that work for any model.
Adjust proportions and fix distortions
The first thing to do after getting your starting mesh is align it to your reference image to fix any proportion issues. Turn on x-ray transparency in your viewport (the little checkbox at the top right of the 3D view) so you can see your model over the reference image. Use the Edit Mode tool to grab individual vertices and move them to match the edges of your reference. For symmetrical objects, enable Blender’s Symmetry modifier so you only have to edit one half of the model, and Blender will automatically mirror your changes to the other half. This cuts your work time in half and ensures your model is perfectly symmetrical if that’s what you need.
Add depth to your 2D outline
If you used the tracing workflow, your starting shape is probably a flat 2D outline. To turn it into a 3D object, you’ll extrude the outline to add depth. In Edit Mode, select all the faces of your flat outline, then press E to extrude. Pull the extrusion out to match the estimated depth of your object. How do you know how much depth to add? If you know the actual dimensions of the object (for example, you know your teacup is 8cm tall and 10cm wide), you can use Blender’s measurement tool to set the proportions correctly. If you don’t have exact measurements, use visual cues from the image: for a chair, the depth of the seat is usually roughly the same as the height of the back legs, so you can use that as a starting point.
For curved objects like mugs, bottles, or vases, you can use the Spin tool instead of manual extrusion to get a perfectly smooth shape. Just trace half the outline of the object along its central axis, select the vertices, then go to Edit > Spin to rotate the outline 360 degrees and create a solid, symmetrical 3D shape. This is a huge time-saver for any round object.
Clean up your mesh for further editing
A messy mesh with overlapping vertices, extra faces, and non-manifold edges will cause problems later when you want to sculpt, texture, or 3D print your model. Follow these steps to clean up your base mesh quickly:
- In Edit Mode, select all vertices, then press M and select Merge by Distance to remove any overlapping duplicate vertices. Blender will automatically delete extra vertices that are in the same spot, which cleans up most small errors.
- Use the Limited Dissolve tool to remove extra edges on flat surfaces. This simplifies your mesh so it’s easier to work with, without changing the overall shape.
- Check for non-manifold edges by going to Select > Select All by Trait > Non Manifold. Blender will highlight any edges that don’t have proper connections, which you can then fix by moving or deleting the problematic vertices. Non-manifold geometry is the most common cause of errors when 3D printing, so this step is non-negotiable if you plan to print your model.
Sculpt fine details
Once you have a clean base mesh, switch to Blender’s Sculpt Mode to add fine details that match your reference image. If your source image is a photo of a hand-carved wooden bowl, for example, you can use the Clay Strips brush to add subtle carving marks, or the Crease brush to add grooves for the rim. You can even use a texture from your source image as a sculpting alpha to add realistic texture to your model: just import your source image as a texture, set it as your brush alpha, and stamp the texture directly onto your model. This gives you a much more realistic result than sculpting every detail by hand.
Adding Textures and Materials to Match Your Reference
One of the biggest advantages of creating a 3D model from a photo is that you can pull texture and color information directly from your source image to make your model look identical to the original. This step is what turns a generic gray mesh into a realistic object that matches your reference.
Unwrap your model for texturing
Before you can add a texture, you need to unwrap your 3D model to create a 2D UV map that tells Blender how to wrap the 2D image around your 3D mesh. For simple objects, you can use Blender’s automatic UV unwrap: go to UV Editing workbench, select all faces in Edit Mode, then click UV > Unwrap. Blender will generate a UV map automatically. For more complex objects, you can add seams to control how the UV map is cut, just like cutting a pattern out of fabric to wrap around a 3D shape. Mark seams along the edges of hidden parts of your model (like the bottom of a mug or the inside of a chair leg) so the seams won’t be visible in your final render.
Extract color and texture from your source image
Once your UV map is done, you can use your source image directly as a texture. In the Shader Editor, create a new Image Texture node, load your source image, and connect the color output to the Base Color input of your Principled BSDF shader. If your model is aligned correctly to the reference, the texture will automatically line up with the shape of your model, so the color and texture from the photo match the contours of your 3D model. For objects that you viewed from a single angle, you may need to touch up the texture on the sides and back that aren’t visible in the source image. You can use Blender’s texture painting tools to clone texture from the visible side to the hidden sides, or use a free PBR texture from a site like Poly Haven to match the material (for example, a wood texture for a wooden chair that matches the color from your photo).
Adjust materials for realism
After adding the base color texture, adjust the material settings to match the original object’s properties. If your object is metallic, increase the Metallic slider in the Principled BSDF shader to around 0.8-0.9. If it’s glass, lower the Roughness to near 0 and increase the Transmission slider. For a rough ceramic mug, keep the Roughness around 0.3-0.5. If you want to add extra detail like bumps or scratches, you can use the same source image to generate a normal map: use Blender’s Generate Normal Map tool to convert the color texture into a normal map that adds fine surface detail without adding extra geometry to your model. This makes your model look more realistic without slowing down your render or 3D print.
Exporting and Using Your Finished Model
Once your model is complete, you need to export it in the right format for whatever you plan to use it for. Different uses require different file settings, so we’ve broken down the most common use cases:
3D printing
If you plan to 3D print your model, you need to export it as an STL or OBJ file. Before exporting, double-check that your model is a closed, solid mesh with no holes or non-manifold geometry. You can use Blender’s built-in 3D Print Toolbox add-on to scan your model for errors: enable the add-on in the preferences, then open the 3D Print Toolbox panel and click Check All. It will highlight any holes, disconnected faces, or other errors that will cause your 3D printer to fail. Fix all the errors, then export your model as STL (the most common format for 3D printing) with the Selection Only checkbox checked if you only want to export your model, not the reference image or any other objects in the scene.
Rendering and animation
If you’re using your model in an animation or for a final render, export it as FBX or GLB if you’re bringing it into another software like Blender, Maya, or Unreal Engine. These formats preserve your rigging, materials, and textures, so you don’t have to reimport them manually. If you’re keeping the model in your current Blender project, you can just pack the textures into the Blender file by going to File > External Data > Pack Resources to make sure all your texture files are saved with the model, so you don’t lose them if you move the file to another computer.
3D modeling for 3D printing
If you’re sharing your model online or 3D printing it at a service, you can also export it as a GLB file to share a preview of the model that anyone can view in a web browser, without needing Blender installed. This is great for sharing your work on portfolio sites or getting feedback from clients before 3D printing.
Common mistakes to avoid at this stage include exporting the model at the wrong scale, forgetting to pack textures, and not checking for errors before exporting. Always do a quick test import of your exported file into a new Blender scene to make sure everything looks right before you send it to a 3D printer or use it in a project. This takes 30 seconds and can save you hours of frustration later.
Conclusion
Creating a 3D model from a single image in Blender is a skill that gets easier with practice, and you don’t need any expensive equipment to get great results. The key is starting with a clean, high-quality reference image, choosing the right workflow for your project (tracing for simple stylized objects, depth estimation for complex realistic ones), and taking the time to clean up your mesh before adding textures and exporting. Even if your first model isn’t perfect, you’ll learn a lot about Blender’s tools and how to translate 2D information into 3D space with each attempt. Whether you’re replicating a family heirloom, building a prop for a game, or just experimenting with 3D art, this process opens up a whole new world of creative possibilities that’s accessible to anyone willing to put in the time.