
An A-frame house 3D model is useful when a scene needs a strong architectural silhouette without becoming visually complicated. The steep triangular roof, compact footprint, exposed structure, and cozy cabin feeling make this house type popular in forest retreats, mountain resorts, vacation rentals, tiny house concepts, and stylized environment scenes.
For 3D artists, architects, interior designers, and visualization teams, the challenge is not only finding a good-looking A-frame model. The model also needs correct scale, clean geometry, usable materials, and enough detail to hold up in the final render. A beautiful thumbnail can quickly become a problem if the roof thickness is unrealistic, the windows are flat, the UVs are messy, or the interior does not match the exterior.
This guide explains how to evaluate, use, and improve an A-frame house 3D model for architectural visualization and design scenes.
What Makes an A-Frame House Model Different?
An A-frame house is defined by its steep roof structure, usually forming a triangular profile from the roof ridge down to the foundation. In 3D, this shape creates several modeling and rendering considerations.
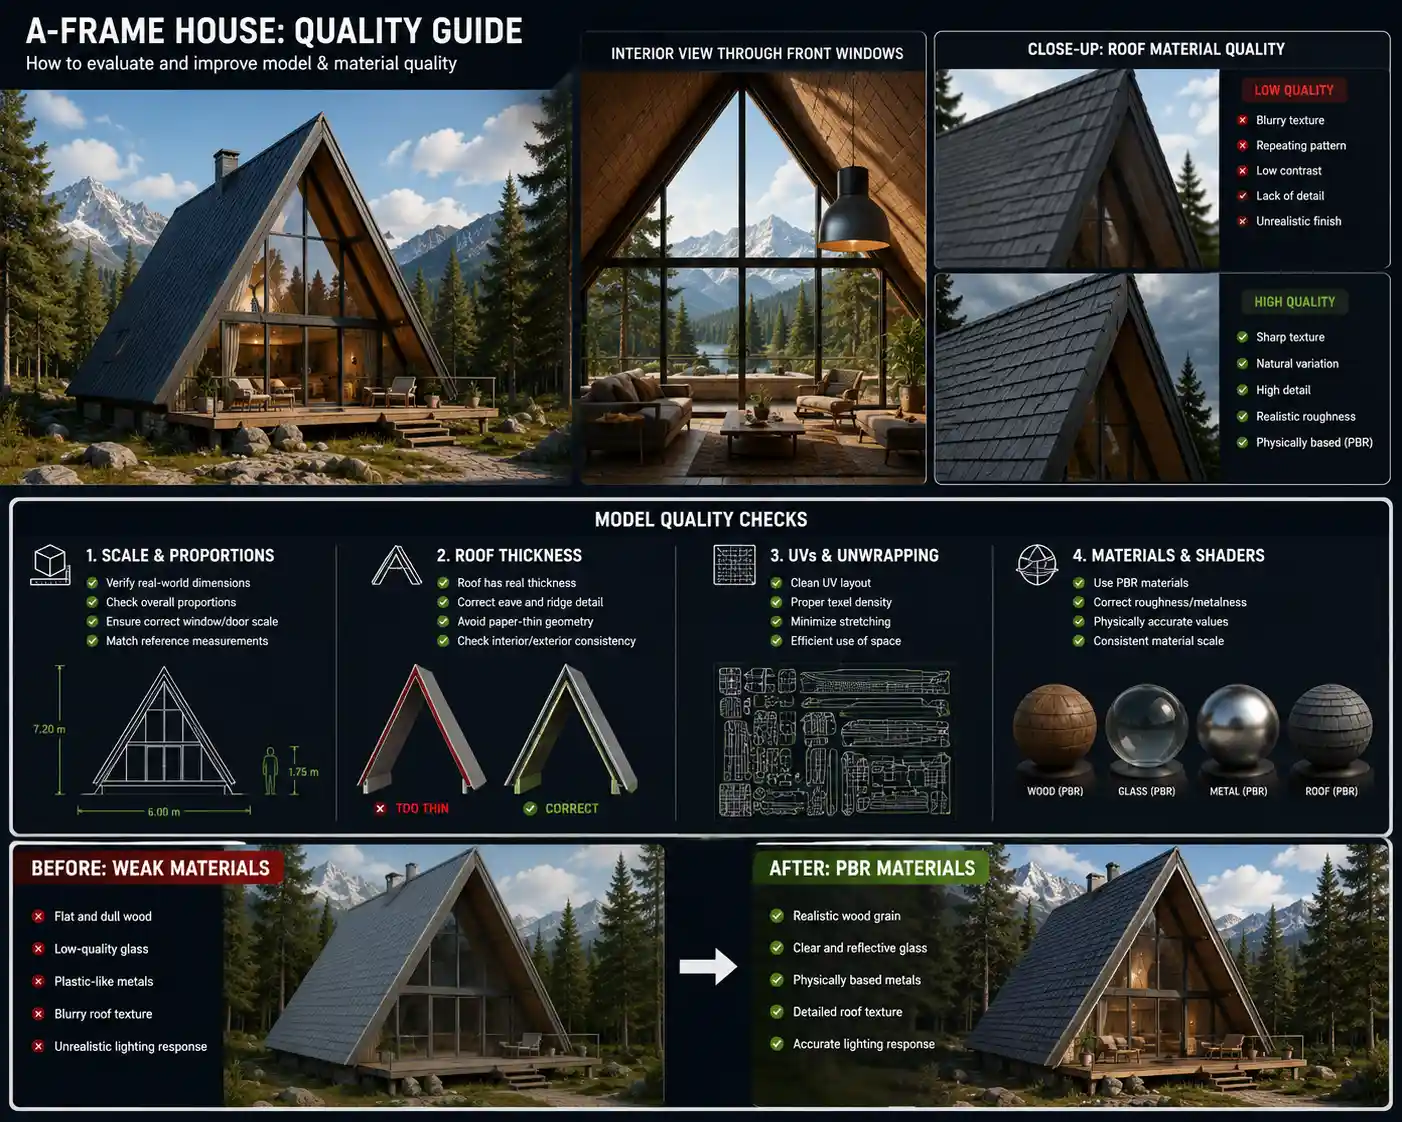
The roof is the main visual feature. It often covers most of the building mass, so roof material quality matters more than it would on many standard house models. Wood shingles, metal panels, dark asphalt, standing seam roofing, or weathered timber can all change the mood of the scene.
The front facade is also important. Large triangular windows are common in A-frame architecture, especially in vacation cabin designs. If the glass is poorly modeled or lacks believable reflections, the whole model can feel flat.
Interior visibility is another key point. Many A-frame renders show the house at dusk or in a natural landscape, with warm light coming from inside. That means the model should ideally include enough interior detail, or at least a believable visible room behind the glass.
Best Uses for an A-Frame House 3D Model
A-frame house models work especially well in:
- Mountain cabin visualization
- Forest retreat renders
- Lakeside house concepts
- Tiny house presentations
- Resort and glamping design scenes
- Real estate-style exterior visuals
- Interior design mood images
- Game or cinematic environment backgrounds
For architectural visualization, the model should be accurate enough to communicate structure, proportion, and material intent. For background use, a lighter model with optimized geometry may be enough. The right choice depends on how close the camera gets to the building.
How to Choose a High-Quality A-Frame House 3D Model
Start with the overall proportion. A good A-frame model should feel structurally believable. The roof pitch should be consistent, the ridge should align cleanly, and the side walls or end walls should not look stretched. If the house includes decks, stairs, beams, or railings, those elements should be scaled realistically.
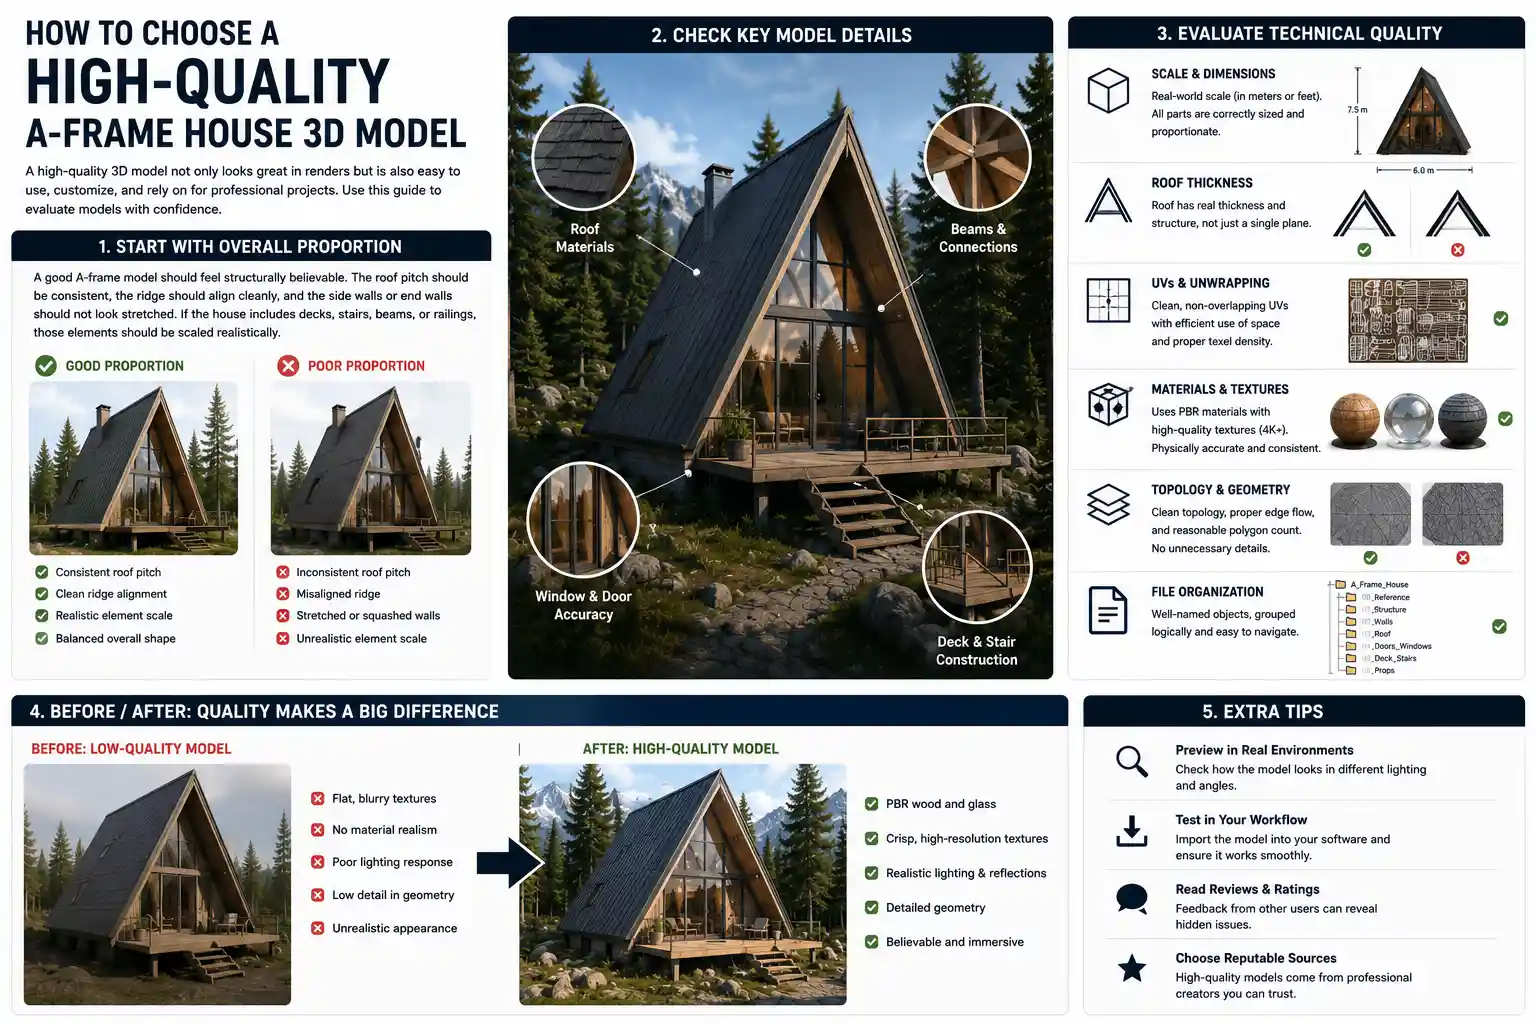
Next, inspect the geometry. Clean topology is especially important around the roof edges, window frames, doors, and structural beams. Avoid models with visibly broken surfaces, overlapping faces, or unnecessary dense geometry in simple flat areas. High polygon count is not always a sign of quality; it should support visible detail.
Materials are just as important as geometry. Since A-frame houses often rely on wood, glass, roofing, stone, and metal, the asset should include materials that respond well to lighting. PBR materials are ideal because they can provide believable roughness, normal, and reflection behavior in modern render engines.
If you plan to customize the house, check whether objects are separated logically. It is easier to edit a model when the roof, windows, doors, deck, walls, and furniture are separate elements. A single merged mesh can be difficult to modify.
File Format and Software Compatibility
Before downloading or using an A-frame house 3D model, check whether the file format fits your workflow. Common formats may include FBX, OBJ, BLEND, MAX, SKP, C4D, or other 3D exchange formats, depending on the source.
For Blender users, a native BLEND file can save setup time if materials and lighting are already configured. For 3ds Max or Cinema 4D workflows, native files may preserve material assignments more reliably. FBX and OBJ are useful exchange formats, but they may require material cleanup after import.
If the model is intended for real-time use in Unity or Unreal Engine, pay closer attention to polygon count, texture resolution, UV layout, and material complexity. A model built for offline rendering may be too heavy for a game engine without optimization.
Texture and Material Details to Check
The roof, wood siding, glass, and surrounding deck usually carry most of the visual weight in an A-frame render. Look for textures that have enough resolution for your camera distance. A 1K texture may be fine for a distant cabin, while close-up architectural renders may need higher-resolution materials.
Wood textures should not look obviously repeated. Seamless wood textures can help, but scale and direction matter. Roof boards, wall panels, beams, and deck planks should have grain direction that makes sense. If all wood surfaces use the same mapping, the model may look artificial.
Glass should have proper material settings rather than just a blue or gray transparent surface. Reflections, slight tint, and interior visibility can make a big difference. For night renders, interior light behind the glass can help the house feel occupied and warm.
Stone foundations, concrete bases, snow, leaves, or ground contact details can also improve realism. A house that appears to float above the terrain will break the scene even if the model itself is detailed.
Building a Strong Scene Around the Model
An A-frame house rarely looks best in isolation. Its character comes from the relationship between architecture and landscape. Place the model in an environment that supports its story: forest, hillside, lakeside, winter slope, desert retreat, or compact garden plot.
Scale the terrain and vegetation carefully. Oversized grass, tiny trees, or mismatched rocks can make the house feel wrong. Use reference images to judge the relationship between the building, doors, steps, railings, and surrounding objects.
Lighting should match the mood. A morning render can emphasize the roof shape and natural material texture. A dusk render can highlight interior warmth and glass reflections. A snowy scene can make the triangular roof more dramatic, but snow buildup should follow gravity and surface angles.
Relebook can be useful in this stage when you need supporting assets such as furniture 3D models, PBR wood materials, seamless textures, HDRI lighting, or architectural visualization models to complete the scene. The goal is not to overload the render, but to give the house believable context.
Common Mistakes to Avoid
One common mistake is using a model with no real thickness in the roof or walls. A-frame houses are simple in outline, so thin or paper-like construction is easy to notice.
Another issue is poor material scale. Wood grain that is too large, roof panels that repeat too visibly, or stone textures that do not match the building scale can make the render look unfinished.
Many artists also forget the interior. If the front facade has large windows, an empty dark box behind the glass will look strange. Even a simple interior setup with chairs, curtains, warm lighting, and wall materials can improve the final image.
Finally, avoid placing the house on perfectly flat ground unless the design calls for it. A-frame cabins often feel more natural when the terrain has slight variation, paths, vegetation, or a deck connection to the landscape.
A Simple Workflow for Rendering an A-Frame House
Import the model and check scale first. Compare the door height, stair rise, deck railing, and window size against real-world expectations.
Then clean the model if needed. Remove unused objects, rename major parts, fix flipped normals, and organize materials. After that, review texture paths and replace weak materials with better PBR textures where necessary.
Set up the environment before final lighting. Terrain, trees, stones, ground textures, and background elements should support the camera composition. Once the scene feels balanced, adjust lighting and render settings.
For the final pass, inspect the roof edges, window reflections, ground contact, and texture repetition. These areas often reveal whether the model is ready for a professional visualization image.
Conclusion
An A-frame house 3D model is more than a cabin-shaped asset. Its roof, glass facade, wood materials, and landscape context all need to work together. A strong model should be clean, correctly scaled, easy to customize, and supported by believable textures and lighting.
For architectural visualization, interior design, or environmental rendering, choose an A-frame model based on how it will be used in the final scene. Close-up renders need more detail, better materials, and interior support. Background cabins can be lighter, but they still need correct proportions and clean silhouettes.