
Whether you’re a prospective homeowner planning a renovation, an architecture student working on your first project, or a hobbyist who wants to visualize your dream cottage before breaking ground, building a 3D model of a house is more accessible than ever before. Gone are the days when detailed 3D house modeling required expensive professional software and years of technical training. Today, beginner-friendly tools, free open-source platforms, and step-by-step workflows let anyone create an accurate, scalable 3D model that matches their vision. This guide breaks down the entire process, from initial planning to exporting a finished model ready for construction or presentation.
Pre-Modeling Planning and Preparation
Before you open any 3D modeling software, you need a clear plan to avoid common mistakes like inaccurate dimensions, missing structural elements, or reworking half your model halfway through. Good planning saves hours of frustration and ensures your final model matches what you actually want to build.
Gather Your Reference Materials
Start by collecting all existing documentation for the house. If you’re modeling an existing home for a renovation, pull out original building blueprints, property surveys, and any recent inspection reports that note changes to the original structure. If you’re starting from scratch with a custom design, collect inspiration photos, floor plan sketches, and plot measurements from your building lot. You’ll also need to note key dimensions: lot size, ceiling heights, wall thickness, window and door sizes, and the location of structural elements like load-bearing beams or foundations.
For existing homes, taking your own measurements is critical. Original blueprints often don’t reflect modifications like added rooms, removed walls, or updated window installations. Grab a tape measure, laser measuring tool, and notebook to walk through the space and record every dimension. Don’t forget to measure ceiling heights, the depth of built-in shelves, and the position of permanent fixtures like fireplaces or plumbing stacks.
Define Your Modeling Goal
What do you need your 3D model for? Your goal will determine how detailed your model needs to be and what tools you should choose. A quick model to visualize a new kitchen layout doesn’t need the same level of detail as a model intended for construction bidding or 3D printing. Common goals include:
- General interior design visualization to test furniture layouts and paint colors
- Architectural presentation for clients or planning permit applications
- Construction documentation to share with contractors and builders
- 3D printing a physical scale model of the house for display or planning
- Real estate marketing to create virtual tours or high-quality renderings
For example, if you’re creating a model for a planning permit, you’ll need to include accurate setback distances from property lines, roof pitch, and exterior materials to meet local building department requirements. If you just want to see how a new sofa will fit in your living room, you can skip most of that detail and focus on interior dimensions and furniture placement.
Choose the Right 3D Modeling Tool
There are dozens of 3D modeling tools available, ranging from free mobile apps to professional enterprise software. The best tool for you depends on your budget, skill level, and modeling goal. Here are the most popular options:
- Beginner, budget-friendly: SketchUp Free, Floorplanner, Homestyler. These tools run in your browser, have intuitive drag-and-drop interfaces, and are perfect for quick interior or basic architectural models. SketchUp Free in particular is widely used by hobbyists and new designers for its simple learning curve and large library of pre-made 3D objects like doors, windows, and furniture.
- Intermediate, full-featured: SketchUp Pro, Revit LT, Blender. Blender is a free open-source option that supports advanced modeling, rendering, and even animation for virtual tours. SketchUp Pro adds professional features like layout tools and export options for construction documents.
- Professional, construction-grade: Autodesk Revit, AutoCAD Architecture, ArchiCAD. These tools are built for professional architects and include features like automated cost estimation, structural analysis, and BIM (Building Information Modeling) that tracks data about every element in the house, from material type to installation date.
For most beginners, SketchUp Free is the best starting point. It’s powerful enough to create a detailed full-house model, free to use, and has thousands of free tutorials online to help you learn the basics.
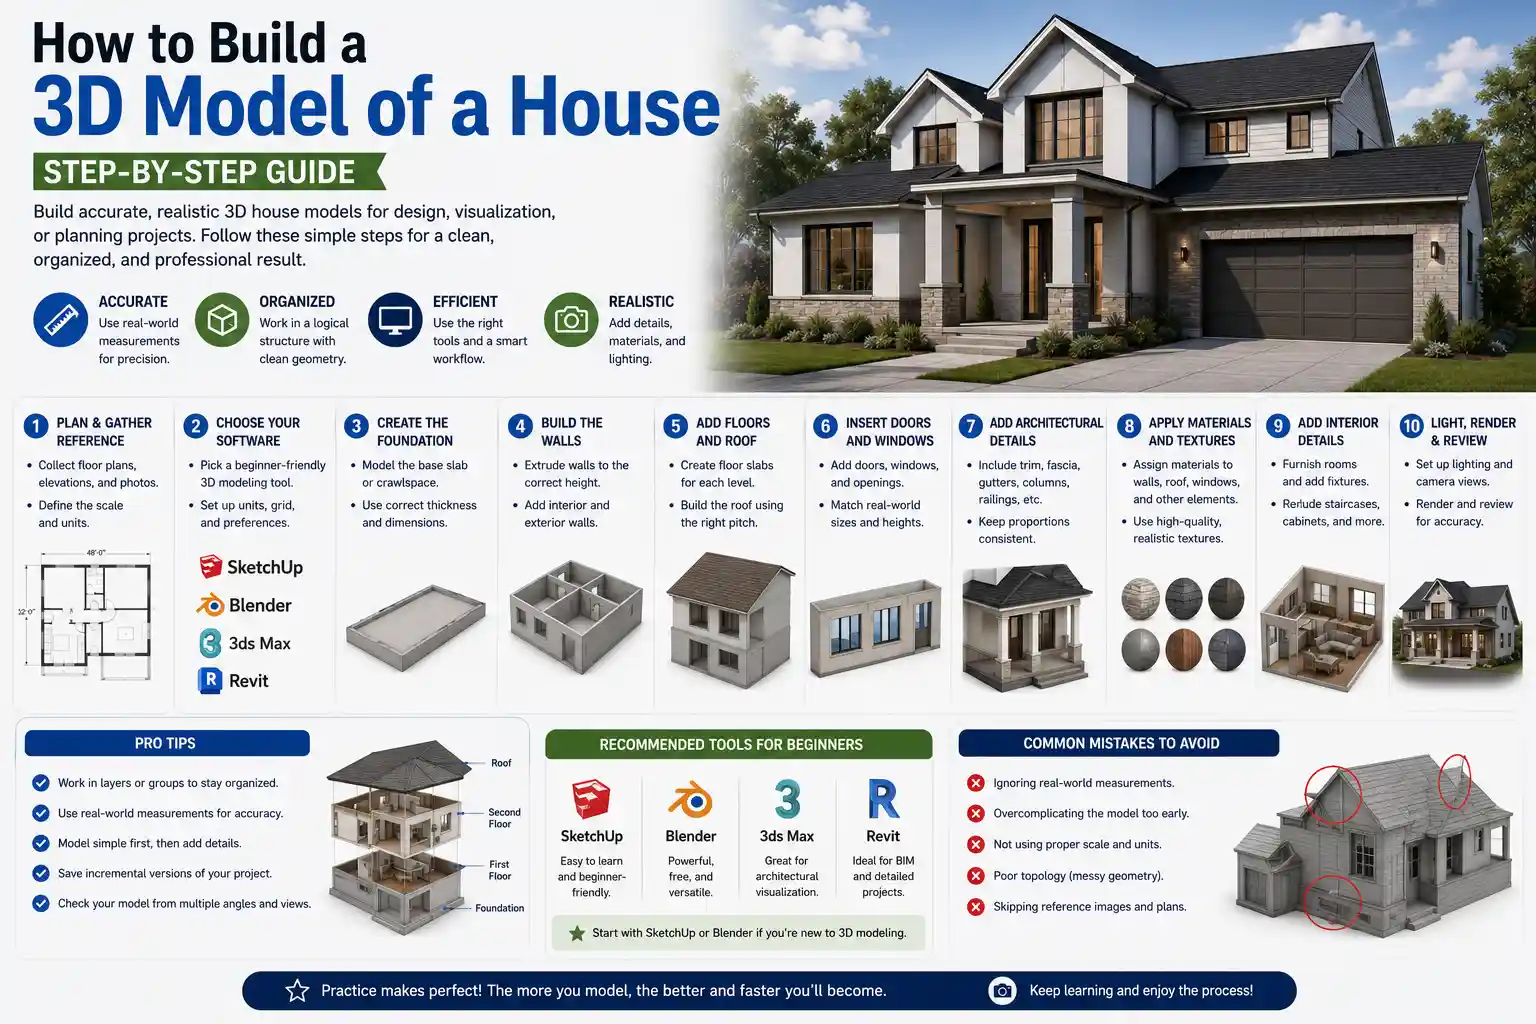
Building the Basic Structure: From Floor Plan to 3D Massing
Once your planning is complete, it’s time to start building the core structure of your model. Most 3D modeling workflows start with a 2D floor plan and build up from there, creating the “massing” of the house – the basic shape and volume before adding details. This step keeps your model organized and ensures structural accuracy from the start.
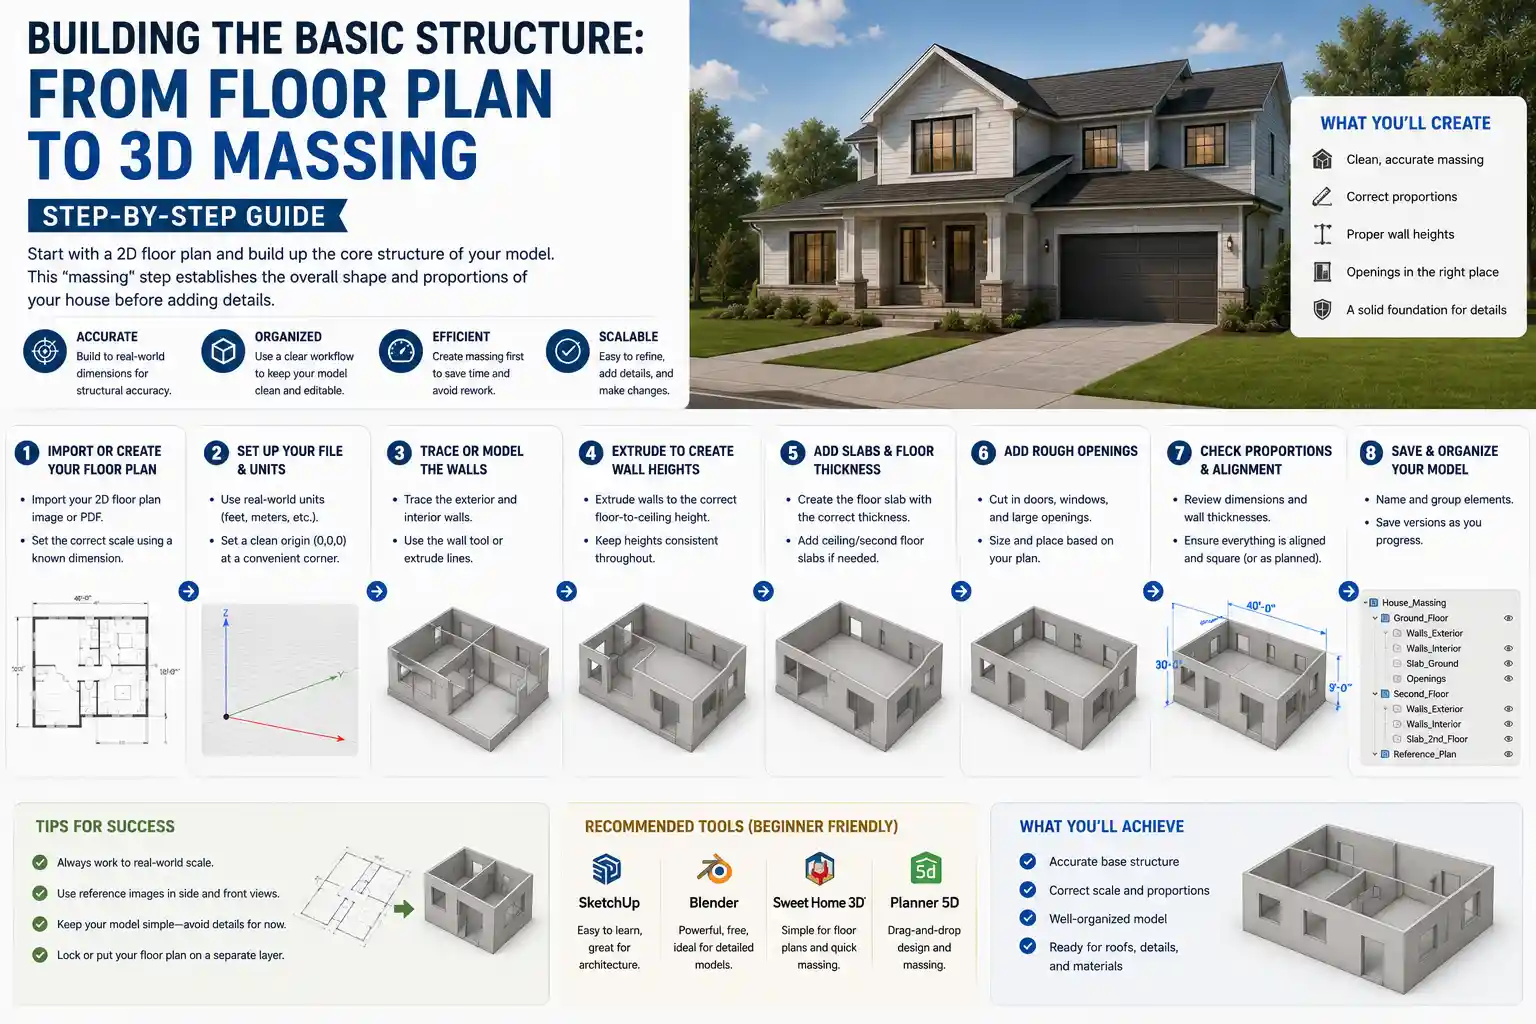
Import or Trace Your 2D Floor Plan
The easiest way to start is to import your scanned 2D floor plan or blueprint into your modeling software as an image reference. You can then trace over the image with the software’s line or wall tool to create your walls in 2D. This is much faster than drawing everything from scratch and helps you stick to your original dimensions.
If you don’t have an existing floor plan, start by drawing the outer perimeter of your house first using your recorded dimensions. For example, if your house is 60 feet long by 30 feet wide, draw a rectangle that matches those exact measurements. Then add interior walls to divide the space into rooms, matching the dimensions you took or designed. Make sure to account for wall thickness: a standard 2x4 exterior wall is 4.5 inches thick (including drywall), while interior walls are usually the same or slightly thinner. Skipping wall thickness can lead to rooms that are 4-9 inches too small, which adds up over the whole house.
Accuracy in the base model is everything. A single wrong measurement at the floor plan stage will throw off every window, door, and roof that you add later. Always double-check your dimensions before you extrude your 2D plan into 3D.
Extrude to Create 3D Walls
Once your 2D floor plan is complete and all dimensions are checked, it’s time to turn your 2D lines into 3D walls. In most software, this is done with an extrude or push/pull tool: you select the face of your wall or the entire floor plan and pull it upward to match your ceiling height. For example, a standard 8-foot ceiling means you’ll pull your walls up to 96 inches (or 8 feet) to create the full wall height.
Next, add the foundation or slab. Most modern homes are built on a concrete slab that sits at ground level, so you can add a 4-6 inch thick slab under your floor plan. If your home has a crawl space or full basement, you’ll need to extend your walls downward to create the foundation walls and add the basement or crawl space floor. Don’t forget to add the floor structure between levels: for a two-story house, you’ll need a 10-12 inch thick floor joist structure between the first and second floor to get the ceiling height right on the first level.
Add the Roof Structure
Adding a roof is often the trickiest part for new modelers, but most modern tools have automated roof tools that do most of the work for you. The most common roof type is a gable roof, which has two sloping sides that meet at a ridge at the top. To add a gable roof, you just select the top edges of your exterior walls and the software will generate the sloped roof surface based on the pitch you input.
Roof pitch is measured as the number of inches it rises vertically for every 12 inches it runs horizontally. For example, a 6/12 pitch means the roof rises 6 inches for every 12 inches of horizontal distance. You can find the pitch of an existing roof from your blueprints or measure it yourself, and if you’re designing a new roof, your building plans will specify the required pitch based on local climate and material requirements.
For more complex roofs with multiple gables, hips, or dormers, build one section at a time. Start with the main roof, then cut out openings for dormers and add the smaller roof sections for the dormers. Don’t worry about adding shingle texture or gutter details at this stage – we’ll add that later when we do finishing details. Your goal here is just to get the correct shape and volume of the roof.
Adding Details: Openings, Fixtures, and Interior Elements
With the basic structure of the house complete, it’s time to add the details that make the model feel realistic and functional. This step includes cutting openings for doors and windows, adding pre-made or custom fixtures, and building out interior elements like stairs, cabinets, and flooring.
Cut Openings for Doors, Windows, and Openings
Start by marking the position of every door and window on your walls, based on your reference dimensions. In most modeling tools, you can use a cookie-cutter or boolean subtraction tool to cut the opening out of your wall. For example, if you have a standard 36-inch wide by 80-inch tall entry door, you’d create a 36x80 rectangle on the wall at the correct height, then subtract that shape from the wall to create the opening.
Most 3D software has free libraries of pre-sized doors and windows that you can drag and drop directly into your model. These pre-made objects already have the correct casing, trim, and glass details, so you don’t have to model them from scratch. This saves hours of work and ensures your elements are sized correctly for standard construction. Just make sure to adjust the size to match your actual door or window before placing it.
Don’t forget other openings: chimneys, skylights, garage doors, and arched openings between rooms. Take your time placing each one, and double-check the position against your reference plans. It’s much easier to move a window now than it is to redo the entire wall after you’ve added interior trim and paint.
Add Stairs and Structural Elements
For multi-story homes, stairs are the next key element to add. Like doors and windows, most tools have automated stair tools that let you input the total rise (the height between floors) and run (the horizontal length of the stairs) and generate a complete set of stairs with treads, risers, and railings automatically. Always check that your stairs meet local building codes: for example, most codes require a maximum 7.75 inch riser height and a minimum 10 inch tread depth to be safe for walking.
Next, add any other key structural elements: load-bearing beams, columns, fireplaces, and chimneys. If you’re building a model for construction, these elements are critical for contractors to see, so make sure their size and position are accurate. For visualization models, you just need them to get the right feel for the space.
Populate the Interior and Exterior
Now comes the fun part: adding furniture, fixtures, and finishes. Again, use pre-made 3D objects from the software’s library or free online repositories like SketchUp’s 3D Warehouse to save time. You can find almost anything pre-made: sofas, dining tables, kitchen cabinets, bathroom sinks, even landscaping elements like trees and patio furniture.
Follow these practical tips for populating your model to keep it organized and realistic:
- Group elements by room or type: for example, group all of the kitchen cabinets together so you can move or hide them easily if you need to make changes later.
- Start with large elements first: place large furniture like sofas and beds before adding small decor like lamps or picture frames to make sure everything fits.
- Match real-world dimensions: a standard king size bed is 76 inches wide by 80 inches long, so don’t drag in an over-sized model that makes your bedroom look smaller than it actually is.
- Don’t overdo the detail: if you’re building a model for construction planning, you don’t need to add every throw pillow to your couch. Only add detail that serves your original goal.
For the exterior, add landscaping elements like driveways, walkways, patios, and planting beds to get a full sense of how the house will sit on the lot. You can add trees and shrubs to test how much shade they’ll provide to the house and how they’ll impact the overall curb appeal.
Applying Materials, Textures, and Lighting for Realism
A model with just plain gray or white walls is functional, but adding materials, textures, and lighting helps you visualize how the finished house will actually look. This step is especially important for presentations, real estate marketing, or interior design planning, where you need to see how different paint colors and materials work together.
Apply Materials and Textures
Most 3D modeling tools come with a built-in library of materials that you can apply directly to any surface in your model. These materials include everything from matte white paint and hardwood flooring to brick siding, asphalt shingles, and glass. To apply a material, you just select the surface you want to change and click the material to apply it.
For example, you’d apply a drywall paint material to all interior wall surfaces, a hardwood material to your first floor, and a brick or vinyl siding material to your exterior walls. Pay attention to texture scale: a brick texture that’s too big will make your house look like a toy, while a texture that’s too small will look blurry when you render it. Adjust the scale of the texture to match the real-world size of the material.
If you can’t find the exact material you want, you can upload your own texture image or download free high-resolution textures from sites like Poly Haven or Textures.com. This lets you match the exact paint color, countertop material, or siding you plan to use in the actual build.
Set Up Lighting
Good lighting makes your model look realistic and lets you test how natural light will move through your house throughout the day. Most tools let you add natural lighting based on your geographic location, time of year, and time of day. This is incredibly useful for checking how much sunlight a room will get in the morning or afternoon, or if a new addition will block sunlight from existing rooms.
Add artificial lighting for interior renderings: overhead ceiling lights, table lamps, and under-cabinet lighting in the kitchen. Adjust the intensity and color temperature of the lights: warm white light (2700K-3000K) is common for most residential interiors, while cool white light (4000K-5000K) is often used for kitchens and bathrooms.
Render Your Model
Once your materials and lighting are set up, you can render your model to create a high-quality static image or animation. Rendering is the process where the software calculates how light interacts with all the materials in your model to create a photorealistic image. Beginners can use cloud-based rendering tools that run on the software’s servers, so you don’t need a powerful graphics card to get a good result.
For most use cases, a 1080p or 4K render is more than enough. If you’re creating images for a website or presentation, you don’t need an ultra-high resolution render that will take hours to process. If you’re creating images for print or large displays, you can increase the resolution for a sharper result.
Many tools also let you create a 360-degree virtual tour of your model, where you can walk through each room and look around. This is a great feature for real estate marketing or for letting your contractor or family members explore the design before you start building.
Exporting and Using Your Finished 3D Model
Once your model is complete, you’ll need to export it in the right format for your intended use. Different uses require different file types, so it’s important to export it correctly to avoid losing detail or compatibility issues.
Common Export Formats for Different Uses
If you’re sharing your model with an architect, contractor, or another designer, you’ll usually export it as a DWG (AutoCAD) or RVT (Revit) file for BIM compatibility. If you need to share it with someone who doesn’t have your modeling software, you can export it as a universal 3D format like OBJ or FBX that can be opened in almost any 3D tool.
If you want to 3D print a physical scale model of your house, you’ll need to export your model as an STL file, which is the standard format for 3D printing. Before exporting, make sure your model is “watertight” – meaning there are no gaps between surfaces that will cause problems for the 3D printer. Most modeling tools have a built-in check to fix gaps before you export.
If you just need images for presentations or planning, export your rendered images as JPEG or PNG files. For virtual tours, you can export the tour as an interactive file that can be viewed in a web browser.
Preparing for Construction or Permitting
If your 3D model is intended for construction or planning permit approval, you’ll need to add additional information before exporting. Most planning departments require you to show setbacks (the distance between the house and the property lines), height measurements, roof slope, and exterior material information. Most professional tools let you add these annotations directly to your model and generate a 2D construction document from your 3D model, which you can submit with your permit application.
For contractors, you can export cut plans that show cross-sections of the walls, foundation, and roof to help them understand how the house is structured. You can also generate a materials list from your BIM model that estimates how much lumber, drywall, and other materials you’ll need for the build.
Conclusion
Building a 3D model of a house is a rewarding process that gives you a clear, accurate visualization of your design before you spend any money on construction or renovations. By starting with careful planning, choosing the right tool for your goal, and building up your model from basic structure to fine details, you can create a professional-quality model even if you’re a complete beginner. The key is to start simple: don’t worry about adding every tiny detail in your first version. Focus on getting the core dimensions and structure right first, then add details and textures gradually as you get comfortable with the software.
Whether you’re designing your dream home from scratch, planning a small bathroom remodel, or studying architecture, 3D modeling helps you catch mistakes early, test different design options, and share your vision clearly with contractors, family, or planning officials. With the wide range of free and affordable tools available today, there’s never been a better time to turn your house idea into a tangible 3D model you can explore, modify, and share.