
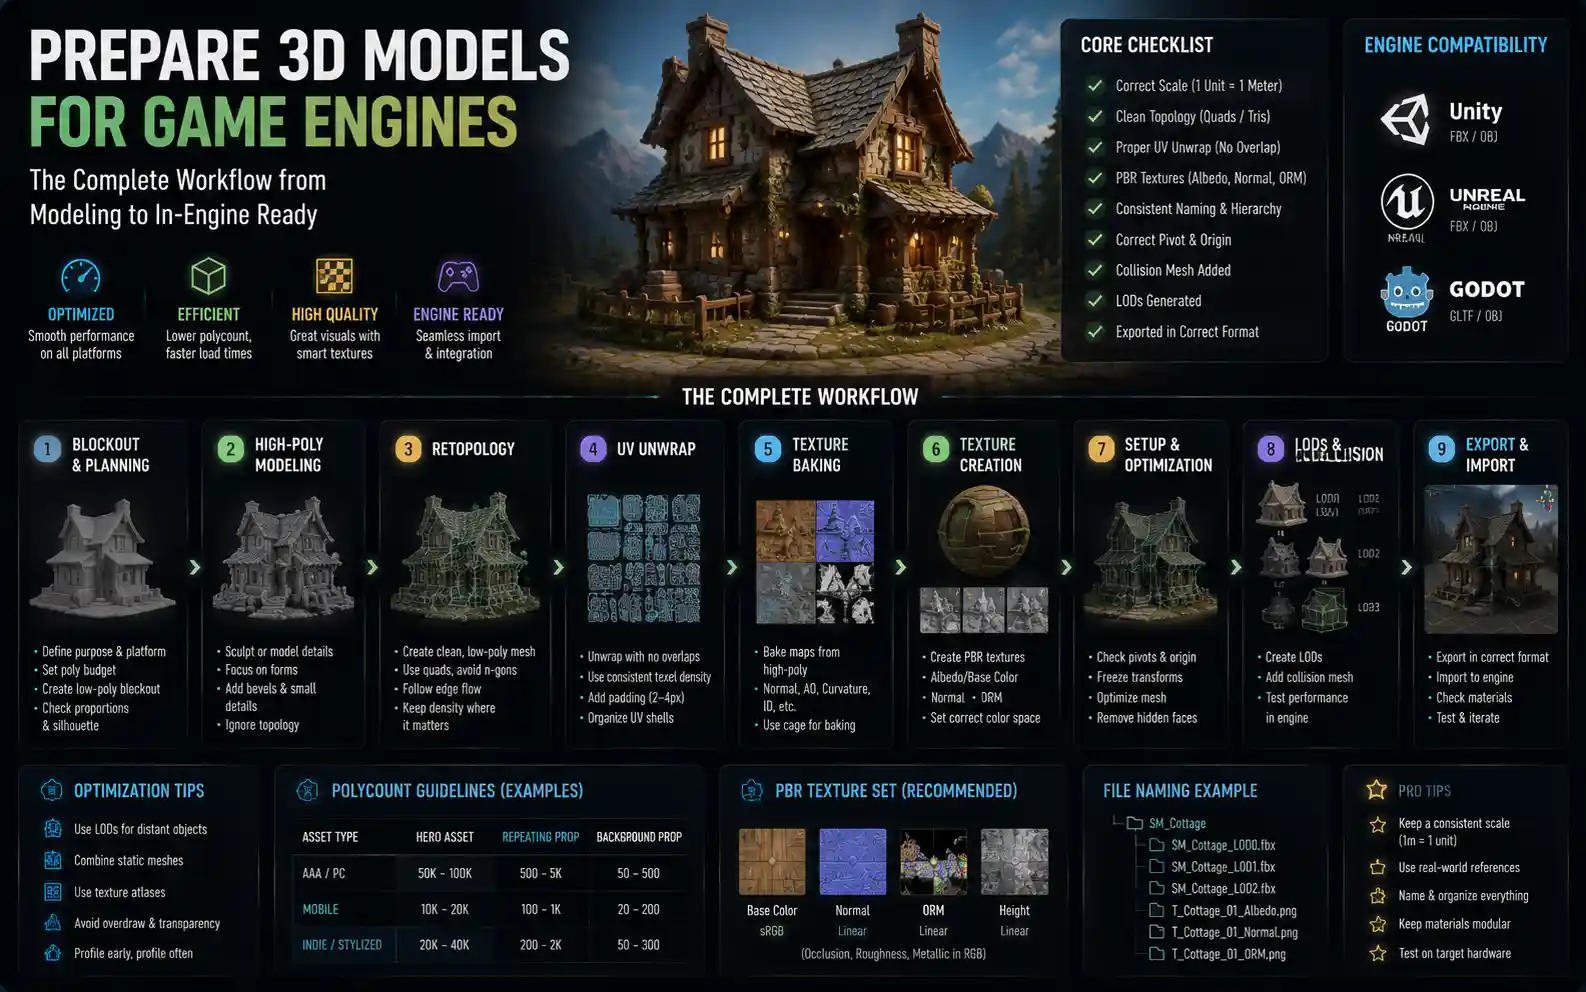
Creating a stunning 3D model in a digital sculpting tool is only half the battle when it comes to game development. No matter how detailed your character or environment asset is, it will never perform well in a real-time game if it isn’t properly prepared for the game engine. Game engines like Unity, Unreal Engine, and Godot have specific requirements for geometry, textures, and file structure that determine how smoothly your model runs, how it looks, and even whether it loads at all. Whether you’re a freelance artist working with a game studio, an indie developer building your first project, or a student learning game art, understanding how to prep models correctly will save you hours of debugging and help your game run at a consistent 60 frames per second even on low-end hardware. This guide breaks down the entire process step by step, from blocking out your initial geometry to exporting a final file ready for engine integration.
Planning for Real-Time Constraints Early
Many new game artists make the mistake of focusing solely on detail during the modeling phase, only to realize later that their 10 million-polygon sculpt can’t run in a real-time game. The most effective preparation starts before you even create your first polygon: understanding the constraints of your target platform and game genre will guide every decision you make later.
First, you need to define your polygon budget, which is the maximum number of triangles your model can use. Consoles, PCs, and mobile devices have very different limits: a main character for a AAA PC game might allow 50,000 to 100,000 triangles, while a mobile indie game might cap the entire level at that number. Background props, which players spend less time looking at, often get just a few hundred or thousand triangles. There’s no universal rule, but checking the documentation for your target engine and platform will give you a baseline to work from.
Block Out Low-Poly Geometry First
Before you jump into high-poly sculpting, start with a simple low-poly block-out that matches your target poly budget. This step helps you confirm that your silhouette and proportions work without wasting time adding detail that will get cut later. For example, if you’re modeling a wooden chair for a cottage level, your block-out might just be a few cubes arranged to match the chair’s shape. If the block-out already hits your 500-triangle budget limit, you know you’ll need to simplify further before adding details. This workflow is called the high-to-low workflow, and it’s the industry standard for most game assets.
Consider Game Functionality Up Front
Model shape isn’t the only thing that matters—your model needs to work with the engine’s systems. If you’re creating a playable character, you’ll need to leave enough geometry for deformation when the character animates. If you’re modeling a door that opens, you need to split the geometry into two separate objects (the door and the frame) rather than modeling them as one solid mesh. Even small things like collision detection require intentional geometry planning: too many small, overlapping polygons can cause the engine’s physics system to stutter or glitch.
“The best game models are not the ones with the most triangles. They’re the ones where every polygon serves a purpose—either to the silhouette, the animation, or the detail the player actually sees.”
Early planning also accounts for level of detail (LOD) systems, which most modern game engines use to reduce the polygon count of assets that are far from the camera. Building LODs into your prep process from the start means you won’t have to go back and remodel assets later when the game’s frame rate drops.
Retopology: Creating Clean Game-Ready Geometry
Once you have your final high-poly sculpt, the next step is retopology: the process of creating a new, clean low-poly mesh that matches the shape of your high-poly original. This is the core of preparing a model for a game engine, because it balances detail with performance.
The goal of retopology isn’t just to reduce the polygon count—it’s to create geometry that deforms well for animation, has clean edges for texture baking, and works with the engine’s rendering system. Bad retopology with messy overlapping faces or n-gons (polygons with more than four sides) can cause all sorts of issues in the engine, from texture stretching to broken shading to failed exports.
Core Rules for Clean Retopology
Follow these practical rules to create game-ready topology that works in any engine:
- Stick almost exclusively to quads (four-sided polygons) where possible. Triangles are acceptable for small details or closing off shapes, but n-gons should be avoided entirely. Most game engines triangulate meshes automatically on import, but messy n-gons can cause unpredictable triangulation that breaks shading.
- Align edge loops to the contours of your model. For characters, this means following muscle groups and joint lines to make deformation smoother when the character bends an arm or leg. For hard-surface assets like weapons or furniture, align edges to the object’s natural lines to keep shading clean.
- Keep polygon density proportional to detail. Put more polygons where the shape changes a lot (like the nose of a character or the corner of a table) and fewer polygons in flat, open areas. This ensures you’re using your polygon budget efficiently.
- Remove unnecessary geometry. Hidden faces that are never visible to the player (like the back of a shelf mounted to a wall) should be deleted entirely to save on polygons.
There are dozens of tools to speed up retopology today: ZBrush has ZRemesher for automatic retopology, Blender has the Remesh tool, and TopoGun is a dedicated option for more control. However, automatic tools almost always require manual cleanup. You’ll still need to adjust edge loops, fix odd shapes, and remove extra polygons to match your budget and functionality requirements. For animated characters, manual retopology is almost always preferred, because automatic tools rarely produce geometry that deforms well.
Checking for Common Retopology Errors
Before moving on, double-check your mesh for issues that will cause problems in the game engine. These include overlapping faces, non-manifold geometry (edges connected to more than two faces, or faces with no volume), flipped normals (faces pointing the wrong direction, which makes them invisible or transparent in the engine), and extra vertices that don’t contribute to shape. Most 3D tools have a built-in function to check for non-manifold geometry and flipped normals, so run that check before you proceed. Fixing these errors now is much faster than troubleshooting them after you import into the game engine.
UV Unwrapping and Texture Baking
Once your clean low-poly mesh is done, the next step is preparing UVs and baking detail from your high-poly sculpt to create the textures that will render in real time. Game engines use texture mapping to add detail without extra polygons, so this step is critical for balancing visual quality and performance.
UV unwrapping is the process of flattening your 3D mesh into a 2D plane so you can apply a 2D texture to it. Bad UVs cause texture stretching, blurring, and wasted space, which makes your model look worse and hurts performance. Good UVs maximize the available texture space so your details look sharp, no stretching.
Best Practices for Game-Ready UVs
Follow these guidelines to create UVs that work well in any game engine:
- Arrange UV islands (separate groups of UV faces) to minimize wasted space. Packing islands tightly into the 0-1 UV space means you get more resolution for your details, so your textures look sharper at the same file size. Most 3D tools have automatic UV packing tools that do this well, but you’ll usually need to adjust them manually to avoid stretching.
- Avoid stretching at all costs. Stretching occurs when a 3D face is distorted in the UV plane, which makes the texture look blurry or warped when it renders. Use your 3D tool’s UV stretching checker to identify problem areas and adjust your islands until stretching is under 5% for most areas.
- Add padding between UV islands. Padding is the empty space between islands that prevents texture bleeding, where the edge of one texture bleeds into another when mipmaps are generated. Most game engines require at least 2-4 pixels of padding for 1K textures, and more for higher resolutions like 4K.
- Split large meshes into multiple UV tiles if needed. If you have a high-detail asset like a main character, you can use multiple UV tiles (also called texture atlases for multiple assets) to get more texture resolution. For example, a character might have one UV tile for the head and hands, which need more detail, and another for the body and clothing.
After UV unwrapping is complete, it’s time to bake your high-poly detail onto your low-poly mesh. Baking transfers details like surface texture, small bumps, crevices, and ambient occlusion from the high-poly sculpt to a set of texture maps that the game engine can use in real time. Common maps you’ll bake include:
- Normal maps: Add surface bump detail without extra polygons
- Ambient occlusion (AO) maps: Add soft shadows in crevices to increase realism
- Height maps: Add displacement detail for advanced rendering
- Cavity maps: Highlight small crevices for additional contrast
Always check your baked maps for errors like baking artifacts, missing detail, or seams before moving on. A common mistake is forgetting to assign the correct material to your low-poly mesh before baking, which results in entirely black or broken maps. Most baking tools let you preview the baked maps directly on your low-poly mesh, so you can spot errors quickly.
Texture Optimization for Game Engines
Once your baked maps are done, you’ll create your final color, roughness, metallic, and other PBR (physically based rendering) textures. PBR is the standard for most modern game engines, so make sure your textures follow the PBR conventions your engine uses (Unreal and Unity have slightly different default workflows for metallic/roughness vs specular/glossiness). The key step here is optimizing texture resolution: higher resolution textures look better but take up more memory and slow down load times. For most background props, 1K (1024x1024) resolution is more than enough, while main characters might use 2K or 4K. Always test your textures on your target platform to make sure they don’t exceed memory limits.
Adding Collision, Rigging, and Engine-Specific Adjustments
Textures and geometry are only part of the story. Your model needs additional components to interact with the game engine’s systems, like physics, animation, and lighting. This step is where many artists cut corners, leading to broken physics or jittery animation in the final game.
Adding Collision Meshes
Every interactive object in a game needs a collision mesh, which the engine’s physics system uses to detect when the player or other objects collide with your asset. You should never use your render mesh as a collision mesh—render meshes have too much detail, which will slow down the physics system and cause glitches. Instead, create a simple low-poly collision mesh that roughly matches the shape of your model. For example, a wooden crate can use a simple box collision mesh, while a character can use a set of capsule colliders for the torso, arms, and legs.
Some game engines can generate collision meshes automatically on import, but automatic collision is almost always less efficient than a custom collision mesh you create yourself. Custom collision meshes use far fewer polygons and match the shape of your model more accurately, which leads to more consistent physics.
Rigging and Weight Painting for Animated Models
If your model is going to animate (like a playable character or a moving door), you’ll need to rig it with a skeleton and paint weight values before exporting. Rigging assigns bones to your geometry, and weight painting defines how much each bone moves each part of the mesh. Bad weight painting causes ugly deformation when the model animates—for example, the shoulder might stretch weirdly when the character raises their arm. Test your rig in your 3D tool by posing the model and checking for deformation issues before you export. Fixing weight painting in the game engine is much more time-consuming than fixing it in your 3D modeling tool.
You should also name your bones clearly and use a hierarchy that matches your engine’s requirements. For example, if you’re using a common game-ready skeleton like the Meta-Human skeleton in Unreal or the Humanoid template in Unity, matching your bone names and hierarchy to the template will let you retarget animations automatically, saving hours of work.
Engine-Specific Settings and Adjustments
Different game engines have slightly different requirements for model preparation. It’s important to research your engine’s specific rules before exporting to avoid import errors. Some common adjustments include:
- Unit scale: Make sure your model is the correct real-world size. For example, Unity uses meters as the default unit, while Blender uses meters by default now, but older files might use centimeters. A character that’s 100 meters tall instead of 2 meters will cause all sorts of issues with physics and camera positioning.
- Origin point: Set the origin of your model to a logical position. For props, the origin is usually at the base of the object where it touches the ground, which makes it easier to place in the engine level. For characters, the origin is usually between the feet.
- Tangent space: Most game engines use Mikk tangent space for normal mapping, which is the industry standard. Most 3D exporters will generate this automatically if you check the correct box, but double-check your settings to avoid broken normal mapping.
- Multiple materials: If your model uses multiple materials (for example, a character with separate materials for skin, hair, and clothing), name each material clearly and make sure the material IDs are assigned correctly to the right faces. This ensures the engine imports each material separately and assigns it to the correct part of the mesh.
For example, Unreal Engine has a 16 bone limit per mesh for static meshes if you’re using skeletal mesh for animated objects, while Unity handles larger skeletons more flexibly. Staying up to date with your engine’s documentation will help you avoid these small but frustrating errors.
Exporting and Testing in the Game Engine
After all your preparation is done, it’s time to export your model and test it in the game engine. This step confirms that everything works as expected, and lets you catch any last-minute issues before you integrate the model into your full project.
First, choose the correct file format. The most common game-ready formats are FBX and glTF. FBX is supported by every major game engine and is the industry standard for most assets, while glTF is a newer open format that’s gaining popularity for web-based games and higher-fidelity assets. Avoid exporting in proprietary formats like .blend or .zpr—game engines don’t handle these well, and they can cause import errors. Export settings matter: for FBX, enable exporting of normals, tangents, UVs, and bones (if your model is rigged) and disable exporting of any unused data like cameras or lights that you don’t need in the engine.
What to Test After Import
Once you import your model into the engine, run through this checklist to confirm everything works correctly:
- Check the scale and positioning: Spawn the model into an empty level and confirm it’s the correct size, sits correctly on the ground, and the origin point is where you expect it. Adjust the import scale if needed, but it’s better to fix it in your original 3D file so all future imports are correct.
- Check the shading and textures: Move the camera around the model to check for any shading errors, like black faces (flipped normals), stretched textures, texture bleeding, or broken normal mapping. If normals are flipped, you can usually enable the “calculate normals” option on import to fix it, but it’s better to flip the normals in your original 3D file for consistency.
- Test physics and collision: Walk the player character into the model, or drop other objects onto it to confirm collision works correctly. If the player falls through the model or can walk through it, your collision mesh is probably missing or incorrectly set up. If collision is jittery, your collision mesh has too many polygons.
- Test animation: If your model is animated, import a test animation and play it back to check for deformation issues, missing bones, or jittery movement. Test how the model deforms at extreme poses to spot bad weight painting that you missed earlier.
- Check performance: Use the engine’s built-in profiler to check how many triangles the model uses, how much memory the textures take up, and how it impacts the frame rate. If the model is dragging down the frame rate, you can go back and reduce the polygon count or lower the texture resolution to optimize it.
It’s always a good idea to test your model on your target hardware as early as possible. A model that runs smoothly on your high-end development PC might stutter on a mobile phone or an older console. Catching performance issues early means you can adjust your model before you’ve invested more time into the project.
Conclusion
Preparing models for game engines is a process that balances artistry with technical discipline. It’s not enough to create a beautiful sculpt—you need to plan for real-time constraints, build clean geometry, unwrap UVs carefully, add the extra components the engine needs to function, and test thoroughly before integration. By following the steps outlined in this guide, you’ll avoid the most common pitfalls that slow down development and cause frustrating bugs down the line. Whether you’re creating a single prop for an indie game or a full cast of characters for a AAA project, good preparation makes the entire development process smoother, resulting in a game that looks great and runs well for every player. The key takeaway is simple: the time you spend preparing your model correctly before export will save you far more time debugging in the game engine later.