
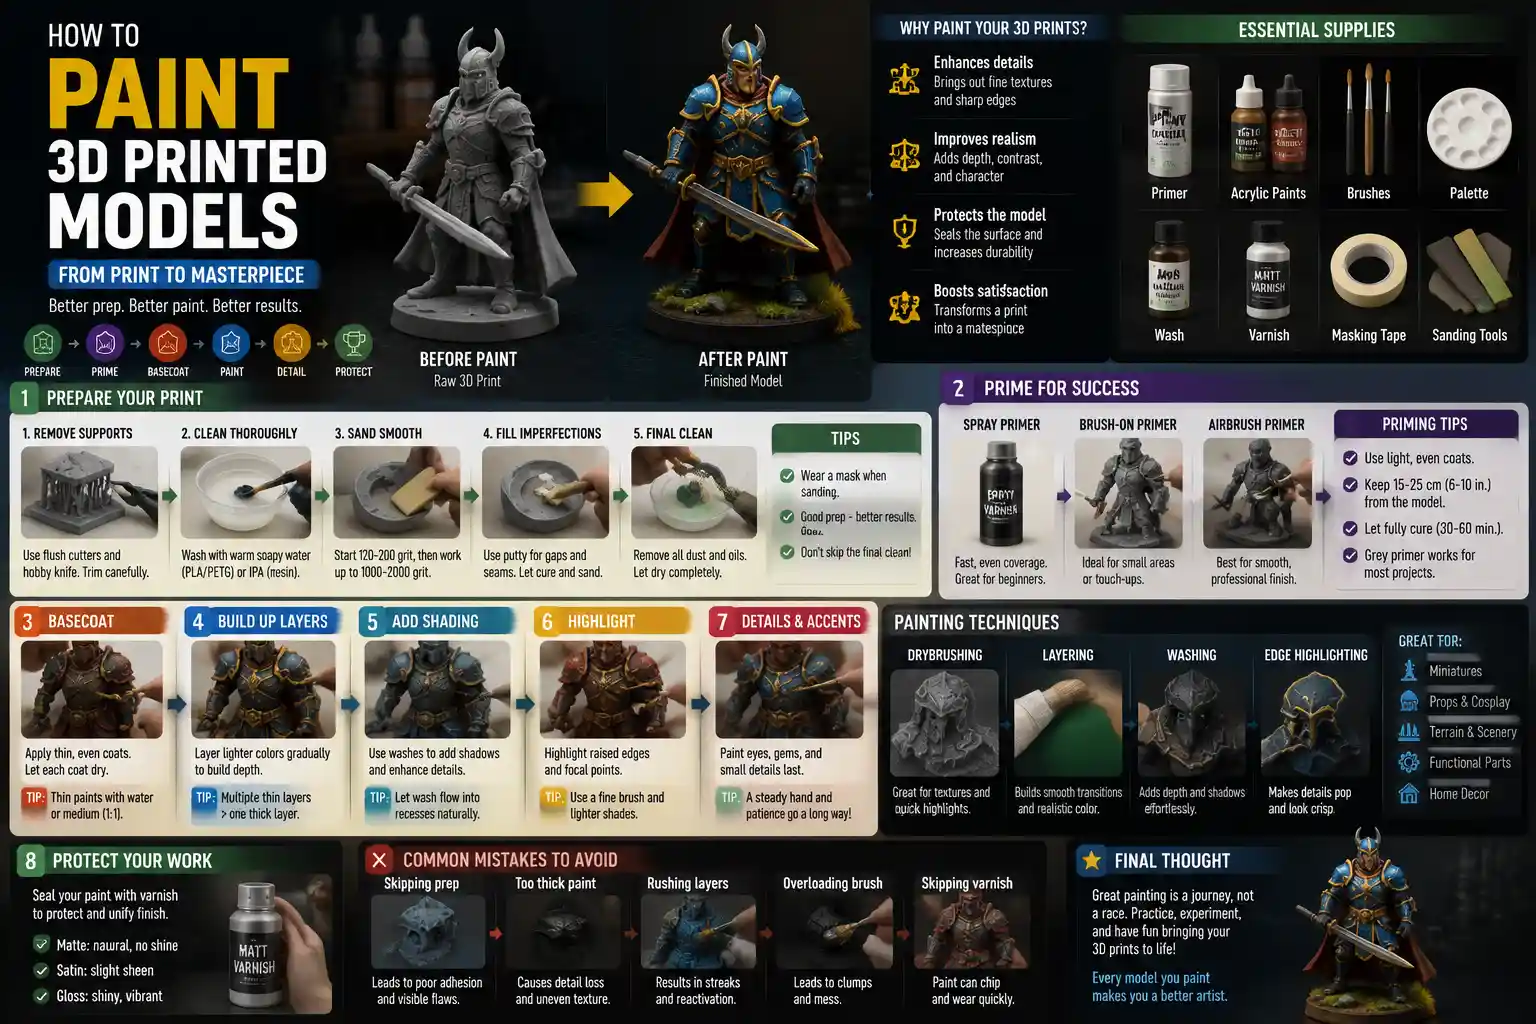
If you’ve ever pulled a freshly 3D printed model off your printer bed, stared at its layer lines and rough texture, and wondered how to turn that humble plastic into a display-worthy work of art, you’re not alone. 3D printing has opened up a world of creative possibility, letting hobbyists print everything from tabletop gaming miniatures and cosplay props to custom home decor and scale model dioramas. But even the best 3D printer leaves behind telltale print artifacts that can make a finished model look unfinished. Learning how to paint 3D printed models doesn’t require a professional art degree or thousands of dollars in supplies – it just relies on following a proven process, from prepping the print correctly to choosing the right paints and finishing techniques. Whether you’re a complete beginner or a seasoned maker looking to level up your results, this step-by-step guide will walk you through every stage of the process.
Prepping Your 3D Print for Painting
The most common mistake new painters make is skipping or rushing through prep work. A perfectly painted model will still look amateurish if it’s covered in visible layer lines, support marks, or uneven texture. Taking the time to properly prep your 3D print will pay off dividends in the final result, no matter what type of paint you use. Prep work looks slightly different depending on the 3D printing material you used, but the core steps are consistent across PLA, ABS, PETG, and resin prints.
Cleaning and Support Removal
First, you need to remove all supports, rafts, and brims from your print. For FDM prints (made with filament), this usually requires a combination of flush cutters for thicker supports and a sharp hobby knife for trimming remaining nubs. Work slowly here to avoid accidentally cutting into the main model – it’s far easier to trim a little more than it is to fix a gouge you didn’t mean to make. For resin prints, you’ll already have washed the model to remove uncured resin, but you’ll still need to remove supports, which are often thinner and more delicate than FDM supports. Use fine-tip flush cutters or dental picks to carefully pry supports free without breaking small details like weapon blades or facial features.
Once all extra material is removed, give your model a thorough clean to remove any dust, oil, or leftover release agent. Oils from your fingers can prevent paint and primer from adhering properly, so even a brand new print should be washed. For most prints, a quick scrub with warm water and a tiny drop of mild dish soap works perfectly. For resin prints, use isopropyl alcohol (90%+ concentration) and a soft toothbrush to get into crevices, then let it fully cure before moving on. Let your washed model air dry completely for a few hours before proceeding – moisture trapped in small gaps can ruin paint adhesion later.
Smoothing Layer Lines and Imperfections
After cleaning, it’s time to smooth out the layer lines that are an unavoidable part of 3D printing. There are several methods to do this, depending on the size of your model and the level of smoothness you want:
- Mechanical sanding: This is the most common method for beginners, and it works for all filament types and resin. Start with a low-grit sandpaper (120-200 grit) to sand down large bumps and support marks, then work your way up to higher grits (400, 800, and finally 1000-2000 grit) for a smooth, polished surface. For small models or hard-to-reach areas, use foam sanding sticks or even sandpaper wrapped around a popsicle stick to get into crevices. Always sand in light, circular motions, and check your progress frequently to avoid sanding away fine details.
- Chemical smoothing: For ABS and PETG filament, many hobbyists use chemical smoothing to dissolve the top layer of plastic and eliminate layer lines entirely. ABS can be smoothed with acetone vapor, while PETG works with isopropyl alcohol vapor. This method gives a super smooth finish, but it requires careful ventilation and safety precautions, as these fumes are flammable and toxic. It can also warp small or thin parts if you leave them exposed too long, so it’s best for larger, solid models.
- Filler primer or putty: For deep layer lines or large gaps between printed parts, you may need to use a filler putty or a high-build primer to even out the surface. Putty like Bondo or hobby-specific green putty works well for large gaps, while spot putty is ideal for small nicks and dents. After applying putty, let it fully cure then sand it down to match the surrounding surface.
Once you’re done sanding and smoothing, wipe down your model one more time to remove all sanding dust. Even a small amount of loose dust can get trapped under primer or paint and ruin your smooth finish, so don’t skip this final clean.
Priming Your 3D Printed Model
Priming is a non-negotiable step for painting 3D printed models, even if you’re tempted to skip it to save time. Primer creates a uniform base that paint adheres to, helps cover any small remaining imperfections, and gives you a consistent starting color that makes your topcoat colors look more vibrant. Choosing the right primer depends on your model size, material, and the type of paint you plan to use.
Types of Primer for 3D Prints
Most hobbyists use one of three common primer types: spray can primer, brush-on primer, or airbrush primer. Spray can primer is the most popular for beginners, because it’s inexpensive, easy to use, and lays down a smooth, even coat without any extra equipment. Look for hobby-specific primers designed for plastic – brands like Rust-Oleum, Vallejo, and Krylon all make great options. Avoid general household primers that are designed for wood or metal, as these can be too thick and can fill in fine details.
Brush-on primer is a good option for small models or if you only need to prime a small area. It’s also useful if you don’t have access to a well-ventilated spray area, which is required for spray primer. Airbrush primer is for hobbyists who already own an airbrush, and it gives the thinnest, most even coat possible, which is ideal for miniatures with lots of fine details.
When it comes to primer color, your choice will affect how your final paint looks. White or gray primer is the most common choice: white primer makes your topcoat colors brighter and more saturated, while gray primer is better for darker or more muted colors, and it makes it easier to see small imperfections you missed during prep. Black primer is great if you’re painting a mostly dark model, or if you plan to use dry brushing to highlight raised details – the black primer will settle into the crevices automatically, giving you instant depth.
How to Apply Primer Correctly
Whether you’re using spray can or airbrush primer, the key is to apply multiple thin coats instead of one thick coat. Thick primer will run, pool in crevices, and fill in fine details that you worked hard to preserve. Follow these steps for a perfect prime:
- Set up your spray area in a well-ventilated space (preferably outside, or in a spray booth with a fan) and cover any surrounding surfaces to avoid overspray. Attach your model to a small handle (a popsicle stick or old paint brush handle works great) with a piece of temporary adhesive like blue tack or masking tape, so you can hold it without touching the model itself.
- Shake your spray can vigorously for 2-3 minutes before starting – this mixes the primer thoroughly and prevents clogs.
- Hold the can 15-25 centimeters (6-10 inches) away from the model, and spray in light, even sweeping motions. Don’t hold the spray in one spot – keep the can moving to avoid drips.
- Apply one thin coat, then let it dry completely (follow the manufacturer’s instructions, usually 15-30 minutes for spray primer). Apply a second thin coat, and if needed a third, until the entire model is evenly covered with no spots of plastic showing through.
- Let the primer fully cure for at least 24 hours before painting. Curing time makes a big difference in how well paint adheres – painting too soon can cause the primer to lift or the paint to bubble.
After priming, inspect your model again under good light. If you see any remaining layer lines or imperfections, you can do a quick light sand with 1000 or 2000 grit sandpaper to smooth it out, then wipe off the dust before painting. This extra step only takes a minute and will give you a much smoother final finish.
The prep and priming stages are 80% of a good paint job. If you get those right, even a beginner can make a 3D print look like a professionally manufactured piece. Rush through prep, and even the most expensive paint won’t save a bumpy, uneven model.
Choosing Paints and Brushes for 3D Printed Models
With your model prepped and primed, it’s time to choose your paints. There are a lot of options on the market, and the best choice depends on the type of model you’re painting, your experience level, and your budget. You don’t need to buy the most expensive paint to get great results – many beginners get excellent results with affordable hobby paints.
Common Paint Types for 3D Prints
The three most popular paint types for 3D printed models are acrylic, enamel, and spray paint. Let’s break down the pros and cons of each:
- Acrylic paints: Acrylic is the go-to choice for most hobbyists, especially beginners. It’s water-based, which means it cleans up easily with soap and water, has low fumes, and dries quickly (usually 15-30 minutes between coats). It’s also very forgiving – if you make a mistake, you can just wipe it off with a damp paper towel before it dries, or paint over it once it’s dry. Acrylic paints come in a huge range of colors, and brands like Vallejo, Army Painter, and Apple Barrel make options specifically for hobbyists. For small miniatures, use high-quality artist or hobby acrylics; for large props, affordable craft acrylics from your local dollar or craft store work perfectly well.
- Enamel paints: Enamel paints are oil-based, which means they have stronger fumes, take longer to dry, and require mineral spirits for clean up. But they also lay down an incredibly smooth, hard finish that’s more durable than acrylic, which makes them a good choice for models that will be handled frequently, like cosplay props or tabletop gaming pieces that get moved around a lot. Enamel is also less likely to leave brush strokes than cheap acrylic, so it’s popular for large, flat surfaces.
- Spray paint: Spray paint is perfect for base coating large models or applying a uniform base color quickly. It lays down a much smoother coat than brush painting for large flat areas, and it’s very affordable. Just like with primer, make sure you use spray paint in a well-ventilated area and apply multiple thin coats instead of one thick one.
For most beginners, starting with Vallejo Model Color or Army Painter paints is a great choice. They’re affordable, come in pre-mixed colors perfect for most models, and are specifically formulated for plastic and resin. If you’re painting a large cosplay prop or home decor item, craft acrylics from brands like Apple Barrel or FolkArt work just fine, and they cost a fraction of the price of hobby-specific paints.
Choosing the Right Brushes
You don’t need a huge set of expensive brushes to get started, but having a few good quality brushes in key sizes will make your job much easier. For large areas like base coating a whole model, use a large flat brush (1/2 inch or 1 inch). For smaller areas and base coating parts, use a medium round brush (size 4 or 6). For fine details like eyes, facial features, or small decorative elements, use a small detail round brush (size 000 or 0000 is perfect for miniatures). Synthetic brushes are better than natural bristle for acrylic paint, because they hold their shape better and don’t fray as quickly when cleaned with water.
Take care of your brushes, and they’ll last you a long time. Always clean them thoroughly after painting with mild soap and water, reshape the brush tip with your fingers before letting them air dry, and never leave them sitting in water bristle-down – this will ruin the tip and cause the bristles to fall out.
Painting Techniques for Great Results
Now that you have your prepped model and supplies ready, it’s time to paint. Whether you’re a complete beginner or have some experience, following a few core techniques will help you get professional-looking results. The process starts with base coating, then moves on to adding depth, highlights, and finishing details.
Base Coating
Base coating is the process of applying your main solid colors to the model. Start with the largest areas first, then move on to smaller areas. For example, if you’re painting a 3D printed dragon miniature, you’d base coat the entire body first, then the horns, then the eyes, then the base. Always let each color dry completely before painting an adjacent color – this prevents the colors from bleeding together. If you make a mistake and get one color where it doesn’t belong, just let it dry, then use a small brush to paint over it with the correct color. Acrylic is very forgiving this way.
Two thin coats are almost always better than one thick coat. Thick paint will leave visible brush strokes and can fill in fine details, while thin coats build up a smooth, even color without obscuring detail. If your paint is too thick, just add a tiny drop of water to thin it out – acrylic paints are designed to be thinned with water, and thin paint flows more smoothly off your brush.
Adding Depth with Shading
Shading is what makes a flat painted model look three-dimensional and realistic. There are a few easy shading techniques that work great for 3D printed models, even for beginners:
Washing is the easiest shading technique for beginners, and it’s perfect for adding depth to crevices and recessed areas. A wash is just a very thinned down paint that flows naturally into the gaps between details, darkening them and making the raised details pop. You can buy pre-made washes from brands like Army Painter and Vallejo, or you can make your own by thinning dark acrylic paint (black, brown, or gray, depending on your base color) with water and a little flow improver. Apply the wash all over the area, then wipe off the excess from the raised surfaces with a damp paper towel. The wash will stay in the crevices, giving you instant depth with almost no effort. This is especially effective for tabletop miniatures, 3D printed statues, and models with lots of texture.
Dry brushing is another easy technique that’s perfect for highlighting raised edges and texture. To dry brush, you just load a small amount of paint onto a dry brush, then wipe almost all of the paint off onto a paper towel. Then you lightly brush the raised areas of your model in quick, light strokes. The small amount of paint left on the brush will only hit the raised edges, leaving them lighter than the base color and creating a natural highlight. Dry brushing is great for textures like rock, skin, fur, and armor, and it’s very forgiving – even if you mess up a little, you can just touch it up with your base color.
Fine Detailing and Finishing
After base coating and shading, it’s time to add small details. This is where your small detail brush comes in. Use it to add things like eyes, logos, decorative patterns, or small accents like belt buckles or button. Work slowly here, and don’t worry if your first few attempts aren’t perfect – fine detailing takes practice. If you make a mistake, just let the paint dry and paint over it with the surrounding color.
For 3D printed models that will be handled frequently or displayed long-term, adding a clear topcoat is a great final step. A clear topcoat seals your paint, protects it from chipping and scratching, and gives you control over the final finish – you can choose matte, satin, or glossy. Matte topcoat is the most common, because it reduces shine and gives a natural, realistic look. Glossy topcoat is great for things like eyes, metal parts, or anything you want to look shiny. Just like with primer and spray paint, apply multiple thin coats of topcoat instead of one thick coat, and let it fully cure for 24-48 hours before handling your model.
Troubleshooting Common Problems
Even experienced painters run into problems sometimes. Knowing how to fix common issues will save you time and help you avoid having to start over from scratch. Here are some of the most common problems you’ll encounter when painting 3D printed models, and how to fix them:
Paint Won’t Adhere or Peels Off
If your paint is peeling or flaking off after it dries, the most common cause is oil or residue left on the model from your fingers or the sanding process. To fix small areas of peeling, sand the area lightly, re-prime it, then repaint it. To prevent this from happening in the future, always wash your model with soap and water after sanding and before priming, and avoid touching the model surface with your fingers after cleaning – hold it by the base or the handle you attached for priming.
Visible Brush Strokes
Visible brush strokes are usually caused by using paint that’s too thick, or using old, worn-out brushes. To fix this, you can sand the area lightly once the paint is dry, then apply a new thin coat of thinned paint. To prevent brush strokes, always thin your acrylic paint with a tiny drop of water, use good quality synthetic brushes, and replace your brushes when they start to fray or lose their shape. For large flat areas, using spray paint for base coating will eliminate brush strokes entirely.
Layer Lines Show Through Paint
If you can still see layer lines after priming and painting, that means you didn’t sand or fill them enough during prep. For small lines, you can fix this by sanding the area lightly, applying a little spot putty or high-build primer, re-sanding, then repainting. For large areas with persistent lines, you may need to add a coat of filler primer, which is designed to fill small gaps and imperfections, then sand it smooth before repainting.
Paint Bleeds Under Masking
If you’re painting sharp lines (for example, a logo or a stripe on a cosplay prop), you might get paint bleeding under your masking tape. To fix this, you can touch up the line with a small detail brush after removing the tape. To prevent bleeding in the future, use low-tack painter’s masking tape, and seal the edge of the tape with a thin coat of the base color before applying your new color. The base color will fill in any gaps under the tape, so the new color can’t bleed through.
Conclusion
Learning how to paint 3D printed models is a skill that improves with practice, but it doesn’t have to be intimidating. The biggest takeaway is that prep and priming are far more important than expensive paint or advanced techniques. By taking the time to clean, smooth, and prime your model properly, you’ll set yourself up for success before you even pick up a brush. Start with simple techniques like base coating, washing, and dry brushing, and gradually work your way up to more advanced techniques like airbrushing or weathering as you gain confidence. Whether you’re painting tabletop miniatures for your next game night, a custom cosplay prop for a convention, or a decorative piece for your home, following this process will help you turn a raw 3D print into a polished, professional-looking finished piece that you can be proud of.