
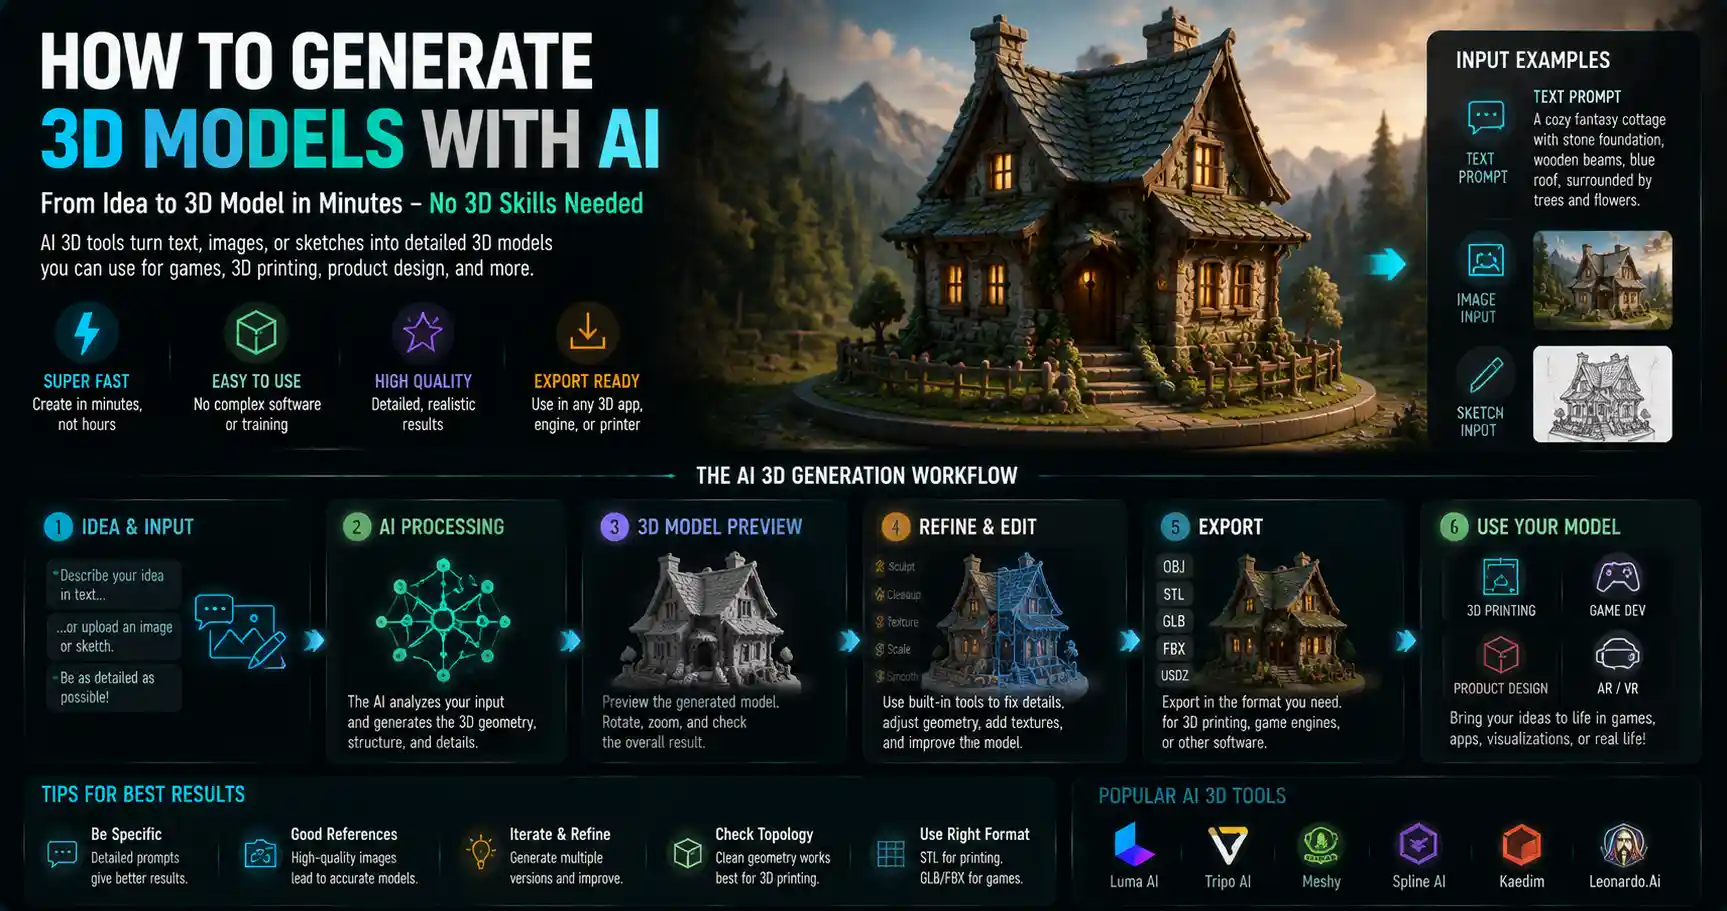
Not long ago, creating a 3D model meant spending hours mastering complex software like Blender or ZBrush, sketching every vertex by hand, and paying thousands of dollars for custom assets for games, product design, or 3D printing. Today, artificial intelligence has flipped that script: anyone with a basic idea, a text prompt, or a 2D photo can generate a polished 3D model in minutes, even without any prior design experience. From indie game developers prototyping new levels to small businesses 3D printing custom parts, AI 3D generation is democratizing access to a skill that was once reserved for professional artists. If you’ve ever wondered how to get started generating your own 3D models with AI, this guide breaks down everything you need to know, from choosing the right tool to refining your output for production.
Understanding How AI 3D Generation Works
Before diving into the step-by-step process, it helps to understand the basics of what AI 3D generation actually does. At its core, AI 3D generation uses deep learning models trained on massive datasets of existing 3D models, images, and text-to-3D pairings to generate new 3D assets from user input. Unlike traditional 3D modeling, where artists manually shape geometry and add textures, AI predicts the structure of a 3D object based on the prompt or input you provide, speeding up the creation process from days to minutes.
There are three dominant approaches to AI 3D generation used by most modern tools today:
- Text-to-3D: This is the most accessible method for beginners. You input a natural language prompt (for example, “a vintage wooden coffee table with curved legs”) and the AI generates a complete 3D model from that description. Most text-to-3D tools use diffusion models similar to those powering popular AI image generators like DALL-E, but adapted to work in three dimensions.
- Image-to-3D: If you already have a 2D photo, sketch, or concept art of an object, image-to-3D AI can reconstruct a 3D model from that single (or multiple) images. This is especially useful for replicating real-world objects or turning a hand-drawn concept into a printable 3D asset. Some advanced tools even generate full 360-degree models from a single phone photo.
- AI-assisted 3D modeling: This category doesn’t generate a full model from scratch. Instead, it adds AI-powered tools to traditional 3D workflows: for example, auto-generating textures for a model you’ve already modeled, filling in missing geometry, or turning a low-poly base model into a high-poly detailed asset with one click. This is the approach most popular with professional 3D artists looking to speed up their workflow.
Early AI 3D models struggled with low resolution and distorted geometry, but modern models like TripoSR, Instant NeRF, and DreamFusion have improved dramatically, producing detailed, production-ready models that work for most use cases from game development to 3D printing.
Choosing the Right AI 3D Generation Tool for Your Use Case
There are now dozens of AI 3D generation tools on the market, ranging from free browser-based options for beginners to enterprise-grade platforms for professional design studios. The best tool for you depends on what you plan to use the 3D model for, your budget, and your level of 3D design experience. Below is a breakdown of the most popular tools by use case to help you narrow down your choice.
For Beginners and Hobbyists: Free and Browser-Based Tools
If you’re just testing out AI 3D generation and don’t need production-ready assets for commercial work, there are several excellent free tools that require no download or installation. These tools work right in your web browser, and most have intuitive interfaces that let you generate a model in minutes:
- Luma AI: One of the most popular consumer tools, Luma AI offers both text-to-3D and image-to-3D generation, with surprisingly high-quality output for a free tier. Its “Genie” text-to-3D tool can generate detailed models up to 10,000 triangles for free, and it supports exporting as OBJ or GLB files that you can edit in other software. It’s especially good for organic shapes like plants, furniture, and character concepts.
- Meshcapade: Meshcapade specializes in 3D human models, but also offers a general text-to-3D tool that’s free for non-commercial use. It integrates with Google’s Instant NeRF for high-fidelity reconstruction from photos, making it a great choice if you want to turn photos of real people into 3D models.
- Tripo AI: Tripo AI’s free text-to-3D tool generates high-resolution models in under a minute, with support for transparent textures and multiple export formats. The free tier allows up to 10 generations per day, which is more than enough for most hobbyist projects.
For Professional Users: Commercial Tools for Production Work
If you need 3D models for commercial use, 3D printing, or game development, paid commercial tools offer higher resolution, better topology, and commercial usage rights that free tools don’t provide. Some of the most popular options include:
- Adobe Substance 3D Generator: For designers already using the Adobe Creative Cloud, Substance 3D Generator integrates AI tools directly into your existing 3D workflow. It excels at generating textures and materials, but also offers text-to-3D asset generation that outputs models compatible with other Adobe tools like Photoshop and Illustrator.
- Spline AI: Spline is a browser-based 3D design tool with built-in AI generation that lets you edit the AI-generated model right in the same interface. It’s especially popular for 3D web design and interactive content, with team plans for studios that need collaborative workspaces. It supports exporting to all major 3D formats, including USDZ for AR applications.
- Ready Player Me: If you need custom 3D character models for games, VR, or metaverse projects, Ready Player Me uses AI to generate fully rigged 3D avatars from a single selfie. It’s free for non-commercial use, and paid commercial plans start at just $29 per month for developers.
- 3DFY.ai: 3DFY.ai is one of the few AI 3D tools purpose-built for 3D printing. It generates models with clean, manifold geometry that’s ready to slice and print, with no manual repair needed. It offers both text-to-3D and image-to-3D generation, and its paid plans include commercial usage rights for all generated assets.
For Open Source Enthusiasts: Self-Hosted AI 3D Models
If you want full control over your generation process and don’t mind running the model on your own hardware, there are several high-quality open source AI 3D models available for free. Popular options include DreamFusion, Instant NeRF, and TripoSR, all of which can be run locally if you have a GPU with at least 8GB of VRAM. This is a great option if you want to fine-tune the model on your own dataset or avoid monthly subscription fees for commercial use.
“AI 3D generation isn’t replacing 3D artists—it’s removing the repetitive work that used to take up 80% of their time, letting them focus on the creative iteration that makes a design great. For beginners, it’s a gateway to a creative field that was previously locked behind a steep learning curve.”
— Kyle Oppenheimer, lead 3D artist at indie game studio Glitch Factory
Step-by-Step: Generating Your First 3D Model with AI
Now that you’ve chosen a tool, let’s walk through the process of generating a high-quality 3D model, whether you’re starting from a text prompt or a 2D photo. We’ll use a common browser-based tool like Luma AI’s Genie for this example, but the same steps apply to most other AI 3D generation tools.
1. Prepare Your Input (Prompt or Image)
The quality of your AI-generated 3D model depends almost entirely on the quality of your input. If you’re using text-to-3D, a good prompt needs to include three key pieces of information: what the object is, what it’s made of, and key details about its shape and style. For example, instead of “coffee table,” a better prompt would be: “A low-poly vintage oak coffee table with rounded corners, a natural finish, and four thick straight legs, designed for 3D printing.”
Be specific about poly count if you’re using the model for games, or mention “manifold geometry” if you plan to 3D print it. If you’re using image-to-3D, make sure your input photo is well-lit, has the object centered in the frame, and shows the full object from the angle you want to capture. Avoid blurry photos or photos with heavy background clutter, as this can confuse the AI and lead to distorted geometry.
2. Generate the Base Model
Once your input is ready, send it to the AI to generate the base model. Most tools will take 30 seconds to 2 minutes to generate the output, depending on the resolution you select. For most use cases, a medium resolution (between 5,000 and 10,000 triangles) is enough for prototyping, while high resolution (100,000+ triangles) is needed for 3D printing or high-end game assets.
Don’t worry if your first generation isn’t perfect—most tools let you generate multiple variations of the same prompt to get different results. Try generating 3-4 variations first to see which one has the basic shape and details you want.
3. Refine and Edit the AI-Generated Model
Even the best AI 3D generation rarely produces a perfect final model on the first try. Common issues you might encounter include small holes in the geometry, distorted details, or incorrect proportions. Most AI tools include basic editing tools to fix these issues, or you can export the model to a traditional 3D tool like Blender (which is free) for more advanced editing.
Key edits you’ll usually need to make:
- Repair non-manifold geometry: If you’re 3D printing, the AI may leave small holes or overlapping faces that will break your slicer. Use Blender’s “Make Manifold” tool or a free online tool like MeshLab to repair these issues.
- Adjust proportions: If the AI got the general shape right but made the legs too short or the table top too wide, use the scaling tool to adjust individual parts of the model to match your needs.
- Add or refine textures: Most AI tools generate basic PBR textures, but you may want to adjust the color, roughness, or add more detail. Tools like Adobe Substance can auto-generate new textures for your model in seconds, or you can paint custom textures by hand.
- Rigging for characters: If you generated a character model for animation, you’ll need to add a armature rig to make it poseable. Some tools like Ready Player Me generate pre-rigged characters, but others require you to add the rig manually or use an AI rigging tool like Mixamo.
4. Export for Your Use Case
Once you’re happy with your edited model, export it in the correct format for your project:
- 3D printing: Export as an STL or OBJ file
- Game development: Export as GLB, FBX, or glTF
- AR/VR applications: Export as USDZ or GLB
- Further editing in Blender or Maya: Export as OBJ or FBX
Pro Tips for Better Quality AI 3D Models
Even with the best tools, AI 3D generation can sometimes produce underwhelming results if you don’t know how to guide the model. These pro tips will help you get more consistent, high-quality output for any project.
Be Specific About Topology and Use Case
Most AI models don’t automatically know what you plan to use the model for, so you need to tell it. If you’re creating a model for a mobile game, add “low-poly, clean topology” to your prompt to get a model with a manageable poly count that will run smoothly on phones. If you’re 3D printing, add “hollow base, manifold geometry, no overhangs” to get a model that requires minimal post-processing before printing. This small addition to your prompt will save you hours of editing later.
Start with a 2D Concept First
If you’re struggling to get the shape you want from a text prompt, try generating a 2D concept first with a tool like MidJourney or DALL-E, then use that concept as input for an image-to-3D tool. This gives the AI a clear visual reference for the shape, style, and details you want, resulting in a much more accurate 3D model. Many professional 3D designers use this workflow to get consistent results: text to 2D concept, then 2D concept to 3D model, then final editing in Blender. It takes an extra step, but it cuts down on the number of generations you need to try to get the result you want.
Use Iterative Refinement for Complex Models
AI 3D generation works best for single, relatively simple objects: a chair, a character, a tree. If you’re trying to generate a full 3D scene or a complex object with many moving parts, don’t try to generate the whole thing at once. Instead, generate each part separately, then assemble them in a traditional 3D editor. For example, if you want a complete desk setup, generate the desk separately, then the chair, then the lamp, then the keyboard, then combine them all in Blender. This gives you more control over the placement and proportions of each part, and results in a cleaner final model.
Check for Commercial Usage Rights Before Publishing
Not all AI 3D generation tools give you full commercial usage rights to the models you generate. Free tools often restrict usage to non-commercial projects, while some platforms retain ownership of all content generated on their service. Always check the terms of service before using an AI-generated model in a commercial product like a game, product design, or marketing campaign. Most paid commercial tools offer full commercial usage rights, but it’s always worth double-checking to avoid legal issues later.
Use AI to Speed Up, Not Replace, Your Workflow
For professional 3D artists, the biggest benefit of AI 3D generation isn’t creating final models from scratch—it’s speeding up the early stages of the design process. Instead of spending a day modeling 10 different base concepts for a new product, you can generate 10 AI concepts in an hour, pick the best one, then refine it by hand. This cuts down on pre-production time and lets you iterate more quickly, resulting in a better final product. Even if you’re a beginner, don’t be afraid to edit the AI’s output by hand—small adjustments can turn a good AI model into a great one.
Common Challenges and How to Fix Them
AI 3D generation is still a relatively new technology, so you’ll likely run into a few common issues when you start out. Here’s how to fix the most frequent problems:
Distorted or misshapen geometry: This is the most common issue, especially with complex organic shapes like faces or animals. If the AI generates a distorted model, try generating more variations with a more specific prompt. If that doesn’t work, start with a clear 2D reference image and use image-to-3D instead of text-to-3D. For small distortions, you can easily pull the geometry into shape in Blender’s edit mode.
Too many polygons for your project: Many AI tools generate high-poly models by default, which can be too slow to work with for game development or 3D printing. You can fix this by using a decimation tool in Blender or MeshLab to reduce the poly count while preserving most of the detail. For most use cases, you can reduce a 100,000 poly model to 10,000 polys without any noticeable loss of quality.
Non-manifold geometry that breaks 3D printing: As we mentioned earlier, AI often leaves small holes or overlapping faces that 3D printing slicers can’t process. The easiest fix is to use a free online tool like Mesh Repair by 3DFY.ai, which automatically repairs non-manifold geometry in one click. For more complex issues, Blender’s built-in 3D print toolbox has a feature that finds and fixes common errors.
Poor texture quality: Many free AI tools generate low-resolution textures that look blurry up close. If that’s the case, you can use an AI upscaling tool like Topaz Gigapixel AI to increase the resolution of your texture, or generate a new PBR texture with a tool like Substance 3D Sampler, which can create a high-quality texture from a single reference photo.
Conclusion
AI 3D generation has opened up 3D design to a whole new audience, from hobbyists 3D printing custom gifts to professional designers speeding up their prototyping workflow. While it’s not yet perfect, the technology has improved dramatically in just the last two years, and today’s AI tools can generate high-quality models that are ready for production with just a little bit of post-processing. The key to success is choosing the right tool for your use case, learning to write clear prompts that guide the AI, and knowing how to fix common issues in a 3D editor after generation. Whether you’re a complete beginner or a professional 3D artist, AI 3D generation can cut down your design time from days to minutes, freeing you up to focus on the creative work that matters most. As the technology continues to improve, we can expect even higher quality output, faster generation times, and more accessible tools that will continue to democratize 3D design for everyone.