
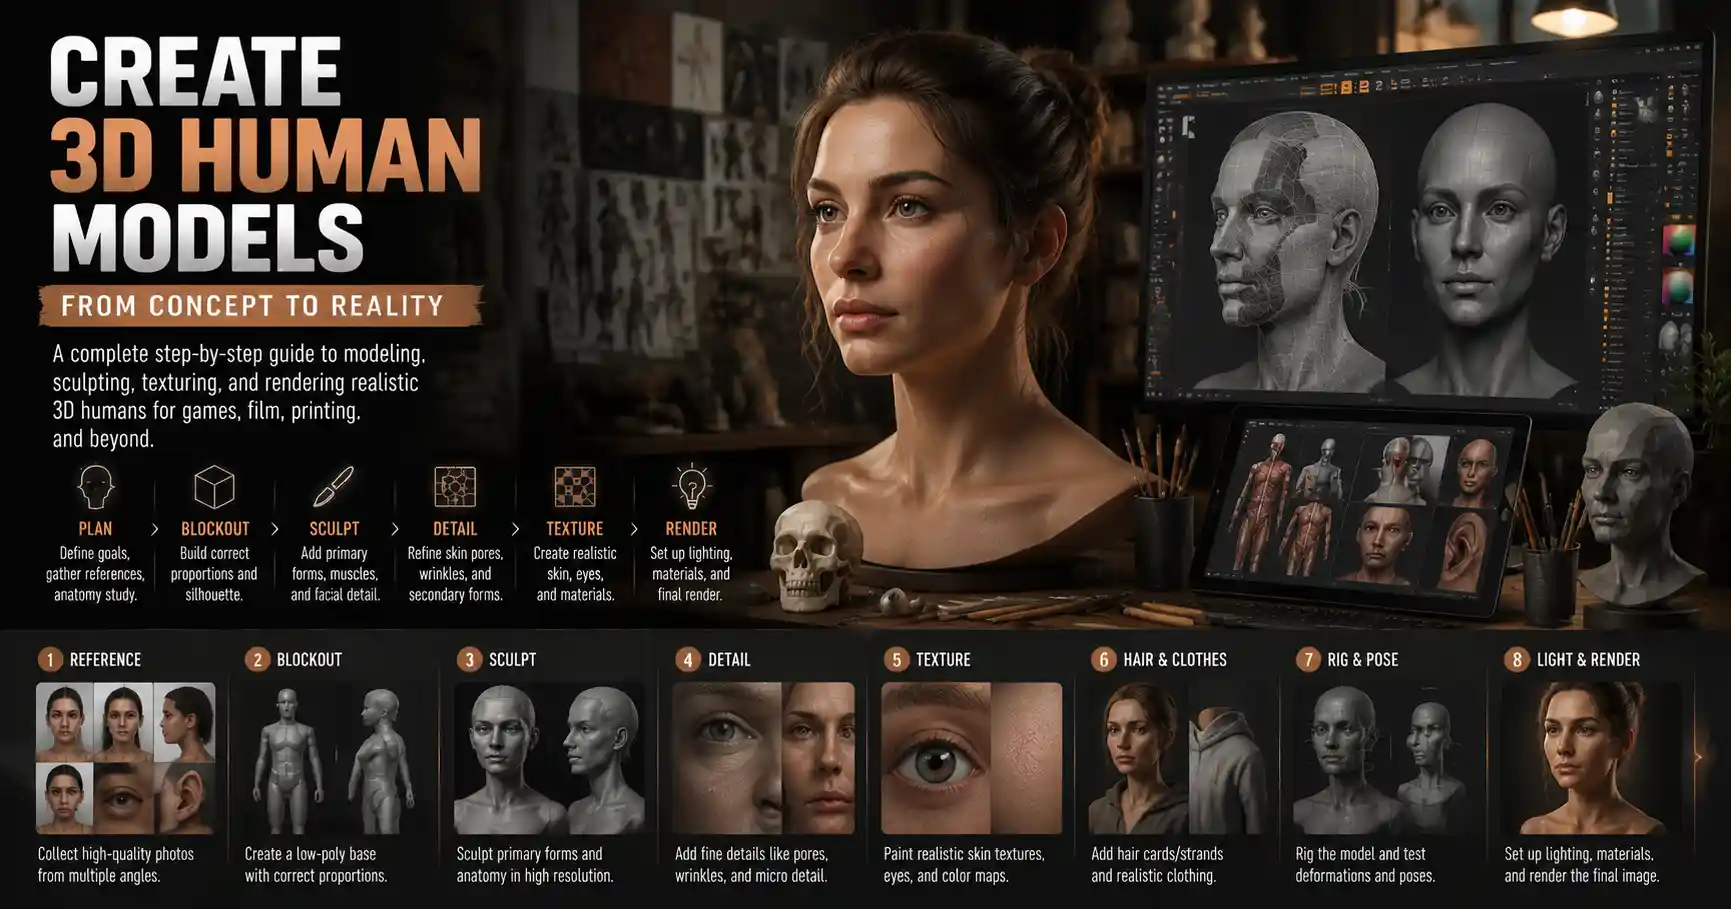
From hyper-realistic characters in blockbuster video games to medical training simulations that help surgeons practice life-saving procedures, 3D human models are everywhere in modern digital creation. Whether you’re an aspiring game artist, a product designer working on wearable tech, or a hobbyist curious about bringing digital people to life, learning to create a convincing 3D human model is one of the most challenging—and rewarding—skills in 3D design. It requires a mix of artistic observation, technical knowledge, and patience, but modern tools have made the process more accessible than ever for beginners and professionals alike. This guide breaks down every step of the process, from planning your model to adding the finishing touches that make it feel alive.
Plan Your Project and Gather References
Before you ever open a 3D modeling program, the most important work for a successful 3D human model happens in the planning stage. Human anatomy is incredibly complex, and even small mistakes in proportion or structure will make your model look uncanny or unnatural. Taking the time to plan and gather references upfront saves hours of rework later.
Define your project goals
Not all 3D human models are created equal. A stylized character for a mobile indie game requires far less detail than a close-up portrait for a feature film, so your first step is to clarify what your model will be used for. This determines everything from poly count (the number of polygons that make up your model) to the level of texture detail you’ll need to add.
For example: if you’re creating a background crowd character for a open-world game, you’ll likely aim for a low-poly model (under 10,000 triangles) with simple textures to keep game performance smooth. If you’re creating a 3D print of a portrait sculpture, you’ll need a high-poly model with tens of millions of polygons to capture fine skin texture and subtle facial features. Knowing your end goal keeps your work focused and efficient.
Gather high-quality reference images
Even professional character artists rely on references—no one can memorize every nuance of human bone structure, muscle shape, or skin texture from memory. The best references are photos of real people matching the age, body type, gender, and ethnicity of your character, shot from multiple angles. Avoid relying solely on 3D models from other artists, as this can lead to unintentional copying and perpetuate common anatomical mistakes.
- Front and side profile photos: These are non-negotiable for blocking out correct proportions. Look for photos where the subject is standing straight against a plain background, with arms slightly away from their body to avoid overlapping shapes.
- Close-up reference for key features: Gather detailed shots of eyes, nose, lips, ears, hands, and any specific details like wrinkles, scars, or hair texture you plan to include.
- Anatomy references: For realistic models, keep a set of anatomy charts showing muscle groups and bone structure handy. Understanding how the skeleton under the skin shapes the surface of the body will help you create a model that moves and looks natural.
- 3D reference tools: Tools like Sketchfab and Character Creator offer free, rotatable 3D reference models you can view from any angle, which is much more flexible than static 2D photos for checking tricky areas like the armpit or hip.
Organize your references in a mood board or reference program like PureRef, so you can keep them open on a second screen while you work. This lets you check proportions and details at a glance without switching windows constantly.
Choose Your Modeling Workflow and Tools
There’s no one “right” way to create a 3D human model, and the workflow you choose will depend on your skill level, budget, and project goals. Two main workflows are common today: photogrammetry (creating a 3D model from hundreds of photos of a real person) and sculpting/modeling from scratch. Each has its own advantages and use cases.
Photogrammetry workflow
Photogrammetry is a process that uses software to automatically generate a 3D model by analyzing overlapping photos of a subject taken from dozens of different angles. This workflow is incredibly fast for creating realistic models of real people, and it captures every tiny detail of skin texture, pores, and even clothing with minimal manual work. It’s commonly used in film and game production for creating digital doubles of real actors.
To get started with photogrammetry, you don’t need a fancy studio—many hobbyists get good results with just a smartphone camera and free software like Meshroom. The key is to take hundreds of photos from every possible angle, moving around the subject slowly and making sure every part of the body is captured in at least 10-15 overlapping shots. The software then stitches these photos together to create a 3D mesh and a matching texture map.
The downside of photogrammetry is that the resulting model is usually very high-poly, and it often needs significant cleaning up to remove errors and make it usable for animation or 3D printing. It’s also not a good fit if you want to create a stylized or original character that doesn’t exist in real life.
Traditional sculpting and modeling workflow
Creating a model from scratch gives you full creative control over every aspect of the character, from overall proportions to the smallest facial detail. This is the standard workflow for original characters in games, animation, and illustration. Modern digital sculpting tools have made this process much more intuitive than traditional polygon modeling, especially for beginners.
The most popular tools for this workflow today include:
- ZBrush: The industry standard for high-poly digital sculpting, with a huge range of brushes and tools designed for creating organic shapes like human bodies and faces. It’s not free, but it’s the tool used by most professional character artists.
- Blender: A free, open-source 3D creation suite that includes powerful sculpting, modeling, and texturing tools. It’s a great choice for beginners on a budget, and it’s powerful enough for professional work too.
- Nomad Sculpt: A mobile/tablet sculpting app that lets you sculpt on the go with a stylus, with enough features for creating full human models. It’s ideal for beginners learning the basics of sculpting.
- Character Creator: A paid tool that lets you start with a base human model and customize proportions, features, and clothing quickly. It’s a great shortcut for game developers who need to create multiple characters fast.
For beginners new to 3D, starting with Blender or Nomad Sculpt is the best way to learn the fundamentals without investing in expensive software upfront. Once you’ve mastered the basics, you can upgrade to professional tools if you need their advanced features.
Block Out Base Shapes and Refine Anatomy
Once you have your references and your tools set up, it’s time to start building your model. Whether you’re sculpting from a blank sphere or starting with a base mesh from Character Creator, the process follows the same core principle: start big, then work your way down to smaller details.
Block out your overall proportions
Blocking out is the process of creating a simple, low-detail version of your model to get the overall proportions right before you add any fine details. This is the most critical step for a natural-looking human model—if your proportions are wrong here, no amount of fine detail will fix the final result.
The classic rule of thumb for adult human proportions is that the average person is 7.5 to 8 head heights tall. That means if you draw a line from the top of the head to the bottom of the feet, it’s about 7.5 times the height of the head itself. Stylized characters often use 8 or even 9 head heights to create a more elongated, heroic look, while children have shorter proportions (a toddler is only 4 head heights tall, for example).
“Proportion is everything in a human model. A 5% shift in the length of the femur or the position of the eyes can turn a believable character into an uncanny valley mess. I spend as much time checking proportions in the blocking stage as I do on all the detailing that comes after.”
Start by blocking out the largest masses first: the head, torso, pelvis, upper arms, lower arms, upper legs, and lower legs. Don’t worry about fingers, facial features, or muscle definition yet. Just focus on getting the overall size and position of each mass right. Compare your model constantly to your references, checking things like the distance between the shoulders, the position of the elbows relative to the waist, and the length of the legs compared to the torso.
Refine anatomy and add secondary shapes
Once you’re happy with your overall proportions, it’s time to add secondary shapes: muscle groups, bone landmarks, and overall body fat distribution that give your character their unique shape. For realistic models, it’s important to remember that the human body isn’t just a collection of separate muscles—muscles overlap and flow into each other, and fat and skin soften the edges between them.
Common mistakes beginners make here include over-defining every muscle (even very fit people don’t have sharply separated abs and arm muscles at rest) and ignoring the impact of the skeleton on the surface shape. Things like the collarbone, shoulder blades, elbow bones, and kneecaps create subtle indentations and bumps on the skin that make a model look believable. For example, the Adam’s apple isn’t just a lump in the throat—it’s shaped by the underlying thyroid cartilage of the larynx, and its size and position vary a lot between people.
Once the body is done, move on to the face and hands. These are the most expressive parts of a human model, and viewers notice mistakes here more than anywhere else. For the face, start by blocking out the overall shape of the skull, then add the brow ridge, cheekbones, jawline, and chin before adding the nose, eyes, and lips. For hands, remember that the palm is roughly the same length as the fingers, and the thumb sits out to the side at a different angle than the other fingers.
Retopologize, Unwrap UVs, and Texture Your Model
After you’ve finished sculpting your high-poly details, you’ll need to prepare the model for its final use. For most applications (like game development or animation), the high-poly sculpt you created has far too many polygons to work with efficiently. This stage of the process cleans up your model and adds the color and texture details that bring it to life.
Retopology
Retopology is the process of creating a new, clean low-poly mesh that matches the shape of your high-poly sculpt. This new low-poly mesh is what you’ll use for animation or rendering, and it keeps file sizes and performance demands manageable. A good retopology also makes it easier to deform the model correctly when you animate it—bad topology will cause weird stretching and bending when you move the character’s arms or legs.
The goal of retopology is to create a mesh with as few polygons as possible while still matching the shape of your high-poly sculpt, with edge loops that follow the natural flow of the muscles and skin. For example, you’ll want edge loops around the mouth and eyes to make it easy to animate facial expressions later. Most 3D tools like Blender and ZBrush have automatic retopology tools that can do most of the work for you, but you’ll usually need to clean up the result by hand to get a good topology for animation.
UV unwrapping
Once you have your clean low-poly mesh, you need to create UV coordinates that tell your software how to map 2D texture images onto your 3D mesh. This process is called UV unwrapping, and it’s like unfolding a 3D shape into a flat 2D pattern, similar to how you’d unfold a cardboard box to lay it flat. A good UV unwrap maximizes the amount of texture space you use, which means your textures will be sharper, and avoids stretching that would make textures look distorted.
Again, most modern 3D tools have automatic UV unwrapping features that work well for human models, but you may need to adjust seams to hide them in less visible areas (like under the arm or along the hairline) to avoid visible distortion.
Baking details
Next, you’ll bake the high-poly details from your sculpt onto your low-poly mesh using texture maps. Baking takes all the fine bumps and wrinkles from your high-poly sculpt and saves that information as a 2D texture map, which can then be applied to the low-poly mesh to make it look just as detailed as the high-poly version, without the performance cost. Common maps you’ll bake include:
- Normal map: Stores information about surface direction to create the illusion of fine detail without adding extra polygons.
- Ambient occlusion map: Stores shadow information for crevices and areas where different parts of the body touch, like between the fingers or under the chin, to add depth.
- Displacement map: For high-end rendering, this actually changes the shape of the mesh to add fine detail, rather than just faking it like a normal map.
Texturing and shading
Texturing is where you add color, skin tone, pores, wrinkles, tattoos, and other surface details to your model. For human skin, modern texturing workflows use a combination of base color maps, roughness maps (to control how shiny the skin is), and subsurface scattering to create a realistic look. Subsurface scattering is a shading effect that simulates how light penetrates and scatters through thin layers of skin, which is what gives human skin its soft, glowing look—without it, skin often looks flat and plastic.
For beginners, pre-made skin texture assets are a great starting point, which you can customize to match your character’s skin tone and add unique details like freckles, scars, or age spots. Programs like Substance Painter make it easy to layer textures and paint details directly onto your 3D model, with presets for skin that take a lot of the guesswork out of shading.
Rigging and Final Testing
If you plan to animate your 3D human model (for a game, animation, or interactive project), the final step after texturing is rigging. Rigging is the process of adding a digital skeleton (called an armature) to your model, and setting up how the mesh deforms when the skeleton moves. A good rig lets you pose your character and animate natural movement without weird stretching or distortion.
Basic rigging for beginners
For beginners, automatic rigging tools like Auto-Rig Pro for Blender or the built-in rigging tools in Character Creator can generate a fully functional human rig in minutes. These tools place the bones in the correct positions for a human body and automatically weight the mesh (which controls how much each part of the mesh moves when a bone moves). You’ll still need to adjust the weight painting by hand to fix deformation issues—for example, fixing bad stretching around the armpit or elbow when the arm bends.
Test your model
After rigging, test your model by posing it in a range of common positions—standing, sitting, bending the arms and legs, and making facial expressions if you have a facial rig. This lets you catch any issues with deformation, topology, or weight painting before you use the model in a final project. Even if you’re not planning to animate your model (for example, if it’s just for a static render or 3D print), testing a few extreme poses will help you spot any anatomical mistakes you missed in the sculpting stage.
For 3D printed models, you’ll also need to check for errors like non-manifold geometry (holes or overlapping faces that will break the 3D printing slicer software) and add supports for overhanging parts like arms or a chin before exporting your model for printing.
Conclusion
Creating a convincing 3D human model is a skill that takes time and practice to master, but it’s far more accessible today than it was even 10 years ago, with free tools and endless learning resources available for beginners. The core process never changes: start with solid references, get your proportions right early, work from large shapes to small details, and test your model thoroughly before calling it done. Don’t get discouraged if your first few models don’t turn out how you hoped—even professional character artists make mistakes and learn from every project. With patience and practice, you’ll be able to create 3D human models that look natural, expressive, and ready for any project.