
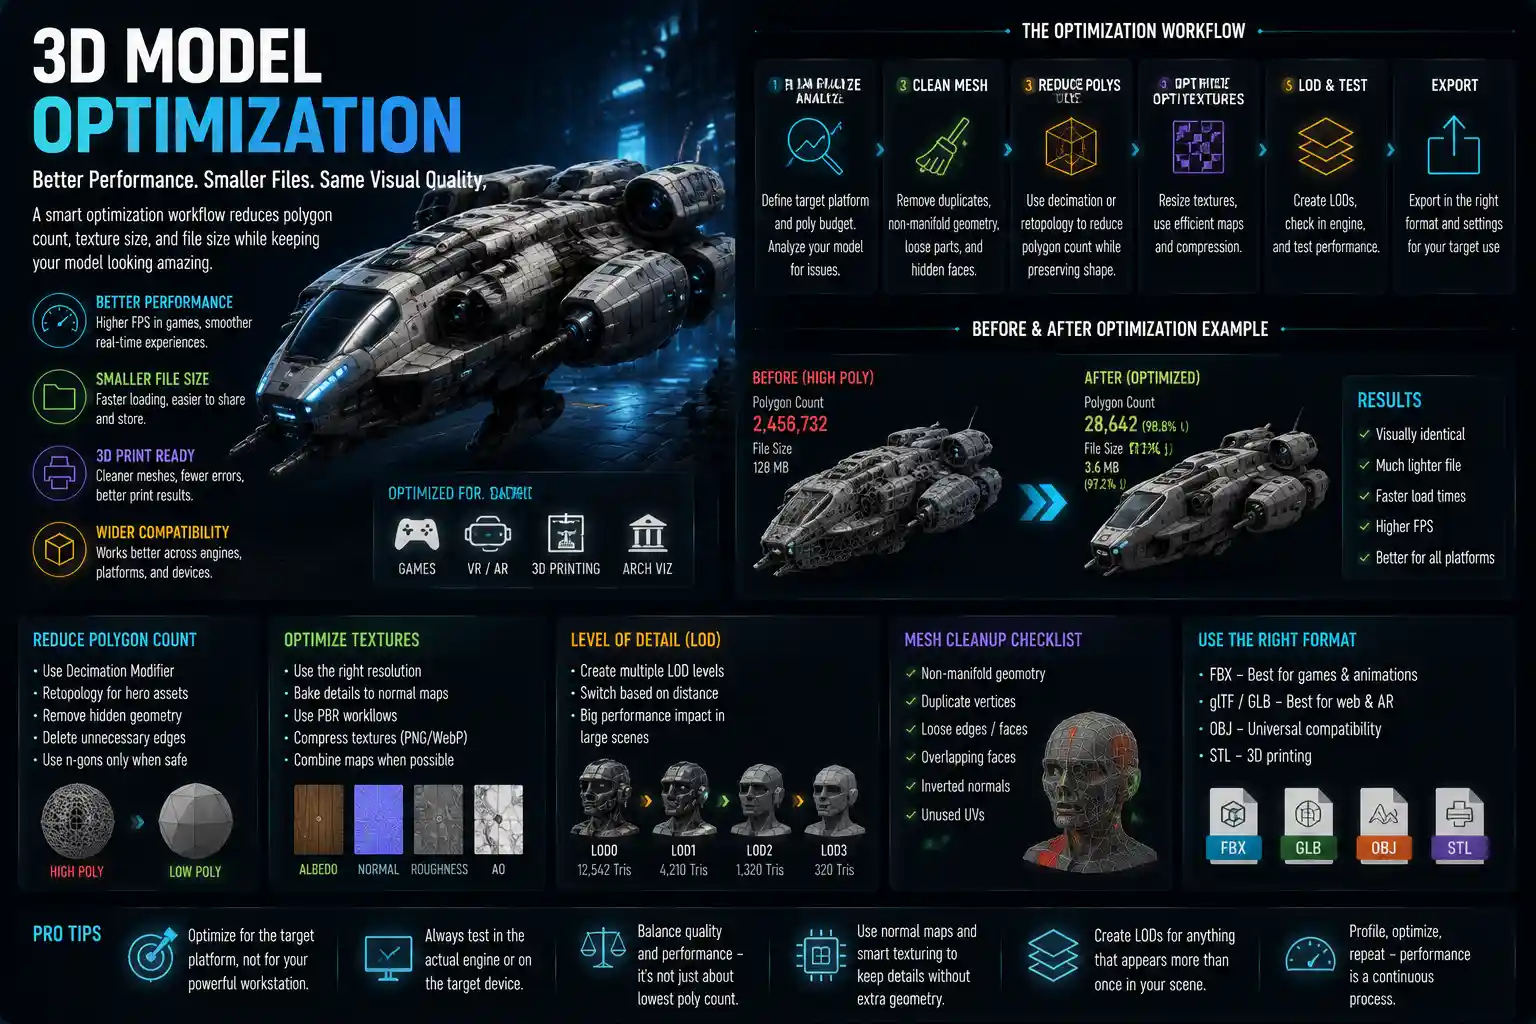
Whether you’re building assets for a AAA video game, creating a 3D printable prototype, or designing a immersive augmented reality filter for social media, an unoptimized 3D model can sink your project before it even launches. Slow load times, choppy frame rates, failed 3D prints, and oversized file sizes that push users away are all avoidable with the right optimization workflow. Optimization isn’t just about reducing polygon counts—it’s a strategic process that balances visual quality, performance, and functionality for your specific use case. Let’s break down how to approach 3D model optimization step by step, from initial modeling to final export.
Start with Optimization in Mind During Modeling
The biggest optimization mistakes happen long before you open a decimation tool or start cleaning up your mesh. The most efficient optimized models are built that way from the start, saving hours of rework later. By establishing good modeling habits early, you can avoid unnecessary complexity that bogs down your project without sacrificing the quality that makes your design stand out.
Block out your base mesh first
Before adding fine details, start with a low-poly base blockout that matches the overall shape and proportions of your final object. This step helps you identify what geometry is actually necessary to sell the form, before you spend time adding vertices that won’t contribute to the final silhouette. For example, if you’re modeling a wooden dining chair, your blockout will capture the curve of the backrest and the thickness of the legs without adding grain or carved details early on. Any geometry that doesn’t read correctly in the low-poly blockout can be adjusted immediately, rather than being left to fix after you’ve built out a high-poly version.
Avoid unnecessary geometry from the start
Many new 3D artists accidentally add extra geometry that serves no functional or visual purpose. A common example is creating a rounded cube by subdividing a box 3 times when a single subdivision would achieve the same silhouette for a background asset. Another frequent issue is overlapping faces or hidden interior geometry—when you model a mug, for example, you don’t need a solid back face for the inside if the opening is too small for the camera to see that area. For 3D printing, interior geometry can add unnecessary material and print time, while for real-time applications, it adds extra triangles that the render engine has to process.
Keep these practical rules of thumb in mind during the initial modeling phase:
- Only add loops where they’re needed to define a sharp edge or preserve a shape when smoothing; extra edge loops just add vertex count
- Delete any faces that are completely hidden from view (interior walls, backs of objects that sit against a wall)
- Weld overlapping vertices and remove loose edges that don’t contribute to any face to clean up your mesh
- Use symmetry modeling for symmetrical objects to cut your work and your polygon count in half
Plan for detail work with texture mapping
One of the core principles of modern 3D optimization is baking detail into textures instead of keeping it in geometry. Fine details like wood grain, scratches, engravings, or stitching can add thousands of unnecessary polygons if you model them directly, but they can be reproduced almost identically with normal maps, roughness maps, or ambient occlusion textures at a fraction of the performance cost. If you’re working for a real-time application like games or AR, plan to create a high-poly sculpt of all your fine details, then bake that detail onto a low-poly base mesh. This workflow gives you the visual quality of a high-poly model with the performance of a low-poly one.
Reduce Polygon Count Strategically
Polygon count (or triangle count, for real-time applications) is the most common metric for 3D model size, and reducing it strategically is the foundation of any optimization project. The goal isn’t to get the lowest possible polygon count—it’s to remove polygons that don’t contribute to the visual quality of the model. A 10,000-triangle model that looks identical to a 50,000-triangle original is a successful optimization, while a 2,000-triangle model that’s distorted and unrecognizable is not.
Understand your polygon budget first
Before you start decimating your model, you need to know what polygon budget you’re working with. Polygon budgets vary wildly depending on the use case:
- Mobile AR/VR assets: 100–5,000 triangles per asset, with a total scene budget under 50,000 triangles
- Real-time game assets: 1,000–50,000 triangles for foreground assets, as low as 100 triangles for small background props
- 3D printing: 50,000–200,000 triangles for most consumer printers (higher counts increase slicing and print time unnecessarily)
- Architectural visualization for web: 100,000–1,000,000 triangles total for an entire building model
Always check the requirements of your platform before you start optimizing. A budget that’s more than enough for mobile will be far too small for a cinematic render, so matching your polygon count to your use case is critical.
Use the right decimation tools for your project
Most 3D software (Blender, Maya, 3ds Max, ZBrush) includes built-in decimation tools that automatically reduce polygon count while preserving shape. Blender’s Decimate Modifier, for example, has three modes that work for different use cases: Collapse mode reduces polygon count by merging vertices based on a set ratio, Planar decimation works well for hard-surface models with flat planes by removing edges between coplanar faces, and Unsubdivide reverses subdivision to remove extra geometry smoothly.
For more control, use manual retopology instead of fully automatic decimation for hero assets that will be front and center in your scene. Automatic decimation can sometimes distort silhouettes or create messy topology, especially on organic models like characters or plants. Manual retopology involves drawing new clean faces over your high-poly sculpt to create a low-poly version that preserves the exact shape you want. It’s more time-consuming, but it’s worth it for assets that will be seen up close.
Optimization is not about removing as much as possible. It’s about removing as much as possible without the viewer noticing. The best optimization is invisible to the end user.
Target unimportant areas for reduction
When you’re reducing polygon count, prioritize preserving detail in areas that will be seen, and remove as much as possible from areas that won’t. For example: if you’re modeling a character that will always be seen from the front, you can reduce polygon count on the back of the head and the torso (that said, don’t remove it entirely if the camera might ever move around the character). For a couch that sits against a wall, you can remove detail from the back face that will never be visible. Objects that are in the background of a scene can have far lower polygon counts than foreground hero assets, even if they’re the same type of object—a background chair can be 200 triangles, while the main character’s desk chair can be 10,000 triangles.
Level of detail (LOD) systems are a powerful tool for this kind of targeted optimization in real-time applications. LODs create multiple versions of the same model with different polygon counts, and the engine automatically switches to a lower LOD when the object is far away from the camera. A single object might have a 10,000-triangle LOD0 for close viewing, a 2,000-triangle LOD1 for medium distances, and a 500-triangle LOD2 for long distances, cutting the performance cost dramatically when the object isn’t close enough for the viewer to notice the lower detail.
Clean Up Topology and Fix Common Issues
Even after you reduce your polygon count, messy topology can cause performance issues, rendering errors, or problems with 3D printing. Cleaning up your mesh is a often-overlooked step that makes a huge difference in how your model performs, regardless of its final polygon count. A clean 5,000-triangle mesh will always perform better than a messy 5,000-triangle mesh with errors.
Fix non-manifold geometry and other errors
Non-manifold geometry is any geometry that doesn’t follow the standard rules for mesh topology, causing errors in render engines, game engines, and 3D print slicers. Common examples include:
- Edges that are connected to more than two faces
- Faces that overlap each other without being merged
- Open edges where a face is missing, leaving a gap in the mesh
- Zero-area faces or disconnected vertices that don’t connect to any face
For real-time applications, non-manifold geometry can cause rendering glitches where faces disappear or flicker. For 3D printing, non-manifold geometry can cause slicer software to fail to generate a toolpath entirely, ruining a print job before it starts. Most 3D software has built-in tools to find and fix non-manifold geometry—Blender’s 3D Print Toolbox add-on, for example, will scan your mesh and highlight non-manifold edges for you to fix. It’s good practice to run a mesh check before exporting your model to catch these errors early.
Optimize UV unwrapping
UV unwrapping is the process of unfolding your 3D mesh into a 2D map so you can apply textures to it. Poor UV unwrapping doesn’t just hurt texture quality—it can also add unnecessary file size and reduce performance. A common mistake is packing UV islands inefficiently, leaving large empty spaces in the texture atlas that waste texture memory. Wasted space means you either end up with a larger texture than you need, or you have less space for detail in the areas that need it.
Another common issue is stretching, where pixels are stretched unevenly across a face, leading to blurry textures that require a higher resolution to look sharp. By unwrapping your UVs properly, you can fit all your detail into a smaller texture size, reducing memory usage and improving performance. For models that use a shared texture atlas (multiple small props using the same texture sheet), efficient UV packing lets you fit more props into a single sheet, reducing the number of draw calls the render engine has to process, which speeds up frame rates.
Combine meshes where it makes sense
If you have a single object made of 20 different small meshes (for example, a chess set with 32 separate pawn, rook, and king meshes), combining them into a single mesh can reduce the number of draw calls and improve performance in real-time engines. Each separate mesh requires a draw call from the engine, so reducing the number of meshes in a scene cuts down on the work the GPU has to do. That said, don’t combine meshes that need separate materials or animations—that will cause more problems than it solves. Only combine static meshes that use the same material and won’t move independently.
Optimize Textures and Materials for Performance
Geometry is only half of the optimization story—textures often take up more memory and cause more performance issues than polygon count, especially on mobile devices. Optimizing your textures ensures that your model loads quickly and runs smoothly without losing visual quality.
Use the right texture resolution
Texture resolution is measured in pixels, with common sizes being 256x256, 512x512, 1024x1024, 2048x2048, and 4096x4096. A 4096x4096 texture has 16 times more pixels than a 1024x1024 texture, which means it takes up 16 times more memory. That’s overkill for small background props that will never be seen up close. Match your texture resolution to the asset’s role in the scene: a tiny prop like a coffee mug on a background shelf only needs a 512x512 texture, while a hero character that’s the focus of the scene can use a 2048x2048 or 4096x4096 texture.
Almost all GPUs work best with texture resolutions that are powers of two (e.g., 512, 1024, 2048, etc.). Using a non-power-of-two resolution like 1200x1200 forces the GPU to resize the texture to 2048x2048 at load time, wasting memory and increasing load times. Stick to power-of-two sizes for all real-time applications.
Compress textures appropriately
Texture compression reduces file size and memory usage by removing redundant data from your texture files. Most game engines and 3D platforms automatically apply compression, but you can adjust the settings to balance quality and file size. For example, a base color texture can use a higher compression level than a normal map, where small details matter more. For web-based 3D platforms like Three.js or Sketchfab, using compressed texture formats like Basis Universal or KTX2 can cut file size by 50-75% compared to uncompressed PNG or JPEG, with almost no visible loss of quality.
Also, remove unused texture channels to save space. If your material doesn’t use a displacement map, don’t include it in your export. If your model is a solid opaque plastic, you don’t need an alpha transparency channel, which adds unnecessary file size. Every unused channel you remove cuts down on memory usage.
Use texture atlases for multiple assets
As we mentioned earlier with UV packing, a texture atlas is a single texture file that contains the textures for multiple small assets. Instead of having a separate 512x512 texture for each of 10 different small props, you can fit all 10 into a single 1024x1024 texture atlas. This reduces the number of draw calls the GPU has to process, because it can render all 10 props in a single draw call instead of 10 separate ones. For scenes with dozens of small static props, this can lead to a noticeable improvement in frame rate, especially on low-end mobile devices.
Optimize for Specific Use Cases
Optimization isn’t one-size-fits-all. The steps you take to optimize a model for 3D printing are very different from the steps you take for mobile AR, so it’s important to tailor your workflow to your end use case. Let’s break down the key priorities for the most common use cases.
Real-time games and AR/VR
The top priorities for real-time applications are low polygon count, low memory usage, and minimal draw calls. For VR, in particular, frame rate is critical to avoid motion sickness, so most VR applications require a frame rate of 90fps or higher, which means keeping total triangle count per frame under 1-2 million for mobile VR. Always implement LODs for all assets larger than a few thousand triangles, compress textures aggressively, and combine static meshes where possible. For AR, keep the entire scene under 50,000 triangles to ensure it runs smoothly on older mobile devices.
3D printing
For 3D printing, the main priorities are a watertight, error-free mesh, and a polygon count that’s low enough for slicer software to process quickly. You don’t need to decimate your model down to a few thousand triangles, but excessive polygon counts (over 1 million triangles) will slow down slicing and increase g-code file size for no benefit, because most consumer 3D printers can’t resolve detail smaller than 0.1mm anyway. Always check for non-manifold geometry, intersecting faces, and gaps before exporting, and add consistent wall thickness to avoid weak prints. Most slicers work best with STL or 3MF files that have between 50,000 and 200,000 triangles.
Web-based 3D and product configurators
For 3D models that load in a web browser, the top priority is small file size to reduce load times, especially for users with slow internet connections. Compress both your model geometry and your textures, use compressed mesh formats like glTF or GLB instead of larger formats like OBJ or FBX, and keep polygon count low. A 10MB GLB file will load in a few seconds on most mobile connections, while a 100MB FBX file can take minutes to load, leading many users to leave before it even appears.
Cinematic rendering and arch-viz
For offline rendering, you don’t need to optimize for real-time frame rates, but optimization still makes rendering faster and avoids file bloat. For architectural visualization, you can optimize by removing hidden interior geometry from walls and floors, and using instancing for repeated assets like chairs or tiles instead of creating multiple copies of the same mesh. Instancing lets the renderer use a single copy of the geometry for all instances, saving memory and reducing render time. For cinematic assets, you still want to keep topology clean to avoid issues with subdivision and rendering, even if you’re working with high-poly models.
Test and Validate Your Optimized Model
After you finish optimizing, you need to test your model in the target environment to make sure it works correctly and still looks good. It’s common for an optimized model to look fine in your 3D modeling software but cause issues when loaded into a game engine or sliced for 3D printing. Always test your model in the final platform to catch issues early.
For real-time applications, check the frame rate with your optimized model added to the full scene. If you’re building a mobile game, test it on the lowest-end device you support to make sure it runs smoothly. Check the model from all camera distances to make sure LOD transitions aren’t visible, and that silhouettes don’t distort when the lower LODs load. Check texture quality to make sure compression didn’t introduce visible artifacts like blurriness or banding.
For 3D printing, run a test slice in your slicer software before you try to print. Most slicers will highlight errors like non-manifold geometry or hollow areas that need support, so catching these issues before you print saves time and material. For large models, check the overall polygon count to make sure your slicer can process it without crashing.
For web-based 3D, test the load time on a slow 3G connection to make sure it doesn’t take too long to load. Many platforms like Sketchfab show you the file size and give you optimization suggestions directly, so you can use those tools to identify any remaining issues.
Conclusion
Optimizing 3D models is a balancing act between visual quality and performance, not just a race to the lowest polygon count. By building optimization into your workflow from the start, reducing complexity strategically, cleaning up your mesh and textures, and tailoring your approach to your specific use case, you can create models that look great and perform exactly as needed. The best optimization is invisible: end users get smooth performance, fast load times, and a great experience without ever noticing the work you put into trimming unnecessary geometry and reducing file size. Whether you’re a game developer, 3D printing enthusiast, or web designer, these steps will help you create optimized models that work for your project every time.