
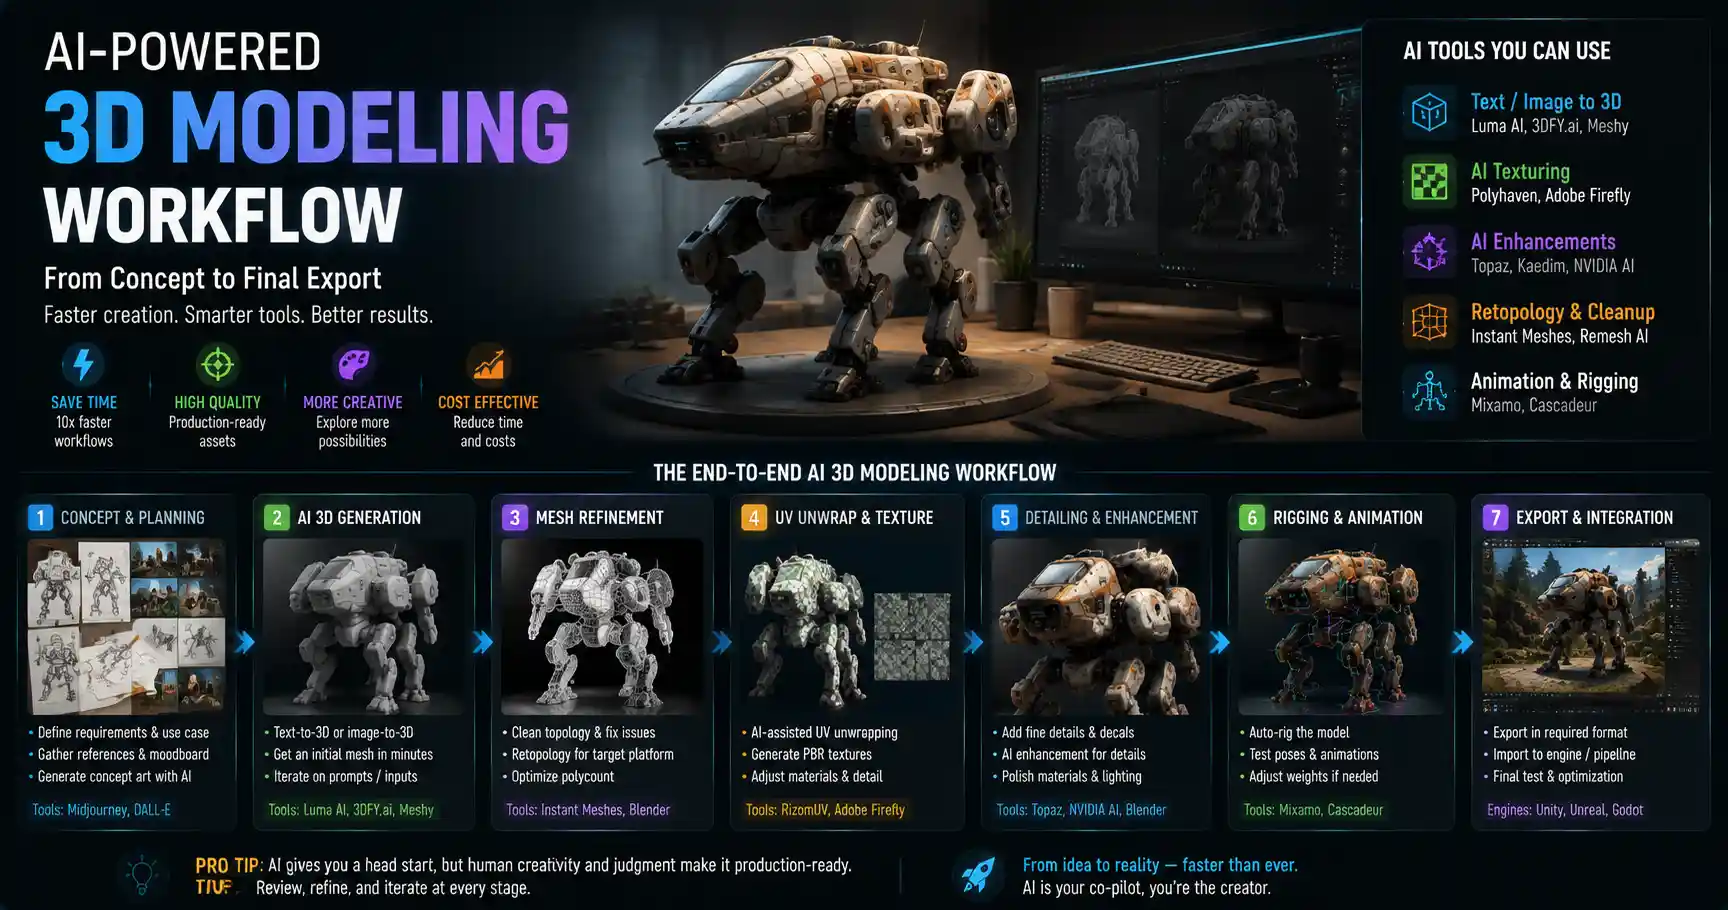
For decades, creating a detailed 3D model required weeks of manual sculpting, retopology, and texture work, with even experienced artists spending hours refining small details to get a usable result. Today, artificial intelligence has upended that process, cutting production time from weeks to hours while opening up 3D creation to designers, game developers, product designers, and hobbyists who never had the advanced technical skills to work in three dimensions. AI 3D modeling workflows combine the speed and automation of machine learning with human creativity to produce high-quality assets for games, film, architecture, e-commerce, and 3D printing. But to get the best results, you need to understand how to integrate AI tools into a structured, efficient process, rather than relying on generative AI to do all the work. This guide breaks down the end-to-end AI 3D modeling workflow, from initial concept to final export, with practical tips to avoid common pitfalls.
The Foundation: Pre-Production and Concept Generation
Every successful 3D project starts long before you open an AI generation tool. Pre-production lays the groundwork for your model, ensuring you end up with a result that matches your use case and avoids costly rework later. AI has already transformed this early stage, turning rough ideas into detailed concepts in minutes, rather than days of hand-drawn sketching.
Defining Project Requirements
Before you generate any 3D geometry, you need to clarify the purpose of your model, as this will shape every decision you make throughout the workflow. A 3D model for a 3D-printed custom chess piece has very different requirements than a model for a background asset in a AAA video game or a product render for an e-commerce listing. Key details to lock in early include:
- Polycount budget: High-poly models for film rendering can have millions of polygons, while real-time game assets are often limited to a few thousand triangles.
- Texture resolution: Product visualizations typically require 4K or 8K textures, while mobile game assets may only need 1K or 2K to keep file sizes small.
- Level of detail: A hero asset (the main object the viewer interacts with) needs far more detail than a repeating environmental asset like a rock or a tree.
- Export requirements: Different platforms (Unity, Unreal, Blender, 3D printing slicers) require different file formats and geometry specifications.
Once you have your requirements clear, the next step is turning your rough idea into a concrete concept that the AI can interpret accurately. Text-to-image AI tools like MidJourney, DALL-E, or Stable Diffusion are perfect for this stage, letting you generate multiple concept variations from a simple text prompt in seconds. For example, if you’re designing a modern wooden coffee table for an architectural visualization, you can generate 10 different style variations (mid-century modern, Scandinavian, industrial) in minutes, then pick the one that fits your project before moving to 3D generation.
Reference Gathering
Even the best text prompts can’t capture every detail of a complex object. Most modern AI 3D tools support image-to-3D generation, so collecting high-quality reference photos is a critical step. If you’re modeling an existing object, such as a custom part for a vintage car or a new consumer product, you can take your own photos from multiple angles to use as a reference. For conceptual work, you can pull reference images from stock photo sites or design libraries to capture specific textures, shapes, or design features.
AI doesn’t create good 3D out of nothing. It gives you a strong starting point, but the quality of that starting point depends entirely on how clear your concept and references are before you start generating.
AI Initial Geometry Generation
This is the step that has revolutionized 3D modeling: turning a text prompt or 2D reference into a full 3D mesh automatically. A process that used to take an artist 10-40 hours of manual work can now be done in seconds or minutes, depending on the complexity of the model. There are three main approaches to AI 3D generation, each suited to different use cases.
Text-to-3D Generation
Text-to-3D tools let you generate a complete 3D model from nothing more than a text description. Tools like Luma AI, 3DFY.ai, and Point-E by OpenAI use diffusion models or transformer architectures to generate textured 3D meshes directly from prompts. This approach is ideal for conceptual work, prototyping, or creating generic assets when you don’t have existing reference images. For example, a game designer needing a handful of generic fantasy rocks for a forest level can generate 10 unique variations from a single prompt in less than 10 minutes.
The key to getting good results from text-to-3D is writing detailed, specific prompts that include style, shape, material, and use case context. A vague prompt like “wooden chair” will often give you a generic, distorted model, while a specific prompt like “mid-century modern solid oak dining chair, four straight legs, fabric upholstered seat, clean simple lines, photorealistic wood grain, low poly for game asset” will produce a much more usable starting point.
Image-to-3D Generation
If you already have a 2D concept or photos of an existing object, image-to-3D is the most common workflow. Tools like RealityCapture, Polycam, Luma AI, and Instant NeRF can take 2-20 photos of a physical object and reconstruct a full 3D mesh with accurate textures automatically. This is a game-changer for product designers who need to model an existing physical prototype, or for archaeologists documenting historical artifacts, or for real estate creators generating 3D models of furniture for virtual home tours.
For conceptual work, you can also use a 2D concept generated in MidJourney as an input for image-to-3D, turning your 2D concept into a 3D mesh in one step. This workflow is often more reliable than pure text-to-3D, because the AI has a clear visual reference for the shape and style you want.
Neural Radiance Fields (NeRF) vs. Traditional Meshes
When generating AI 3D assets, you’ll encounter two main output types: neural radiance fields (NeRF) and traditional polygon meshes. NeRF is a neural network-based representation that stores color and density information for every point in 3D space, producing incredibly photorealistic results for rendering and visualization. However, NeRF models can’t be edited easily, don’t work well in real-time game engines, and aren’t suitable for 3D printing. For most use cases where you need to edit, animate, or 3D print your model, you’ll need to convert the NeRF output to a traditional polygon mesh, which most modern AI tools can do automatically.
Post-Generation Refinement and Cleanup
It’s rare that an AI-generated 3D model is ready to use straight out of the generator. AI can produce a great starting point, but it often makes mistakes with geometry, topology, and textures that require human cleanup. This stage is where most creators lose the most time, so having a structured workflow for refinement is critical.
Geometry Cleanup and Retopology
AI-generated meshes frequently have common issues: non-manifold geometry (edges connected to more than two faces, which breaks 3D printing and animation), overlapping faces, extra polygons in areas that don’t need detail, and distorted or misshapen features. For example, an AI generating a hand will often get the number of fingers wrong, or merge fingers together, requiring manual correction.
The good news is that AI can also help with this step, rather than requiring you to do all the work manually. Tools like Blender’s AI Retopology add-on, or Instant Meshes, can automatically retopologize a messy high-poly AI-generated mesh into a clean, quad-based mesh with the correct polycount for your use case. A typical cleanup workflow looks like this:
- Import the raw AI-generated mesh into your 3D editing software (Blender, Maya, or ZBrush are the most common options).
- Scan for and fix non-manifold geometry using automatic tools like Blender’s “Make Manifold” function.
- Delete any stray floating polygons or extra geometry that the AI generated by mistake.
- Manually correct any major shape errors: for example, adjusting the position of a table leg, fixing the number of fingers on a hand, or smoothing out an uneven surface.
- Run AI automatic retopology to reduce polycount and create clean topology if you’re working on a real-time asset.
For high-poly assets that will be baked down to a low-poly model for games, you can keep the high-poly mesh generated by the AI as your source of detail, then only retopologize the low-poly version that will be used in-engine. This cuts down on work significantly compared to sculpting the high-poly version from scratch manually.
AI-Powered Texture Refinement
Just like geometry, AI-generated textures are a great starting point but often need refinement. AI may generate blurry details, misaligned textures, or inconsistent materials. Again, AI tools can speed up this step dramatically.
One of the most useful AI texture tools is textural texture generation: you can use tools like Adobe Substance 3D Sampler’s AI generation or Stable Diffusion to generate custom textures based on a text prompt, then apply them to your model. For example, if your AI-generated chair has a blurry wood grain texture, you can generate a new 4K high-resolution oak wood texture in seconds and replace the AI’s default output. AI can also automatically generate normal maps, roughness maps, and ambient occlusion maps from a single base texture, cutting down the time you spend creating PBR (physically based rendering) materials.
Another common workflow is upscaling: if your AI generator outputs a 1K texture but you need 4K for a high-resolution render, AI upscaling tools like Topaz Gigapixel can increase the resolution while preserving detail, without the blurriness that comes with traditional upscaling.
Normal and Detail Baking
If you’re creating a real-time game asset, the final step in refinement is baking the high-poly detail from your AI-generated mesh onto a clean low-poly mesh. This process transfers all the fine surface details (like wood grain, scratches, or sculpted ornamentation) from the high-poly model to a texture map that can be applied to the low-poly model, keeping the polycount low for real-time performance. Many modern tools now automate this process with AI, reducing the baking errors that used to require hours of manual correction.
Integration with Traditional 3D Workflows
AI 3D modeling doesn’t replace traditional 3D skills—it augments them. The most efficient workflows combine AI automation with traditional 3D techniques to leverage the strengths of both: AI handles the repetitive, time-consuming heavy lifting, while human artists add the intentional detail and polish that makes a model production-ready. There are several common integration patterns that professional 3D artists use today.
Blockout and Concept Iteration
For architectural visualization or product design, many artists use AI to generate multiple blockout versions of a design early in the process, before committing to a detailed model. Instead of spending a day modeling 3 different versions of a building facade, you can generate 3 variations in 10 minutes, compare them, and refine the direction before adding detailed geometry. This lets teams iterate on concepts much faster, reducing time wasted on detailed modeling of designs that get scrapped.
For example, a product designer working on a new water bottle can generate 15 different shape variations from text prompts in an hour, present them to stakeholders for feedback, then only refine the 1 or 2 approved designs in detail. This cuts down the product development cycle from weeks to days.
Speed Sculpting for Characters and Creatures
Character modeling is one of the most time-consuming types of 3D work, requiring advanced sculpting skills to get realistic proportions and details. AI has transformed this workflow by generating a base mesh that matches your concept, which the artist can then refine in ZBrush or Blender. Instead of starting with a primitive sphere and sculpting the entire character from scratch, the artist starts with a complete base mesh, then spends their time adjusting proportions, adding fine details like wrinkles or scars, and fixing any AI mistakes (like extra fingers or misaligned facial features).
A 2023 survey of professional game artists by ArtStation found that 68% of respondents now use AI to generate base meshes for characters, reducing their character modeling time by an average of 50%. This lets studios produce more content faster, without sacrificing quality.
Asset Generation for Games and Architecture
Most large 3D projects, like open world video games or architectural visualizations of entire buildings, require dozens or hundreds of small repeating assets: trees, rocks, chairs, tables, decor, plumbing fixtures. Before AI, artists had to model each of these assets from scratch, or buy generic asset packs that looked repetitive. Now, AI can generate dozens of unique variations of a single asset type in minutes, ensuring that every asset in the scene is unique without requiring hours of manual work.
For example, an architectural visualization artist working on a residential interior can generate 20 unique books of different sizes for a bookshelf, 10 different throw pillows for a sofa, and 5 different potted plants for the living room, all in less than half an hour. This adds visual interest to the scene without adding days of work to the project timeline.
Common Pitfalls to Avoid
Even with the best tools, it’s easy to make mistakes that waste time or produce low-quality results when working with AI 3D. Here are the most common pitfalls and how to avoid them:
- Ignoring copyright and licensing: Not all AI 3D generators allow commercial use of output, and some train their models on unlicensed artist work. Always check the terms of service before using an AI-generated model for commercial projects, and use tools that offer clear commercial licensing (like 3DFY.ai or Adobe’s AI tools) for professional work.
- Skipping pre-production: It’s tempting to jump straight into generating 3D models as soon as you have a rough idea, but without clear requirements, you’ll end up re-generating and re-working your model multiple times, wasting the time you saved with AI.
- Not checking for geometry errors: AI-generated meshes often have hidden issues like non-manifold geometry that will break 3D printing or animation. Always run a geometry check before exporting your final model, even if the mesh looks correct on the surface.
- Over-relying on AI: AI can’t read your mind, and it will rarely produce a perfect result on the first try. Leave enough time in your timeline for cleanup and refinement—even with AI, you’ll still need to do some manual work to get a production-ready asset.
Export and Final Optimization
Once your model is refined and polished, the final step is to optimize and export it for your intended use case. AI can help with this step too, automating many of the tedious optimization tasks that used to require manual work.
Optimization for Target Platform
Optimization ensures your model works as intended on the platform you’re using it on. For real-time game engines like Unity or Unreal, this means keeping polycount and texture size within the project’s budget. AI tools can automatically reduce polycount while preserving detail, far better than traditional automatic decimation tools. For example, Blender’s new AI decimation function can cut a 100,000 poly mesh down to 10,000 polys without losing the fine surface detail that makes the model look good.
For 3D printing, optimization means ensuring the model is watertight (no holes in the geometry) and has the correct wall thickness for your printer. Many AI 3D tools now include automatic watertight conversion and wall thickness checking, which flags areas that are too thin or too thick before you export, reducing failed prints.
For product rendering and architectural visualization, optimization means ensuring textures are high enough resolution and materials are correctly set up for PBR rendering. AI can automatically adjust material properties like roughness and metallicness to match your description, so you don’t have to spend hours tweaking material sliders to get the right look.
File Format Export
Once optimized, you export your model in the correct file format for your use case. Common formats include:
- FBX or GLB/GLTF for real-time game engines and web-based 3D viewers
- OBJ or STL for 3D printing
- USDZ for augmented reality (AR) applications
- BLEND or MA for native editing in Blender or Maya
Most AI 3D tools let you export directly to all of these formats, so you don’t need to convert files between multiple tools before using your model.
Conclusion
AI 3D modeling has transformed 3D creation, turning a craft that required years of training and dozens of hours of manual work into a process that anyone can use to produce high-quality assets in hours. But AI is not a replacement for human creativity and oversight—it’s a tool that amplifies your ability to turn ideas into 3D assets. The most effective AI 3D modeling workflow follows a clear structure: start with solid pre-production to define your requirements and gather references, use AI to generate a high-quality starting mesh, spend time cleaning up and refining the geometry and textures, integrate AI output with traditional 3D techniques to add intentional detail, and finally optimize and export for your target platform.
As AI tools continue to improve, the line between AI and traditional 3D workflows will continue to blur, with more automation handling repetitive tasks and letting artists focus on the creative parts of the process. For professional artists and new creators alike, learning to work with AI 3D tools is no longer optional—it’s a core skill for creating 3D content efficiently in 2024 and beyond. By following this structured workflow, you can leverage the speed of AI while still producing the high-quality, production-ready results that professional projects require.