
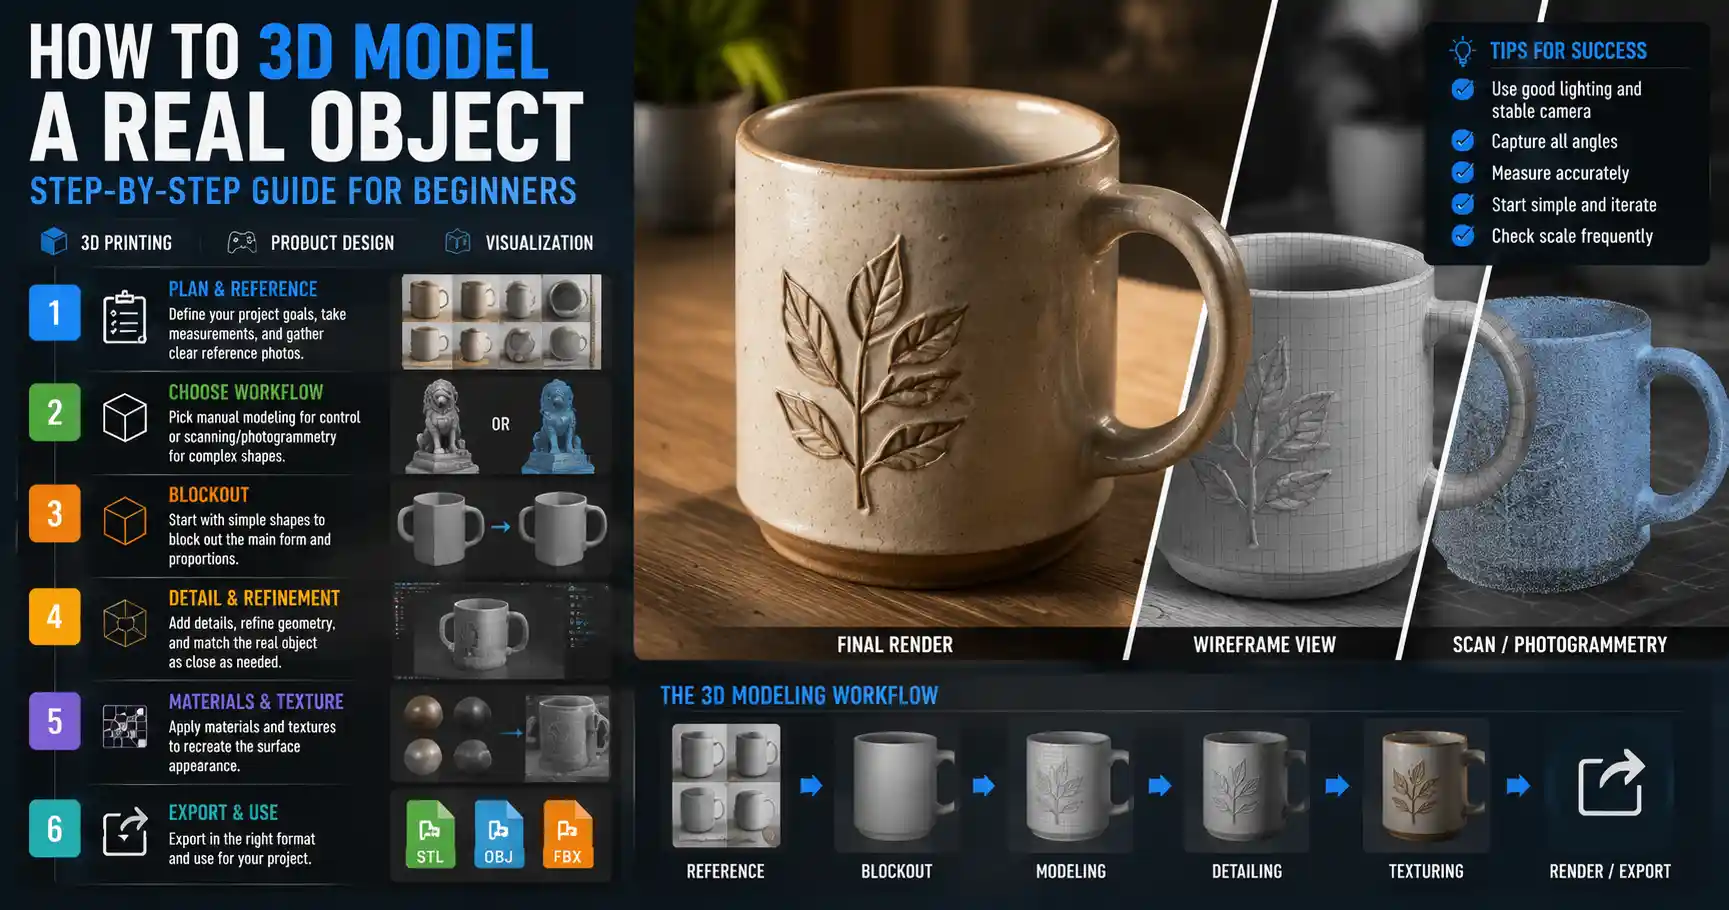
Whether you’re a product designer creating a prototype of a new coffee mug, a game developer building a prop for an open-world adventure, or a hobbyist 3D printing a custom replacement part for your bike, 3D modeling a real object is an accessible skill that opens up a world of creative and practical possibilities. The process doesn’t require a Hollywood studio budget or a decade of technical experience; by breaking the work into clear, manageable steps, anyone can turn a physical object into a precise, usable digital 3D model. This guide walks you through every stage of the process, from planning your project to refining the final model for its intended use.
Pre-Production Planning and Reference Gathering
Before you open a 3D modeling program or pick up a scanner, careful planning will save you hours of rework and help you create a model that matches your needs. Every project has different requirements: a model for 3D printing needs precise measurements to function correctly, while a model for a background game asset only needs to look accurate from a distance. Starting by defining your goals keeps your work focused.
Define Your Project Requirements
First, clarify what you will use the 3D model for. This dictates the level of detail, polycount (the number of polygons that make up your model), and accuracy you need to achieve. For example, a 3D printable replacement gear for an old sewing machine requires millimeter-perfect accuracy and a watertight mesh, with no holes or gaps that will ruin the print. A decorative vase model for an architectural visualization only needs to match the general shape and texture of the original; you can get away with small inaccuracies that won’t be noticeable in a render.
Next, note any constraints you’re working with. Do you need to match the exact dimensions of the original object, or is visual accuracy enough? What file format do you need for your final output? Do you need to model just the outer surface, or do you need to capture internal features as well? Answering these questions early will help you choose the right modeling method later.
Gather High-Quality Reference Materials
No matter if you plan to model the object manually by hand or use 3D scanning to capture the shape, you need clear, comprehensive reference images and measurements to work from. Poor references are the most common reason for inaccurate final models, so take the time to get this step right.
For photography, follow these practical tips to get usable references:
- Use even, diffused lighting (such as natural light on an overcast day) to avoid harsh shadows that obscure small details.
- Take photos from every angle: front, back, left, right, top, bottom, and close-ups of any unique features like engravings, curved handles, or textured surfaces.
- Keep your camera parallel to the object’s main faces to avoid lens distortion that skews proportions. If you’re photographing a large object, step back and use a zoom lens to minimize distortion.
- Include a ruler or coin in at least one reference photo to use as a size reference later.
After capturing photos, take precise measurements of all key dimensions. For small objects, use digital calipers to get measurements accurate to 0.1 millimeters. For larger objects, a tape measure or laser measure will work. Note down the length, width, height, diameter of any circular features, and the size of critical details like holes or notches. If the object has curved or organic shapes, measure key reference points along the curve to match the shape in your digital model.
Choose Your Modeling Workflow
There are two primary approaches to 3D modeling a real object: manual (polygon) modeling, where you build the shape from scratch in a 3D program, and photogrammetry/3D scanning, where you use software or hardware to automatically generate a model from photos or scan data. Each has its own advantages and ideal use cases, and the right choice depends on your project requirements, budget, and available tools.
Manual Polygon Modeling
Manual modeling is the process of building the 3D object shape by shape, starting with a basic primitive like a cube or sphere and gradually refining it to match the original object. This method gives you full control over every part of the model, and it is ideal for objects with mostly geometric shapes (like mugs, furniture, or machine parts) or projects where you need a clean, low-poly model for 3D printing or game development.
Manual modeling does not require expensive hardware: you only need a 3D modeling program (many free options are available, including Blender, Fusion 360 for personal use, and SketchUp Free) and a computer with a basic graphics card. It is also the best option if you want to modify the original object’s design as you model — for example, if you’re copying a chair but want to widen the seat by 10% to fit your dining table, manual modeling makes this adjustment easy.
The main downside of manual modeling is that it takes more time, especially for complex organic shapes like a human face or a twisted tree branch. It also relies on your ability to interpret references and match proportions accurately, which takes practice to master.
3D Scanning and Photogrammetry
3D scanning and photogrammetry capture the shape of a real object automatically by processing data from a scanner or multiple photos. Photogrammetry uses software to analyze dozens or hundreds of photos of the object taken from different angles, then reconstructs a 3D mesh by matching common features across all images. Dedicated 3D scanning uses a laser or structured light sensor to directly capture depth data from the object, resulting in more accurate data for complex shapes.
This workflow is perfect for capturing complex organic shapes that would be extremely time-consuming to model by hand — think a carved wooden statue, a human face for a 3D portrait, or a natural rock formation. It is also much faster than manual modeling for very detailed objects, as the software does most of the work of capturing shape automatically.
"Photogrammetry doesn’t eliminate the need for post-processing, but it turns what would take weeks of manual modeling into a process that takes a few hours of photography and cleanup."
The downsides of scanning-based workflows include: higher cost for dedicated 3D scanners (high-accuracy models can cost thousands of dollars, though entry-level options start around $500), the need for powerful processing hardware to handle large 3D meshes, and the fact that automatically generated models almost always need significant cleanup to fix holes, distortion, or unwanted captured details like dust or background objects. Photogrammetry, while often free for software, can struggle with shiny, transparent, or very smooth objects that don’t have distinct features for the software to match across photos.
Many modern 3D artists use a hybrid workflow: use photogrammetry or scanning to capture the base shape of a complex object, then manually clean up and refine the model to get the clean, usable final result. This combines the speed of automatic capture with the control of manual modeling.
Step-by-Step Manual Modeling Workflow
If you’ve chosen to manually model your object, following a structured step-by-step process will help you avoid common mistakes and create an accurate final model. For this example, we’ll assume you’re modeling a simple ceramic mug — a common beginner project that introduces core modeling techniques that work for almost any solid object.
- Block out the base shape
Start by importing your reference photos into your 3D modeling program as background images, then create a primitive shape that matches the overall proportions of your object. For a mug, that would be a cylinder scaled to match the height and diameter you measured from the real object. Resize the cylinder until it matches the reference images and your recorded measurements. This rough block-in doesn’t need any details yet; it just needs to get the overall size and shape right before you add smaller features.
- Refine major features
Next, add the largest secondary features to your base shape. For the mug, that means hollowing out the inside of the cylinder and adding the handle. To add the handle, you can start with a smaller cylinder, bend it into the curved shape of the original handle, then join it to the main body of the mug. Use your reference photos and measurements to position the handle correctly and match its thickness and curve. At this stage, focus on getting the big shapes right before moving to small details like the rim thickness or the base of the mug.
- Add small details and adjustments
Once your major features are correct, add smaller details that match the original object. For the mug, this could be a subtle curve to the body (many mugs taper outward at the top), a rounded rim, a raised base, or a small logo engraved on the side. Use your reference photos to check that every feature is in the right position and the right size. This is the stage where it pays to compare your digital model to the real object side by side — it’s easy to miss a small curve or a tilted feature that will throw off the final result.
- Check your topology
Topology refers to the arrangement of polygons and edges in your 3D model. For most uses, you want clean topology that is easy to edit later and works well for 3D printing or rendering. Avoid unnecessary triangles, overlapping faces, or non-manifold geometry (edges that are connected to more than two faces, which cause errors in 3D printing and rendering). If you’re creating a model for 3D printing, make sure your mesh is watertight, with no holes or gaps between faces.
For more complex geometric objects, like a table with curved legs or a custom tool handle, the same workflow applies: start with big blocks, add large features, then refine small details. The key principle is to work from large to small, never adding fine details until your overall shape and proportions are correct. This saves you from spending hours perfecting a small detail that you later have to move or delete because the overall shape was wrong.
Common mistakes to avoid during manual modeling include: ignoring your measurements and guessing proportions, which leads to a model that doesn’t match the original; adding too many polygons too early, which slows down your computer and makes the model harder to edit; and forgetting to check for errors like non-manifold geometry until you’re ready to export, which can require major rework to fix.
Processing a Scanned or Photogrammetry Model
If you used 3D scanning or photogrammetry to capture your base model, your work isn’t done once the software generates the initial mesh. Automatic capture almost always produces a raw model that is messy, overly detailed, and full of errors that need to be fixed before you can use it. The processing workflow below will turn your raw scan into a clean, usable 3D model.
Clean Up the Raw Mesh
The first step after generating your raw model is to remove unwanted geometry. Most scans capture more than just your object: you’ll get parts of the table you set the object on, background walls, and floating bits of geometry from blurry photos or mis-matched features. Start by deleting all these extra parts, leaving only the mesh that corresponds to your original object.
Next, fix any holes in the mesh. Holes form when the scanner or photogrammetry software can’t see a part of the object (for example, the area where the mug handle touches the main body, or the bottom of the object sitting on the table). Most 3D programs have automatic hole-filling tools that can close small holes smoothly. For larger holes, you may need to manually fill the hole and adjust the shape to match the original object.
Retopologize for Usability
Raw photogrammetry and scan models often have millions of polygons, which is way more than most applications need. A 3D printable model of a mug doesn’t need 5 million polygons to capture the shape; it can work perfectly with 5,000 clean polygons. Retopology is the process of creating a new, clean low-poly mesh over the top of your high-resolution scanned shape, matching the original form while reducing the polygon count and creating clean topology.
For beginners, automatic retopology tools in programs like Blender or Instant Meshes can do most of this work automatically, giving you a clean mesh that you can touch up by hand. For more complex organic shapes, you may need to manually retopologize the model to get the cleanest result. Retopology is especially important if you plan to 3D print the model or use it in a game, where high polygon counts will cause performance errors or print failures.
Refine Details and Match Measurements
Even the best 3D scans have small inaccuracies, so after retopology, compare your processed model to your reference measurements and photos. Stretch or adjust small areas to match the original object’s dimensions, and remove any unwanted bumps or distortions caused by dust, reflections, or errors in scanning. If you need to add features that the scanner couldn’t capture (like internal threads in a bottle cap or a hollow interior for 3D printing), you can add these manually at this stage, just like you would in a manual modeling workflow.
Texturing and Final Export
Once your 3D mesh is complete and accurate, the final step before using your model is adding textures and exporting it in the correct file format for your intended use. Texturing adds color, surface detail, and material properties to your model, making it look like the original object when rendered or viewed in 3D software.
Creating Accurate Textures
For most projects, you can create textures by sampling colors and details directly from your reference photos. If you need a high-accuracy texture, you can use uv unwrapping to map your 3D mesh to a 2D image, then project your reference photos onto the mesh to get an exact color match. For simpler projects, you can create a solid color or simple material that matches the original object’s finish — for example, a glossy ceramic material for your mug, a matte wood material for a table leg.
If you have a high-resolution scanned model, you can also generate a normal map or displacement map from the high-resolution mesh to capture fine surface details (like the texture of hand-carved wood or a bumpy ceramic surface) on your low-poly retopologized model. This gives you the visual detail of a high-resolution model with the small file size and clean geometry of a low-poly model.
Exporting for Your Use Case
When you’re ready to export your final model, choose the right file format based on what you’re using it for:
- For 3D printing: Use STL or OBJ file formats, which are universally supported by all 3D printing slicer programs. Make sure your model is watertight and all dimensions are set correctly before exporting.
- For game development or interactive 3D: Use GLB, FBX, or OBJ formats with appropriately sized texture maps to keep file sizes small.
- For architectural visualization or rendering: Use FBX or TIFF (for textures) to preserve material and detail information for rendering software like 3ds Max, Cinema 4D, or Keyshot.
Always test your exported model by opening it in the program you will use it in before you consider the project complete. This lets you catch any errors like missing textures, incorrect dimensions, or corrupted mesh data early, before you start 3D printing or integrating the model into a larger project.
Conclusion
Modeling a real object in 3D is a skill that improves with practice, whether you prefer manual modeling for the control it gives you or scanning-based workflows for their speed with complex shapes. By starting with clear planning, gathering accurate references, choosing the right workflow for your project, and working step-by-step from large shapes to fine details, you can create a precise, usable 3D model that matches your original object perfectly. Start with simple, small objects like a mug or a wooden spoon to practice the core techniques, then work your way up to more complex projects as you build confidence. Over time, you’ll develop a workflow that fits your needs and lets you turn any physical object into a digital 3D model for work, hobbies, or creative projects.