

Marble has long been synonymous with luxury, elegance, and timeless design. In the world of 3D visualization, capturing the subtle veining, polished sheen, and cold weight of real stone is what separates a convincing interior from a flat, unconvincing one. Whether you are rendering a grand hotel lobby, a minimalist bathroom, or a high-end kitchen countertop, the quality of your marble texture can make or break the scene.
This guide walks through the essentials of working with marble textures for luxury interiors: what makes a texture look real, how to choose the right resolution, and which file formats matter for your pipeline. We’ll also look at practical workflows and where resources like Relebook can fit into your toolkit.
Why Marble Textures Are a Cornerstone of Luxury Rendering
Luxury interiors rely on materials that feel substantial. Marble, with its natural variation and reflective surface, instantly adds depth and richness. But rendering it convincingly requires more than a flat image wrapped around a box. The interplay of light across polished stone, the subtle bump of veined patterns, and the way a surface catches reflections all depend on a well-constructed texture map.
For 3D artists working in Blender, 3ds Max, or Cinema 4D, a marble texture is rarely just a diffuse map. The modern pipeline demands PBR (Physically Based Rendering) materials: albedo, roughness, normal, height, and sometimes ambient occlusion maps. These layers together simulate how light interacts with the marble’s surface, giving you control over gloss, wear, and depth.
Understanding PBR Marble Textures
A PBR marble texture set typically includes:
Albedo (diffuse): The base color and pattern of the stone.
Normal map: Simulates surface bumps and veining depth without adding geometry.
Roughness map: Controls the glossy versus matte areas – polished marble has very low roughness, while honed or tumbled finishes are higher.
Height (displacement) map: Provides actual geometric offset, useful for close-up shots where you need real surface relief.
Ambient occlusion map: Adds shadow detail in crevices and around edges.
Not every render engine uses all maps the same way. For instance, in Blender’s Cycles or Eevee, you may plug displacement into the material output, while in V-Ray for 3ds Max, you might use a VRayDisplacementMod. Knowing your target engine is key to picking a texture set that will work out of the box.
Seamless vs. Non-Seamless: When It Matters
Seamless marble textures tile without visible repeats. These are essential for large surfaces like floors, walls, or endless countertops where you don’t want a visible seam every two feet. For hero objects – a single slab behind a reception desk or a sculptural bathtub – a non-seamless, unique texture might look better because it avoids even the most subtle repetition.
Seamless textures are typically created by careful editing or procedural generation. When you choose a seamless marble texture, check the tile size. A 2K texture tiled eight times across a floor may look blurry; a 4K or 8K map will hold up better. For luxury interiors, where cameras often sweep close to surfaces, prioritize higher resolution and clean tileable edges.

Selecting the Right Resolution and Format
Resolution depends on the usage and camera distance. For a wide shot of a hallway floor, a 2K texture may be sufficient if repeated. But for a countertop close-up, 4K or even 8K is advisable to capture the fine veins and polish.
Common file formats for marble textures:
JPEG: Small file size, lossy compression. Fine for base color, but avoid for normal or height maps where detail matters.
PNG: Lossless, supports alpha. Good for most PBR maps.
EXR or TIFF: Higher bit depth, useful for displacement or if you plan heavy post-processing. Larger file sizes, often used in film and high-end archviz.
Before downloading, verify that the texture set includes the maps in a format compatible with your software. Many sites offer ready-made SBSAR (Substance) files or material presets for specific renderers. This can save hours of manual setup.
Workflow Tips for Realistic Marble Rendering
1. Scale the texture properly – One common mistake is applying a marble texture without matching real-world scale. A marble slab on a kitchen island might be 1.5 meters wide; your texture should tile accordingly. Use a UVW Map or a box mapping with real-world scale enabled.
2. Layer details with blending – Pure polished marble looks too perfect. In luxury interiors, you often see slight matte spots from wear or a subtle honed finish. Using a layered material where you blend a polished and a brushed version through a mask can add realism.
3. Use HDRI for reflections – Marble reflects its environment. A gray studio HDRI makes the stone look flat. Place your marble object in a scene with soft, natural lighting or a deliberately chosen HDRI that complements the interior.
4. Don’t forget imperfections – Scratches, smudges, and small cracks give marble character. Some texture sets include dirt or grunge maps. If not, you can add a separate mask on roughness or color to break up uniformity.
5. Optimize for your render engine – Unreal Engine users may need packed textures (R, G, B channels combined). Octane and Redshift handle PBR maps differently; always check the documentation. A universal approach is to use standard maps that any engine can interpret.
Where to Find Quality Marble Textures
The internet is full of texture libraries, but not all are suitable for luxury visualization. Low-resolution, poorly scanned, or over-processed textures will show their flaws in a close-up render. Platforms that specialize in 3D design resources often provide curated textures with consistent quality and licensing.
Relebook, for example, offers a range of marble PBR textures alongside 3D models, HDRI, and other CG assets. While availability and licensing vary per asset, the convenience of having textures, models, and environments in one place can streamline your workflow. Always check each asset’s page for format, license terms, and resolution details before downloading.
For free resources, some platforms offer selected free marble textures, but quality can be inconsistent. If you are working with a paid client, investing in a reliable texture set from a vendor you trust is usually worth it.
Common Mistakes and How to Avoid Them
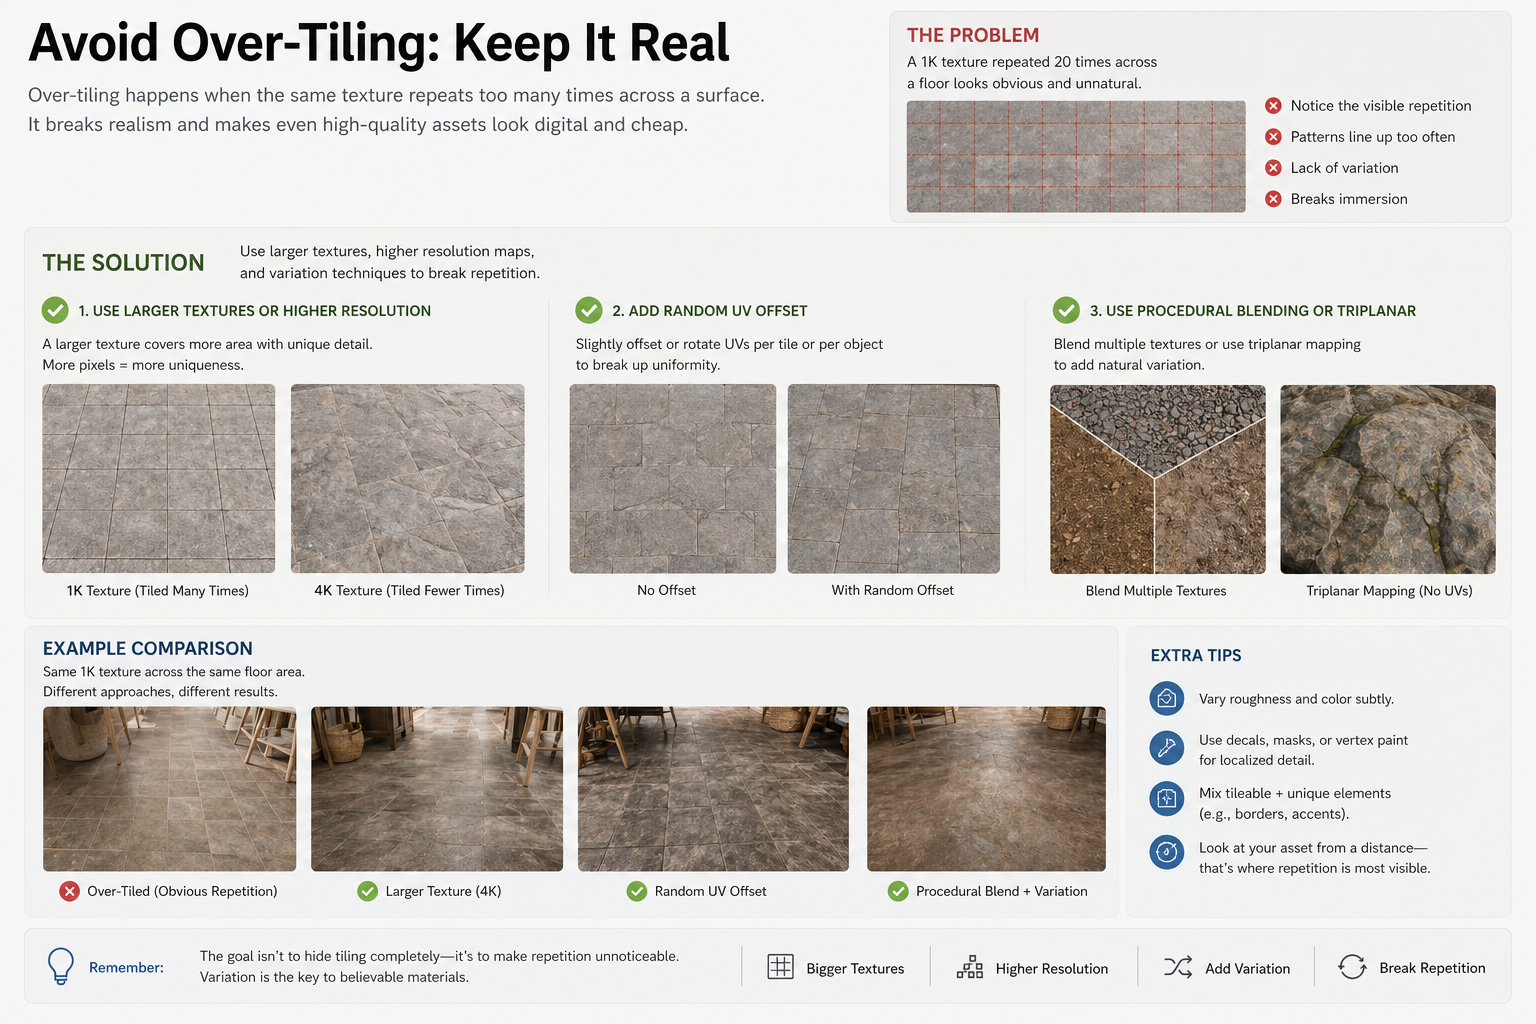
Over-tiling: A 1K texture repeated 20 times across a floor looks digital and cheap. Use larger textures or higher resolution maps, and consider a random UV offset or procedural blending to break repetition.
Ignoring normal maps: A flat diffuse map on a flat plane looks like a photograph glued onto a surface. Normal maps add the micro-detail that gives the stone its physical presence.
Wrong roughness values: Polished marble should have roughness near 0.05–0.1, while honed marble might be 0.3–0.5. Test your values against reference photos.
Forgetting UV seams: On complex geometry, UV seams can cut through veins awkwardly. Plan your UV layout to hide seams along natural edges or use tri-planar mapping for organic shapes.
Conclusion
Marble textures remain a defining element in luxury interior rendering. With the right maps, resolutions, and workflow, you can achieve photorealistic results that elevate your portfolio and satisfy demanding clients. Whether you are rendering a penthouse master bath or a boutique hotel lobby, understanding the subtleties of PBR materials, seamless tiling, and engine-specific setup will save you time and improve your output.
Take the time to build a library of quality marble textures, test them under different lighting, and learn to customize them for each project. And when you need to find new assets, platforms like Relebook are worth exploring for their curated selection of CG resources. Just remember to review each asset’s details – format, license, resolution – before integrating it into your scene.
FAQ
What is a PBR marble texture?
A PBR (Physically Based Rendering) marble texture set includes multiple maps such as albedo, normal, roughness, height, and ambient occlusion. These maps together simulate how light interacts with the stone surface, giving realistic reflections, micro-detail, and depth. They work across most modern render engines like Cycles, V-Ray, and Unreal.
How do I make a marble texture seamless?
Seamless marble textures are created by editing the image so that opposite edges match when tiled. Many texture libraries provide ready-to-use seamless sets. If you have a non-seamless texture, you can use Photoshop’s offset filter to adjust edges and then clone-stamp the seams. There are also tools like Materialize or Substance Sampler that can automate tiling.
What resolution should I use for marble textures in luxury interiors?
For large surfaces like floors or walls, 4K or higher is recommended, especially if the camera will be close. For smaller objects or wide shots where the texture is seen from a distance, 2K may be sufficient. Always consider the final render size and viewing distance. Close-up product renders often benefit from 8K displacement maps.
Are marble textures on Relebook free to use commercially?
Relebook offers both free and paid resources. Each asset page specifies the license and usage rights. You should always review the individual license, format, and resolution details before downloading and using any texture in commercial work.