
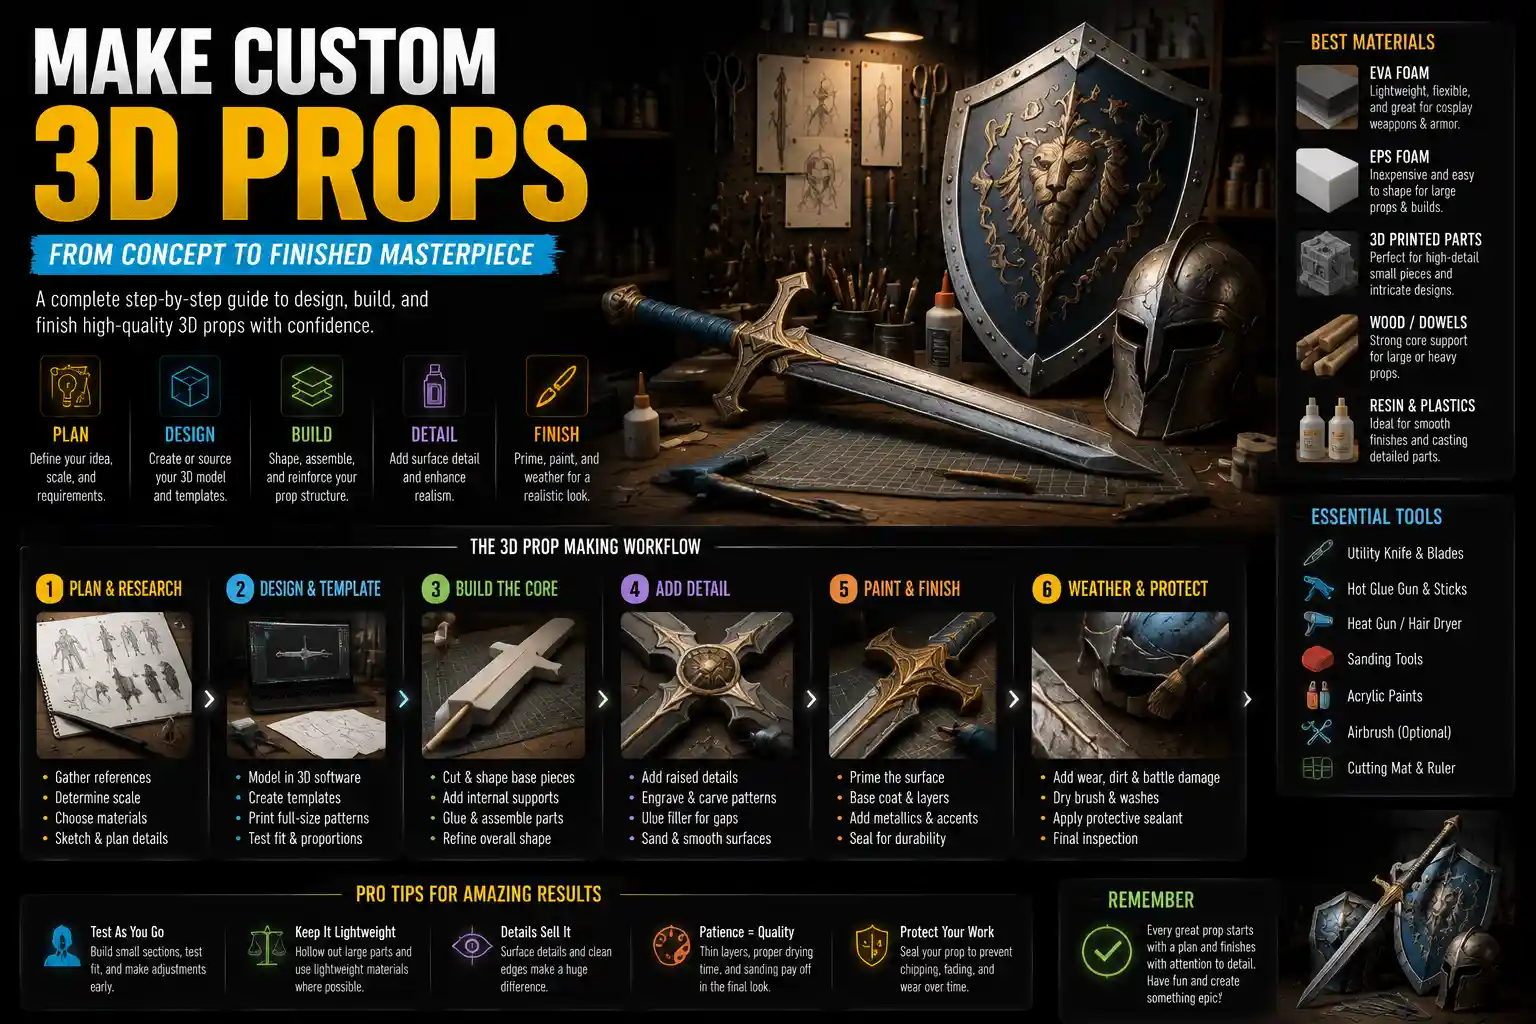
Whether you’re building a cosplay costume, decorating a community theater set, creating a display for a retail pop-up, or just exploring a new creative hobby, custom 3D props add a level of polish and personality that off-the-shelf pieces can’t match. Unlike mass-produced alternatives, handmade 3D props let you tailor every detail to your vision, from the size of a medieval fantasy sword to the weathered texture of a post-apocalyptic water bottle. You don’t need a fancy workshop or a six-figure 3D printer to get started either—many beginners create stunning, durable props with basic tools and affordable materials. This guide will walk you through every step of the process, from planning your first design to adding the finishing touches that make your prop look and feel authentic.
Planning and Designing Your 3D Prop
Before you cut a single piece of foam or mix any resin, solid planning prevents wasted materials, ill-fitting parts, and frustration down the line. The best props start with a clear understanding of their purpose, which dictates every design choice you’ll make later. A prop that’s going to be carried around a 12-hour convention needs to be lightweight and durable, while a static display prop for a wall can be heavier and more detailed. A prop for a children’s theater production needs to be soft and safe, even if it’s designed to look like a solid weapon.
Reference Gathering and Scale
Start by collecting multiple reference photos of your prop from every angle. If you’re replicating a prop from a movie, game, or TV show, search for official concept art, high-resolution screenshots, and fan photos of existing replicas to catch small details you might miss. For original designs, sketch multiple views to work out proportions before you start building. One of the most common mistakes new prop makers make is getting the scale wrong—a sword that looks right on paper can end up too heavy to carry or too short to look authentic next to your body.
To get scale right, measure the person who will use the prop, then mark full-size dimensions on a large sheet of craft paper or cardboard. For example, if you’re building a life-size stormtrooper blaster that’s supposed to reach from the ground to a 5’8” person’s hip, you can draw a full-size outline to reference as you build. If you’re working from a digital reference, use a free tool like Blender or Canva to resize the image to match your desired real-world dimensions before you print it out as a template.
Choosing the Right Material
Material choice depends on your prop’s purpose, your budget, and the tools you have available. For most beginners, the following materials are the most accessible:
- Expanded polystyrene (EPS) foam: Affordable, lightweight, and easy to cut with basic tools. It’s ideal for large props like armor, weapons, and set pieces. The main downside is that it’s easily dented and needs a protective coating to hold up to heavy use.
- EVA foam: The go-to for cosplay props and armor. It’s denser than EPS foam, holds detail well, and is flexible enough to fit to body shapes. It’s available in sheets from craft stores in thicknesses from 2mm to 10mm, making it versatile for everything from small buckles to large sword blades.
- Cardboard and corrugated plastic: The cheapest option for beginners on a budget. Sturdy cardboard can be layered to create 3D shapes, and corrugated plastic (also called correx) is water-resistant and more durable for props that need to hold up to frequent use.
- 3D printed resin/PLA: Perfect for small, high-detail props like gemstones, weapon handles, or intricate accessories. 3D printing lets you replicate complex shapes perfectly, but it requires an upfront investment in a printer and post-processing work to smooth out layer lines.
- Wood and MDF: Great for core supports in large props that need extra rigidity. A thin wooden dowel down the center of a long sword blade prevents it from bending or breaking during use.
For most first-time prop makers, EVA foam is the best starting point: it’s forgiving, affordable, and produces professional-looking results with minimal tools.
Building the Core Structure
Every well-made 3D prop has a solid core that holds its shape and adds durability. Even lightweight foam props need an internal support structure to prevent bending, tearing, or warping over time. The core is often hidden under outer layers, so it doesn’t need to look pretty—it just needs to be strong and the right shape.
Internal Reinforcements
For long, thin props like swords, staffs, or spears, the most common reinforcement is a rigid rod run through the center. Fiberglass rods are ideal because they’re lightweight, strong, and don’t rust like metal. If you can’t find a fiberglass rod, a wooden dowel or even a rigid PVC pipe works well for props that don’t need to be ultra-light. For larger props like armor chest plates or full-size masks, you can build a core from layered cardboard or thin foam, then add a thin layer of EVA foam on top for detail.
The difference between a good prop and a great prop is all in the structure. If your core bends or breaks, none of the beautiful paint in the world will fix it. Spend the extra 10 minutes to add a solid support—it’s worth it.
Shaping Your Base Prop
Once your core is ready, it’s time to build up the outer shape of your prop. If you’re working with EVA foam, the process is straightforward:
- Cut your full-size template out of paper, then trace it onto your EVA foam sheet using a permanent marker. Use a sharp utility knife or a special foam cutter to cut out the shape—dull blades will tear the foam and leave ragged edges. For curves, heat the foam gently with a hair dryer or heat gun to make it more flexible before you cut.
- Build up thickness by gluing multiple layers of foam together. Most prop makers use hot glue for EVA foam because it dries quickly and creates a strong bond. Contact cement also works well for large, flat layers. Be sure to work in a well-ventilated area when using any adhesive.
- Shape details by carving away foam with a utility knife or sanding with sandpaper. For rounded edges like the curve of a sword hilt or the bulge of a gem, use a heat gun to gently melt and shape the foam—keep the heat gun moving, because too much heat in one spot will melt the foam completely or leave unsightly burn marks.
- For complex 3D shapes like helmets or hollow bottles, you can use the “heat forming” method: trace your pattern onto thick EVA foam, cut out the pieces, heat the foam until it’s flexible, then press it over a mold (or a buck) to hold the shape. Common molds can be made from crumpled aluminum foil covered in plaster, or even an existing round object like a ball or bucket that matches the shape you need.
If you’re working with EPS foam for large set pieces, the process is similar, but EPS is easier to carve with hot wire cutters for large, smooth shapes. Many prop makers use a serrated knife to rough out the shape, then sand it with low-grit sandpaper to get smooth curves.
Smoothing and Sealing for a Professional Finish
One of the biggest challenges with foam and cardboard props is getting a smooth surface that’s ready for paint. Raw foam has a porous texture, and glue lines, layer edges, and cut marks will show through paint if you don’t seal them properly. Sealing also protects the foam from paint solvents and makes your prop more durable, so it’s a critical step you can’t skip.
Filling Gaps and Sanding
Start by going over your entire prop and filling any gaps between layers, uneven edges, or dents. For small gaps, hot glue works well—just spread a thin layer over the gap and let it dry. For larger gaps or uneven areas, many prop makers use wood filler, joint compound, or lightweight spackle. These products are cheap, easy to sand, and work great on foam. If you’re using spackle, apply a thin layer with a putty knife, let it dry completely, then sand it smooth with 120-grit sandpaper, followed by 220-grit sandpaper for a finer finish.
For 3D printed props, you’ll need to fill in layer lines to get a smooth finish. The most common method is to use a filler primer, which sprays on and fills small gaps, then sanding between coats. For very deep layer lines, you may need to apply a thin layer of epoxy putty before sanding.
Sealing the Surface
Once your prop is smooth and all gaps are filled, you need to seal the porous surface to keep paint from soaking in and to add an extra layer of protection. There are several popular sealing options, depending on your material and budget:
- Mod Podge: A cheap, easy option for beginners. Brush on 2-3 thin layers, letting each layer dry completely between coats. It works well for small props that won’t get heavy use, but it can crack on larger flexible foam pieces.
- Plasti Dip: A popular rubberized spray coating that flexes with foam, so it won’t crack when the prop is bent. It creates a smooth, paintable surface and adds extra durability to cosplay props that get carried around frequently. Most prop makers apply 2-3 light coats of Plasti Dip for the best results.
- Spray-on primer: A good all-around option for both foam and 3D printed props. Look for a primer that’s safe for foam—oil-based primers can melt some types of foam, so test a small scrap first if you’re unsure. Two thin coats of primer create a smooth, paintable base that seals pores perfectly.
- Clear resin or epoxy: For high-end props that need a super smooth, rigid finish, you can brush on a thin layer of clear epoxy resin. This creates a hard, glass-like surface, but it’s more expensive and requires careful ventilation and safety gear to use.
After sealing, do a final light sanding with 220-grit sandpaper to knock down any uneven spots or brush marks before you start painting. Wipe off all sanding dust with a damp cloth and let the prop dry completely before you move on to painting.
Painting and Weathering for Realism
Painting and weathering are where your prop really comes to life. A good paint job can turn a plain block of foam into a weathered iron sword or a glossy plastic blaster that looks like it came straight out of a movie set. The key to realistic painting is building up layers, starting with a base coat and adding highlights and shadows to create depth.
Base Coating
Start with a solid base coat that matches the primary color of your prop. Spray paint is the fastest way to get a smooth, even base coat, but brush-on acrylic paint works well too, especially for small props. If you’re using spray paint, work in a well-ventilated area, apply multiple thin coats instead of one thick coat, and let each coat dry completely between applications. Thick coats of spray paint can melt some types of foam, so always test on a scrap piece first.
For metallic props, there are two main options: metallic spray paint, which gives a quick, shiny finish, or hand-brushed metallic acrylics, which let you build up more depth. Many prop makers prefer hand-brushed metallics for historical or fantasy props, because they look less uniform and more authentic than factory-bright spray paint metallics.
Adding Highlights and Shadows
Once your base coat is dry, add highlights and shadows to make the 3D shape of your prop pop. This is called “dry brushing” for highlights, and it’s one of the easiest techniques for beginners to master. To dry brush:
- Squeeze a small amount of a lighter color than your base coat onto a paper plate.
- Dip the tip of a flat brush into the paint, then wipe almost all of the paint off onto a paper towel until the brush is almost dry.
- Lightly brush the paint over the raised edges and high points of your prop. The dry brush will only catch the raised areas, leaving the recesses darker, which creates natural depth.
For shadows, use a wash: mix a small amount of dark paint (black or dark brown works for most props) with a lot of water, then brush the mixture into the recesses and crevices. Wipe off any excess with a damp paper towel, and the dark wash will stay in the grooves, making details pop. For example, if you’re painting a prop with engraved runes, a dark wash will make the runes stand out clearly without you having to paint each one by hand.
Weathering for Authenticity
Almost every real object has scratches, dents, dirt, and wear, so adding weathering to your prop will make it look far more realistic than a pristine, freshly painted finish. How much weathering you add depends on the look you’re going for—a brand-new sci-fi blaster might only need a few tiny scratches, while a medieval battle axe should look like it’s been used for hundreds of fights. Some easy, effective weathering techniques for beginners include:
- Chipping: To create the look of chipped paint on metal or wood, use a small piece of sponge or a stiff brush to dab small spots of a lighter or darker color along edges that would naturally get scratched. For an even more realistic look, you can use the “salt method”: apply a base coat of the base color, sprinkle salt on areas where you want chipping, then paint the top color over the whole prop. When the paint is dry, brush off the salt to leave irregular chipped spots underneath.
- Dirt and grime: A thin wash of dark brown or black paint around the handle, along the bottom edge, or in crevices simulates accumulated dirt from hands and use. You can also dab on a little bit of powdered pastels to add dusty effects, then seal it with a clear coat to keep the powder from rubbing off.
- Rust effect: For old metal props, build up layers of orange, brown, and red paint starting from the bottom of the prop (where rust accumulates most), and blend them up for a natural rusted look. You can add a little bit of texture with sand before painting to make the rust look uneven.
After you finish painting and weathering, always add a clear top coat to protect your paint job. A matte clear coat works for most props, but if you want a glossy finish for a plastic or new metal prop, use a gloss clear coat. The clear coat will prevent paint from chipping or rubbing off on your clothes or hands during use.
Adding Final Details and Finishing Touches
Small details are what set a homemade prop apart from a generic store-bought one. Adding functional or decorative details doesn’t have to be complicated, but it makes a huge difference in the final result. For example, a sword prop with a real leather wrap on the handle feels far more authentic than a painted foam handle, and it’s more comfortable to hold for long periods of time.
Functional Details
If your prop will be used for cosplay or performance, add functional details that make it easier to use. For handles of weapons, wrap the handle in paracord, leather, or faux leather to add grip and comfort. For armor pieces, add straps with buckles or Velcro so the prop stays in place during wear. If you’re making a prop that needs to open or close (like a treasure chest or a book prop), add simple hinges made from thin plastic or cardboard, or use a fabric hinge for flexible movement.
For props that need extra durability, you can add a final layer of clear resin or a flexible rubber coating to the high-wear areas like edges or handles. This prevents scuffing and chipping during long days at conventions or multiple performances.
Decorative Details
Small decorative details add character to your prop. For example, you can add fake gemstones made from resin, or use hot glue to create raised details like rivets or engravings that you can paint later. Hot glue rivets are a favorite trick of beginner prop makers: just heat up a hot glue gun, dab small dots of glue onto your prop where you want rivets, let them dry, then paint them metallic to look just like real metal rivets. For fabric details like banners or tassels, you can glue on thin fabric to your prop base, which adds texture and movement that solid foam can’t match.
If you’re working on a prop that needs LED lights (like a glowing magic sword or a sci-fi console with illuminated buttons), it’s easier to add the wiring and batteries before you seal the final prop. Plan for the battery compartment in your core structure, and leave a small opening to access the batteries to change them when they run out. Use low-voltage LED strips or individual LEDs that don’t generate much heat, so they’re safe to use inside foam props.
Conclusion
Making your own 3D props is a rewarding creative hobby that lets you bring any vision to life, from a favorite movie character’s weapon to a custom set piece for a local play. You don’t need expensive tools or years of experience to get started—all you need is a clear plan, the right materials for your project, and a willingness to experiment and learn from small mistakes. Start small with a simple prop like a dagger or a small sign to practice your cutting, sealing, and painting techniques, then work your way up to larger, more complex projects like full armor or life-size statues. The more props you make, the more you’ll develop your own techniques and style, and you’ll be able to create pieces that look just as professional as any mass-produced prop. Whether you’re building props for fun, for cosplay, or for professional work, the process of turning a flat sheet of foam or a pile of cardboard into a three-dimensional work of art is one of the most satisfying creative experiences around.