

Wood has a way of anchoring a room. Whether it’s a wide-plank oak floor, a walnut veneer cabinet, or a weathered pine ceiling, the grain, color, and reflectivity of wood instantly add warmth and character. In architectural visualization and product rendering, capturing that natural complexity is both a goal and a challenge. A flat, tiled, or overly uniform wood surface can break the illusion of realism faster than almost any other material. That’s where proper use of wood textures and PBR maps comes in.
And if you’re in the middle of building a library of such resources, platforms like Relebook offer a curated selection of 3D models, textures, HDRI, and other CG assets that can slot directly into your workflow. But let’s walk through the practical side first: how to actually make wood textures work in your renders.
Choosing the Right Wood Texture
The first step is understanding that “wood texture” is not one thing. The visual identity of wood comes from multiple layers: color variation, grain pattern, natural imperfections (knots, cracks), and surface roughness. Your choice depends heavily on the intended use.
For a modern Scandinavian interior, you’d typically look for light woods with subtle, straight grain: ash, birch, or bleached oak. The woodgrain texture should be clean, with minimal knots, and the roughness map should reflect a matte, slightly satin finish. For a rustic or industrial setting, reclaimed oak or barn wood with visible saw marks, cracks, and darker stains gives the right story. The color map will have more contrast, and the normal or displacement map should carry deeper surface relief.
Always check the resolution of the texture. Floor and wall applications often require 2K to 4K maps, especially when the camera comes close. For distant elements like background panels, 1K may suffice. But for hero furniture or close-up cabinetry, invest in higher resolution. It’s also wise to confirm whether the texture is tileable (seamless) — many platforms, including Relebook, clearly indicate tiling behavior on asset pages.
PBR Wood Textures: Why They Matter
PBR (Physically Based Rendering) has become the standard in modern render engines — Cycles, V-Ray, Arnold, Redshift, and Unreal Engine all rely on it. A true PBR wood texture set typically includes at least four maps:
Albedo (Base Color): The raw color and pattern of the wood, without lighting or shadow baked in.
Normal map: Simulates the small-scale bumps and grain direction, adding perceived depth without extra geometry.
Roughness map: Defines where the surface is glossy (polished) or matte (raw). For wood, roughness varies across the grain — earlywood bands are often smoother than latewood.
Displacement, height, or bump map: Optional but valuable for physical depth, like deep grain grooves or uneven plank surfaces.
Using a non-PBR wood texture — perhaps a single jpeg that combines color, highlights, and shadows — will look flat and hard to light correctly. That’s why pbr wood texture resources have become essential. They give you predictable behavior under any lighting setup. When browsing for assets, look for “PBR” or “physically based” in the title. Relebook’s texture library, for instance, includes PBR-ready materials across categories like floors, walls, and furniture, with maps organized for popular render engines.
Wood Textures by Application
Different surfaces in an interior require different approaches to texture mapping and scale.
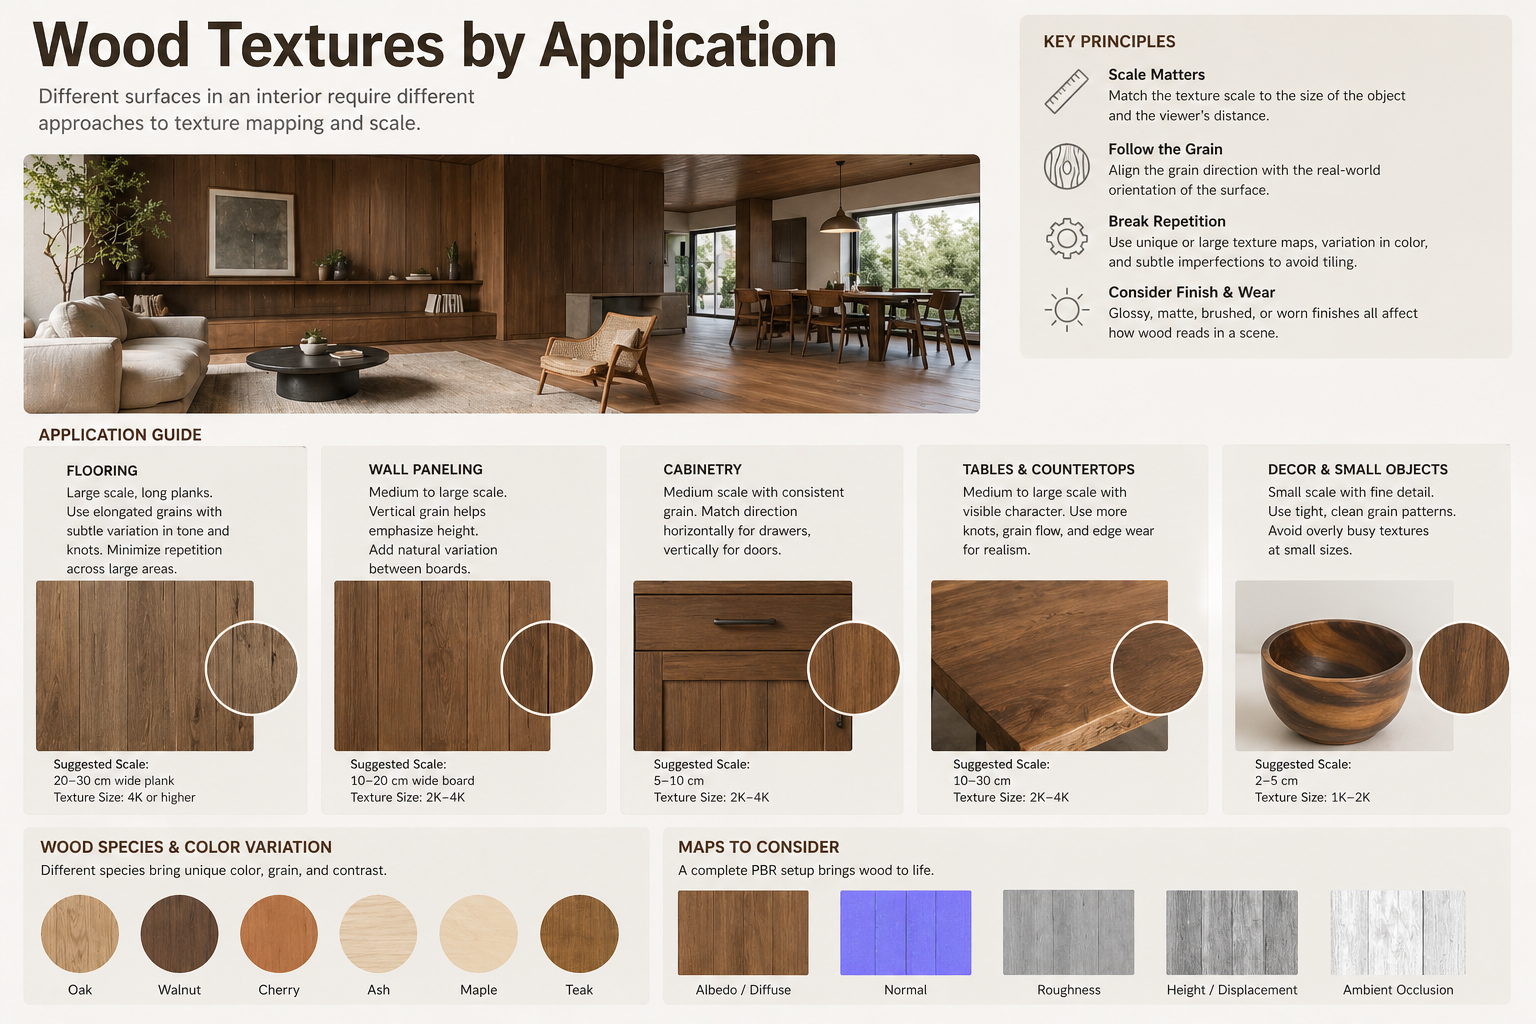
Floors: Wood floors are typically shown with planks. Each plank has a distinct grain, but the texture should tile realistically. You’ll want to adjust UV mapping so that the grain runs lengthwise along the floor. Many artists use multi-texture or “randomize” nodes (available in Blender, 3ds Max, or Unreal) to break up repetition across large areas. Consider blending two or three slightly different woodgrain textures to avoid visible tiling. Also, floors often show more wear near doors and traffic paths — this can be simulated with a dirt or scratch map layered on top.
Cabinetry and Panels: Here, wood is often cut as veneer or engineered panels. The grain tends to be book-matched or slip-matched, creating symmetrical patterns. In a kitchen render, the wood texture on cabinet doors should feel continuous across adjacent faces. Use a single UV projection (box mapping with proper orientation) rather than independent per-face mapping. Pay attention to the reflectivity: cabinets often have a semi-gloss or satin clear coat, so the roughness value should be lower than for raw wood. A subtle clear-coat layer (in renderers like V-Ray) can sell the realism.
Furniture and Accents: Tables, chairs, shelving — these allow for more freedom. You can use natural edge slabs with bark, which demand high-resolution displacement maps. For mid-century designs, teak or walnut with a low-gloss oil finish works well. The UV layout should follow the physical shape: cylindrical mapping for legs, planar for tabletops. Avoid stretching the grain; always check the aspect ratio in your viewport.
Workflow Tips for Realistic Results
Let’s walk through a standard setup in 3ds Max + V-Ray (the principles apply to Blender, Cinema 4D, etc.):
1. Import your texture set. Place the albedo, normal, roughness, and displacement maps into the appropriate slots. If your pbr wood texture came as a single file set, it’s often in a folder with clearly named maps.
2. Set the correct scale. Wood grain looks wrong if it’s too large or too small. A standard floor plank might be 8–10 cm wide in real life. Use a real-world map size in your texture coordinate settings. Most renderers let you input dimensions directly.
3. Tweak the roughness. The roughness map from the provider is a good starting point, but every shot’s lighting is different. Lower the overall roughness for a lacquered look, increase it for unfinished wood. Do this via a color correction node that scales the map output.
4. Layer imperfections. Even high-quality PBR wood textures can feel too clean. Layer a subtle dust or scratch map (in V-Ray, use a blend material) to add realism, especially for floors.
5. Lighting interaction. Wood is a diffuse material with a slight specular component. In a sunlit scene, the grain will catch light at grazing angles. Rotate your texture so that the grain aligns with the dominant light direction — it creates a more natural flow.
Where to Find Quality Wood Textures
Building a personal library takes time. Many artists rely on a mix of self-shot photos (for unique patterns) and curated online resources. Relebook fits into this workflow as a destination where you can browse textures alongside 3D models, HDRI environments, and other CG assets — all in one place. The platform organizes assets by category, which helps when you need multiple wood types for a single project. Some assets are offered as free downloads; others are paid. Always check the license terms and supported formats on each product page before using them in commercial work.
A practical approach: for a client project that requires consistent materials across multiple scenes, you might download a few wood grain textures from Relebook, test them in your render engine, and then keep the ones that match the lighting conditions best. Larger sets often include variations (light/dark, different grain directions) that can be swapped without redoing the UV layout.
Common Pitfalls to Avoid
Tiling is the most obvious giveaway. Even with seamless textures, repeating the same plank two or three times in view breaks the illusion. Use UDIM workflow or texture randomization nodes.
Wrong scale — a woodgrain texture that’s too large makes the surface look like plastic; too small feels cluttered. Reference real-world photography of similar wood species.
Missing normal or displacement maps — the grain without depth looks painted on, not carved.
Ignoring the direction of grain — on a table leg, horizontal grain screams “texture stretched.” Rotate and project wisely.
Over-polishing — wood should reflect, but rarely like a mirror. If your roughness is too low, it will look like varnished plastic.
Conclusion
Wood textures remain one of the most rewarding material types to master in 3D rendering. They bring nature indoors, evoke emotion, and ground a space in tactile reality. By selecting high-quality PBR wood textures, understanding how to apply them per surface, and paying attention to scale and lighting, you can elevate your interior visualizations significantly. Platforms like Relebook make it easier to find and test a variety of materials, but as always, the final polish comes from your eye and workflow discipline. Start with a reference photo, pick a texture that matches, and iterate until the grain feels right.
FAQ
What is the difference between a wood texture and a PBR wood texture?
A basic wood texture is usually a single image (diffuse map) that includes color and baked lighting. A PBR wood texture set contains multiple maps — albedo, normal, roughness, and often displacement — that interact correctly under any lighting. This makes them essential for realistic rendering in modern engines like V-Ray, Cycles, or Unreal.
Can I use free wood textures from the web in commercial projects?
It depends on the license. Some platforms offer free downloads, but usage rights vary — some are only for personal use, others allow commercial use with attribution or a purchase. Always check the license terms on each asset page before using in client work.
How do I avoid visible tiling when using wood texture on large areas?
Use high-quality seamless textures and implement randomization techniques. In Blender, you can use the ‘Random per Island’ option or mapping nodes to offset the UV. In 3ds Max and V-Ray, use the ‘Multitexture’ or ‘VRayUVWRandomizer’ to rotate and shift tiles. Blending two or three slightly different woodgrain textures also helps break repetition.
What resolution should I choose for a wood texture in interior rendering?
For close-up shots of furniture or cabinets, 4K maps are recommended. For floors or walls where the camera is at a medium distance, 2K usually works well. Background or distant elements can be 1K. Higher resolution gives more detail but uses more memory, so balance based on your scene and hardware.
Where can I find wood textures that are ready for PBR rendering?
Many CG resource platforms offer dedicated PBR texture libraries. For example, Relebook provides PBR wood textures across categories like flooring, cabinetry, and furniture, with maps compatible with popular render engines. Always check the product page for map types, resolution, and tiling behavior.