
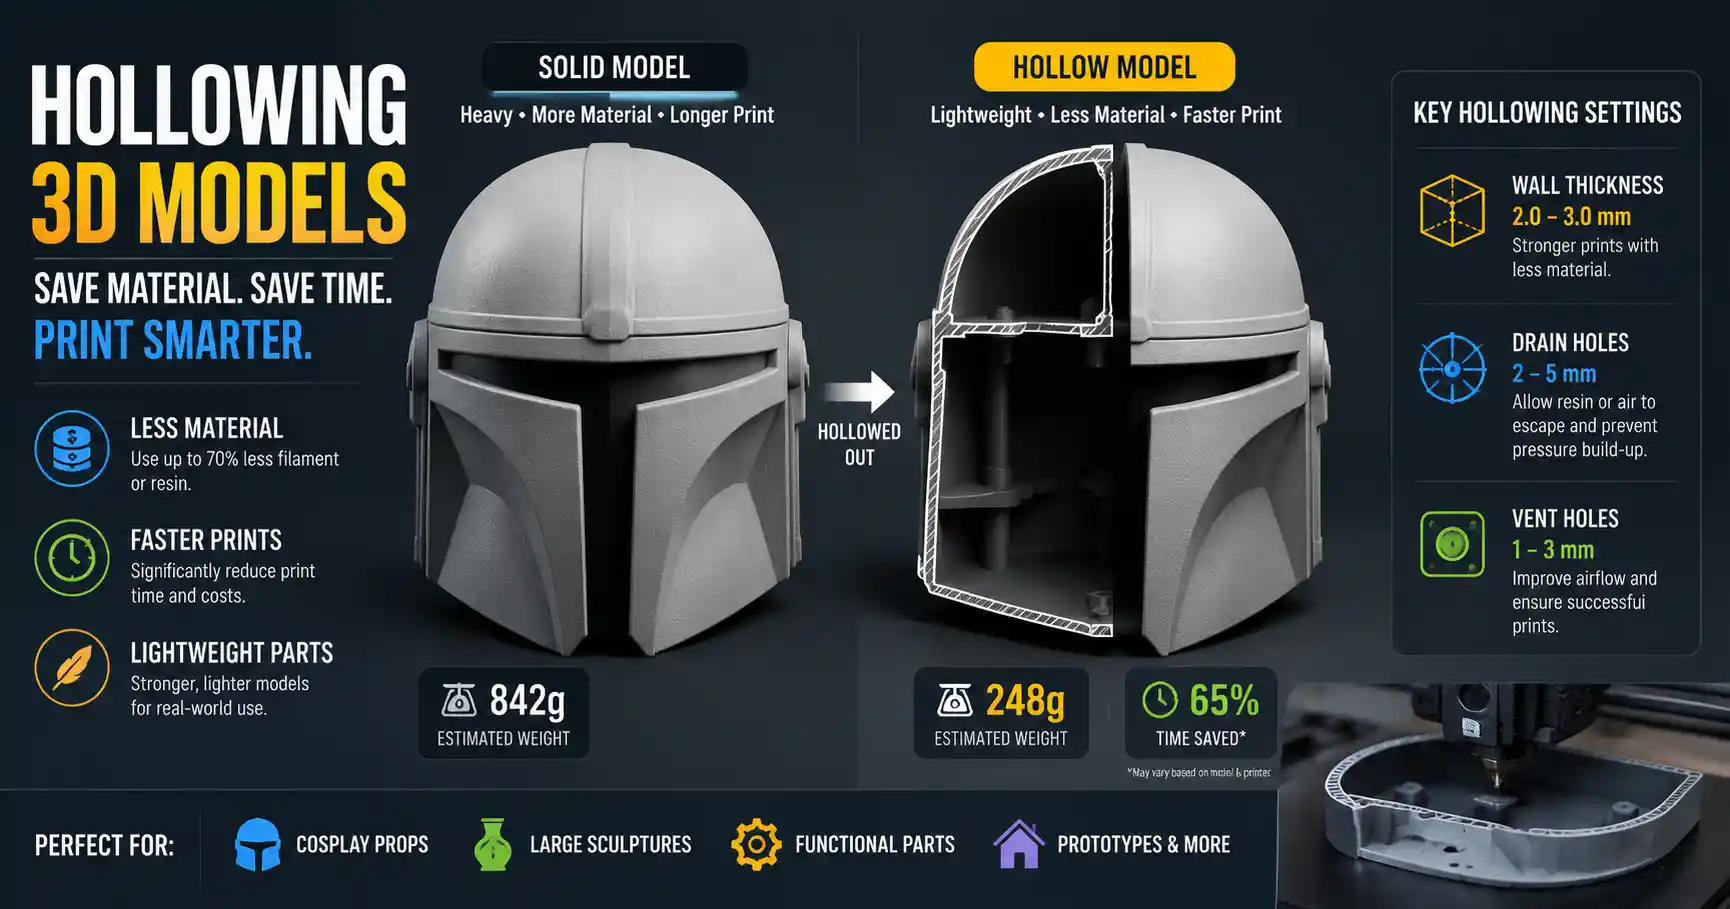
If you’ve ever finished 3D printing a large solid model only to find you’ve burned through an entire spool of filament, waited 12 hours longer than necessary, and ended up with a part heavy enough to double as a doorstop, you’ve probably wondered why anyone prints solid objects at all. Hollowing 3D models is one of the most useful skills in any 3D printing or digital fabrication workflow, cutting material costs, reducing print time, and creating lightweight parts ideal for everything from cosplay props to industrial prototypes to art sculptures. Whether you’re a hobbyist working with a cheap FDM printer or a professional using high-resolution resin SLA, learning to hollow a model correctly saves time, money, and frustration. This guide breaks down the entire process, from prepping your model to troubleshooting common mistakes, for every skill level.
Why Hollow 3D Models? The Core Benefits
Before diving into the how-to, it’s worth understanding why hollowing is such a common step in 3D model preparation. For most use cases, a hollow model with a thick, consistent wall is just as strong as a solid part, but with a fraction of the material and weight. Let’s break down the most impactful benefits:
Lower Material Costs and Reduced Waste
Filament and resin aren’t cheap. A 1kg spool of standard PLA costs around $20-$25, and a liter of resin can run $30-$50 or more for high-performance formulations. Hollowing a large model like a life-sized cosplay helmet can cut material usage by 70% or more, turning a $25 print into a $7 one. For commercial operations running dozens of prints a week, those savings add up to thousands of dollars a year in reduced material costs. Hollowing also eliminates the need to dispose of excess internal material, which is especially important for resin printing, where unused resin can be recycled, but solid waste has to be thrown away.
Faster Print Times
3D print time is directly tied to the amount of material your printer has to deposit. A solid 20cm tall vase might take 8 hours to print; a hollow version with 3mm walls can take as little as 2 hours. That means you can fit more prints in a single day, finish projects faster, and reduce wear and tear on your printer’s moving parts. For makers running print farms or accepting custom commissions, faster turnarounds translate directly to higher profit margins.
Lightweight, Functional Parts
Weight matters for many 3D printing projects. A cosplay sword that’s solid plastic will weigh 2-3kg, making it tiring to carry around a convention for 8 hours. A hollow version weighs 300-500g, easy to carry and pose with. For drone parts, custom prosthetics, or aerospace prototypes, weight is not just a convenience—it’s a functional requirement. Hollowing also creates internal cavities that can be used for embedding electronics, adding support structures for moving parts, or inserting metal threaded inserts for stronger connections.
Better Resin Printing Results
Resin printers require hollowing for most large models far more than FDM printers do. Solid resin models trap uncured resin inside, which is not just a waste of material but can also cause the part to crack as the resin cures and expands internally. Hollowing with proper drainage holes lets excess resin flow out before curing, resulting in more consistent, durable parts that don’t warp or crack post-print.
"Hollowing isn’t a trick for saving a few grams of filament—it’s a fundamental technique that unlocks 3D printing for large-format projects that would otherwise be too expensive or time-consuming to produce."
Preparing Your 3D Model for Hollowing
Before you can hollow a model, you need to make sure it’s ready for the process. A messy, poorly optimized model will result in uneven walls, gaps, or failed hollowing, no matter what software you use. Taking 10 minutes to prep your model upfront saves hours of rework later.
Check for Model Errors
The first step is to fix any existing errors in your STL or OBJ file. Common issues include non-manifold geometry, overlapping faces, flipped normals, and gaps between surfaces. Most 3D modeling and slicing software have built-in tools to check for these errors, but it’s good practice to inspect the model manually before you start. Non-manifold geometry—edges that are connected to more or less than two faces—is the most common cause of failed hollowing, so fixing this first is critical.
If you’re working with a model you downloaded from sites like Thingiverse or MyMiniFactory, it’s especially important to check for errors, as many community-uploaded models haven’t been fully optimized. For basic repairs, free tools like Meshmixer or Blender’s 3D Print Toolbox work perfectly. For more complex errors, professional tools like Meshy or Netfabb have advanced automated repair features.
Determine Optimal Wall Thickness
Wall thickness is the most important decision you’ll make when hollowing a model. Too thin, and your part will be fragile, flexible, or even collapse during printing. Too thick, and you lose all the benefits of hollowing: higher material cost, longer print time, and unnecessary weight. The right thickness depends on two main factors: the type of 3D printing you’re doing, and what the part will be used for.
- FDM Printing (PLA, PETG, ABS): For most hobbyist projects, 1.5mm to 3mm is the ideal range. Standard 0.4mm nozzles can easily accommodate 2mm walls (three 0.4mm perimeters), which balances strength and weight. For large structural parts like prop weapons or furniture, go up to 3mm. For small decorative items, 1.5mm is enough.
- Resin SLA/DLP Printing: Resin is stronger and more detailed than FDM filament, so walls can be thinner. Most resin prints work well with 1.2mm to 2.5mm walls. For small miniatures or jewelry, 1mm to 1.5mm is sufficient. For large cosplay parts, 2mm to 2.5mm adds enough strength without excess weight.
- Industrial 3D Printing (MJF, SLS): For functional end-use parts, 2mm to 4mm is standard, depending on the load the part will carry.
A good rule of thumb: if your part will be handled often, dropped, or carry any load, add 0.5mm to the minimum thickness. It’s better to have slightly thicker walls than risk a broken part halfway through a project.
Plan for Drainage and Access
This is a step many beginners forget: if you’re hollowing a closed model (like a helmet, vase, or sphere), you need to add holes to let excess material out. For resin printing, this is non-negotiable: uncured resin has to drain out before curing, otherwise it will get trapped inside and can cause cracking or leaking. For FDM printing, drainage holes are still useful if you want to shake out any loose leftover filament dust, or if you plan to pour in concrete, plaster, or epoxy to weight the part later.
When planning hole placement, put them in the least visible areas of the model: the bottom of a helmet, the base of a sculpture, or the inside seam of a prop. For large models, add at least two holes: one to let material drain out, and another to let air in, which improves flow and prevents suction from slowing drainage. Hole size depends on the model: 5mm to 8mm is standard for most medium to large prints, while smaller models only need 3mm to 4mm holes.
Step-by-Step Hollowing Methods for Common Software
There are dozens of 3D modeling and slicing tools that can hollow models, from free open-source options to professional paid software. We’ll cover the most common methods for the tools that makers actually use every day, with step-by-step instructions for each.
Free Method 1: Hollowing in Meshmixer (Autodesk)
Meshmixer is a free, powerful tool for STL editing and hollowing, and it’s been a go-to for makers for over a decade. It’s available for Windows and Mac, and works with almost any STL file. Here’s how to do it:
- Import your STL file into Meshmixer by going to File > Import. Wait for the model to load and generate a preview.
- Go to the Select tool in the left sidebar, then drag to select the entire model (double-clicking the model will usually select it automatically).
- Open the Edit dropdown menu and select Hollow.
- In the Hollow menu that pops up, enter your desired wall thickness. Make sure the "Auto-Repair" box is checked to fix any small errors that come up during hollowing.
- Click Accept to generate the hollow model. Meshmixer will create an internal offset of the outer surface to create the hollow cavity.
- To add drainage holes, go back to Edit > Make Hole. Click on the area where you want to add a hole, then adjust the diameter to your desired size. Click Accept and repeat for as many holes as you need.
- Export your finished hollow model by going to File > Export and saving it as a new STL file.
Meshmixer works best for relatively simple models with no extremely thin features. For very complex models with lots of small details, it can sometimes create small gaps in walls, so always inspect the model before exporting.
Free Method 2: Hollowing in Blender
Blender is a full-featured open-source 3D modeling suite, and it’s completely free to use. It’s a better option for complex models or if you already use Blender for other 3D work. The hollowing process uses the Solidify modifier, which is easy to use once you know the steps:
- Import your STL file into Blender by going to File > Import > Stl (.stl). Select your model and click Import STL.
- Switch to Edit Mode by pressing Tab, then press A to select all faces. Check for any non-manifold geometry by going to Select > Select All by Trait > Non Manifold. Fix any selected errors before proceeding.
- Switch back to Object Mode by pressing Tab again. Go to the Modifiers tab (the wrench icon) in the right sidebar.
- Click Add Modifier and select Solidify from the dropdown menu.
- Adjust the Thickness value to match your desired wall thickness. Make sure the Even Thickness box is checked to get consistent walls across the entire model. Adjust the Offset value to make sure the thickness is offset inward (so the outer shape of your model stays the same).
- To add drainage holes, go into Edit Mode, select the faces where you want the holes, and press X to delete them.
- Apply the modifier by clicking the down arrow next to the Solidify modifier and selecting Apply. Export your model as a new STL file.
Blender gives you more control over the hollowing process than Meshmixer, but it has a steeper learning curve for new users. If you’re new to Blender, there are hundreds of free short tutorials on YouTube that walk through this exact process for beginners.
Paid/Integrated Method: Hollowing in Slicer Software (PrusaSlicer, Cura, Lychee Slicer)
Many modern slicers have built-in hollowing tools, so you don’t need to leave your slicing workflow to hollow your model. This is the most convenient method for most makers, as you can hollow, add supports, and slice all in one place.
PrusaSlicer has one of the best built-in hollowing tools, available in the advanced mode. Once you import your model, right-click it and select Hollow. Enter your desired wall thickness, click generate, and then add drainage holes directly in the slicer. Lychee Slicer, the popular slicer for resin printers, also has a one-click hollowing tool that automatically adds recommended drainage holes based on your model size. Ultimaker Cura has hollowing plugins available through the Cura Marketplace that work similarly.
The biggest advantage of slicer-integrated hollowing is convenience: you don’t have to switch between multiple programs, and any changes you make are immediately reflected in your final slice. The downside is that it has fewer advanced repair options than dedicated mesh editing tools, so it works best for already error-free models.
One-Click Online Hollowing
If you don’t want to download or install any software, there are several free online tools that can hollow your STL in a few clicks. Sites like 3D Slash, Hollow3D, and Printful’s 3D Model Tool let you upload your STL, enter your wall thickness, add holes, and download the hollow model directly from your browser. This is great for occasional use or if you’re working on a public computer, but it’s not ideal for large models or proprietary projects, since you have to upload your file to a third-party server.
Best Practices for Strong, Printable Hollow Models
Hollowing a model is only half the battle. If you want your hollow part to be strong, printable, and free of defects, follow these practical best practices that experienced makers swear by.
Add Internal Reinforcements for Large Parts
Even with thick enough walls, large hollow models can be flexible or prone to bending. To add strength without adding too much extra weight, add internal ribs or struts inside the hollow cavity. These are thin support structures that connect the opposite inner walls of the model, adding rigidity without the material cost of a solid core.
Most dedicated hollowing tools let you automatically generate internal struts, or you can add them manually in Blender or Meshmixer. For a 50cm tall cosplay armor piece, adding 3-4 2mm thick ribs along the length of the part will make it far stiffer without adding more than 10-15g of extra material. If you’re printing a large hollow sphere or vase, add a horizontal internal ring every 10cm to prevent the sides from bulging or collapsing during printing.
Check for Wall Thickness Consistency
One of the most common mistakes new users make is ending up with uneven wall thickness after hollowing. If you offset your hollow cavity incorrectly, you can end up with walls that are 3mm thick in some areas and 0.5mm thick in others, leading to weak spots or even holes in the final print. After hollowing, always use your software’s wall thickness analysis tool to check for inconsistencies.
Most tools (including Meshmixer, Blender, and Netfabb) have a feature that color-codes your model based on wall thickness, so you can quickly spot thin spots. If you find an area that’s too thin, you can adjust the hollow offset or add a little extra material to the inner cavity to fix it. This only takes a minute and prevents a failed print that wastes hours of time.
Orient Your Model Correctly for Printing
Orientation matters for hollow models, especially for resin printing. When orienting a hollow model, always place the drainage holes facing downward towards the build plate, so gravity can pull excess resin out. If you place drainage holes on the top or side, excess resin will get trapped inside the cavity.
For FDM printing, orient overhangs the same way you would for a solid model, but keep in mind that hollow models have internal overhangs too. If you have an internal overhang that’s more than 45 degrees, you may need to add a small internal support to prevent sagging. Most modern slicers will automatically add internal supports if you enable the option, but it’s good to check manually before slicing.
Seal Holes After Printing If Needed
Once you finish printing, you’ll need to seal the drainage holes if you don’t want them to be visible. For FDM prints, you can glue a small 3D printed plug into the hole, then sand it smooth to blend it into the surface. For resin prints, you can use a little bit of uncured resin to fill the hole, then cure it with a UV flashlight, then sand it smooth. If you’re making a watertight hollow part (like a vase or water bottle), you’ll need to seal all holes and coat the inside with epoxy or sealant to prevent leaks.
Common Hollowing Mistakes and How to Fix Them
Even experienced makers run into issues when hollowing complex models. Here are the most common problems and simple fixes for each:
- Thin walls or gaps in the outer surface: This usually happens when your original model has small features that are thinner than your chosen wall thickness. When you offset the inner cavity, it cuts through the outer surface, creating a gap. Fix this by reducing the overall wall thickness, or manually filling the gap in your mesh editing software before exporting.
- Hollowing fails with a messy, broken mesh: This is almost always caused by existing errors in the original model, like non-manifold geometry or overlapping faces. Run an automatic repair on the original model before hollowing, and check for flipped normals. If that doesn’t work, try simplifying the model slightly to reduce the number of faces before hollowing.
- Resin trapped inside the hollow cavity: If you didn’t add enough drainage holes, or the holes are too small, uncured resin will get stuck inside. To fix this after printing, you can drill a larger hole in the base to drain the resin, then seal it after. To prevent this in the future, add at least two holes, and make sure they’re large enough for resin to flow out easily.
- Hollow model warps or collapses during FDM printing: This is usually caused by too-thin walls or lack of internal reinforcement. Increase your wall thickness by 0.5mm to 1mm, and add internal ribs to add rigidity. Printing with a stronger material like PETG instead of PLA also helps for large hollow parts.
- The outer shape of my model changed after hollowing: This happens when you offset the solidify modifier outward instead of inward in Blender or other tools. Double-check the offset direction before applying the hollowing, so only the internal cavity changes and the outer surface stays the same as your original model.
For most issues, the fix is to go back to the original model, run a full repair, and start over with a slower, more careful approach. Rushing through the prep step is the cause of 90% of hollowing errors, so taking an extra 5 minutes to check your work always pays off.
Conclusion
Hollowing 3D models is a simple skill that has an outsized impact on your 3D printing projects. It cuts material costs by 50-70%, reduces print time dramatically, and creates lightweight, functional parts that are just as strong as solid equivalents for almost every use case. Whether you’re using free tools like Meshmixer or Blender, or integrated tools in your favorite slicer, the process only takes a few extra minutes once you get the hang of it.
The key to successful hollowing is upfront preparation: fix model errors before you start, choose the right wall thickness for your project and printer type, and don’t forget to add drainage holes for closed models. Adding simple internal reinforcements eliminates flexibility without adding much weight, and checking for consistent wall thickness prevents hidden weak spots that can cause your part to break later. If you run into issues, most common problems have simple fixes that don’t require starting over from scratch.
Whether you’re a hobbyist printing cosplay props for your next convention, a small business making custom art pieces, or an engineer prototyping a new product, mastering hollowing will make your 3D printing workflow faster, cheaper, and more versatile. Once you start hollowing your models, you’ll wonder how you ever printed solid parts at all.